
1. Introduction
This manual provides detailed instructions for the installation, operation, and maintenance of your AZUIQiMeng Car Radio Stereo. Please read this manual thoroughly before using the product to ensure proper function and safety.
This unit is designed for Toyota Land Cruiser LC 70 Series vehicles manufactured between 2007 and 2020, featuring an Android 13 operating system, a 9-inch IPS touch screen, and advanced connectivity options like CarPlay and Android Auto.
2. Safety Information
- Professional Installation Recommended: Due to the complexity of car electrical systems, professional installation is highly recommended. Incorrect installation can damage the vehicle's electrical system or the product.
- Vehicle Compatibility: Ensure the product is compatible with your specific vehicle model and year. Refer to the "Vehicle Compatibility" section.
- Power Disconnection: Always disconnect the vehicle's battery before starting any installation or wiring work to prevent electrical shorts and damage.
- Wiring: Follow the wiring diagram precisely. Do not modify the wiring harness unless explicitly instructed.
- Driving Safety: Do not operate the device in a way that distracts you from driving. Always prioritize road safety.
- Temperature: Avoid exposing the unit to extreme temperatures or direct sunlight for prolonged periods.
- Cleaning: Use a soft, dry cloth for cleaning. Do not use abrasive cleaners or solvents.
3. Package Contents
Verify that all items listed below are included in your package:
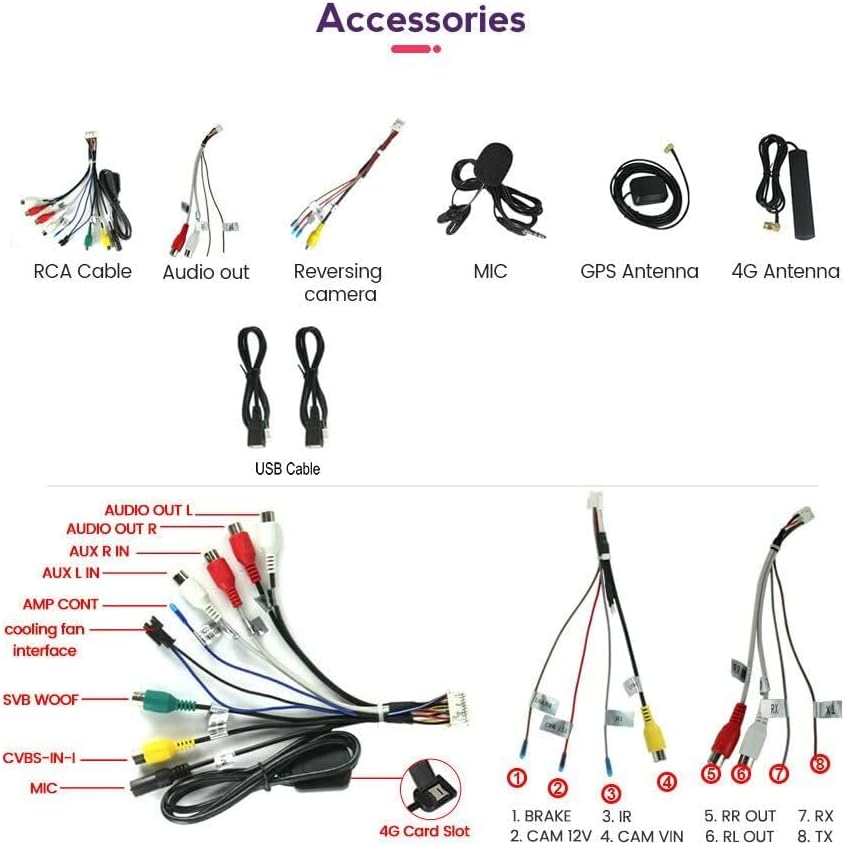
Figure 3.1: Included Accessories
This image displays the various cables and components that come with your car radio stereo unit, such as RCA cables, audio output cables, reversing camera, microphone, GPS antenna, 4G antenna, and USB cables.
- Main Head Unit (9-inch IPS Touch Screen)
- Power Cable and all other necessary cables
- Microphone
- GPS Antenna
- USB Cables
- Reversing Camera (if included in your specific package)
- 4G Antenna (if applicable to your model)
Note: The exact contents may vary slightly based on the specific model and package purchased.
4. Specifications
| Feature | Description |
|---|---|
| Model Name | Car radio for Toyota Land Cruiser LC 70 Series 2007-2020 |
| Operating System | Android 13.0 |
| CPU | 8 CORE |
| RAM | 8 GB |
| ROM (Internal Storage) | 128 GB |
| Screen Size | 9 Inches |
| Display Type | IPS Touch Screen |
| Display Resolution | 1280x720 |
| Connectivity Technology | Wireless (5G Wi-Fi, Bluetooth) |
| Special Features | CarPlay, Android Auto, GPS Navigation, DSP, SWC, Rear View Camera Support, FM/RDS Radio, Built-in Microphone, Cooling Fan, Metal Frame |
| Product Dimensions | 5.9"L x 13.77"W x 16.92"H |
5. Setup and Installation
5.1 Vehicle Compatibility
This unit is specifically designed for Toyota Land Cruiser LC 70 Series models from 2007 to 2020. If you are unsure about compatibility, please provide a photo of your car dashboard to the seller for verification before installation.
5.2 Pre-Installation Checklist
- Ensure the vehicle's ignition is off and the battery's negative terminal is disconnected.
- Gather all necessary tools (e.g., screwdrivers, wire strippers, electrical tape).
- Review the wiring diagram carefully.
5.3 Wiring Diagram

Figure 5.1: Wiring Connections Overview
This diagram illustrates the various connection points on the back of the head unit, including power (ACC, Battery+12V, Battery GND), speaker outputs (FL, FR, RL, RR), steering wheel controls (KEY1, KEY2), reverse input, GPS antenna, 4G antenna, USB ports, and the cooling fan interface. Pay close attention to the labeled ports for correct installation.
Refer to Figure 5.1 for a comprehensive overview of the wiring connections. Ensure each cable is connected to its corresponding port. Specific attention should be paid to:
- Power Connections: Connect the ACC (Accessory), B+ (Battery Positive), and GND (Ground) wires correctly to the vehicle's power system.
- Speaker Outputs: Connect the front left (FL), front right (FR), rear left (RL), and rear right (RR) speaker wires to your vehicle's speakers.
- Steering Wheel Control (SWC): Connect KEY1 and KEY2 wires to your vehicle's steering wheel control wires. Configuration may be required in the unit's settings after installation.
- GPS Antenna: Connect the GPS antenna and place it in a location with a clear view of the sky for optimal signal reception.
- 4G Antenna: Connect the 4G antenna for cellular data connectivity (if applicable).
- USB Ports: Connect the provided USB cables for external devices or wired CarPlay/Android Auto.
- Reversing Camera: Connect the reversing camera to the "REVERSE" input and the camera's video output to the "CAM VIN" port.
Note: If your car requires a CANBUS connection, please use the dedicated USB cable for this port as indicated in the diagram.
5.4 General Installation Steps
- Carefully remove the original car radio and dashboard trim.
- Connect the new head unit's wiring harness to the vehicle's wiring. Refer to the wiring diagram (Figure 5.1).
- Connect the GPS antenna, 4G antenna (if applicable), and USB cables.
- If installing a rear view camera, route the camera cable to the back of the vehicle and connect it to the head unit.
- Mount the new head unit securely into the dashboard opening.
- Reconnect the vehicle's battery.
- Turn on the ignition and test all functions of the new head unit.
- Reassemble the dashboard trim.

Figure 5.2: Unit After Installation
This image demonstrates the appearance of the car radio stereo unit once successfully installed into the dashboard of a Toyota Land Cruiser LC 70 Series, showing the integrated display.
6. Operating Instructions
6.1 Power On/Off
The unit will power on automatically when the vehicle's ignition is turned on. To power off, turn off the vehicle's ignition. A short press of the power button (if available) may put the unit into standby mode.
6.2 Touch Screen Operation
The 9-inch IPS touch screen supports multi-touch gestures. Tap to select, swipe to scroll, and pinch to zoom (where applicable). The interface is designed to be intuitive, similar to a smartphone or tablet.
6.3 CarPlay & Android Auto

Figure 6.1: Wireless CarPlay + Android Auto
This image illustrates the seamless integration of Apple CarPlay and Android Auto with the head unit, showing a smartphone connected for wireless synchronization of apps, music, and navigation.
The unit supports both wireless and wired Apple CarPlay and Android Auto. This allows for seamless integration of your smartphone's apps, navigation, music, and calls directly onto the car stereo display.
- Wireless Connection: Ensure your phone's Bluetooth and Wi-Fi are enabled. Follow the on-screen prompts on the head unit to pair your phone for wireless CarPlay or Android Auto.
- Wired Connection: Connect your smartphone to one of the unit's USB ports using a high-quality USB cable. The system should automatically detect and launch CarPlay or Android Auto.
6.4 Bluetooth Connectivity

Figure 6.2: Bluetooth and Radio Interface
This image displays the unit's interface for Bluetooth calling, showing a dial pad and contact information, alongside the radio tuning screen and steering wheel control settings.
The built-in Bluetooth module supports hands-free calling and audio streaming.
- Pairing: Go to the Bluetooth settings on the head unit and enable Bluetooth. Search for available devices on your smartphone and select the head unit's name (e.g., "CarBT"). Enter the PIN (usually "0000" or "1234") if prompted.
- Hands-Free Calling: Once paired, you can make and receive calls directly through the head unit using the built-in microphone.
- Audio Streaming: Play music from your smartphone via Bluetooth. Control playback (play/pause, skip tracks) from the head unit.
6.5 FM & RDS Radio
Access the "Radio" application to tune into FM stations. The unit supports RDS (Radio Data System) for displaying station information, song titles, and traffic announcements where available.
- Scanning: Use the scan function to automatically find and save available radio stations.
- Manual Tuning: Manually adjust the frequency to find specific stations.
- Presets: Save your favorite stations to preset buttons for quick access.
6.6 Wi-Fi Connectivity

Figure 6.3: Wi-Fi, GPS, and Audio Features
This image highlights the unit's Wi-Fi connectivity for internet access, GPS navigation with map display, music playback interface, and detailed HiFi audio equalizer settings.
The built-in 5G Wi-Fi receiver allows you to connect to a Wi-Fi hotspot (e.g., from your smartphone) or a home Wi-Fi network for internet access. This enables app downloads, online streaming, and real-time traffic updates for navigation.
- Connecting: Go to "Settings" > "Network & Internet" > "Wi-Fi". Turn on Wi-Fi and select your desired network. Enter the password if required.
6.7 GPS Navigation
The unit features a built-in GPS module and comes with an external GPS antenna for accurate positioning. You can download and use various online or offline navigation applications from the Google Play Store.
- Map Downloads: Connect to Wi-Fi to download free maps for any country within your chosen navigation app.
- Offline Navigation: Once maps are downloaded, the unit can provide navigation even without a mobile signal.
6.8 Steering Wheel Control (SWC)
After installation, you may need to configure the steering wheel controls. Access the "Steering Learn" or "SWC Settings" menu in the unit's settings. Follow the on-screen instructions to map your vehicle's steering wheel buttons to the desired functions (e.g., volume up/down, track skip, mode change).
6.9 Rear View Camera Support

Figure 6.4: Reverse Image Display
This image demonstrates the automatic display of the rear view camera feed on the head unit when the vehicle is shifted into reverse, enhancing safety and ease of parking.
When a compatible rear view camera is connected and the vehicle is shifted into reverse gear, the head unit will automatically display the camera feed on the screen, providing a clear view of the area behind your vehicle for safer reversing.
6.10 DSP (Digital Sound Processor)
The built-in DSP allows for advanced audio customization. Access the "Equalizer" or "Sound Settings" to adjust sound parameters such as bass, treble, balance, fader, and various EQ presets to optimize your audio experience.
6.11 Split-Screen Function
The unit supports a split-screen feature, allowing you to run two applications simultaneously on the screen. For example, you can have navigation running on one side and music playback on the other. To activate, long-press the recent apps button or drag an app to one side of the screen (depending on the Android launcher).
7. Maintenance
- Screen Cleaning: Use a soft, lint-free cloth to gently wipe the touch screen. For stubborn smudges, slightly dampen the cloth with water or a screen-safe cleaner. Avoid harsh chemicals.
- Software Updates: Periodically check for software updates through the unit's settings (if available) to ensure optimal performance and access to new features.
- General Care: Keep the unit free from dust and debris. Avoid spilling liquids on the device.
8. Troubleshooting
| Problem | Possible Cause | Solution |
|---|---|---|
| Unit does not power on. | Incorrect power wiring; Blown fuse; Vehicle battery issue. | Check power connections (ACC, B+, GND). Verify vehicle fuses. Ensure battery is charged. |
| No sound from speakers. | Incorrect speaker wiring; Volume too low; Mute function active; DSP settings. | Check speaker connections. Increase volume. Disable mute. Adjust DSP/Equalizer settings. |
| GPS signal is weak or inaccurate. | GPS antenna not properly connected or positioned; Obstruction. | Ensure GPS antenna is securely connected and placed in a location with a clear view of the sky. |
| CarPlay/Android Auto not connecting. | Incorrect USB cable; Phone settings; Bluetooth/Wi-Fi issues. | Use a certified USB cable. Check phone's CarPlay/Android Auto settings. Ensure Bluetooth/Wi-Fi is on and paired for wireless connection. |
| Steering wheel controls not working. | Incorrect SWC wiring; Not configured in settings. | Verify KEY1/KEY2 wiring. Perform "Steering Learn" in the unit's settings. |
| Rear view camera not displaying. | Camera not connected; Reverse trigger wire not connected; Faulty camera. | Check camera video input (CAM VIN) and reverse trigger wire connection. Ensure camera is powered. |
| Touch screen unresponsive. | Software glitch; Screen damage. | Restart the unit (turn off/on ignition). If issue persists, contact support. |
For issues not listed here, or if troubleshooting steps do not resolve the problem, please contact customer support.
9. Warranty and Support
9.1 Warranty Information
This product comes with a 1-year warranty from the date of purchase. The warranty covers manufacturing defects and malfunctions under normal use. It does not cover damage caused by improper installation, misuse, accidents, or unauthorized modifications.
Please retain your proof of purchase for warranty claims.
9.2 Technical Support
For any questions, technical assistance, or warranty claims, please contact the seller or manufacturer. Professional technical support is available to assist you.
- Seller: InCar-MediaLab
- Response Time: Questions are typically answered within 24 hours.
When contacting support, please provide your product model number (B_8CORE 8+128GB) and a detailed description of the issue.