1. Introduction
This manual provides detailed instructions for the installation, operation, and maintenance of your ZXKLXYY HUANANZHI X99 F8 Motherboard. Designed for high-performance computing, this ATX motherboard supports LGA 2011-3 processors, DDR4 REG ECC memory, and NVMe M.2 SSDs, offering a stable and efficient platform for various applications.
Please read this manual thoroughly before proceeding with installation to ensure proper setup and to prevent damage to the components.
2. Setup and Installation
Before beginning installation, ensure your system is powered off and disconnected from the main power supply. Wear an anti-static wrist strap to prevent electrostatic discharge (ESD) damage to components.
2.1 Motherboard Overview
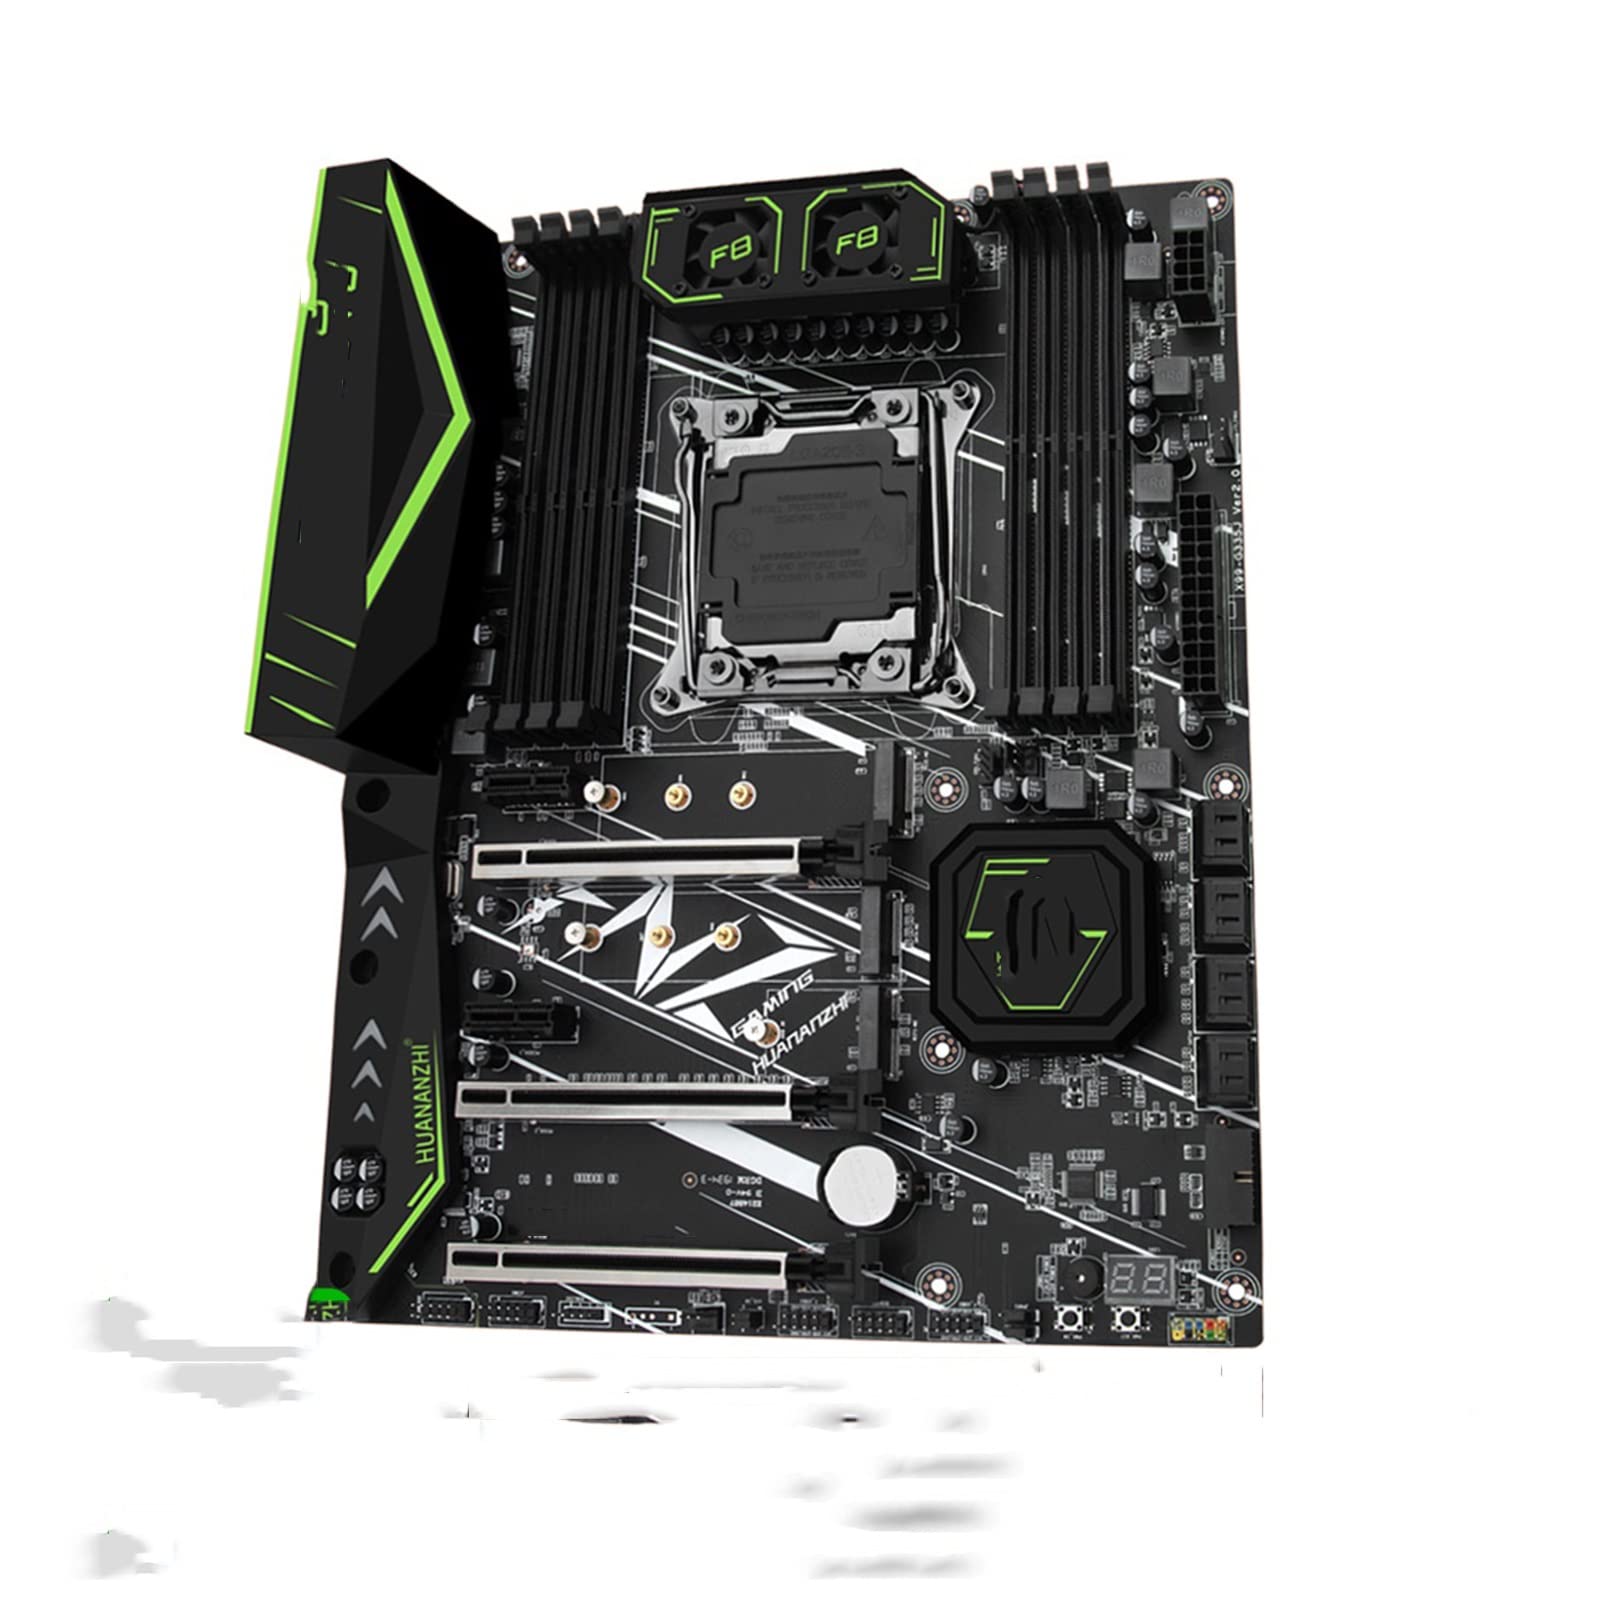
This image displays the ZXKLXYY HUANANZHI X99 F8 motherboard from a top-down perspective. Key components visible include the LGA 2011-3 CPU socket at the center, eight DDR4 RAM slots surrounding it, multiple PCI-E X16 slots for expansion cards, and M.2 slots for NVMe SSDs. The board features a black PCB with green accents and heatsinks, including two small fans labeled 'F8' near the top.
2.2 CPU Installation (LGA 2011-3)
- Locate the LGA 2011-3 CPU socket on the motherboard.
- Gently push down the load lever and pull it away from the socket to open the CPU retention frame.
- Carefully align the CPU with the socket, ensuring the gold triangle on the CPU matches the triangle on the socket. Do not force the CPU into place.
- Lower the CPU into the socket.
- Close the retention frame and push the load lever back into its locked position.
- Apply thermal paste to the CPU and install the CPU cooler according to its manufacturer's instructions.
2.3 Memory (RAM) Installation (DDR4)
- Locate the DDR4 memory slots. This motherboard features eight slots.
- Open the clips at both ends of the memory slot.
- Align the memory module with the slot, ensuring the notch on the module matches the key in the slot.
- Press down firmly on both ends of the memory module until the clips snap into place.
2.4 NVMe M.2 SSD Installation
- Locate the M.2 slot(s) on the motherboard.
- Remove the M.2 screw and standoff from the slot.
- Insert the NVMe M.2 SSD into the slot at a 30-degree angle.
- Gently push the SSD down and secure it with the screw into the standoff.
2.5 Graphics Card and Expansion Card Installation (PCI-E X16)
- Locate the PCI-E X16 slot(s).
- Remove the corresponding expansion slot cover from your PC case.
- Align the graphics card or expansion card with the PCI-E X16 slot.
- Press down firmly until the card is fully seated in the slot and the retention clip locks.
- Secure the card to the case with a screw.
2.6 Power Connections
- Connect the 24-pin ATX power connector from your power supply to the main 24-pin power socket on the motherboard.
- Connect the 8-pin EPS 12V power connector from your power supply to the 8-pin CPU power socket on the motherboard.
- Connect any necessary SATA power cables to your storage devices.
2.7 Front Panel and Peripheral Connections
- Connect your case's front panel connectors (power switch, reset switch, HDD LED, power LED) to the corresponding pins on the motherboard. Refer to your case manual for pin assignments.
- Connect USB 3.0 headers from your case to the USB 3.0 headers on the motherboard.
- Connect audio headers from your case to the audio header on the motherboard.
- Connect SATA data cables from your storage devices to the SATA ports on the motherboard.
3. Operating Instructions
3.1 Initial Boot-Up
- After all components are installed and connected, ensure all power cables are securely plugged in.
- Connect your monitor, keyboard, and mouse.
- Press the power button on your PC case.
- The system should power on, and you should see a display on your monitor.
3.2 BIOS/UEFI Access
To enter the BIOS/UEFI setup utility, press the DEL or F2 key repeatedly during the initial boot-up sequence. The BIOS allows you to configure system settings, boot order, and monitor hardware status.
3.3 Driver Installation
After installing your operating system, install the necessary drivers for the motherboard chipset, LAN, audio, and any other integrated components. These drivers are typically provided on a support CD or can be downloaded from the manufacturer's website.
4. Maintenance
- Dust Cleaning: Regularly clean dust from inside your PC case, especially from heatsinks and fans, to maintain optimal cooling and prevent overheating. Use compressed air for best results.
- BIOS Updates: Periodically check the manufacturer's website for BIOS/UEFI updates. Updates can improve system stability, add support for new hardware, or fix bugs. Follow the update instructions carefully to avoid damaging the motherboard.
- Connection Checks: Occasionally check all internal cable connections (power, data, expansion cards) to ensure they are secure.
5. Troubleshooting
If you encounter issues, refer to the following common troubleshooting steps:
- No Power: Ensure all power cables (24-pin ATX, 8-pin EPS 12V) are securely connected to the motherboard and power supply. Verify the power supply switch is on.
- No Display: Check that your monitor is connected to the graphics card (not the motherboard's integrated graphics, if applicable) and is powered on. Reseat the graphics card and RAM modules.
- POST Code Display: The motherboard features a debug LED display (visible as '88' in the image). If the system fails to boot, this display will show a two-digit code. Refer to the motherboard's detailed manual or manufacturer's website for a list of POST codes and their meanings to diagnose the issue.
- Memory Errors: If you experience frequent crashes or boot failures related to memory, try reseating the RAM modules or testing them one by one to identify a faulty stick.
- System Instability: Ensure all drivers are up to date. Check CPU and GPU temperatures to rule out overheating. Verify power supply wattage is sufficient for your components.
6. Specifications
| Feature | Specification |
|---|---|
| Model | ZXKLXYY666 (HUANANZHI X99 F8 Compatible) |
| CPU Socket | LGA 2011-3 |
| Form Factor | ATX |
| Memory Slots | 8 x DDR4 (Supports REG ECC Memory) |
| PCI-E Slots | PCI-E X16 (Multiple slots) |
| Storage | NVMe M.2 SSD support, SATA ports |
| USB Ports | USB 3.0 |
| Power Connectors | 24-Pin ATX, 8-Pin EPS 12V |
| Item Weight | 3.31 pounds |
| Package Dimensions | 1.18 x 0.79 x 0.39 inches |
7. Warranty and Support
For warranty information and technical support, please refer to the documentation provided with your purchase or visit the official ZXKLXYY website. Keep your proof of purchase for warranty claims.