1. Introduction
The FOSA MIDI Controller Pad is a versatile and portable device designed for music production. It features 16 RGB drum pads, 2 assignable faders, and 2 adjustable knobs, offering extensive control for triggering notes, adjusting parameters, and expressing musical ideas. Crafted from durable ABS and silicone materials, this controller ensures stability and reliability for long-term use. Its low latency and stable connectivity provide seamless integration with various music software and hardware interfaces.

Figure 1.1: Top view of the FOSA MIDI Controller Pad, showcasing its 16 pads, faders, and knobs.

Figure 1.2: Visual representation of the controller's key features, including 16 colorful drum pads, 2 knobs, 2 assignable faders, USB output compatibility, and 1-button octave shifting.
2. Package Contents
Please verify that all items listed below are included in your package:
- 1 x MIDI Controller Pad
- 2 x USB Cables
- 1 x Converter
- 1 x Storage Bag
3. Setup
Follow these steps to set up your FOSA MIDI Controller Pad:
- Connect the Device: Use a USB cable to connect the controller to your computer or compatible device. Ensure the controller's power is turned on.
- Install the Driver: The drum pad controller will be recognized as an input and output device in the digital interface settings of your sound workstation software. No separate driver installation is typically required for most operating systems.
- Choose Software: Open your preferred music production software (e.g., FL Studio, Reason, Audition, Logic, Sonar, Studio One, Reaper, Waveform, Cubase).
- Configure MIDI Input/Output: Within your music production software's MIDI settings, select the FOSA MIDI Controller Pad as the input device. This allows the software to receive note and controller data from the pad.
- Configure the Controller: In the music production software, configure the layout and functions of the controller. Each button, knob, and slider can typically be assigned to different functions, such as triggering notes or adjusting parameters.

Figure 3.1: Diagrams illustrating how to connect the MIDI Controller Pad to a computer or mobile device using a USB A to Type-C cable.

Figure 3.2: Close-up view of the side ports, labeled 13 (Lock Slot), 14 (Type-C Port for power/data), and 15 (Instrument Digital Interface Output).
4. Operating Instructions
The FOSA MIDI Controller Pad offers a range of controls for dynamic music creation:
- 16 RGB Drum Pads: These vibrant, color-illuminated pads are velocity-sensitive and can be customized. You can record up to 48 custom sounds for enhanced creativity.
- Assignable Faders and Knobs: The 2 assignable faders and 2 adjustable knobs provide versatile control over various parameters within your music software.
- Customizable Keys: Multiple programmable buttons allow for personalized functions, improving efficiency in music composition.
- Shift Functions: Utilize the Shift button to access secondary functions for pads, such as note repeats, octave shifts, and transposing.
- Pad Banks: The controller supports multiple pad banks, allowing you to switch between different sets of assigned sounds or functions.
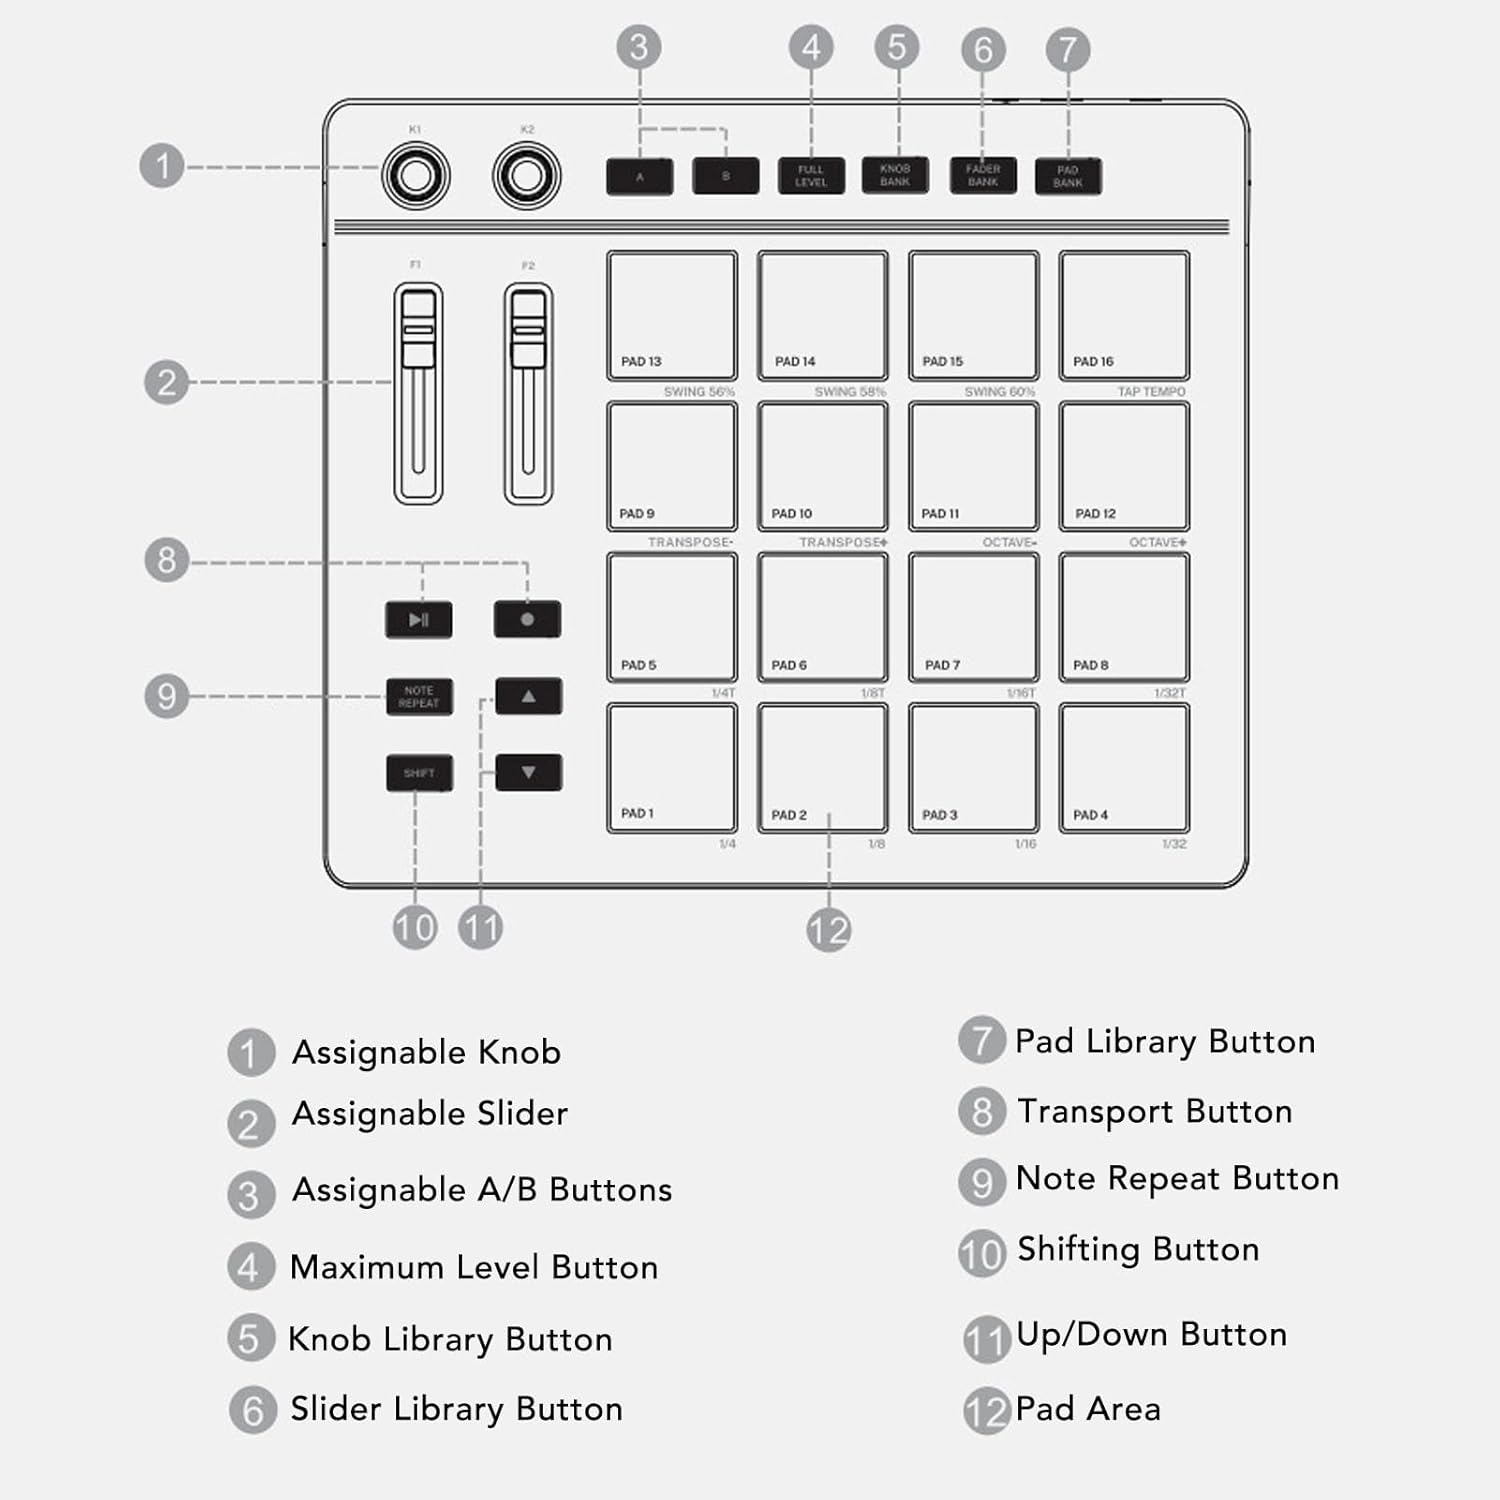
Figure 4.1: Detailed diagram labeling all controls: 1. Assignable Knob, 2. Assignable Slider, 3. Assignable A/B Buttons, 4. Maximum Level Button, 5. Knob Library Button, 6. Slider Library Button, 7. Pad Library Button, 8. Transport Button, 9. Note Repeat Button, 10. Shifting Button, 11. Up/Down Button, 12. Pad Area.

Figure 4.2: The MIDI Controller Pad being used, demonstrating the vibrant RGB lighting of the drum pads during music production.
5. Maintenance
To ensure the longevity and optimal performance of your FOSA MIDI Controller Pad, follow these maintenance guidelines:
- Cleaning: Use a soft, dry cloth to clean the surface of the controller. Avoid using abrasive cleaners, solvents, or harsh chemicals, as these can damage the finish and components.
- Storage: Store the controller in a cool, dry place away from direct sunlight, extreme temperatures, and high humidity. Use the provided storage bag to protect it from dust and scratches when not in use.
- Handling: Handle the controller with care. Avoid dropping it or subjecting it to strong impacts, which could damage internal components or the casing.
- Connectivity: Always connect and disconnect USB cables gently to prevent damage to the ports.
6. Troubleshooting
If you encounter issues with your FOSA MIDI Controller Pad, consider the following troubleshooting steps:
- No Power/Connectivity:
- Ensure the USB cable is securely connected to both the controller and your computer.
- Verify that the controller's power is on (if applicable, though it's typically USB-powered).
- Try a different USB port on your computer or a different USB cable.
- Pads Not Responding:
- Check your music production software's MIDI settings to ensure the FOSA MIDI Controller Pad is selected as the active input device.
- Verify that the pads are correctly mapped to the desired functions or sounds within your software.
- Ensure no other software is interfering with the MIDI input.
- Incorrect Sound/Function:
- Review your software's controller mapping settings to confirm that the correct parameters are assigned to the faders, knobs, and pads.
- Check if you are on the correct pad bank or control bank.
- Latency Issues:
- Adjust the buffer size in your audio interface or DAW settings. A lower buffer size can reduce latency but may require more processing power.
- Close unnecessary applications running in the background.
7. Specifications
| Specification | Detail |
|---|---|
| Item Type | MIDI Controller Pad |
| Material | ABS, Silicone |
| Item Weight | 2.95 pounds |
| Package Dimensions | 11.81 x 9.45 x 3.94 inches |
| ASIN | B0DZNTD2PS |
| Item Model Number | fosac7hdbm40tz |
| Compatible Devices | Laptop, PC |
| Connector Type | USB |
| Hardware Interface | USB |
| Supported Software | FL Studio (and other major DAWs) |
| Instrument Key | Any |
| Number of Keyboard Keys | 16 |
| Hardware Platform | PC/Mac |
| Number of Keys | 16 |
| Connectivity Technology | USB |
8. Warranty and Support
For warranty information and technical support, please refer to the documentation provided with your product or contact FOSA customer service directly. Keep your purchase receipt as proof of purchase for any warranty claims.
