1. Introduction
Thank you for choosing VEVOR Steel Landscape Edging. This product is designed to provide a durable and aesthetically pleasing border for your garden, lawn, or pathways. Made from high-quality galvanized steel with a rust-resistant coating, it is built to withstand various weather conditions and offers long-term durability. Its flexible design allows for easy shaping to fit diverse landscape layouts.
This manual provides essential information for the safe and effective installation and maintenance of your landscape edging. Please read it thoroughly before beginning installation.
2. Product Components
Each set of VEVOR Steel Landscape Edging (Model ZY-39X5-5) includes the following items:
- 5 x Metal Landscape Edging Borders (39" L x 5" H each)
- 1 x Pair of Installation Gloves
- 1 x Instruction Manual (this document)

Image: Contents of the VEVOR Steel Landscape Edging package, showing five dark gray metal edging pieces with integrated spikes and a pair of white installation gloves.
3. Safety Information
WARNING:
- Always wear the provided installation gloves during handling and installation to prevent cuts or injuries from sharp edges.
- Keep children and pets away from the installation area.
- Exercise caution when bending the metal edging to avoid pinching hands or fingers.
4. Installation Guide
Follow these steps for proper installation of your VEVOR Steel Landscape Edging:
Step 1: Prepare the Area
Use appropriate tools, such as a shovel or trowel, to dig a shallow trench or define the edge line where the edging will be installed. Clear any obstacles like rocks or roots from the path.

Image: A person digging a shallow trench in the soil with a small shovel, preparing the ground for the landscape edging.
Step 2: Shape the Edging
Plan your desired landscape design. The VEVOR Steel Landscape Edging is flexible and can be bent to create various shapes, including curves, squares, or irregular designs. Gently bend the metal pieces to match your layout. For sharper bends, you may use a workbench edge or a sturdy piece of wood for leverage.

Image: A person wearing gloves bending a piece of metal landscape edging over a wooden board to achieve a desired curve.

Image: Two examples of installed landscape edging, one showing an irregular, curved path and another showing square garden beds, demonstrating the product's bendability.
Step 3: Interlock the Edging Pieces
Connect the individual edging pieces by interlocking them at their designated edges. Ensure a secure connection to maintain the integrity of your border. A screwdriver or heavy-duty pliers may assist in securing the connections if they are tight.

Image: A close-up view of gloved hands connecting two sections of the landscape edging by snapping their interlocking mechanisms together.
Step 4: Insert into Ground
Once the edging is shaped and connected, carefully position it into the prepared trench. The extended sharp spikes are designed for easy penetration into the ground. Use a rubber mallet and a block of wood (to protect the edging) to gently tap the top edge of the edging until it is firmly seated and stable. Ensure the ground is soft or wet for easier insertion.

Image: A person wearing gloves using a rubber mallet to gently tap the top of the landscape edging, driving its spikes into the ground for secure placement.
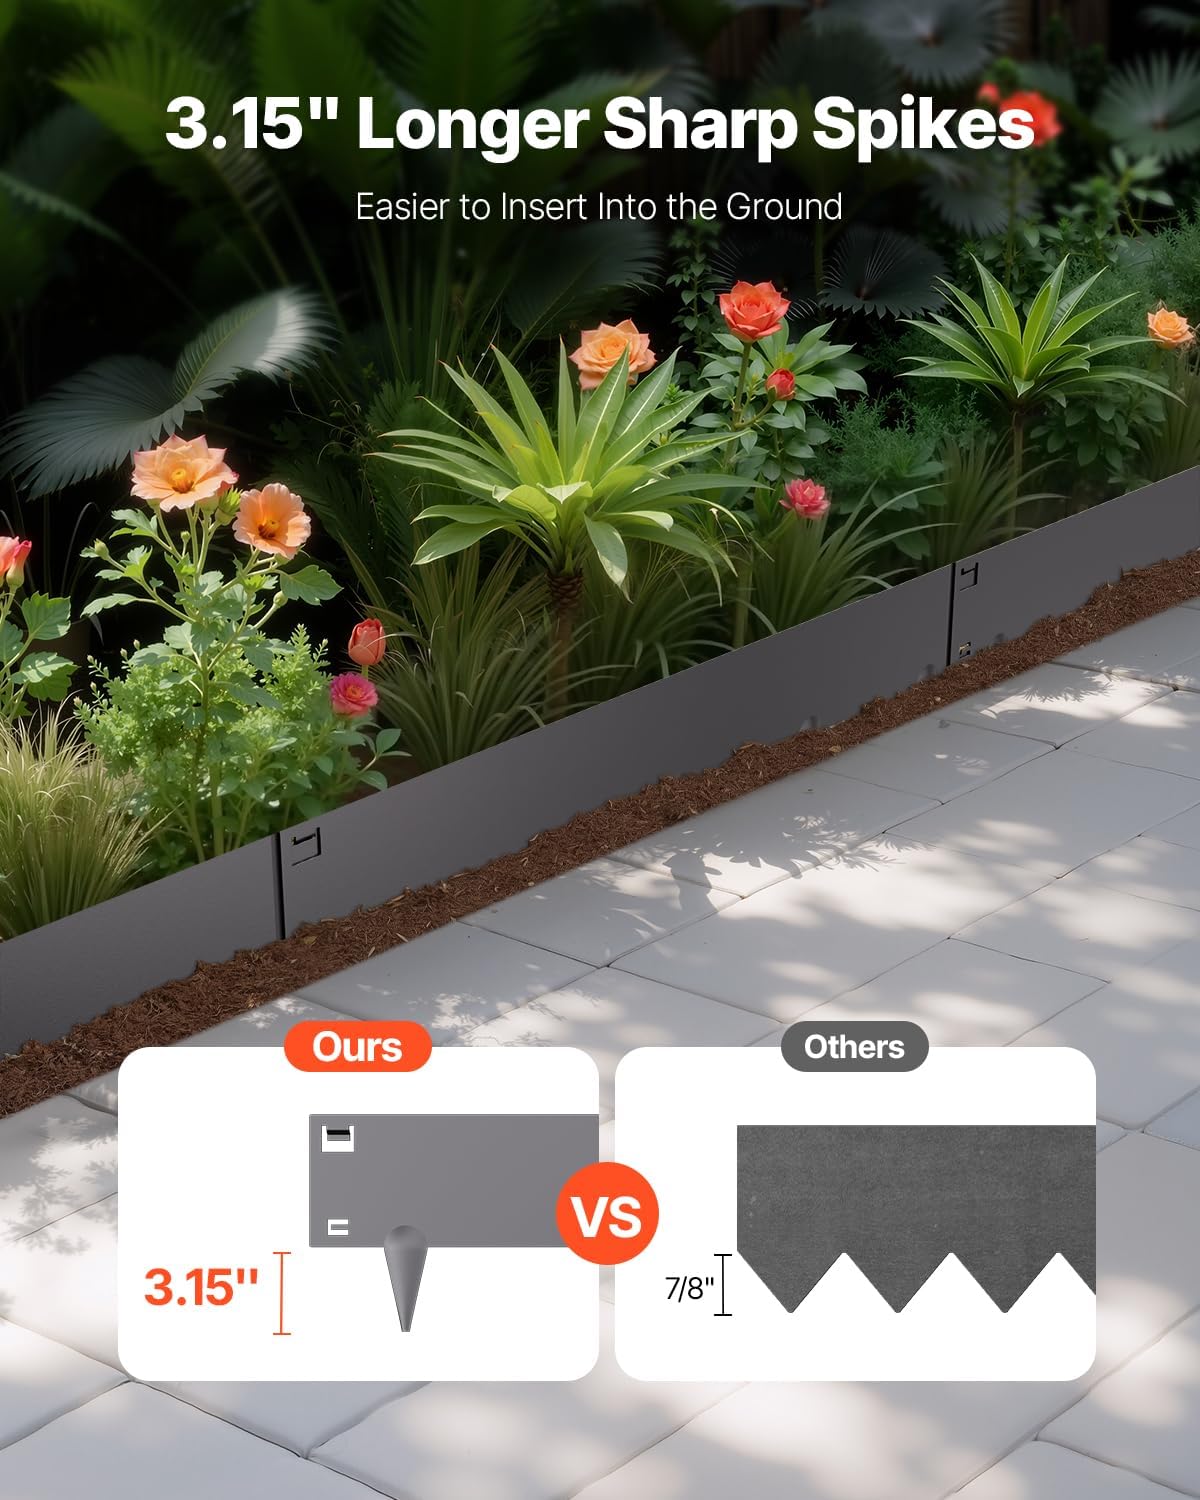
Image: A visual comparison highlighting the 3.15-inch longer sharp spikes of the VEVOR landscape edging compared to shorter spikes on other products, indicating easier ground insertion.
5. Maintenance
VEVOR Steel Landscape Edging is designed for minimal maintenance due to its galvanized steel construction and rust-resistant coating. To ensure its longevity and appearance:
- Cleaning: Periodically wipe down the edging with a damp cloth to remove dirt or debris. Avoid abrasive cleaners that could damage the coating.
- Inspection: Occasionally check for any signs of damage or loosening, especially after extreme weather conditions.
- Rust Prevention: While rust-resistant, prolonged exposure to harsh chemicals or standing water may affect the coating over time. Ensure proper drainage around the edging.

Image: A three-panel image demonstrating the weather resistance of the landscape edging, showing it intact and functional under sunny, rainy, and snowy conditions.
6. Troubleshooting
- Edging not staying connected: Ensure the interlocking tabs are fully engaged. If the ground is uneven, this can put stress on the connections. Consider using additional metal stakes (not included) at connection points for extra stability, especially in areas with significant ground movement or on inclines.
- Difficulty inserting into hard ground: If the ground is very dry or compact, water the area thoroughly a few hours before installation to soften the soil. A rubber mallet with a wood block should be used for tapping, avoiding direct hammering on the metal to prevent damage.
- Edging bending unevenly: When shaping, apply even pressure. For long, gentle curves, bend gradually. For sharper angles, use a stable edge (like a workbench) to create a consistent bend.
7. Specifications
| Item Model Number | ZY-39X5-5 |
| Product Color | Dark Gray |
| Number of Edgings | 5 pieces |
| Surface Height | 5 inches / 127 mm |
| Spike Height | 3.15 inches / 80 mm |
| Main Material | Galvanized Steel |
| Product Dimensions (each piece) | 39" L x 8.15" W x 0.06" Thickness / 990 x 207 x 1.5 mm |
| Item Weight (total) | 17.2 lbs / 7.8 kg |
| UPC | 197988126782 |

Image: A technical diagram illustrating the dimensions of a single VEVOR landscape edging piece, including length (39"), surface height (5"), spike height (3.15"), and thickness (0.06").
8. Warranty and Support
For warranty information or technical support regarding your VEVOR Steel Landscape Edging, please refer to the contact information provided with your purchase or visit the official VEVOR website. Keep your purchase receipt as proof of purchase.