1. Introduction
The Wanptek NPS-W series DC Power Supply is a miniature switching power supply designed for laboratory, industrial, and educational applications. It features adjustable output voltage and current, with high-precision three-window digital tube displays for voltage, current, and power. This series includes models such as NPS306W (30V 6A), NPS3010W (30V 10A), NPS605W (60V 5A), and NPS1203W (120V 3A), offering stable and reliable power output with complete operating protection functions.
Key features include:
- Complete operating protection functions: over temperature protection, overload protection, short circuit protection.
- Compact size, low ripple, lightweight, and high power density.
- Voltage stabilization and current limiting capabilities.
- Automatic switching between Constant Voltage (CV) and Constant Current (CC) modes.
- High-precision three-LED display for voltage, current, and power.
2. Safety Precautions
To ensure safe operation and prolong the lifespan of your power supply, please observe the following safety guidelines:
- Always connect the power supply to a grounded electrical outlet.
- Do not operate the device in wet or damp conditions. Avoid exposure to rain or moisture.
- Ensure proper ventilation. Do not block the ventilation openings on the device.
- Do not open the casing of the power supply. There are no user-serviceable parts inside. Refer all servicing to qualified personnel.
- Before connecting or disconnecting any load, ensure the power supply is turned off.
- Verify the input voltage switch setting (115V/230V) matches your local power supply before connecting to mains power.
- In case of smoke, unusual odors, or abnormal operation, immediately disconnect the power supply from the mains and contact support.
3. Product Overview
3.1 Front Panel
The front panel provides all necessary controls and displays for operating the power supply.
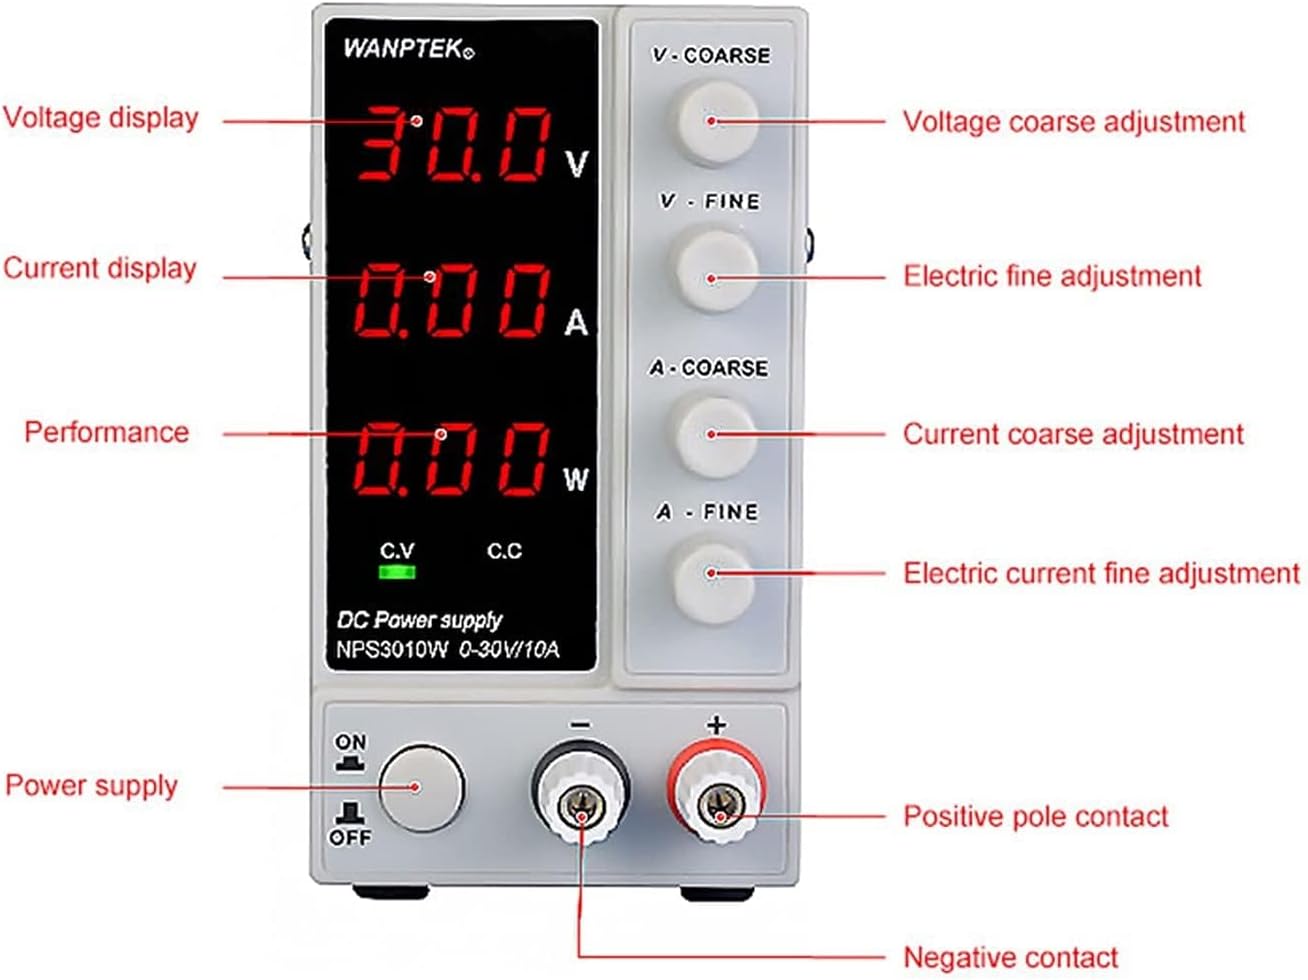
Image: Front panel of the Wanptek DC Power Supply, highlighting the digital displays for voltage, current, and power, along with the coarse and fine adjustment knobs for voltage and current, the power switch, and output terminals.
- Voltage Display: Shows the output voltage in Volts (V).
- Current Display: Shows the output current in Amperes (A).
- Power Display: Shows the output power in Watts (W).
- V-COARSE Knob: Coarse adjustment for output voltage.
- V-FINE Knob: Fine adjustment for output voltage.
- A-COARSE Knob: Coarse adjustment for output current.
- A-FINE Knob: Fine adjustment for output current.
- C.V Indicator: Illuminates when the power supply is operating in Constant Voltage mode.
- C.C Indicator: Illuminates when the power supply is operating in Constant Current mode.
- Power Switch (ON/OFF): Toggles the main power to the unit.
- Negative Output Terminal (-): Connects to the negative side of the load.
- Positive Output Terminal (+): Connects to the positive side of the load.
3.2 Rear Panel
The rear panel contains the main power input and cooling components.

Image: Rear panel of the Wanptek DC Power Supply, showing the cooling fan, AC input socket, fuse holder, and the 115V/230V AC input voltage switch.
- Cooling Fan: Provides active cooling for the internal components.
- AC Input Voltage Switch (115V/230V): Selects the appropriate input voltage for your region. Ensure this is set correctly before connecting to power.
- AC Input Socket: For connecting the provided power cord.
- Fuse Holder: Contains the protective fuse for the unit.
- Cooling Window: Additional ventilation for heat dissipation.
4. Setup
Follow these steps to set up your DC power supply:
- Unpack the Unit: Carefully remove the power supply and all accessories from its packaging. Inspect for any signs of damage.
- Select Input Voltage: Locate the AC input voltage switch on the rear panel. Ensure it is set to match your local mains voltage (115V or 230V). Incorrect setting can damage the unit.
- Connect Power Cord: Insert the provided AC power cord into the AC input socket on the rear panel. Do not connect the other end to a wall outlet yet.
- Placement: Place the power supply on a stable, flat surface with adequate ventilation. Ensure the cooling fan and ventilation openings are not obstructed.
- Initial Power On (No Load): Before connecting any load, plug the power cord into a grounded wall outlet. Turn the power switch on the front panel to the 'ON' position. The displays should illuminate.
- Verify Functionality: Adjust the voltage and current knobs to observe changes on the displays. Turn the power switch to 'OFF' before proceeding to connect a load.
5. Operating Instructions
5.1 Powering On/Off
- To Power On: Ensure the power cord is connected and the input voltage switch is correctly set. Press the power switch on the front panel to the 'ON' position.
- To Power Off: Press the power switch on the front panel to the 'OFF' position. It is recommended to disconnect the load before powering off for sensitive applications.
5.2 Voltage and Current Adjustment
The power supply allows for precise adjustment of both output voltage and current limit.
- Setting Voltage:
- Turn the V-COARSE knob to set the approximate desired voltage.
- Use the V-FINE knob for precise adjustment of the voltage.
- Setting Current Limit:
- Turn the A-COARSE knob to set the approximate desired current limit.
- Use the A-FINE knob for precise adjustment of the current limit.
- Note: It is good practice to set the current limit slightly above the expected operating current of your load to prevent accidental overcurrent, or to a specific value if current limiting is desired.
- Connecting Load: With the power supply OFF, connect the positive (+) terminal of the power supply to the positive input of your load, and the negative (-) terminal to the negative input of your load. Ensure secure connections.
- Applying Power to Load: Turn the power supply ON. The unit will automatically operate in either Constant Voltage (CV) or Constant Current (CC) mode depending on the load.
5.3 Constant Voltage (CV) and Constant Current (CC) Modes
The power supply automatically switches between Constant Voltage (CV) and Constant Current (CC) modes:
- Constant Voltage (CV) Mode: When the load current is below the set current limit, the power supply maintains the set output voltage. The C.V indicator will be illuminated.
- Constant Current (CC) Mode: If the load current attempts to exceed the set current limit, the power supply will automatically reduce the output voltage to maintain the current at the set limit. The C.C indicator will be illuminated. This protects both the power supply and the connected load from overcurrent.
6. Maintenance
Proper maintenance ensures the longevity and reliable operation of your power supply:
- Cleaning: Disconnect the power supply from the mains before cleaning. Use a soft, dry cloth to wipe the exterior. Do not use abrasive cleaners or solvents.
- Ventilation: Regularly check that the cooling fan and ventilation openings are free from dust and debris. A clogged fan can lead to overheating.
- Storage: When not in use for extended periods, store the power supply in a cool, dry place, away from direct sunlight and extreme temperatures.
- Fuse Replacement: If the unit does not power on, check the fuse located in the fuse holder on the rear panel. Replace only with a fuse of the same type and rating.
7. Troubleshooting
This section addresses common issues you might encounter:
| Problem | Possible Cause | Solution |
|---|---|---|
| No power, displays off | Power cord not connected; Mains power issue; Blown fuse; Incorrect input voltage setting. | Check power cord connection; Verify wall outlet power; Check and replace fuse if necessary; Ensure 115V/230V switch is correct. |
| No output voltage/current | Output terminals not connected; Voltage/current knobs set to zero; Overload/Short circuit protection active. | Ensure load is properly connected; Adjust voltage/current knobs to desired values; Disconnect load, check for short circuit, then reconnect. |
| Unit enters CC mode unexpectedly | Load current exceeds set current limit; Short circuit in load. | Increase the current limit setting; Check the load for short circuits or excessive current draw. |
| Overheating, fan running loudly | Blocked ventilation; Prolonged high load operation. | Ensure clear airflow around the unit; Reduce load or allow for cooling periods. |
8. Specifications
Technical specifications for the Wanptek NPS-W series DC Power Supply:
| Parameter | Value |
|---|---|
| Input Voltage | AC 115V/230V ±10% (Switchable) |
| Output Voltage Range | 0-30V (NPS306W, NPS3010W), 0-60V (NPS605W), 0-120V (NPS1203W) |
| Output Current Range | 0-6A (NPS306W), 0-10A (NPS3010W), 0-5A (NPS605W), 0-3A (NPS1203W) |
| Display Accuracy (Voltage) | 0.1V (3-digit), 0.01V (4-digit) |
| Display Accuracy (Current) | 0.01A (3-digit), 0.001A (4-digit) |
| Display Accuracy (Power) | 0.01W |
| Load Regulation (CV) | ≤0.1% + 2mV |
| Load Regulation (CC) | ≤0.1% + 2mA |
| Ripple and Noise (CV) | ≤20mVrms |
| Ripple and Noise (CC) | ≤20mArms |
| Protection Functions | Over Temperature Protection (OTP), Overload Protection (OLP), Short Circuit Protection (SCP) |
| Dimensions (Approx.) | 1.18 x 0.79 x 0.39 inches (Package Dimensions) |
| Weight (Approx.) | 6.61 pounds |
9. Warranty and Support
This product is manufactured by CVXDD. For warranty information and technical support, please refer to the documentation provided with your purchase or contact the seller directly. Keep your purchase receipt as proof of purchase for any warranty claims.
For further assistance, please reach out to the customer service department of your retailer or the manufacturer's official support channels.