1. Introduction
The LETLINK ZigBee Smart Switch is a versatile 1-channel relay module designed for smart home automation. It allows you to control various home appliances or electrical devices remotely via a ZigBee hub and compatible applications like Tuya Smart or Smart Life. This switch supports both self-locking and momentary (inching) working modes, offering flexibility for different applications such as smart garage door openers, access control, or general device automation. It operates on a low voltage of 5V (via Micro USB) or 7-32V DC/AC.
2. Safety Information
- Electrical Safety: Installation should be performed by a qualified electrician or in accordance with local electrical codes. Ensure power is disconnected before installation or maintenance.
- Voltage Compatibility: Verify that the input voltage (5V USB or 7-32V DC/AC) and load voltage (DC 0-30V or AC 85-250V) are within the specified limits to prevent damage to the device or connected equipment.
- ZigBee Hub Required: This device requires a ZigBee 3.0 compatible hub (e.g., Tuya ZigBee Gateway) to function as a smart switch. It cannot connect directly to Wi-Fi.
- Indoor Use Only: The device has an IP50 rating, indicating protection against dust but not water. Avoid exposure to moisture or extreme environmental conditions.
3. Product Features
- Wide Compatibility: Supports 5V (Micro USB) or 7-32V DC/AC input voltage.
- ZigBee 3.0 Protocol: Ensures quick and reliable pairing with compatible ZigBee hubs.
- Adjustable Working Modes: Easily switch between Self-Lock (latching) and Momentary (inching) modes.
- Remote Control: Control connected devices via the Tuya Smart or Smart Life app from anywhere.
- Voice Control: Compatible with smart home assistants like Amazon Alexa and Google Assistant (via ZigBee hub).
- Scheduling & Timers: Set countdowns, loop timers, and schedules for automated operation.
- Dry Contact Output: Provides an isolated dry contact on/off relay, suitable for various applications.
- 433Mhz RF Receiver: Built-in receiver supports fixed learn 433Mhz RF remotes (remote not included).
4. Package Contents
- 1 x LETLINK ZigBee Wireless Smart Switch
- 1 x English Instructions (this manual)
5. Specifications
| Feature | Value |
|---|---|
| Model | 1 Channel 5V/12V/24V |
| Input Voltage | DC/AC 7V~32V or USB 5V |
| Max. Current | 10 Amps |
| Max. Wattage | 2200W |
| Operation Mode | ON-OFF, Self-Lock, Momentary (Inching) |
| Connectivity Protocol | ZigBee 3.0 |
| Radio Frequency | 433Mhz (for RF receiver, remote not included) |
| Control Method | App, Voice, Manual Button, RF Remote (optional) |
| Working Temperature | -20°C to 70°C |
| Dimensions (L x W x H) | 69 x 41 x 20 mm (2.68 x 1.62 x 0.8 inches) |
| Item Weight | 0.96 ounces |
| Contact Type | Normally Open, Dry Contact |
| Terminal Type | Screw, Clamp |
| Material | Acrylonitrile Butadiene Styrene, Copper |
| International Protection Rating | IP50 |
The image below provides a visual overview of the product and its key parameters.

This image displays the LETLINK ZigBee Smart Switch module, highlighting its compatibility with Tuya Smart, Smart Life, Alexa, and Google Assistant. Key parameters are listed: Input voltage DC/AC 7V~32V or USB 5V, Max. Current 2200W/10A, Wireless Standard Zigbee, Radio Frequency 433Mhz, Working temperature -20°C~70°C, and Size 69*41*20mm.
6. Setup and Wiring
6.1 Power Supply and Load Connections
The controller can be powered by either a Micro USB 5V input or a DC 7V-32V input via the screw terminals. The load power supply for the controlled device can be DC 0-30V or AC 85V-250V, with a maximum current of 10A.

This diagram illustrates the wiring for the LETLINK ZigBee Smart Switch. It shows connections for DC 7V-32V controller power supply and a load power supply at the control end (DC 0-30V or AC 85V-250V). Key components like the Reset/RF pairing button, Manual button, Network indicator, RF indicator, and USB 5V input are also labeled.

This wiring diagram shows an alternative setup for the LETLINK ZigBee Smart Switch, specifically for controlling an AC load. It illustrates the connection for an AC 90V-250V/10A or DC 0-30V/10A load power supply, with the controller powered by DC 7V~32V or USB 5V.
6.2 Initial Power-Up and Pairing
- Connect the appropriate power supply (5V Micro USB or 7-32V DC/AC) to the smart switch.
- Upon powering up, the device will automatically enter pairing mode, indicated by a blinking network indicator light.
- Open your ZigBee hub's application (e.g., Tuya Smart, Smart Life) and initiate the device discovery or 'Add Device' process.
- Follow the on-screen instructions in the app to complete the pairing process.
7. Operating Modes
The LETLINK ZigBee Smart Switch supports two primary operating modes: Self-Locking and Momentary (Inching).
- Self-Locking Mode: In this mode, a single command (e.g., a tap in the app) will toggle the relay's state. If the relay is OFF, it will turn ON and stay ON until another command is received. If it's ON, it will turn OFF and stay OFF. This is suitable for controlling lights or other devices that need to remain in a specific state.
- Momentary (Inching) Mode: In this mode, the relay will turn ON for a brief, configurable duration (e.g., 0.5 seconds) after receiving a command, and then automatically turn OFF. This is ideal for applications like garage door openers, electric strikes, or other devices that require a short pulse of power. The inching duration can typically be set within the app.
The working mode can be adjusted within the Tuya Smart or Smart Life application settings for the device.
8. Application Examples
8.1 Access Control (Inching Mode)
The switch can be used to integrate access control systems, such as electric door locks, into your smart home. In inching mode, it provides a brief pulse to trigger the lock mechanism.
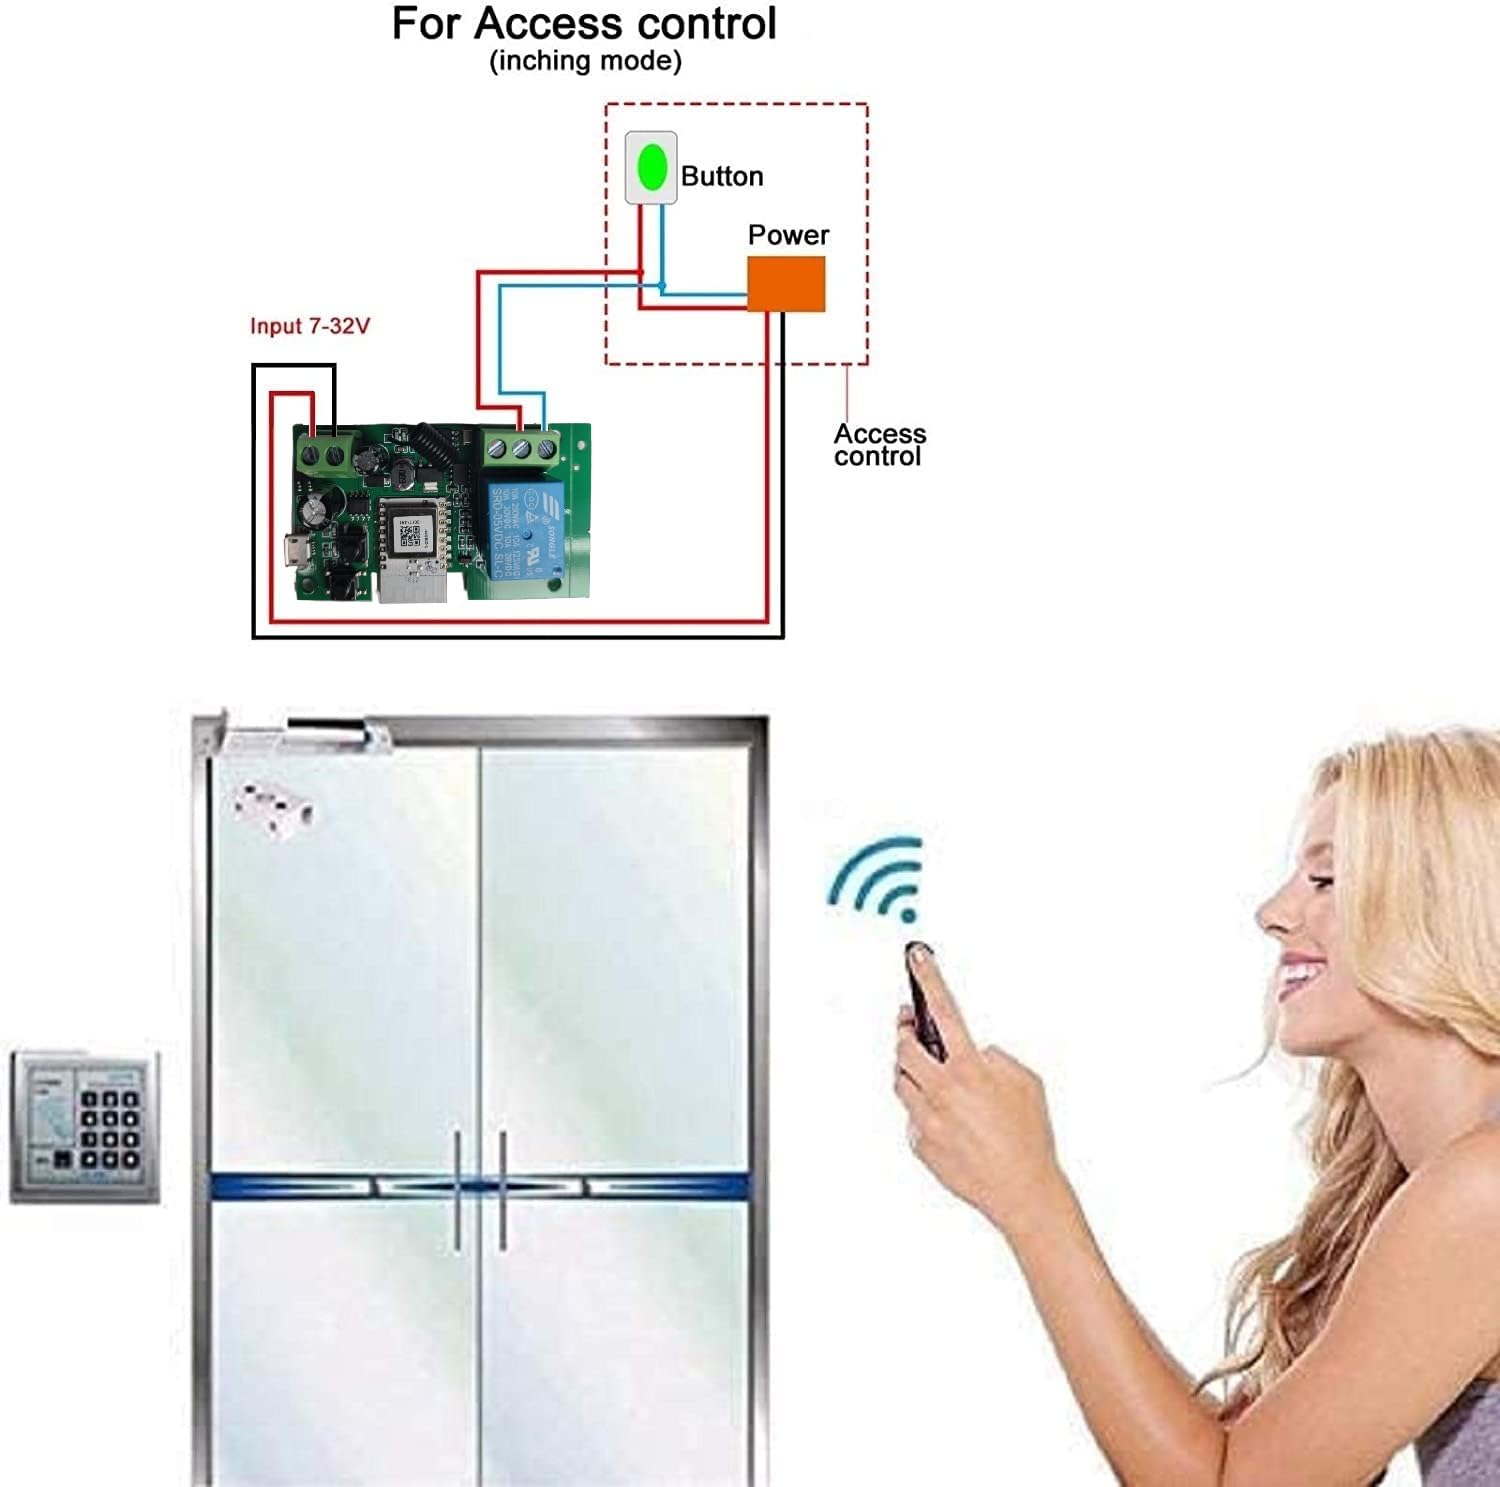
This image demonstrates an application of the ZigBee Smart Switch for access control, specifically in inching mode. It illustrates how the switch can be wired to a button and an access control system, such as for opening a door, with a user operating a remote control.
8.2 Motor Lock Modification (Jog Mode)
For certain motor lock systems, the switch can be integrated to provide smart control. Ensure to follow the specific wiring requirements for your motor lock.
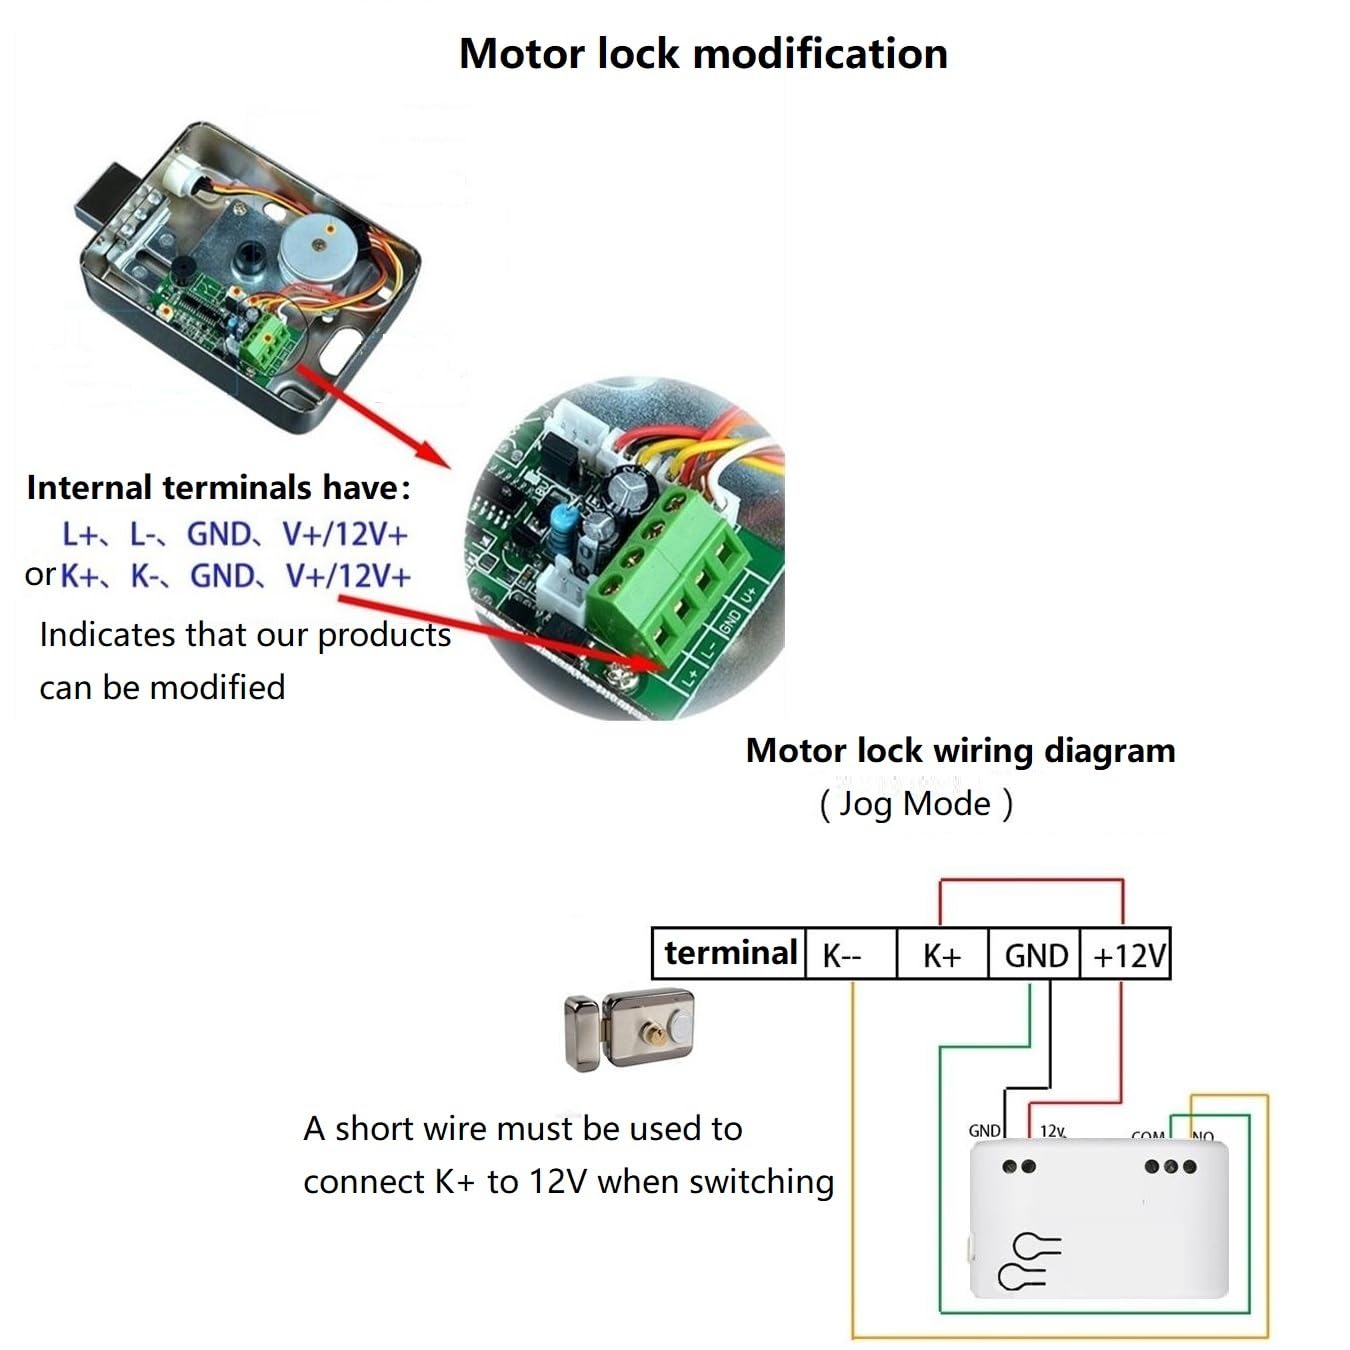
This diagram provides instructions for modifying a motor lock using the ZigBee Smart Switch in Jog Mode. It details the internal terminals (L+, L-, GND, V+/12V+ or K+, K-, GND, V+/12V+) and shows a wiring diagram where a short wire connects K+ to 12V when switching.
9. App Control (Tuya Smart / Smart Life)
Once paired with your ZigBee hub, the device can be controlled and configured through the Tuya Smart or Smart Life application.

This image shows the user interface of the control application (e.g., Tuya Smart or Smart Life) for the ZigBee Smart Switch. It highlights features such as renaming the device, managing notifications, sharing device access, creating groups, and updating firmware. Options for setting timers, schedules, countdowns, circulating/random operations, and inching mode are visible, along with the relay status.
9.1 Key App Functions:
- On/Off Control: Tap the switch icon to toggle the connected device.
- Rename Device: Long press the switch icon or use the edit option to change the device name for easier identification.
- Offline Notification: Receive alerts if the device goes offline.
- Share Device: Grant control access to other family members.
- Create Group: Group multiple smart devices for simultaneous control.
- Device Update: Check for and install firmware updates.
- Timer & Schedule: Set one-time, recurring, or countdown timers for automated operation.
- Inching/Self-Locking Mode: Adjust the working mode and inching duration in the device settings.
10. Voice Control
Once integrated with your ZigBee hub and linked to your smart assistant account (e.g., Amazon Alexa, Google Assistant), you can control the LETLINK ZigBee Smart Switch using voice commands.
- Example Commands:
- "Alexa, turn on [Device Name]"
- "Hey Google, turn off [Device Name]"
- Ensure your device name in the app is simple and easy for the voice assistant to recognize.
11. Maintenance
- Cleaning: Use a dry, soft cloth to clean the device. Do not use liquid cleaners or aerosols.
- Firmware Updates: Regularly check for and install firmware updates via the app to ensure optimal performance and security.
- Environmental Conditions: Keep the device away from excessive heat, cold, humidity, and direct sunlight.
12. Troubleshooting
- Device Not Pairing:
- Ensure the device is powered on and the network indicator is blinking.
- Verify your ZigBee hub is powered on and within range.
- Try resetting the device by pressing and holding the Reset/RF pairing button for 5-10 seconds until the indicator blinks rapidly.
- Ensure your ZigBee hub is compatible with ZigBee 3.0 devices.
- Device Offline in App:
- Check the power supply to the smart switch.
- Ensure the ZigBee hub is online and functioning correctly.
- The device might be out of range of the ZigBee hub or a ZigBee mesh router. Consider adding ZigBee repeaters if necessary.
- Connected Device Not Responding:
- Verify the wiring connections to the load are secure and correct.
- Check if the load device itself is functioning properly.
- Ensure the operating mode (Self-Locking or Momentary) is correctly configured for your application in the app.
- Voice Control Issues:
- Confirm the ZigBee hub is linked to your voice assistant account.
- Ensure the device name in the app is recognized by the voice assistant. Try re-syncing devices in your voice assistant app.
13. Warranty and Support
For warranty information and technical support, please refer to the seller's policy or contact the manufacturer directly. Keep your purchase receipt for warranty claims.