K-Cafe Barista Bar
Keuriig K-Café Barista Bar Single Serve Coffee Maker with Milk Frother User Manual
Model: K-Cafe Barista Bar
Introduction
Welcome to the world of convenient and delicious coffee with your new Keuriig K-Café Barista Bar. This versatile single-serve coffee maker, equipped with a milk frother, allows you to enjoy a wide range of hot and cold beverages, including lattes, cappuccinos, espresso, and classic coffee, all from the comfort of your home. This manual provides essential information for safe operation, setup, maintenance, and troubleshooting to ensure you get the most out of your appliance.
Important Safety Information
Please read all safety instructions before using your Keuriig K-Café Barista Bar. Failure to follow these instructions may result in electric shock, fire, or serious injury.
- Always plug the coffee maker into a grounded electrical outlet.
- Do not immerse the coffee maker, cord, or plug in water or other liquids.
- Keep hands and cords away from hot surfaces and steam.
- Unplug the appliance when not in use and before cleaning.
- Do not operate any appliance with a damaged cord or plug, or after the appliance malfunctions or has been damaged in any manner.
- Use only water in the water reservoir. Do not use other liquids.
- Exercise caution when handling hot liquids and K-Cup pods after brewing.
- The milk frother contains a heating element; allow it to cool before cleaning.
What's in the Box
Carefully unpack all components and ensure you have the following items:
- Keuriig K-Café Barista Bar Coffee Maker
- Milk Frother
- Removable Water Reservoir
- Removable Drip Tray
- K-Cup Pod Holder

Setup
- Unpack and Place: Remove all packaging materials. Place the coffee maker on a stable, level surface.
- Rinse Water Reservoir: Remove the 42oz water reservoir from the back of the brewer. Rinse it with fresh water.
- Fill Water Reservoir: Fill the reservoir with fresh water up to the MAX fill line. Place it back onto the brewer, ensuring it is seated properly.
- Plug In: Plug the brewer into a grounded outlet. The power button will illuminate.
- First Brew Cycle (Cleansing Brew):
- Place a large mug on the drip tray.
- Do not insert a K-Cup pod.
- Press the 8oz brew button. The brewer will dispense hot water.
- Discard the hot water. Your brewer is now ready for use.

Operating Instructions
Brewing Coffee or Espresso
- Add Water: Ensure the water reservoir has sufficient water.
- Insert Pod: Lift the handle and place a K-Cup pod into the K-Cup pod holder. Close the handle firmly.
- Place Mug: Place a mug on the drip tray. For travel mugs, remove the drip tray if needed.
- Select Brew Size: Choose your desired brew size: 8oz, 10oz, or 12oz. The selected button will illuminate.
- Brew Espresso Shot: For a concentrated espresso shot, press the 'SHOT' button. This brews a stronger, more intense shot of coffee, ideal for lattes and cappuccinos.
- Start Brewing: The brewer will begin dispensing your beverage. Once complete, the button light will turn off.

Frothing Milk (Hot & Cold)
The integrated milk frother allows you to create creamy hot or cold frothed milk for your specialty beverages.
- Add Milk: Pour fresh milk (dairy or non-dairy alternatives like oat, almond, or soy) into the frother cup up to the indicated fill line.
- Select Froth Type: Press the button on the frother to select hot or cold froth. The indicator light will show your selection.
- Start Frothing: The frother will begin to froth the milk. It will automatically stop when complete.
- Pour: Pour the frothed milk into your brewed coffee or espresso.

Brewing Over Ice
The Keuriig K-Café Barista Bar is designed to brew delicious iced coffee without diluting the flavor.
- Fill Mug with Ice: Fill a large, durable plastic or glass mug with ice. Do not use a glass mug that is not designed for hot liquids.
- Insert Pod: Insert your desired K-Cup pod.
- Select Brew Over Ice: Press the 'Brew Over Ice' button (often indicated by an ice cube icon). The brewer automatically adjusts the brew temperature to extract full flavor and minimize ice melt.
- Brew: The brewing process will begin.


Travel Mug Friendly
The removable drip tray allows for easy accommodation of travel mugs up to 7.25 inches tall.

Maintenance
Daily Cleaning
- Drip Tray: Remove the drip tray and empty any accumulated liquid. Wash with warm, soapy water and rinse thoroughly.
- K-Cup Pod Holder: After each use, remove the K-Cup pod holder and rinse it under running water.
- Milk Frother: The frother has a nonstick interior for easy cleaning. After each use, rinse the frother cup and whisk with warm water. For a more thorough clean, use a soft cloth and mild dish soap. Ensure the frother is completely dry before storing.
Descaling
Over time, calcium deposits (scale) can build up in your brewer, affecting performance. The 'DESCALE' indicator light will illuminate when descaling is needed. Follow these steps:
- Prepare Descaling Solution: Refer to the Keuriig descaling solution instructions or use white vinegar.
- Empty Reservoir: Empty the water reservoir.
- Fill with Solution: Pour the descaling solution into the reservoir.
- Run Cleansing Brews: Place a large mug on the drip tray. Run several 8oz cleansing brews without a K-Cup pod until the reservoir is empty.
- Rinse Reservoir: Rinse the reservoir thoroughly with fresh water.
- Fill with Fresh Water: Fill the reservoir with fresh water.
- Final Cleansing Brews: Run several more 8oz cleansing brews with fresh water until the reservoir is empty to remove any residual descaling solution. The 'DESCALE' light should turn off.
Troubleshooting
| Problem | Possible Cause | Solution |
|---|---|---|
| Brewer not turning on | Not plugged in; power outage; circuit breaker tripped. | Ensure brewer is plugged into a working, grounded outlet. Check household circuit breaker. |
| Coffee not brewing | No water in reservoir; K-Cup pod not properly seated; air bubble in water line. | Fill water reservoir. Ensure K-Cup pod is firmly inserted. Lift and lower handle several times to clear air bubble. |
| 'ADD WATER' light illuminated | Water reservoir is low or empty. | Refill the water reservoir. |
| 'DESCALE' light illuminated | Calcium buildup in the brewer. | Perform a descaling procedure as outlined in the Maintenance section. |
| Frother not working | Not enough milk; frother not properly seated on base; internal issue. | Ensure milk is above minimum fill line. Check frother placement on base. Contact customer support if issue persists. |
| Coffee grounds in cup | K-Cup pod punctured incorrectly; exit needle clogged. | Ensure K-Cup pod is properly inserted. Clean the exit needle using a paper clip. |
Specifications
| Feature | Detail |
|---|---|
| Brand | Generic |
| Model Name | K-Cafe Barista Bar |
| Color | Glossy Black |
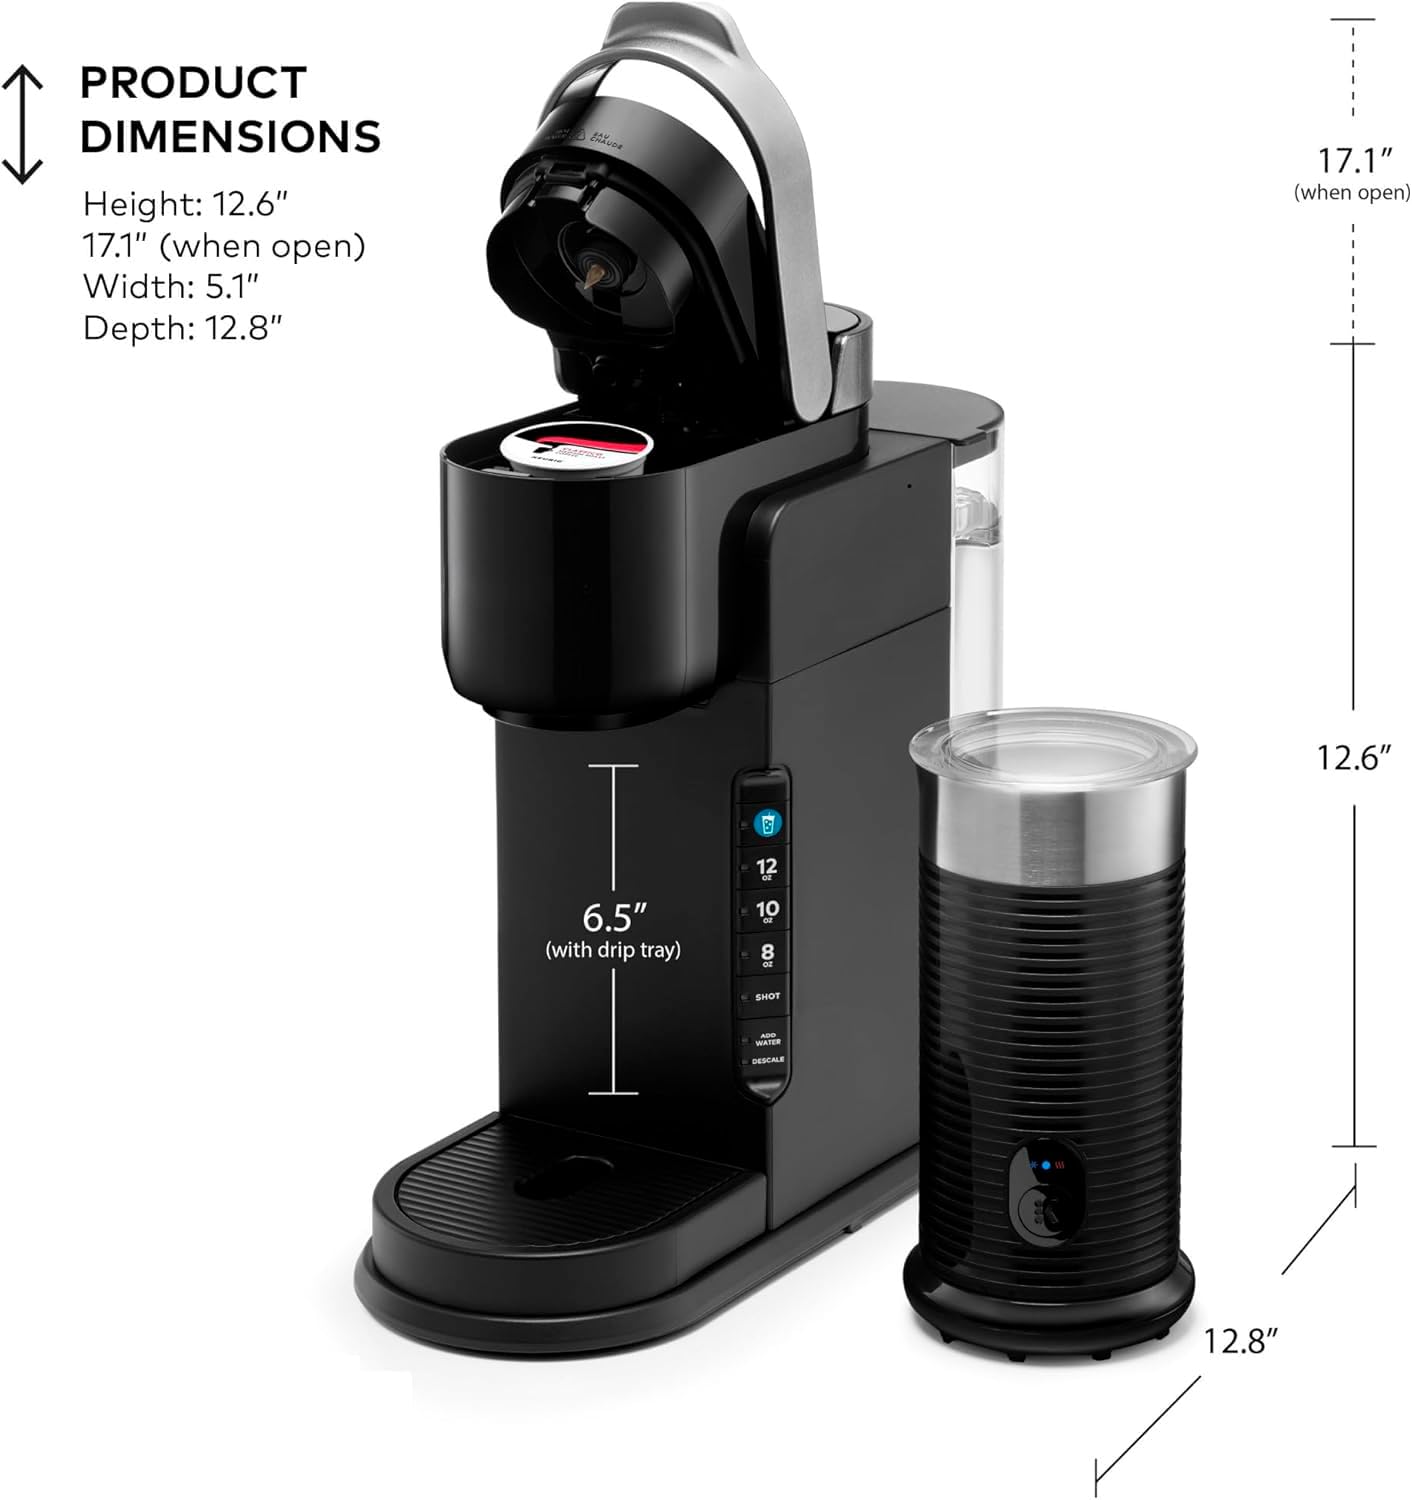
| Product Dimensions | 13.5"D x 11.5"W x 15"H |
| Item Weight | 6 pounds |
| Coffee Maker Type | Espresso Machine / Single-Serve Brewer |
| Special Features | Hot and cold frother, Travel mug friendly, Fast brewing, Auto off, High altitude brewing, Descale notification |
| Water Reservoir Capacity | 42oz (approx. 4 cups) |
| Brew Sizes | 8oz, 10oz, 12oz, Shot |
| Coffee Input Type | K-Cup Pods |

Warranty and Support
This product comes with a manufacturer's warranty. Please refer to the warranty card included with your purchase for specific terms and conditions. For technical support, troubleshooting assistance, or to inquire about replacement parts, please contact the manufacturer's customer service. Keep your purchase receipt as proof of purchase for warranty claims.
Related Documents - K-Cafe Barista Bar
 |
Keurig SimpleCafé Frother Use & Care Guide: Frothing Milk for Coffeehouse Drinks at Home Comprehensive guide for the Keurig SimpleCafé Frother, covering setup, operation, cleaning, troubleshooting, and warranty information. Learn to make lattes, cappuccinos, and other coffeehouse beverages at home. |
 |
Keurig K-Café Barista Bar Use & Care Guide Comprehensive guide for the Keurig K-Café Barista Bar single-serve coffee maker, covering setup, brewing, frothing, cleaning, maintenance, troubleshooting, and warranty information. |
 |
Sage Barista Touch Impress BES882/SES882: Uživatelská příručka a návod k použití Komplexní uživatelská příručka pro kávovar Sage Barista Touch Impress BES882/SES882. Zjistěte vše o nastavení, obsluze, čištění, údržbě a řešení problémů s tímto prémiovým kávovarem. |
 |
Keurig 2.0 Brewer: Welcome and Compatibility Guide Information for new Keurig 2.0 brewer owners, explaining compatibility with K-Cup and K-Carafe packs and how to identify the correct packs. |
 |
PlusCity Lifestyle & Trends: Oktober/November 2025 Entdecken Sie die neuesten Trends, Angebote und Events im PlusCity Lifestyle Magazin für Oktober und November 2025. Von Mode und Genuss bis hin zu spannenden Veranstaltungen wie dem Weinfest, Halloween und Black Friday Week. |
 |
London Drugs Holiday Gift Flyer 2019 - Electronics, Home Goods, Toys & More Explore the London Drugs Holiday Gift Flyer for 2019, featuring a wide selection of electronics, home appliances, beauty products, toys, confectionery, and more. Find great deals and gift ideas from November 15 to December 24, 2019. |
Ask a question about this manual
Ask about setup, troubleshooting, compatibility, parts, safety, or missing instructions. Manuals+ will review the question and use this page’s manual context to help answer it.