Introduction
This user manual provides essential information for the safe and efficient operation, maintenance, and troubleshooting of your HAVAI Premium Glass Top GT 12 Air Cooler. Please read this manual thoroughly before using the appliance and retain it for future reference.
Product Overview
The HAVAI Premium Glass Top GT 12 is a personal air cooler designed for efficient cooling in residential and commercial indoor spaces. It features a sleek glass top design, a 40-litre water tank, and three-side honeycomb cooling pads for enhanced performance.

Figure 1: Front view of the HAVAI Premium Glass Top GT 12 Air Cooler, showcasing its blue and white design with a 12-inch fan blade visible through the grille.
Key Features:
- Premium Glass Top Design: Enhances aesthetics and provides a durable surface.
- 40-Litre Tank Capacity: Allows for extended cooling without frequent refills.
- 160W Energy-Efficient Motor: Delivers powerful air throw while minimizing power consumption.
- Three-Side Honeycomb Cooling Pads: Maximizes cooling efficiency and air circulation.
- 12-inch Fan Blade: Ensures strong airflow.
- 15ft Air Throw: Provides effective cooling across a significant distance.
- 4 Castor Wheels: For easy mobility and positioning.
- Adjustable Speed: Three speed settings for customized comfort.
- Oscillating Fan: Distributes cool air evenly across the room.
- Low Water Indicator: Alerts when water level is low, preventing pump damage.

Figure 2: Infographic detailing key features such as 160W power, 40L tank capacity, 12-inch fan blade, sleek glass top, 15ft air throw, lockable wheels, 2300 RPM, and three-side honeycomb cooling.
Setup
1. Unboxing and Inspection:
Carefully remove the air cooler from its packaging. Inspect the unit for any signs of damage during transit. Ensure all components listed in the packing list are present. The package should include the air cooler unit and a user manual.
2. Wheel Installation:
Attach the four castor wheels to the designated slots at the bottom of the air cooler. Ensure they are securely fastened for easy mobility. Some wheels may include a brake lock mechanism; ensure these are engaged when the cooler is stationary.
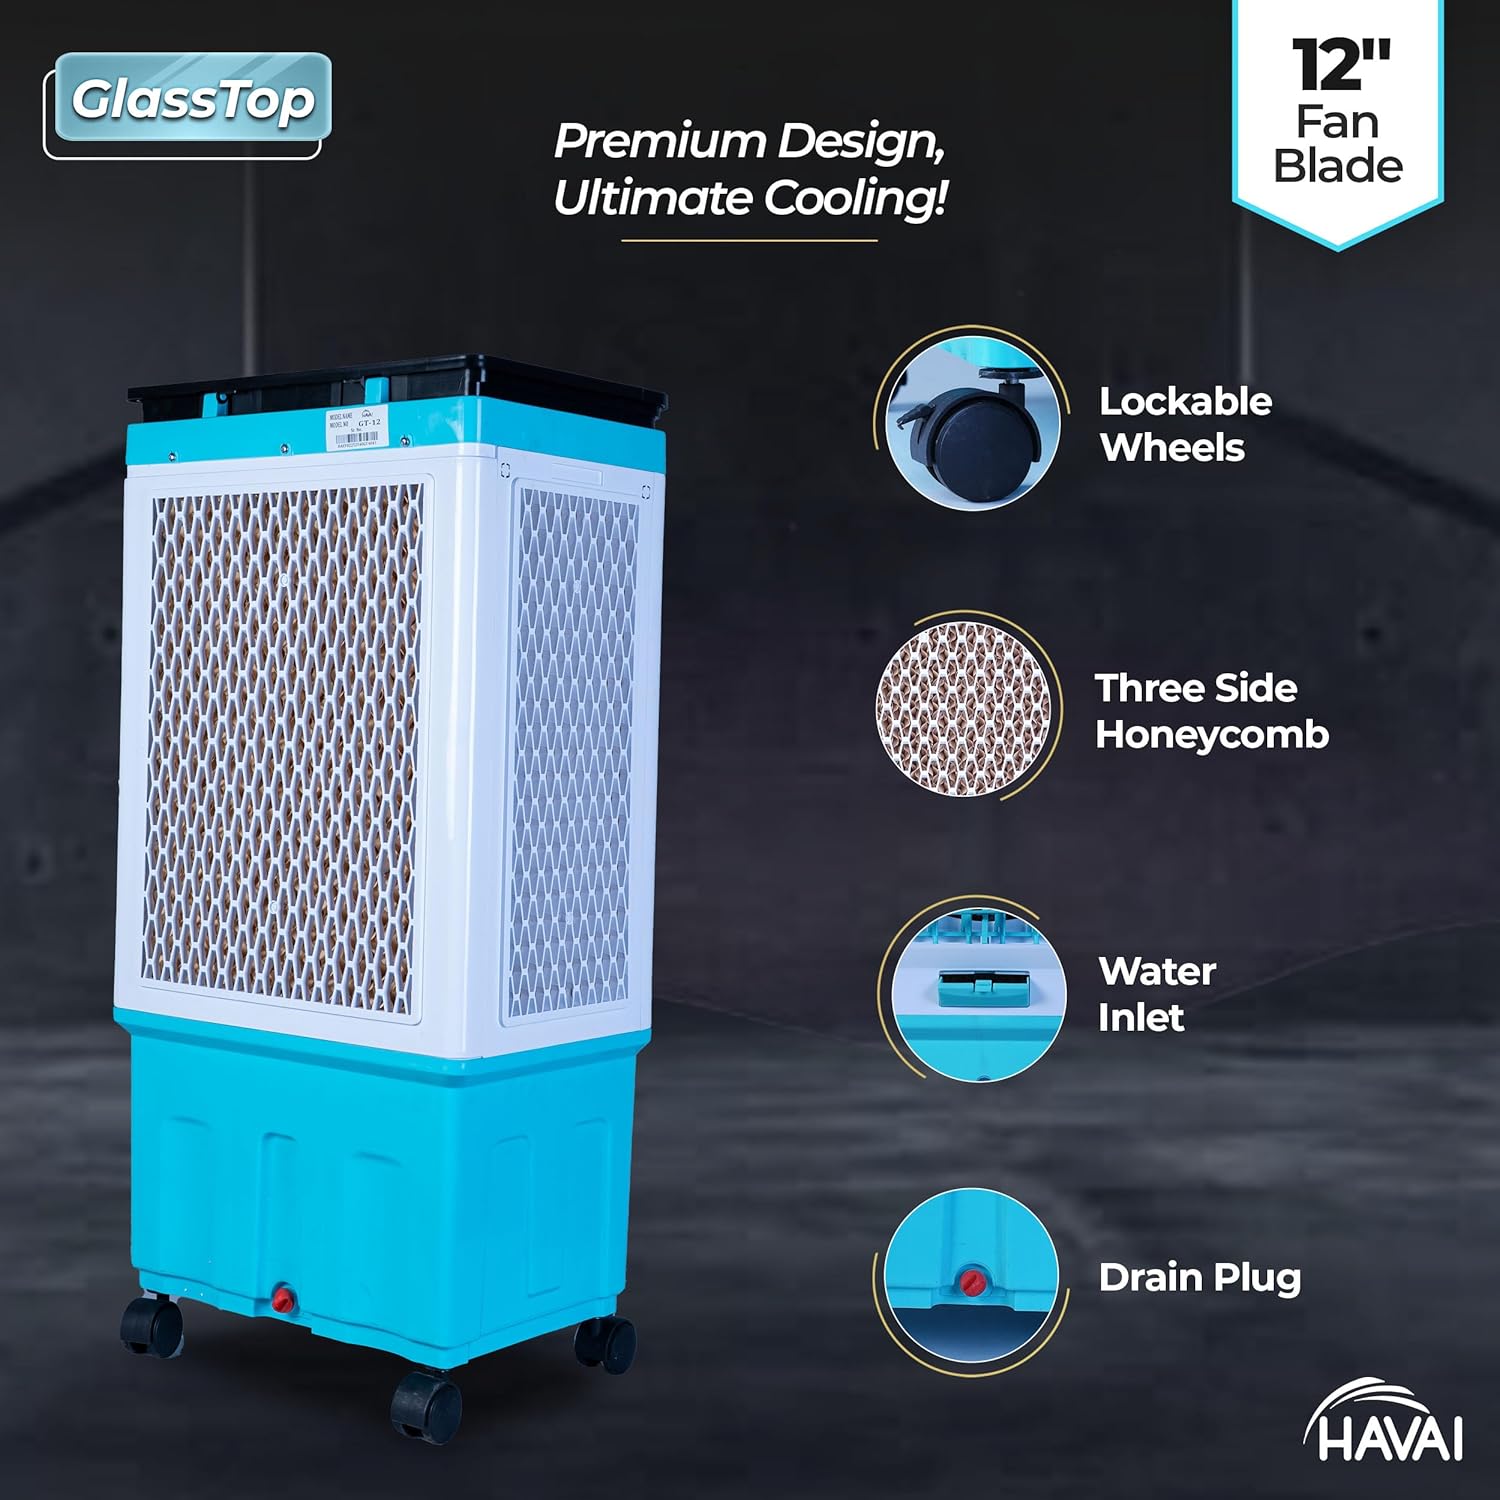
Figure 3: Side view of the air cooler highlighting the lockable wheels, three-side honeycomb pads, water inlet, and drain plug.
3. Water Filling:
Locate the water inlet on the side or top of the cooler. Fill the water tank with clean, fresh water up to the 'MAX' indicator level. Do not overfill. The cooler has a 40-litre tank capacity.

Figure 4: Image emphasizing the 40-litre tank capacity of the air cooler.
4. Power Connection:
Plug the power cord into a standard 230V AC electrical outlet. Ensure the power switch on the cooler is in the 'OFF' position before plugging in.
Operating Instructions
1. Control Panel Overview:
The HAVAI GT 12 features a knob control system located on the top panel. The controls typically include settings for Fan Speed, Pump, and Swing function.

Figure 5: Close-up of the sleek glass top panel with controls for Pump, Speed, and Swing, alongside a beverage and a small plant.
2. Powering On and Fan Speed:
Turn the main power knob to the 'ON' position. Select your desired fan speed (Low, Medium, High) using the speed control knob. The cooler offers 3 speed options.
3. Activating Cooling (Pump):
To initiate cooling, turn on the 'Pump' function. This will circulate water over the honeycomb pads, allowing for evaporative cooling. Ensure the water tank has sufficient water before activating the pump.
4. Activating Swing Function:
Turn on the 'Swing' function to enable the oscillating louvers. This distributes cool air more widely across the room, covering an area of up to 200 square feet with a 15ft air throw.

Figure 6: The air cooler positioned in a living room, illustrating its air delivery and coverage for a 200 sq ft area with 15 ft air throw.
5. Enhancing Cooling with Ice:
For enhanced cooling performance, especially in very hot conditions, you can add ice cubes directly into the water tank or the dedicated ice chamber (if available) on the top of the unit. This lowers the water temperature, resulting in cooler air output.

Figure 7: Top view of the air cooler with the lid open, showing ice cubes in the water reservoir, indicating the option for enhanced cooling.
Maintenance
Regular maintenance ensures optimal performance and longevity of your air cooler.
1. Water Tank Cleaning:
Drain the water tank completely every few days or when not in use for an extended period to prevent algae and bacterial growth. Use the drain plug located at the bottom/rear of the unit. Clean the tank with a mild detergent and water, then rinse thoroughly.
2. Honeycomb Pad Cleaning:
The three-side honeycomb pads should be cleaned periodically, especially if you notice reduced cooling efficiency or unpleasant odors. Carefully remove the pads (refer to diagrams if available in a physical manual) and rinse them under running water to remove dust and mineral deposits. For stubborn deposits, soak them in a solution of water and mild descaling agent.
3. Exterior Cleaning:
Wipe the exterior surfaces, including the glass top, with a soft, damp cloth. Do not use abrasive cleaners or solvents that could damage the finish.
4. Seasonal Storage:
Before storing the cooler for an off-season, ensure the water tank is completely drained and dry. Clean all components thoroughly. Store the unit in a dry, dust-free place, preferably covered to protect it from dust accumulation.
Troubleshooting
| Problem | Possible Cause | Solution |
|---|---|---|
| Cooler not turning on. | No power supply; Power switch off; Loose connection. | Check power outlet; Ensure power switch is ON; Securely plug in the power cord. |
| No cooling effect. | Water tank empty; Pump not activated; Honeycomb pads clogged. | Fill water tank; Turn on the 'Pump' function; Clean honeycomb pads. |
| Water leakage from front. | Overfilling of water tank; Unit not level; Damaged water hose/seal. | Do not overfill; Place cooler on a flat, level surface; Contact customer support if leakage persists. |
| Excessive noise. | Low water level (pump noise); Fan obstruction; Loose components. | Ensure adequate water level; Check for obstructions around fan; Contact support if noise is unusual or persistent. |
| Swing mode not working. | Swing function not activated; Motor issue. | Ensure 'Swing' function is ON; Contact customer support if the issue persists. |
Specifications
| Feature | Detail |
|---|---|
| Brand | HAVAI |
| Model Name | GT12 |
| Item Model Number | GT12 AIR COOLER |
| Mounting Type | Freestanding |
| Colour | BLUE |
| Special Features | Adjustable Speed, Silent Operation, Oscillating Fan, Low Water Indicator |
| Air Flow Capacity | 15 Cubic Feet Per Minute |
| Controls Type | Knob |
| Reservoir Capacity | 40 litres |
| Floor Area Coverage | 200 Square Feet |
| Air Throw | 15 feet |
| Number of Speeds | 3 |
| Voltage | 230 Volts |
| Product Dimensions (D x W x H) | 48D x 38W x 100H Centimeters |
| Item Weight | 12 kg |
| Manufacturer | M.R. ELECTRONICS PVT.LTD |
| Country of Origin | India |

Figure 8: Diagram illustrating the dimensions of the HAVAI GT 12 Air Cooler: 38 inches in height, 18 inches in width, and 13 inches in depth.
Warranty and Support
Warranty Information:
Your HAVAI Premium Glass Top GT 12 Air Cooler comes with a 1 Year Warranty from the date of purchase. This warranty covers manufacturing defects and issues arising from normal use. Please retain your purchase receipt for warranty claims.
Customer Support:
For any queries, technical assistance, or warranty claims, please contact HAVAI HOME PRODUCTS customer support:
- Phone: 9819991318
- Manufacturer: M.R. ELECTRONICS PVT.LTD
Please have your product model number (GT12 AIR COOLER) and purchase details ready when contacting support.