1. Safety Information
Please read all instructions carefully before operating the Tiskgg 4.5 Cubic Fireproof Safe Box. Retain this manual for future reference.
- Do not store emergency keys inside the safe. Keep them in a secure, separate location.
- Ensure the safe is securely anchored to a wall or floor to prevent theft.
- Keep the safe away from excessive moisture or direct heat sources unless specifically designed for such conditions.
- This safe is designed for security and includes a fireproof document bag for enhanced protection against fire.
2. Product Overview
The Tiskgg 4.5 Cubic Fireproof Safe Box is designed to protect your valuable assets with robust construction and advanced security features.

Image: The Tiskgg 4.5 Cubic Fireproof Safe Box shown open, revealing organized compartments for various valuables such as a camera, gold bars, credit cards, medication, and stacks of cash. A fireproof document bag is visible in the foreground.
Key Features:
- Large Capacity: 4.5 cubic feet interior space.
- Robust Construction: Made of high-quality alloy steel with thickened 30mm triple bolts and a 64mm thickened front door.
- Digital Lock System: Electronic combination lock for secure access.
- Anti-Theft Design: Features anti-prying, anti-drilling, and scratch-proof properties.
- Removable Shelf: An adjustable interior shelf helps organize items and can be removed for larger objects.
- Interior LED Light: Illuminates automatically when the safe is opened for easy viewing.
- Alarm System: Activates after multiple incorrect code entries.
- Included Fireproof Bag: Provides additional protection for documents and small valuables.

Image: Diagram illustrating the multi-layered steel construction of the safe, highlighting its anti-prying, anti-drilling, and scratch-proof features. The image also shows the 30mm thick bolts and 40mm door thickness.
3. Setup
3.1 Initial Opening
Upon receiving your safe, use the emergency keys to open the door for the first time. The keyhole is typically concealed behind a badge or cover on the keypad.
- Locate the emergency keyhole cover on the keypad.
- Remove the cover to expose the keyhole.
- Insert an emergency key and turn it while simultaneously turning the knob to open the safe door.
3.2 Battery Installation
The electronic lock requires 4 AA batteries (not included).
- Open the safe door.
- Locate the battery compartment on the inside of the door.
- Insert 4 AA batteries, ensuring correct polarity (+/-).
- Close the battery compartment cover.
3.3 Anchoring the Safe
For enhanced security, it is recommended to anchor the safe to a wall or floor using the provided expansion screws.

Image: A diagram illustrating the three steps for anchoring the safe to a wall. Step 1 shows marking drill points, Step 2 shows drilling and inserting expansion screws, and Step 3 shows securing the safe to the wall.
- Choose a suitable location for the safe, preferably a solid wall or floor.
- Mark the positions for drilling through the pre-drilled holes on the back or bottom of the safe.
- Drill holes in the marked positions using an appropriate drill bit.
- Insert the expansion screws into the drilled holes.
- Align the safe with the screws and secure it tightly.
4. Operating Instructions
4.1 Setting Your Personal Code
Follow these steps to set your personal access code:
- With the safe door open, press the red reset button located on the inside of the door (usually near the hinge).
- The indicator light on the keypad will flash, indicating it's ready for a new code.
- Enter a new personal code (3-8 digits) on the keypad.
- Press the '#' button to confirm. The indicator light will stop flashing, and a beep will confirm the code is set.
- Test the new code with the door open before closing it.
4.2 Opening the Safe
There are three methods to open the safe:
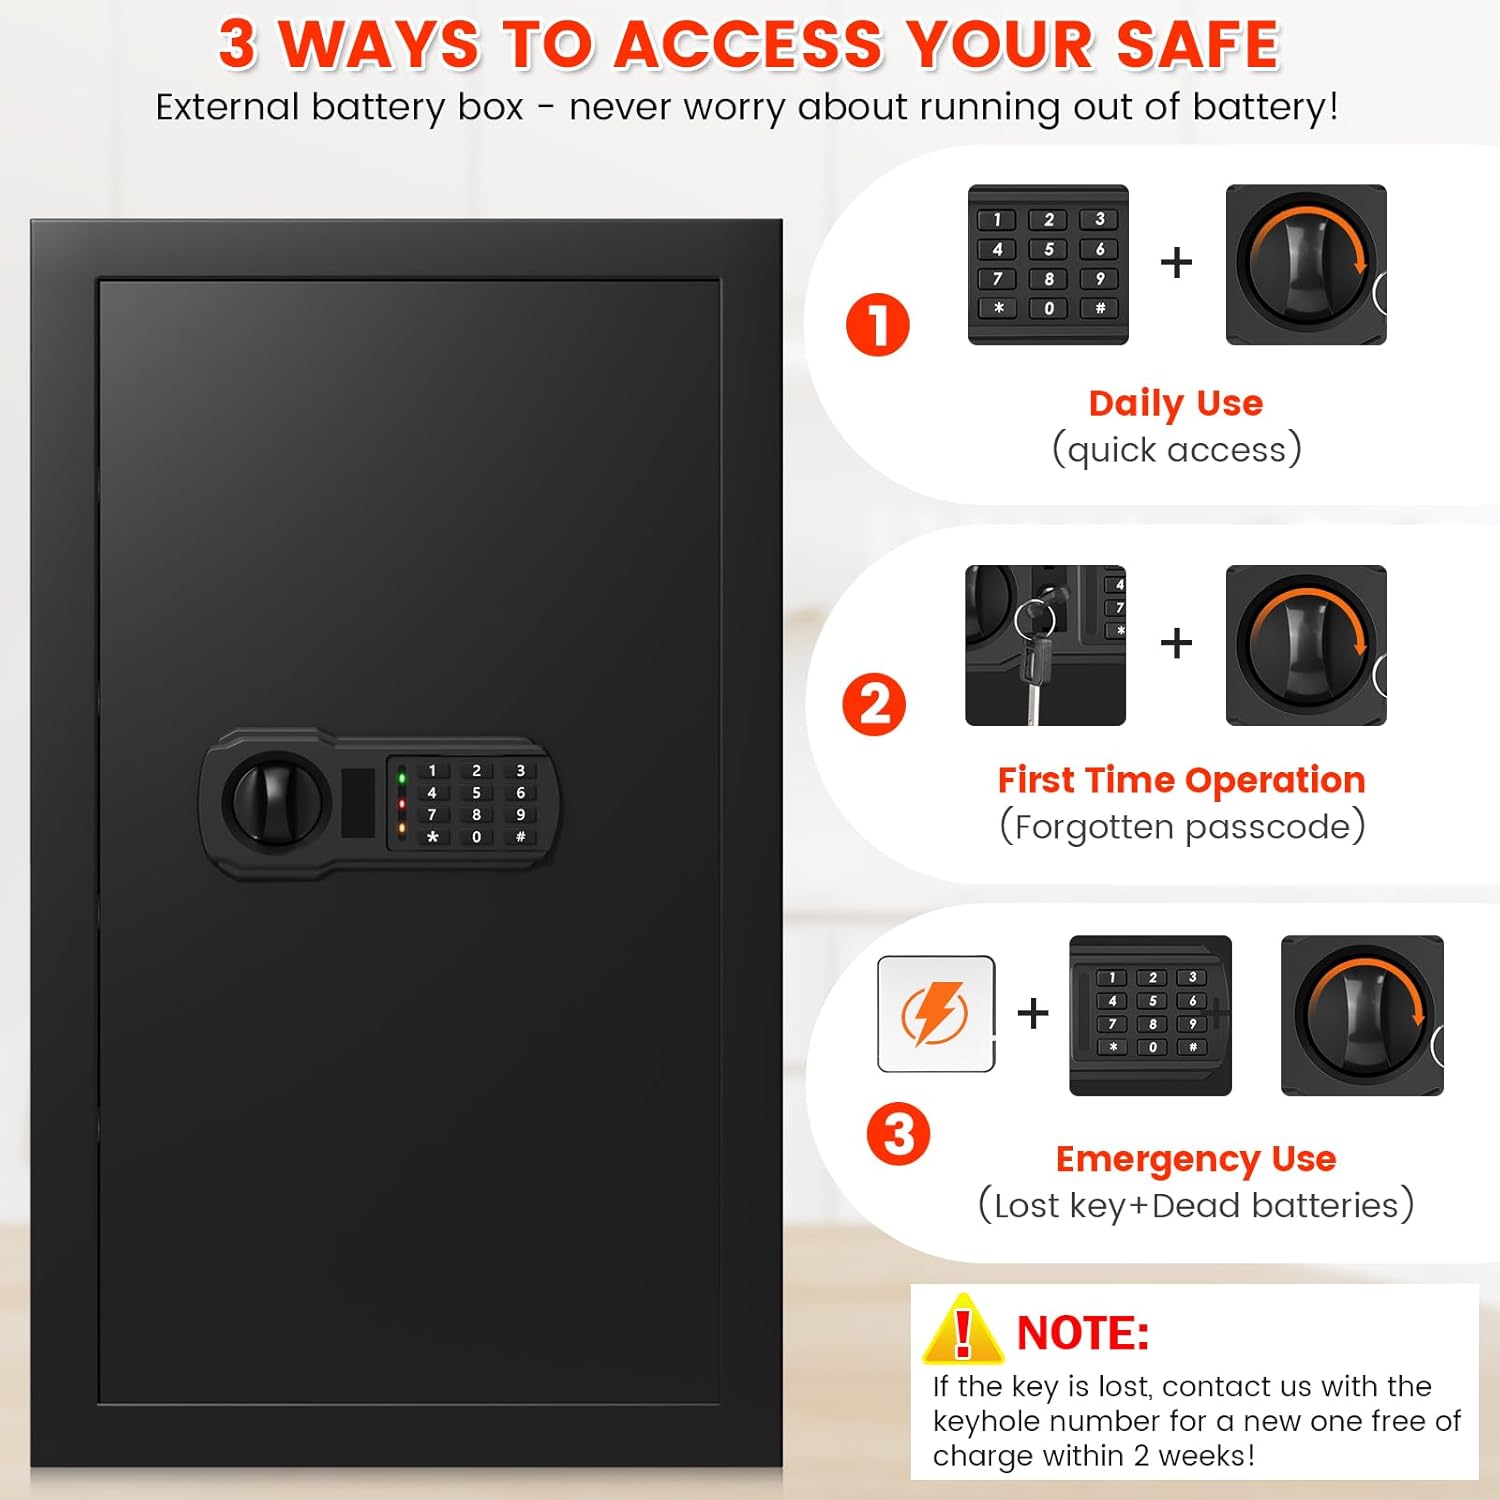
Image: A visual guide detailing the three ways to open the safe: 1) Daily Use with personal code and turning knob, 2) First Time Operation/Forgotten Passcode with emergency keys and turning knob, and 3) Emergency Use with an external battery box, personal code, and turning knob.
- Using Personal Code: Enter your personal code, then press '#' or '*' (depending on model, usually '#'). Turn the knob clockwise within 5 seconds to open the door.
- Using Emergency Keys: If you forget your code or batteries are dead, use the emergency key. Remove the keyhole cover, insert the key, turn it, and simultaneously turn the knob to open.
- Using External Battery Box: If batteries are dead and emergency keys are not readily available, connect the external battery box to the port on the keypad. Then, enter your personal code and turn the knob.
Important: Do not keep emergency keys inside the safe.
4.3 Automatic Alarm and Mute Function
- Alarm Activation: After 3 consecutive incorrect code entries, the lock will temporarily disable, and an alarm will sound for 20 seconds. If more than 3 incorrect entries occur, a 5-minute alarm will be issued.
- Mute Function: To turn off button sounds and alarm sounds, press ‘*633’. To turn sounds back on, press ‘*66’.
4.4 Removable Shelf
The safe includes a removable shelf to help organize contents. It can be adjusted or removed to accommodate larger items.
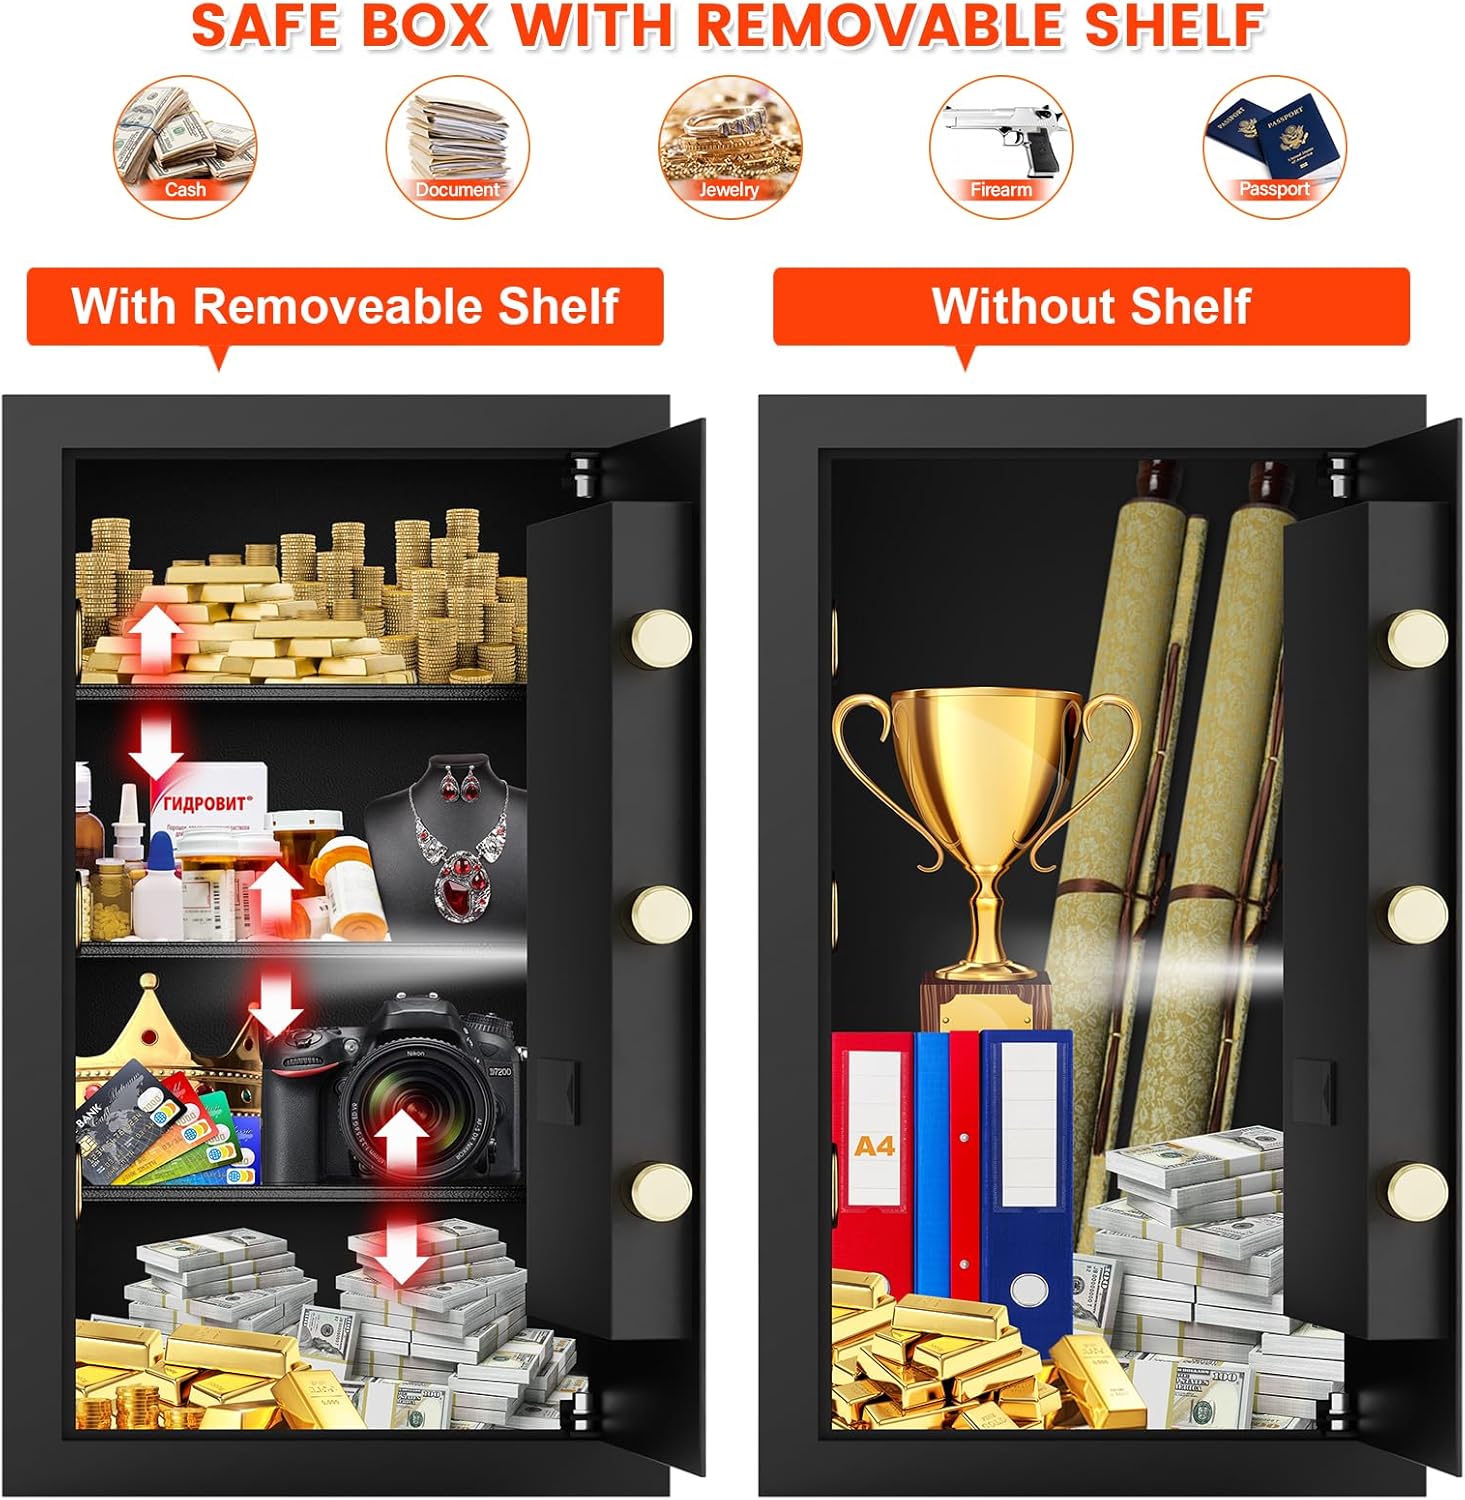
Image: A split image showing the safe's interior. On the left, the safe is shown with the removable shelf installed, organizing smaller items. On the right, the shelf is removed, allowing for storage of taller items like a trophy or rolled documents.
To remove or adjust the shelf, simply lift it and reposition it on the desired supports or remove it completely.
5. Maintenance
5.1 Battery Replacement
When the battery indicator light signals low power, or if the keypad becomes unresponsive, replace the batteries promptly. Follow the battery installation steps in Section 3.2.
5.2 Cleaning
Wipe the exterior of the safe with a soft, damp cloth. Avoid using abrasive cleaners or solvents that could damage the finish or electronic components.
6. Troubleshooting
- Safe will not open with code:
- Ensure batteries are not depleted. Replace if necessary.
- Verify you are entering the correct code.
- Ensure you turn the knob within 5 seconds after entering the code.
- If the code is forgotten, use the emergency keys.
- Keypad is unresponsive:
- Batteries may be dead. Use the external battery box or emergency keys to open, then replace batteries.
- Alarm sounds unexpectedly:
- This indicates multiple incorrect code entries. Wait for the alarm to cease or use the mute function (*633).
- Missing anchoring screws:
- If any components are missing from your package, please contact customer support for assistance.
7. Specifications
| Feature | Detail |
|---|---|
| Brand | Tiskgg |
| Model Number | 65SP |
| Product Dimensions (D x W x H) | 12.2"D x 13.78"W x 25.59"H |
| Lock Type | Electronic Combination Lock |
| Capacity | 4.5 Cubic Feet |
| Material | Alloy Steel |
| Special Feature | Anti-Theft |
| Mounting Type | Wall Mount (anchoring hardware included) |
| Item Weight | 44.7 pounds (20.3 Kilograms) |
| Included Components | Safe, Fireproof Bag, Two Emergency Keys, Four Expansion Screws, Pad Blanket, External Battery Box |
| Batteries Required | Yes (4 AA batteries, not included) |
8. Warranty and Support
Tiskgg provides a 90-day return policy for any unreasonable returns and a lifetime warranty service for the 4.5 Cubic Fireproof Safe Box.
For any questions, concerns, or support needs, please contact Tiskgg customer service. Our team is available to provide assistance.
Please refer to your purchase documentation or the retailer's website for specific contact details.