CWWK CW-N
CWWK N355 Mini PC User Manual
Model: CW-N
1. Introduction
This manual provides comprehensive instructions for the setup, operation, and maintenance of your CWWK N355 Mini PC. Designed for versatility, this compact device serves as a powerful mini PC and a Pocket NAS solution, ideal for home labs, offices, and mobile computing needs. Please read this manual thoroughly before using the device to ensure optimal performance and longevity.

Figure 1: CWWK N355 Mini PC, showcasing its compact design and various ports including USB, HDMI, and Ethernet.
2. Product Overview and Features
The CWWK N355 Mini PC is engineered for high performance in a small form factor, featuring advanced components and versatile connectivity options.
2.1 Key Components and Architecture
- Processor: Equipped with the Intel Twin Lake N355 processor (an upgrade from N305), featuring 8 cores and 8 threads, boosting up to 3.9 GHz with 6 MB cache. This processor is designed for handling complex and demanding tasks efficiently.
- Memory: Features one SO-DIMM DDR5 slot, supporting up to 48GB of 4800MHz RAM for high-speed data processing.
- Storage: Includes four M.2 2280 NVMe (PCIe3.0 x1) slots for high-speed SSD storage. Additionally, two non-standard 12-pin SATA 3.0 ports are available for external SATA SSD/HDD connections via adapter cables.
- Network: Two Intel i226-V 2.5GbE LAN controllers provide high-speed network connectivity, suitable for NAS applications and virtualization platforms.
- Display: Integrated UHD Graphics (1.35 GHz, 32 EU) with hardware decoding support for 4K video. Two HDMI 2.0 ports support dual display output up to 4K @ 60 Hz.
- Connectivity: Two USB 3.2 Type-A ports (10 Gbps) for data transfer and peripherals. An internal M.2 E-Key slot allows for Wi-Fi 7/BT 5.4 wireless card expansion.

Figure 2: Diagram illustrating the Intel Twin Lake N355 Processor, highlighting its 8 cores, 8 threads, and up to 3.9GHz clock speed.

Figure 3: View of the CWWK Mini PC with the top cover removed, showing the four M.2 NVMe slots for SSD installation.
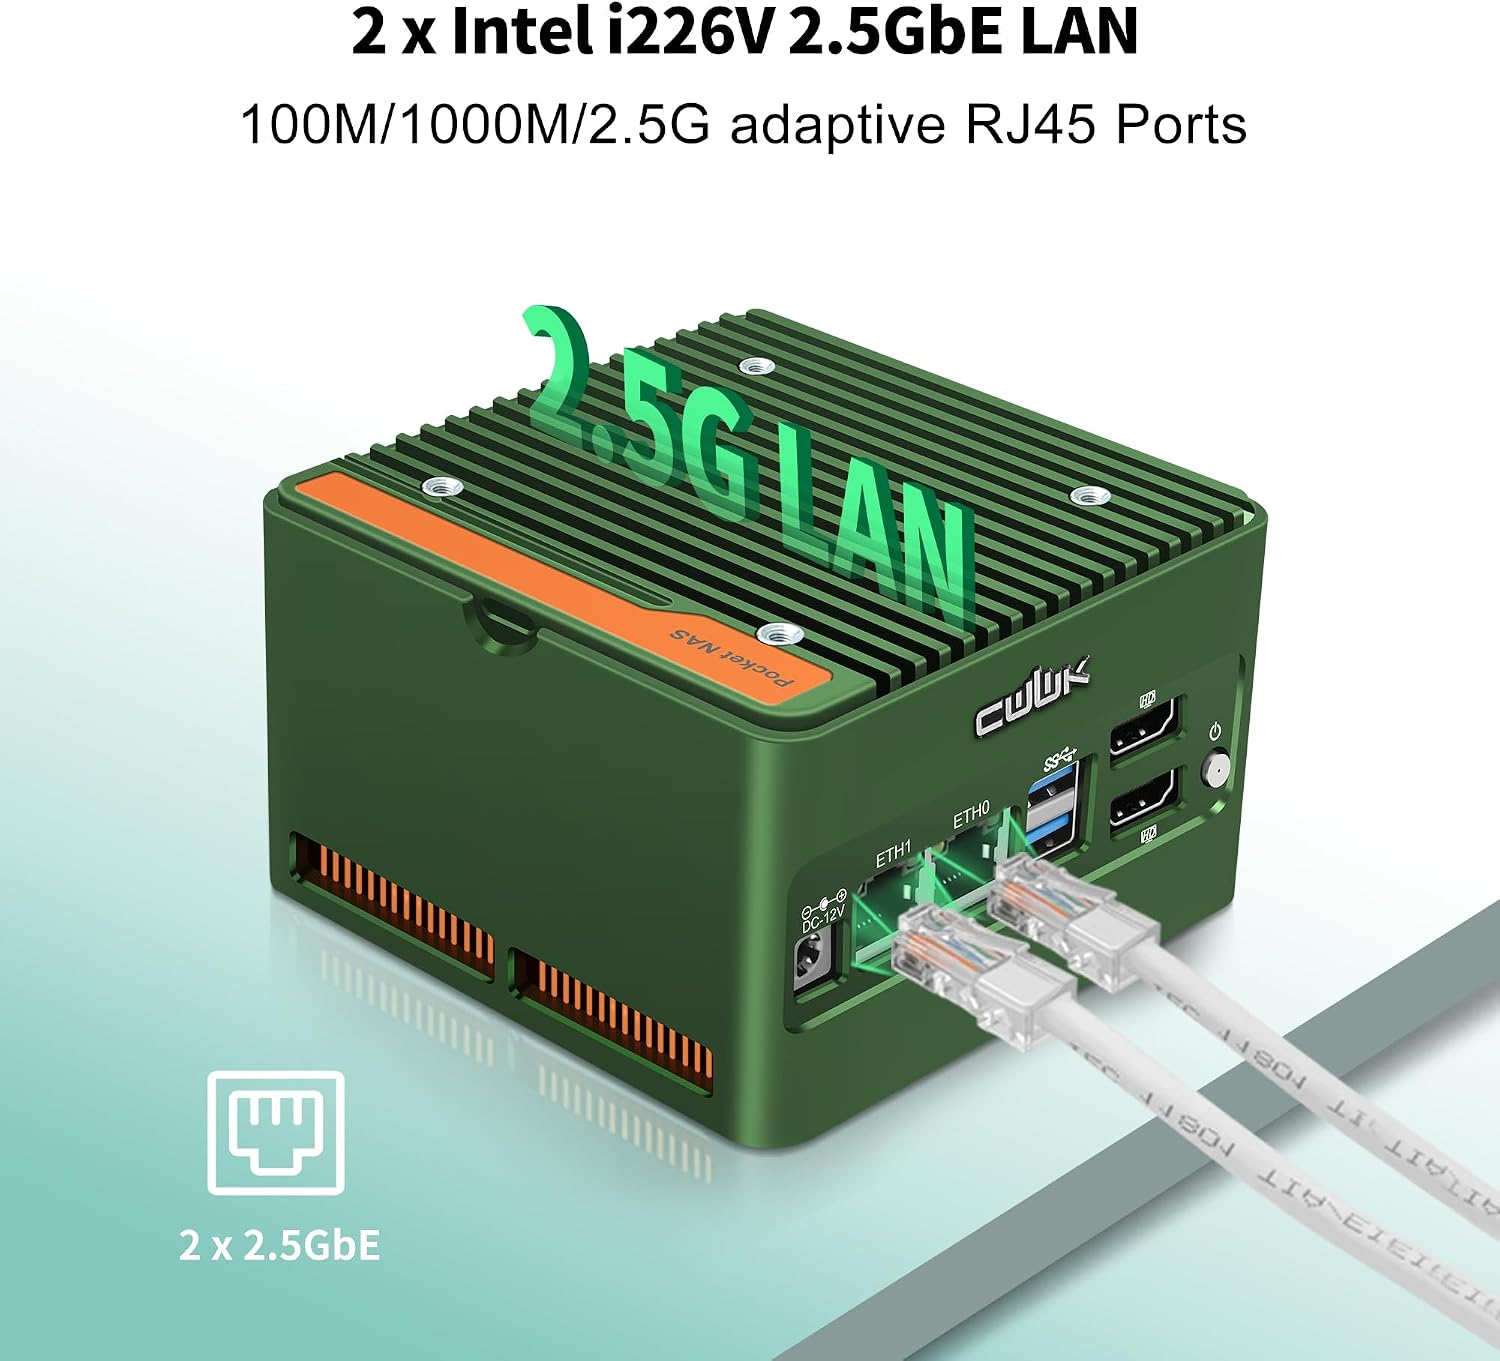
Figure 4: Close-up of the two Intel i226-V 2.5GbE LAN ports, emphasizing high-speed network capabilities.
3. Setup Guide
3.1 Unboxing and Initial Inspection
Carefully remove all components from the packaging. Verify that the following items are included:
- CWWK X86-P5 Mini PC
- Power Adapter (12V DC)
- USB 7015 Fan (optional, for additional cooling)
- Fan Cover
- NVMe SSD Thermal Pads
- Screws
3.2 Hardware Installation (RAM and SSD)
The device may come with pre-installed RAM and SSD, or as a barebones unit. Follow these steps for installation or upgrade:
- Accessing Internals: The top cover of the aluminum casing is freely removable. Gently lift or slide it off to expose the internal components. Refer to Figure 5 for an exploded view of the product structure.
- RAM Installation: Locate the single SO-DIMM DDR5 slot. Insert the RAM module firmly until the clips on both sides snap into place.
- NVMe SSD Installation: Identify the four M.2 2280 NVMe slots. Insert your NVMe SSDs into the slots at an angle, then gently push down and secure with the provided screws. Apply thermal pads to the SSDs before securing the top cover for optimal heat dissipation.
- Optional WiFi/BT Module: If expanding with a wireless card, locate the M.2 E-Key slot. Insert the WiFi/BT module and connect any necessary antenna cables (antennas typically sold separately). Refer to Figure 6.

Figure 5: Exploded view showing the various components of the CWWK Mini PC, including the mainboard, M.2 backplane, and cooling elements.

Figure 6: Internal view of the Mini PC, highlighting the M.2 E-Key slot for WiFi/Bluetooth module expansion.
3.3 Connecting Peripherals
Before powering on, connect your essential peripherals:
- Display: Connect your monitor(s) to the HDMI ports. The device supports dual 4K @ 60Hz displays.
- Network: Connect Ethernet cables to the 2.5GbE LAN ports for wired network access.
- USB Devices: Connect your keyboard, mouse, and other USB devices to the USB 3.2 Type-A ports.
- Power: Connect the 12V DC power adapter to the DC-in port.
4. Operating Instructions
4.1 Powering On and Initial Boot
After connecting all necessary hardware and peripherals, press the power button located on the front panel. The device is pre-installed with Windows 11 Pro, or you can install your preferred operating system such as PVE, EXSi, Linux, TrueNAS, Unraid, or Ubuntu.
Note: On first boot after connecting power, some users have reported that the monitor may not immediately display. If this occurs, try pressing the power button again or ensure all display cables are securely connected.
4.2 Display Configuration
The Mini PC supports dual display output. Once the operating system loads, you can configure your display settings to extend or duplicate your desktop across two monitors. Refer to your operating system's display settings for detailed configuration options.

Figure 7: Example of a dual monitor setup connected to the CWWK Mini PC, demonstrating its multi-display capability.
4.3 Network Attached Storage (NAS) Functionality
With its multiple M.2 NVMe slots and 2.5GbE LAN ports, the CWWK Mini PC is well-suited for Network Attached Storage (NAS) applications. You can install open-source NAS operating systems like TrueNAS or Unraid to create a robust home server for data storage, media streaming, and virtualization.
4.4 Advanced Features
- AES-NI Support: Enhances data encryption and decryption performance.
- Auto Power On: Configurable to automatically power on after a power outage.
- Wake-on-LAN (WoL): Allows the device to be powered on remotely over a network.
- PXE Boot: Enables booting from a network server.
- Power Management: Advanced power saving features.
5. Maintenance
5.1 Cooling and Airflow
The CWWK Mini PC features an all-aluminum casing for efficient heat dissipation. An optional USB 7015 fan is included for additional cooling, especially during prolonged heavy loads. Ensure proper airflow around the device and keep ventilation grilles clear of obstructions.
5.2 Cleaning
Regularly clean the exterior of the device with a soft, dry cloth. If dust accumulates inside, especially on the fan or heatsink, carefully open the top cover and use compressed air to remove dust. Ensure the device is powered off and unplugged before cleaning internal components.
5.3 Component Upgrades
RAM and NVMe SSDs can be upgraded. Always use compatible components (DDR5 SO-DIMM RAM, M.2 2280 NVMe SSDs). Refer to Section 3.2 for installation guidance. When upgrading, ensure the device is powered off and unplugged to prevent damage.
6. Troubleshooting
This section addresses common issues you might encounter with your CWWK Mini PC.
| Problem | Possible Cause | Solution |
|---|---|---|
| No display on monitor after power on. | Loose HDMI cable, monitor input not selected, or initial boot display issue. |
|
| Device does not power on. | Power adapter not connected, faulty power outlet, or internal power issue. |
|
| Network connection issues. | Loose Ethernet cable, incorrect network settings, or router issue. |
|
| System performance is slow. | Insufficient RAM, high CPU usage, or overheating. |
|
7. Specifications
Detailed technical specifications for the CWWK N355 Mini PC (Model: CW-N).
| Feature | Description |
|---|---|
| Brand | CWWK |
| Model Number | CW-N |
| CPU Options | Intel Twin Lake N355 (8 Cores, 8 Threads, up to 3.9 GHz, 6MB Cache, TDP 9-15W) |
| RAM | 1x SO-DIMM DDR5 slot, up to 48GB (max. 4800 MHz) |
| Storage | 4x M.2 2280 NVMe (PCIe3.0 x1) slots, 2x non-standard 12-pin SATA3.0 ports |
| Network Controller | 2x Intel i226-V 2.5GbE LAN |
| Display Ports | 2x HDMI 2.0, supports up to 4K @ 60 Hz |
| USB Ports | 2x USB 3.2 Type-A (10 Gbps) |
| Internal Pins | USB 2.0, COM pin, GPIO pin, Auto Power On cap |
| Wireless Expansion | 1x M.2 E-Key slot for WiFi7/BT5.4 (module sold separately) |
| Chassis | Full aluminum casing, removable top cover |
| Cooling | Pure copper CPU contact, optional USB 7015 fan (included) |
| Power Supply | 12V DC |
| Operating Temperature | -10 °C ~ 70 °C |
| Dimensions (L x W x H) | 11 x 10 x 3.5 cm (4.33 x 3.94 x 1.38 inches) |
| Weight | 1.2 kg (2.65 lbs) |
| Operating System (Pre-installed) | Windows 11 Pro (Supports PVE, EXSi, Linux/TrueNAS/Unraid/Ubuntu) |
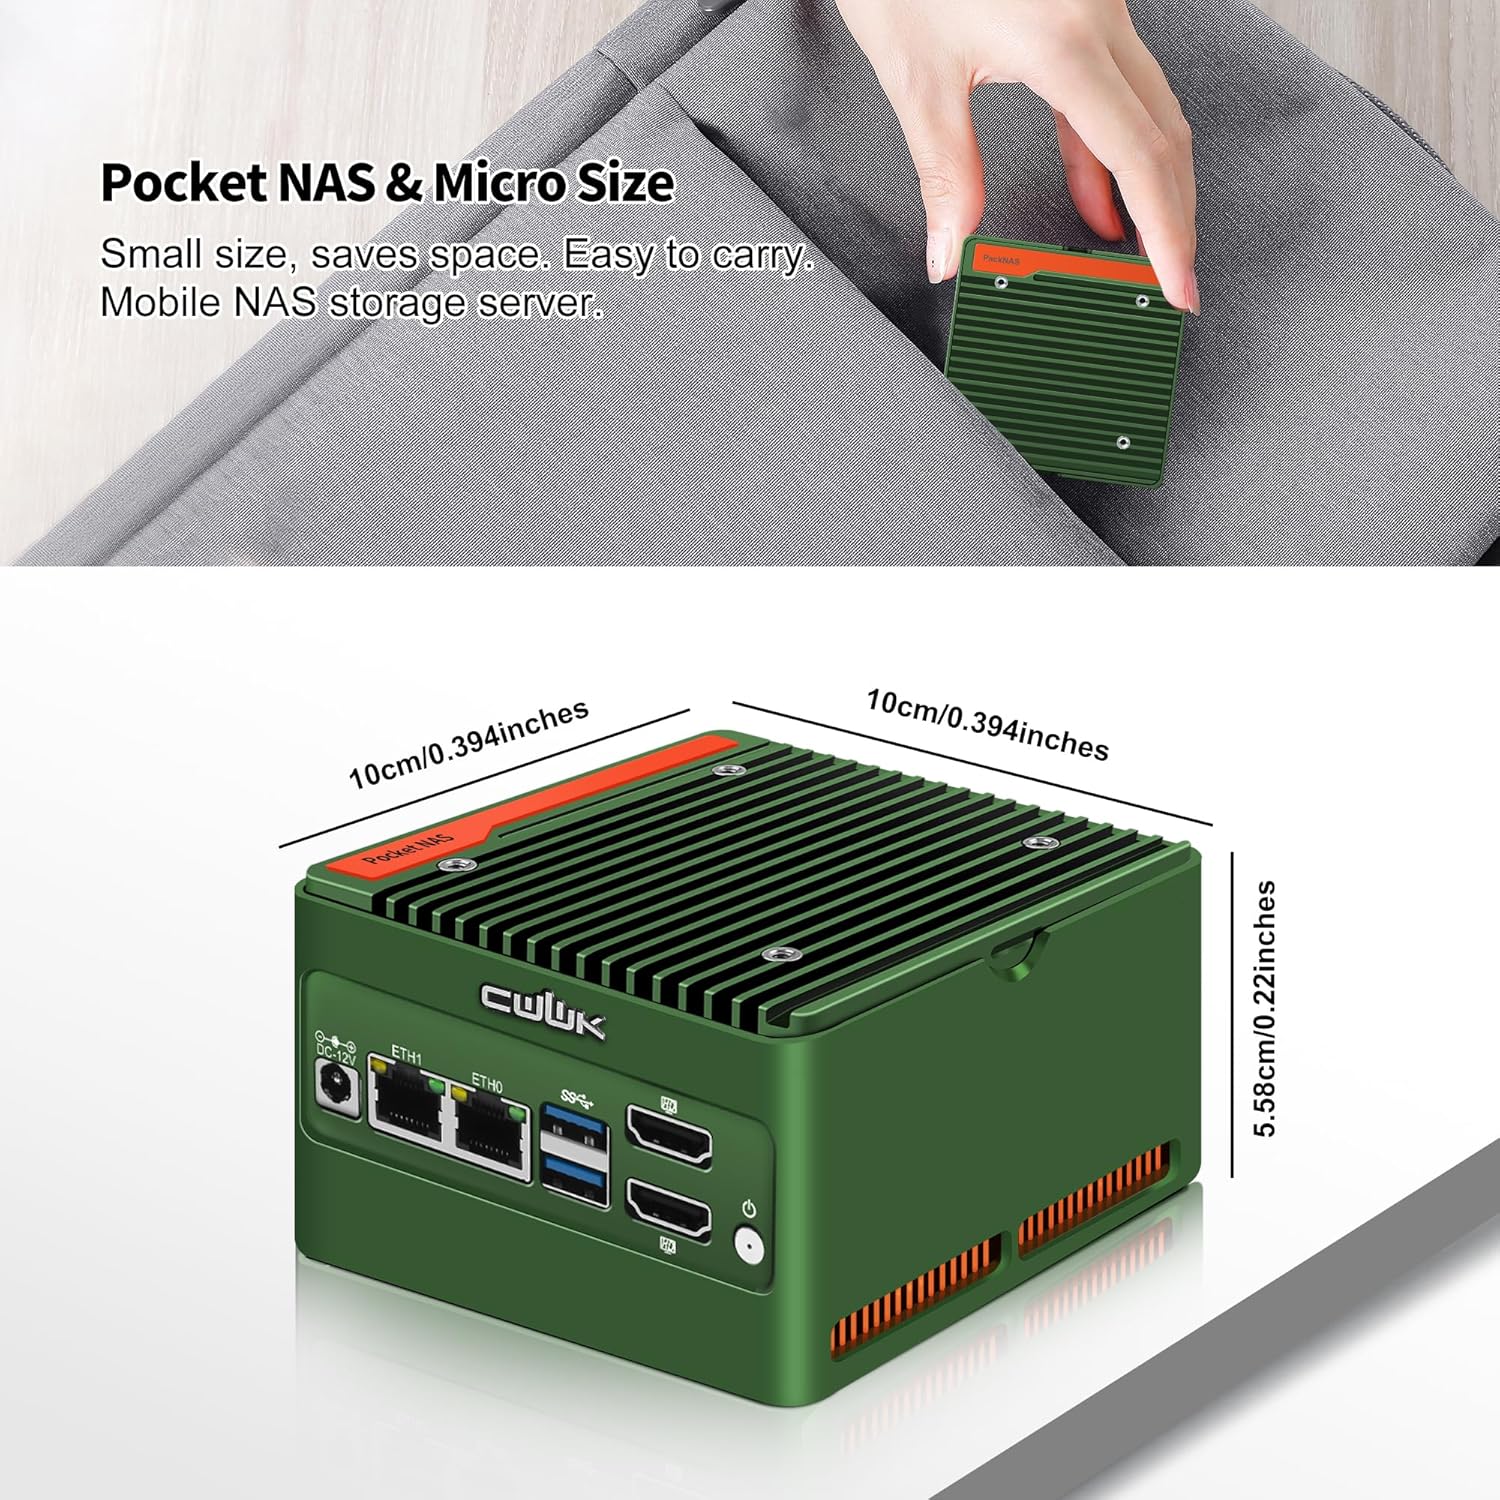
Figure 8: The compact size of the CWWK Mini PC, demonstrating its portability and small footprint.
8. Warranty and Support
CWWK is committed to providing quality products and customer service. While specific warranty details are not provided in this document, official support and documentation are available.
- Official Support: For the latest product manual, driver files, and other related documents, please visit the official CWWK website.
- Customer Service: If you encounter any issues or have questions not covered in this manual, please contact CWWK customer service through their official channels.
Ask a question about this manual
Ask about setup, troubleshooting, compatibility, parts, safety, or missing instructions. Manuals+ will review the question and use this page’s manual context to help answer it.