1. Introduction
This manual provides detailed instructions for the installation, setup, operation, and maintenance of your Generic Smart Door Lock with Biometric Fingerprint and Camera Monitoring, Model B0DZCG45SD. Please read this manual thoroughly before installation and use to ensure proper function and safety.
2. Product Overview
2.1. Package Contents
Verify that all components are present in the package:
- Front panel x 1
- Rear panel x 1
- Mortise lock x 1
- Smart card x 5
- M1 Wristbands x 2
- Mechanical Key x 2
- Screw Kit x 1
2.2. Key Features
- Multiple Unlocking Modes: App, M1 Card, Fingerprint, Passcode, Wristband, or Mechanical Key.
- Biometric Fingerprint Recognition: Semiconductor fingerprint technology with AI smart algorithm for accurate and fast recognition.
- Camera Monitoring: Integrated camera for visual monitoring.
- Tuya Compatibility: View access logs and manage settings via the Tuya app.
- Free Handle Design: Prevents violent unlocking attempts and extends motor service life.
- Virtual Passcode: Anti-peeping function for secure passcode entry.
- Anti-Electromagnetic Attack: Designed to resist electromagnetic interference.
- Normal Open Mode Support: Allows the door to remain unlocked for convenience.
2.3. Product Components and Dimensions
Familiarize yourself with the main components of the smart door lock.

Image Description: This diagram illustrates the various components of the smart door lock. On the front panel (left), labels point to the Battery Box, Display Screen, Control Button, Anti-lock Button, and Micro USB Charging Port. On the rear panel (right), labels indicate the Night Vision Camera, Touch Keypad, Card Sensing Area, Doorbell Button, Fingerprint Reader, and Mechanical Key Hole. The overall height of the lock is indicated as 370mm, and the width of each panel is 75mm.

Image Description: A view of the smart door lock's exterior and interior panels. The exterior panel (left) features a display screen, a camera, and a handle. The interior panel (right) includes a numeric keypad, a fingerprint reader integrated into the handle, and a mechanical keyhole cover. The lock has a metallic, possibly copper or bronze, finish.
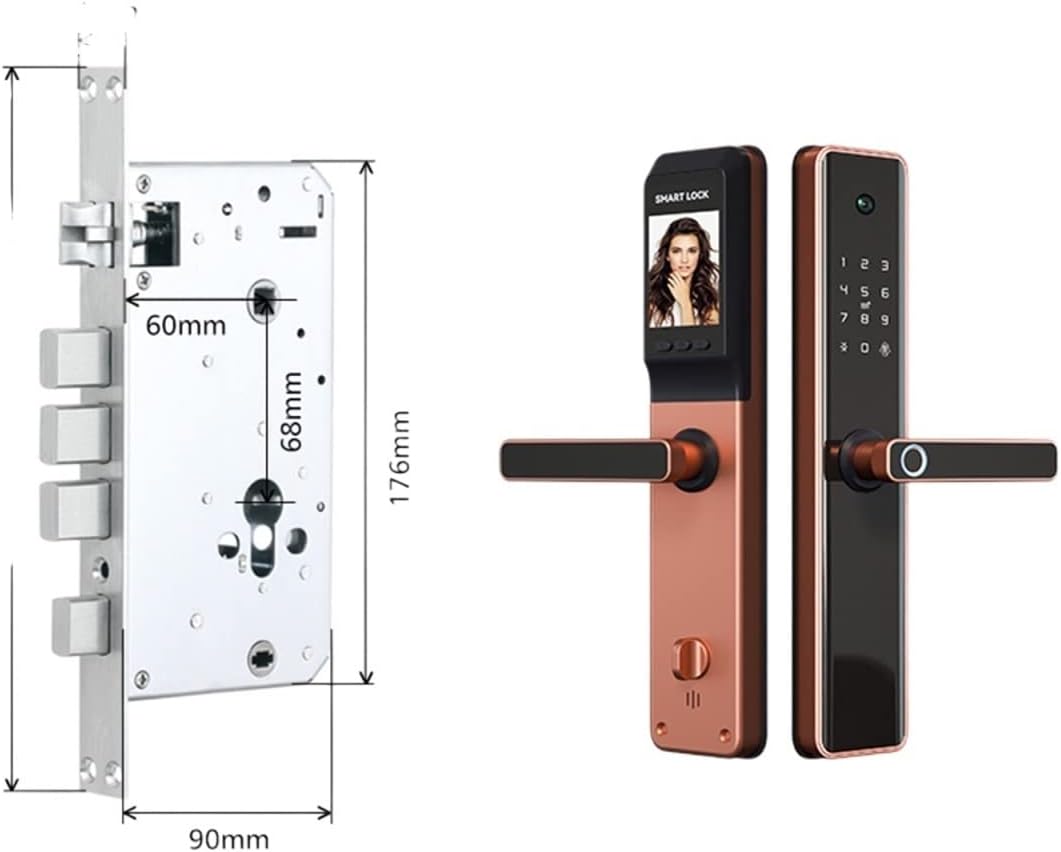
Image Description: This image displays the dimensions of the mortise lock body and the smart door lock panels. The mortise lock body has a height of 176mm, a width of 90mm, and a backset of 60mm. The smart lock panels are shown alongside, providing a visual reference for their size relative to the mortise.

Image Description: This image presents two types of C-class anti-theft lock bodies. On the left is a "Cylindrical lock body" with dimensions 30x240. On the right is a "Square lock body" with dimensions 24x240. These are internal components of the lock mechanism.
3. Installation Guide
3.1. Door Preparation
Ensure your door meets the following specifications for proper installation:
- Suitable Door Thickness: 45mm to 120mm.
- Door Direction: Universal Left/Right direction, adjustable during installation.
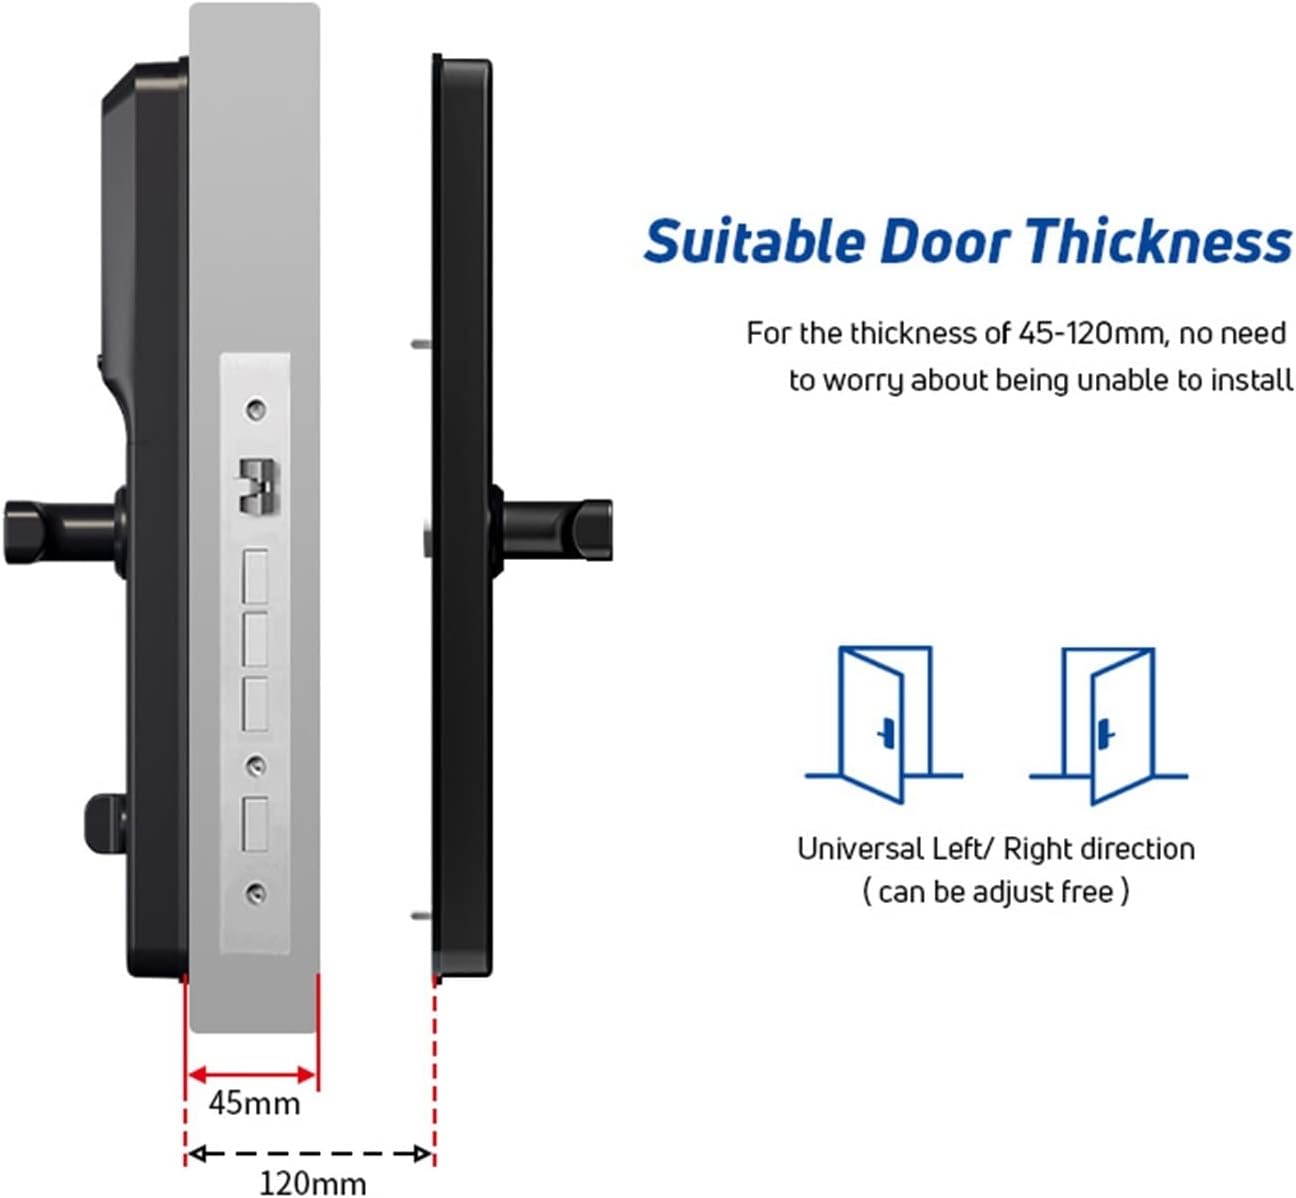
Image Description: This image shows the recommended door thickness for installation, ranging from 45mm to 120mm. It also indicates that the lock supports universal left/right door directions, meaning it can be adjusted to fit either orientation.
3.2. Mortise Installation
- Prepare the mortise cutout in the door according to the provided template (not included in this manual, refer to packaging).
- Insert the mortise lock body into the prepared cutout.
- Secure the mortise lock body with screws from the screw kit.
3.3. Panel Installation
- Connect the cables from the front panel to the rear panel through the door.
- Align the front panel with the mortise and secure it to the door.
- Align the rear panel with the mortise and connect the cables.
- Secure the rear panel to the door using the remaining screws.
- Ensure handles operate smoothly and the latch retracts and extends correctly.
Note: If your mortise requires upper and lower hooks, ensure you have the correct mortise type. If not needed, specify "no hooks" when ordering.
4. Operating Instructions
4.1. Initial Setup and App Connection
- Install the Tuya Smart app on your smartphone.
- Create an account or log in.
- Follow the in-app instructions to add your smart door lock. This typically involves putting the lock into pairing mode (refer to the lock's display or control button instructions) and connecting it to your Wi-Fi network.
- Once connected, you can manage users, view access logs, and configure settings via the app.
4.2. Unlocking Methods
- Fingerprint Unlocking:
- Register your fingerprint via the app or directly on the lock's keypad/display.
- Place your registered finger on the fingerprint reader. The lock will unlock if recognized.
- Passcode Unlocking:
- Enter your registered passcode on the touch keypad.
- To use the anti-peeping virtual passcode feature, you can enter a sequence like [random numbers] + [correct passcode] + [random numbers]. As long as the correct passcode is embedded, the lock will recognize it.
- Press '#' or 'Enter' (if available) to confirm.
- M1 Card/Wristband Unlocking:
- Register your M1 card or wristband via the app or lock interface.
- Place the registered card or wristband on the card sensing area. The lock will unlock.
- App Unlocking:
- Open the Tuya Smart app on your smartphone.
- Select your smart lock and follow the prompts to unlock remotely.
- Mechanical Key Unlocking:
- Insert the mechanical key into the keyhole (usually located under a cover on the rear panel).
- Turn the key to unlock the door. This method is primarily for emergency access.
4.3. Locking the Door
The lock typically auto-locks after a set period once the door is closed. You can also manually lock it by lifting the handle (if applicable) or through the app.
4.4. Normal Open Mode
If enabled, the Normal Open Mode allows the door to remain unlocked for extended periods. Refer to the Tuya app or the lock's settings menu for instructions on how to activate and deactivate this mode.
5. Maintenance
- Cleaning: Wipe the lock's surface with a soft, dry cloth. Avoid abrasive cleaners or solvents that may damage the finish or electronic components.
- Battery Replacement: The lock is powered by batteries (not included, but typically AA batteries). Replace batteries when the low battery indicator appears on the display or in the app. Use high-quality alkaline batteries.
- Firmware Updates: Regularly check the Tuya Smart app for available firmware updates to ensure optimal performance and security.
- Fingerprint Sensor: Keep the fingerprint sensor clean and dry for accurate readings.
6. Troubleshooting
| Problem | Possible Cause | Solution |
|---|---|---|
| Lock not responding | Low batteries; power failure. | Replace batteries. Use mechanical key for emergency access. |
| Fingerprint not recognized | Fingerprint sensor dirty; finger wet/damaged; unregistered fingerprint. | Clean sensor. Ensure finger is clean and dry. Re-register fingerprint or use another unlocking method. |
| Passcode not working | Incorrect passcode entered; keypad malfunction. | Verify passcode. Try virtual passcode method. If issue persists, use app or mechanical key. |
| App connection issues | Wi-Fi signal weak; lock not paired; app outdated. | Check Wi-Fi router. Re-pair lock with app. Update Tuya Smart app. |
| Lock makes unusual noises | Mechanical obstruction; internal component issue. | Check for obstructions around the latch/bolt. If noises persist, contact customer support. |
7. Specifications
- Model: B0DZCG45SD
- Brand: Generic
- Unlocking Methods: App, M1 Card, Fingerprint, Passcode, Wristband, Mechanical Key
- Compatible App: Tuya Smart
- Door Thickness Compatibility: 45mm - 120mm
- Mortise Type: Multi-protection mortise (various types available, e.g., Square Latch)
- Power Source: Batteries (not included, typically AA)
8. Warranty and Support
For warranty information and technical support, please refer to the product packaging or contact the retailer from whom you purchased this device. You may also visit the manufacturer's website for further assistance.
Please have your product model number (B0DZCG45SD) and purchase date available when contacting support.