1. Introduction
Thank you for choosing the BrilMaison 18-Inch Outdoor Ceiling Fan with Light. This product is designed to provide optimal air circulation and lighting for various indoor and outdoor environments, including patios, gazebos, porches, and garages. Featuring smart app and remote control, 6 fan speeds, and 3 adjustable color temperatures, this fan offers versatile comfort and convenience. Its IP65 waterproof rating ensures durability and safe operation in diverse weather conditions.
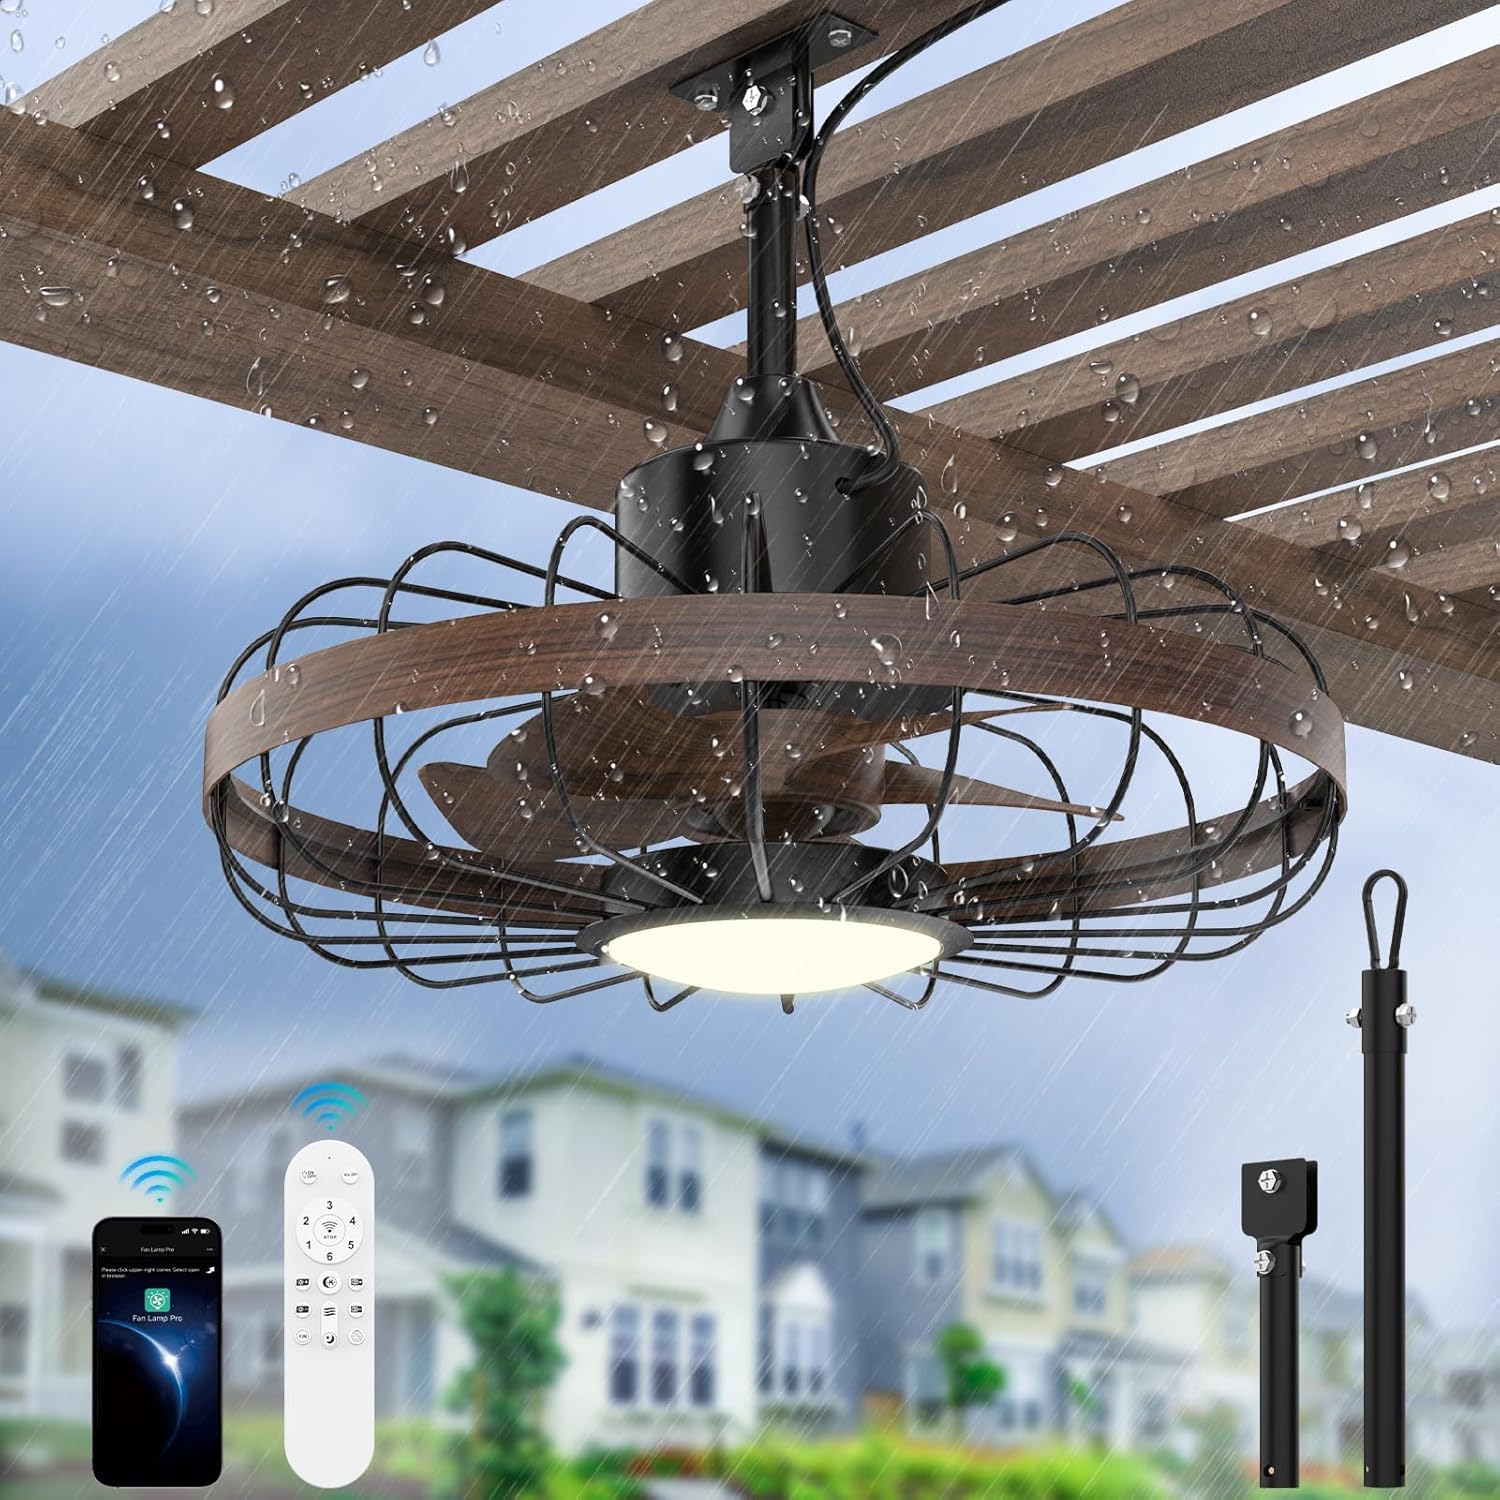
Figure 1.1: BrilMaison 18-inch Outdoor Ceiling Fan with Light.

Figure 1.2: IP65 All-Weather Durability and Smart Control Features.
This manual provides detailed instructions for installation, operation, maintenance, and troubleshooting to ensure you get the most out of your new ceiling fan. Please read this manual thoroughly before installation and use, and retain it for future reference.
2. Important Safety Information
Always follow basic safety precautions when installing and operating electrical appliances to reduce the risk of fire, electric shock, and personal injury.
- Read all instructions: Before beginning installation, carefully read and understand all instructions provided in this manual.
- Electrical Safety: Ensure the power supply is disconnected at the circuit breaker before installation or servicing. All wiring must be in accordance with national and local electrical codes.
- Qualified Electrician: If you are unsure about wiring or installation, consult a qualified electrician.
- Mounting Surface: The mounting surface must be capable of supporting the weight of the fan (approximately 12 lbs) and its accessories.
- Clearance: Maintain a minimum clearance of 2.3 meters (7.5 feet) from the floor to the bottom of the fan blades. Ensure there is adequate clearance from walls and other obstructions.
- Blade Safety: Do not insert any objects into the path of the fan blades while the fan is operating.
- Water Exposure: While the fan is IP65 rated for outdoor use, ensure all electrical connections are properly sealed and protected from direct water spray or submersion.
- Cleaning: Always turn off the fan and disconnect power before cleaning.
3. Package Contents
Verify that all components are present and undamaged before proceeding with installation. If any parts are missing or damaged, contact customer service.

Figure 3.1: Product Overview and Functions.
- Ceiling Fan Unit (with integrated light)
- Remote Control
- 6-inch Downrod
- 12-inch Downrod
- Mounting Bracket
- Hardware Kit (screws, washers, wire nuts)
- User Manual (this document)
- 5-meter UL-certified power cord (pre-installed)
4. Product Specifications
| Feature | Specification |
|---|---|
| Brand | BrilMaison |
| Model Name | FL72801W-AMZUS |
| Dimensions | 12"D x 18"W x 18"H |
| Item Weight | 12 Pounds |
| Color | Black+Walnut |
| Power Source | DC |
| Voltage | 110 Volts |
| Wattage | 55 watts |
| Noise Level | ≤28 dB (Ultra-Quiet) |
| Fan Speeds | 6 Levels |
| Airflow | Up to 4000 CFM |
| Light Color Temperatures | 3000K (Warm White), 4000K (Neutral), 6000K (Cool White) |
| Dimming Range | 10% to 100% |
| Control Method | Remote Control, Bluetooth APP (iOS/Android) |
| Waterproof Rating | IP65 |
| Downrod Lengths Included | 6 inches, 12 inches |
| Max Angled Ceiling Tilt | 15° |
| Power Cord Length | 5 meters (16.4 feet) |
| Indoor/Outdoor Usage | Indoor, Outdoor |
5. Installation Guide
The BrilMaison ceiling fan is designed for easy installation, typically completed within 30 minutes without the need for an electrician. Ensure power is OFF at the circuit breaker before starting.
5.1 Pre-Installation Checklist
- Verify all package contents are present.
- Ensure the mounting location is structurally sound and can support the fan's weight.
- Confirm the distance from the floor to the fan blades will be at least 2.3 meters (7.5 feet).
- Turn off power to the installation area at the main circuit breaker.
5.2 Step-by-Step Installation

Figure 5.1: Easy Installation in 6 Steps.
- Step 1: Turn off Power. Locate the circuit breaker for the installation area and turn off the power. Ensure the switch for the fan's intended location is also off.
- Step 2: Mount the Junction Box. Secure the mounting bracket to a suitable electrical outlet box or wood ceiling joist using appropriate screws and lock washers. Ensure it is firmly attached.
- Step 3: Install the Downrod. Select either the 6-inch or 12-inch downrod based on your ceiling height and desired fan position. Attach the chosen downrod to the fan motor assembly, ensuring the safety needle is inserted correctly.
- Step 4: Hang the Fan. There are two options for hanging: using a fixed clamp for direct mounting or a carabiner for easier detachment. Securely hang the fan assembly to the mounting bracket.
- Step 5: Wiring and Light Installation. Connect the pre-installed 5-meter power cord to your power source. Ensure all connections are secure. The light is integrated and will function once power is restored.
- Step 6: Finish Assembly. Once wired and securely hung, ensure all components are properly aligned and tightened. Restore power at the circuit breaker.
5.3 Downrod and Mounting Options

Figure 5.2: Two Replaceable Downrods and Power Cord.

Figure 5.3: Two Mounting Options.
The fan includes both a 6-inch and a 12-inch downrod to accommodate different ceiling heights. For angled ceilings, the fan can be tilted up to 15 degrees. The pre-installed 5-meter (16.4 feet) power cord provides ample length for flexible installation without needing extension cords.
6. Operating Instructions
Your BrilMaison ceiling fan can be controlled via the included remote control or a dedicated Bluetooth mobile application.
6.1 Smart Control: APP & Remote

Figure 6.1: App and Remote Control Interface.
6.1.1 Mobile APP Control
To use the mobile app:
- Scan the QR code provided in the product packaging or on the fan's control module to download the 'Fan Lamp Pro' app. A direct link is also available at https://www.jasonghost.com/fanlamppro/.
- Install the app on your iOS or Android device.
- Open the app and follow the on-screen instructions to add your device. Ensure Bluetooth is enabled on your phone.
- Once connected, you can control fan speed, light brightness, color temperature, set timers, and switch wind modes.
6.1.2 Remote Control
The remote control allows direct access to all fan and light functions:
- ON/OFF: Power the fan and light on or off.
- Fan Speed: Adjust between 6 speed settings (1-6).
- Light ON/OFF: Turn the light on or off independently.
- Brightness +/-: Adjust light brightness from 10% to 100%.
- Color Temperature +/-: Cycle through 3000K, 4000K, and 6000K.
- Night Light: Activate a subtle illumination mode.
- Forward/Reverse: Change fan direction for summer/winter mode.
- Natural Wind: Simulates varying natural breezes.
- Timer: Set automatic shut-off for 1, 2, 4, or 8 hours (via app) or 2 hours (via remote).
6.2 Fan Functions

Figure 6.2: 6-Speed Settings for Optimal Comfort.

Figure 6.3: Fan Speed Recommendations for Various Activities.
- 6 Speed Settings: Choose from gentle breeze (1-2), natural wind (3-4), or powerful cooling (5-6) to suit your comfort needs.
- Reversible Mode: The fan features a reversible DC motor for year-round use. In summer, forward mode creates a downward airflow for cooling. In winter, reverse mode circulates warm air upwards, helping to distribute heat evenly.

Figure 6.4: Reversible Mode for Year-Round Comfort.
6.3 Light Functions

Figure 6.5: Dimmable Light and Color Temperature Options.

Figure 6.6: Detailed Light Color and Dimming Control.
- 3 Color Temperatures: Easily switch between 3000K (warm white), 4000K (neutral white), and 6000K (cool white) to match your ambiance.
- Stepless Dimming: Adjust the light brightness from 10% to 100% to create the perfect illumination level.
- Night Light Mode: Activate a subtle, low-brightness setting ideal for nighttime use.
6.4 Timer Function

Figure 6.7: Intelligent Timing Options.
Set the fan to automatically turn off after a specified period. The mobile app allows for 1, 2, 4, or 8-hour timer settings, while the remote control offers a 2-hour timer option.
7. Maintenance
Regular maintenance ensures the longevity and optimal performance of your BrilMaison ceiling fan. Always turn off the power at the circuit breaker before performing any maintenance.
- Cleaning: Use a soft, damp cloth to wipe down the fan's exterior. Do not use abrasive cleaners or solvents, as they may damage the finish. For the light cover, gently wipe with a dry or slightly damp cloth.
- Blade Cleaning: Periodically clean the fan blades to prevent dust buildup, which can affect performance and balance.
- Inspection: Annually inspect all connections and mounting hardware to ensure they remain secure.
- Motor: The DC motor is designed for long-term, maintenance-free operation. Do not attempt to lubricate or disassemble the motor.
- Storage (if applicable): If storing the fan for extended periods, especially in harsh winter conditions, detach it and store it in a dry, protected area.
8. Troubleshooting
If you encounter issues with your fan, refer to the following common problems and solutions. If the problem persists, contact customer support.
| Problem | Possible Cause | Solution |
|---|---|---|
| Fan does not turn on | No power supply Loose wiring connection Remote control battery low/dead | Check circuit breaker and wall switch. Ensure all wiring connections are secure (power off first). Replace remote control batteries. |
| Fan makes grinding noise | Loose screws or components Obstruction in fan blades | Check and tighten all mounting screws and fan components. Ensure nothing is obstructing the fan blades. |
| Light does not work | No power to light Light setting off Light module issue | Check power supply and wiring. Ensure light is turned on via remote/app. If problem persists, contact customer support. |
| Remote control not working | Batteries dead/incorrectly inserted Remote not paired Signal interference | Replace batteries, ensure correct polarity. Refer to remote pairing instructions in the app or quick start guide. Reduce distance to fan, remove obstructions. |
| APP cannot connect to fan | Bluetooth off Fan not in pairing mode App version outdated | Ensure Bluetooth is enabled on your device. Follow app instructions to put fan in pairing mode. Update the app to the latest version. |
| Fan wobbles | Loose mounting Unbalanced blades | Ensure mounting bracket and downrod connections are secure. Check for any bent or damaged blades. |
9. Warranty & Support
BrilMaison is committed to providing high-quality products and customer satisfaction.
- Product Warranty: This BrilMaison ceiling fan comes with a 2-Year Limited Warranty covering manufacturing defects.
- Motor Warranty: The DC motor is covered by a separate 10-Year Warranty.
- Customer Service: For any questions, technical assistance, or warranty claims, please contact our 24-HOUR CUSTOMER SERVICE TEAM. Refer to your purchase documentation or the BrilMaison official website for contact details.

Figure 9.1: BrilMaison Warranty and Support Information.