1. Introduction
This manual provides essential instructions for the safe and efficient operation, installation, and maintenance of your OUBO 16L Automatic Class N Oral Autoclave. This high-pressure steam sterilizer is designed for effective disinfection based on Europe Class N standards, offering both wrapped and unwrapped sterilization cycles at 121°C and 134°C. The chamber is constructed from special #304 stainless steel, ensuring durability and reliability for surgical and laboratory departments.
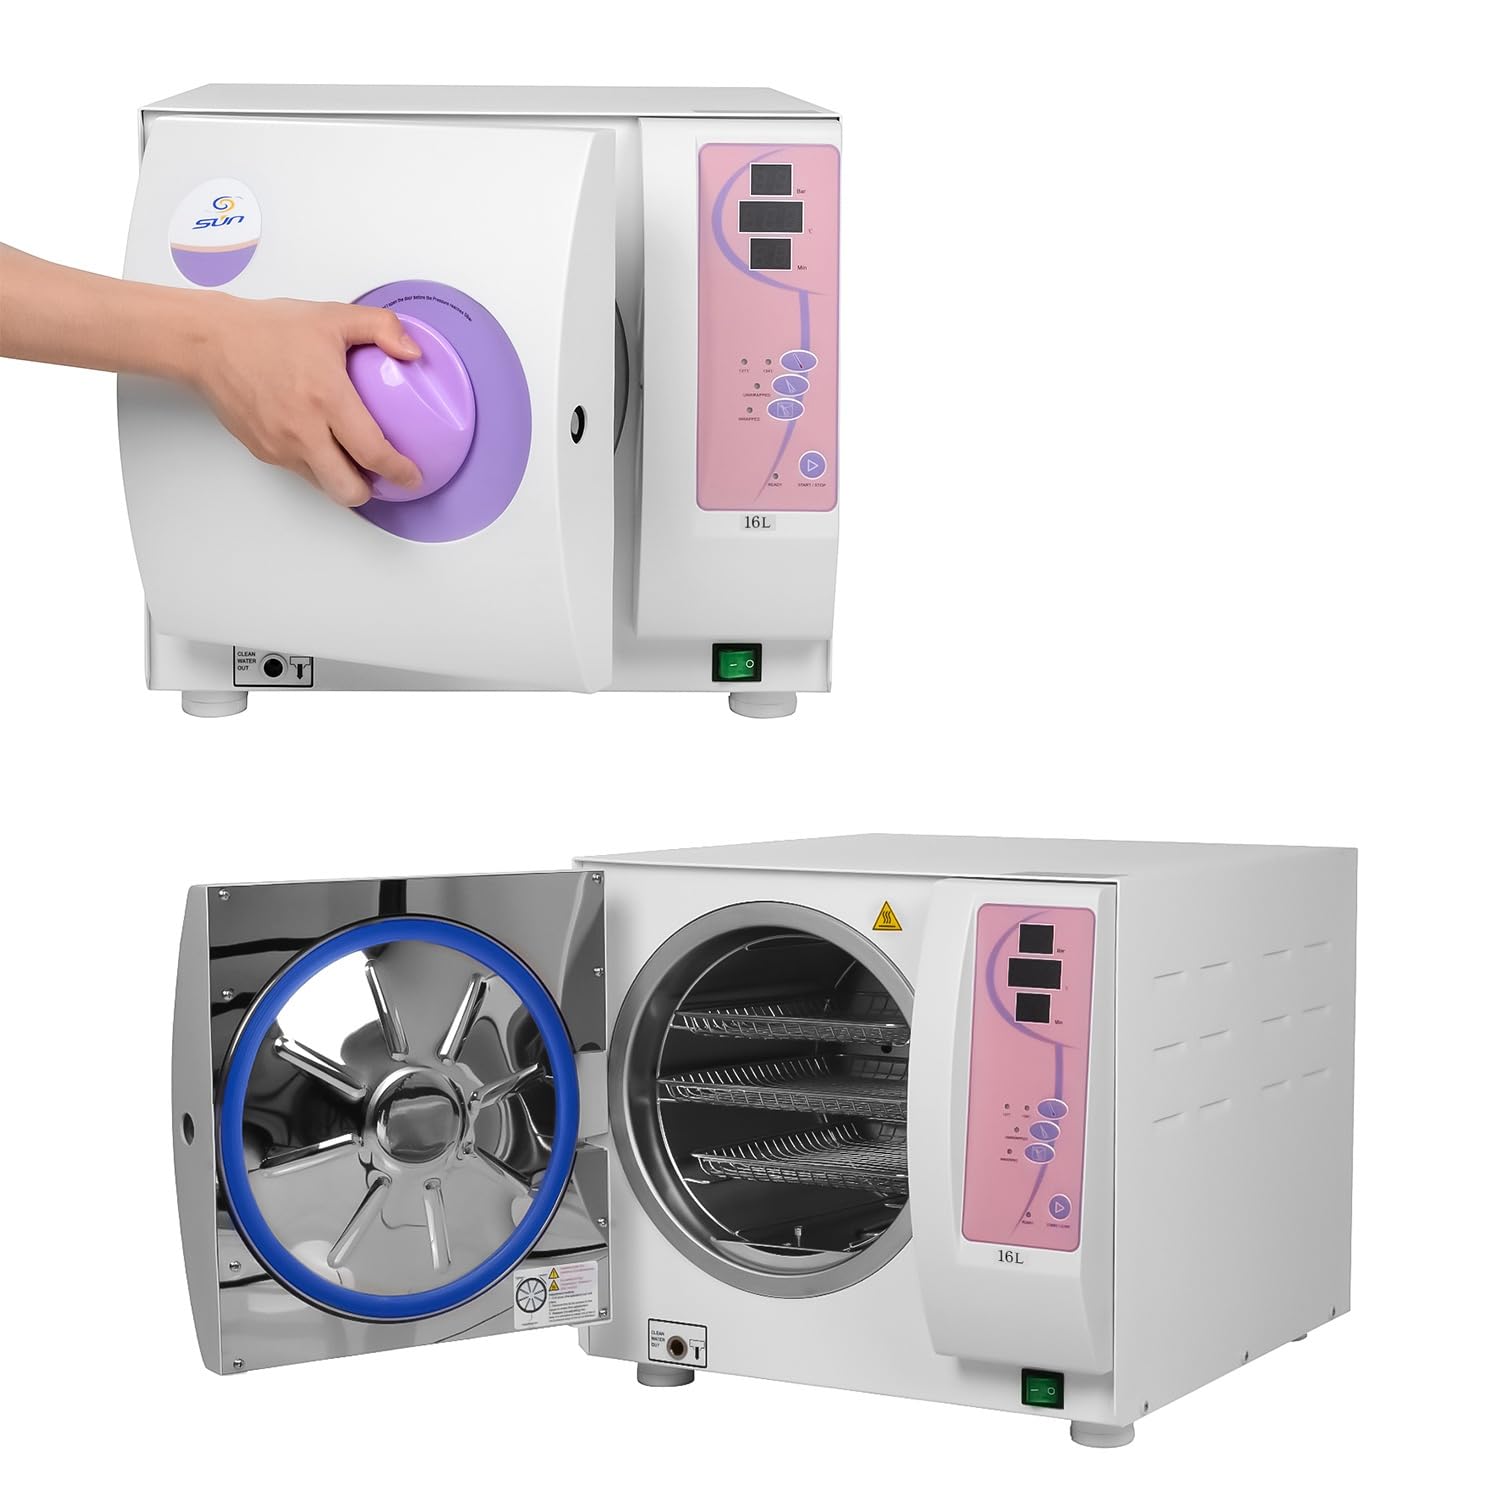
Figure 1: Front view of the OUBO 16L Automatic Class N Oral Autoclave.
2. Safety Information
Please read all safety warnings and instructions carefully before operating the autoclave. Failure to follow these instructions may result in injury or damage to the unit.
- High Pressure and Temperature: The autoclave operates under high pressure and high temperatures. Never attempt to open the door during a cycle or when the pressure indicator shows pressure inside the chamber.
- Steam Hazard: Hot steam can cause severe burns. Use caution when opening the door after a cycle and allow items to cool before handling.
- Electrical Safety: Ensure the unit is properly grounded. Do not operate with damaged power cords or plugs. Disconnect power before cleaning or maintenance.
- Water Quality: Use only distilled or demineralized water as specified in the maintenance section to prevent scale buildup and damage to internal components.
- Ventilation: Operate the autoclave in a well-ventilated area to dissipate heat and steam.
- Authorized Personnel: Only trained and authorized personnel should operate and maintain this equipment.
3. Product Components
Familiarize yourself with the main components of your autoclave and the included accessories.
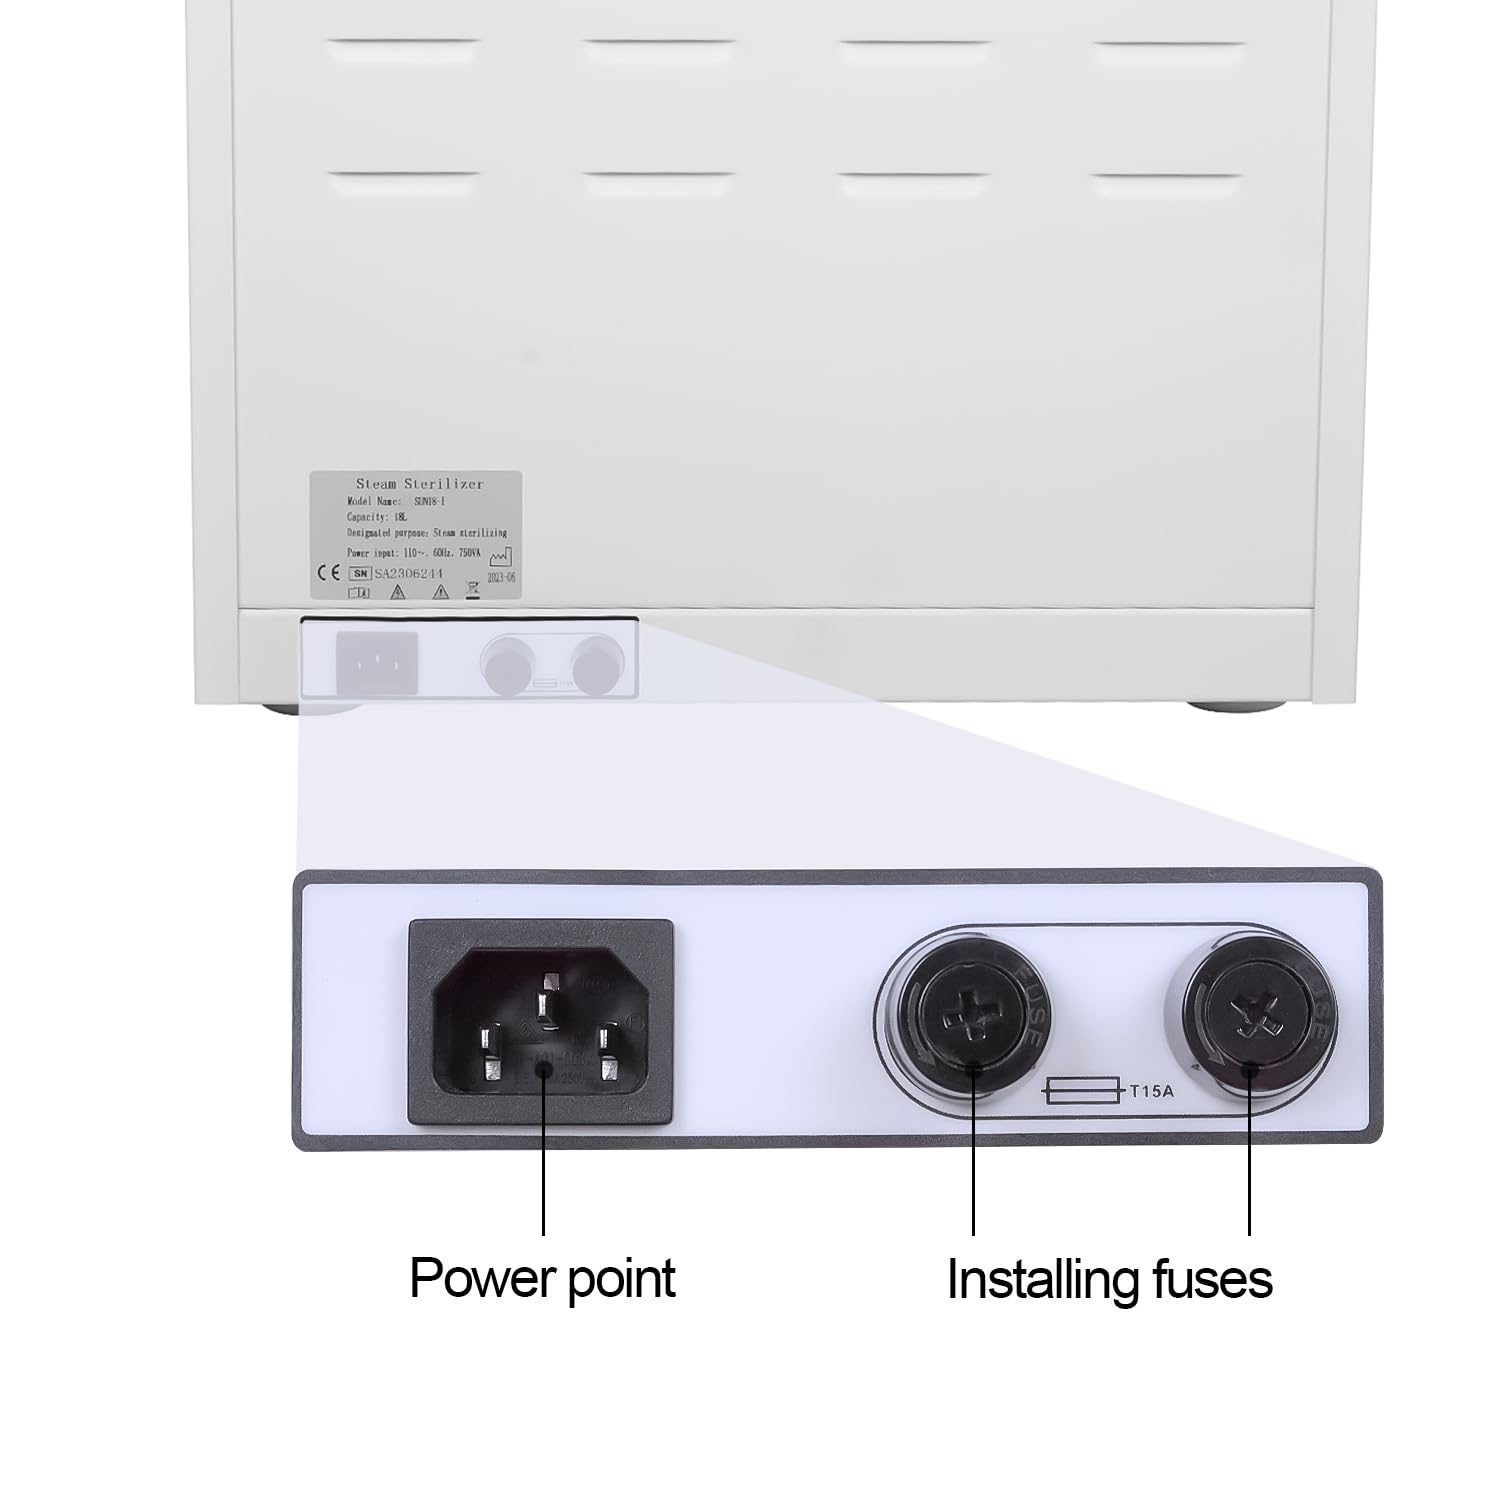
Figure 2: Autoclave and included accessories. These include a power cord, plastic handle, water/steam pipe, measuring cup, O-rings, and sterilization trays.
- Main Unit: The autoclave body with sterilization chamber and control panel.
- Door Handle: For opening and securely closing the chamber door.
- Control Panel: Digital display for pressure and temperature, program selection buttons, and indicator lights.
- Sterilization Trays: Multiple trays for holding items to be sterilized.
- Power Cord: For connecting the unit to an electrical outlet.
- Plastic Handle: Tool for safely removing hot trays.
- Water and Steam Pipe: For draining used water.
- Measuring Cup: For adding distilled water to the reservoir.
- Sealing Ring & O-rings: Spare parts for maintenance.
4. Setup Instructions
Follow these steps to set up your autoclave for first use.
- Placement: Place the autoclave on a stable, level surface with adequate ventilation around the unit.
- Unpacking and Internal Access:
Rotate the door handle counter-clockwise to open the door. Remove all packaging materials and accessories from inside the chamber.

Figure 3: Autoclave chamber with door open and trays inside.
- Power Connection:
Locate the power input and fuse holders on the rear panel of the autoclave. Connect the provided power cord securely. Ensure the power switch is in the OFF position before connecting to a power source.
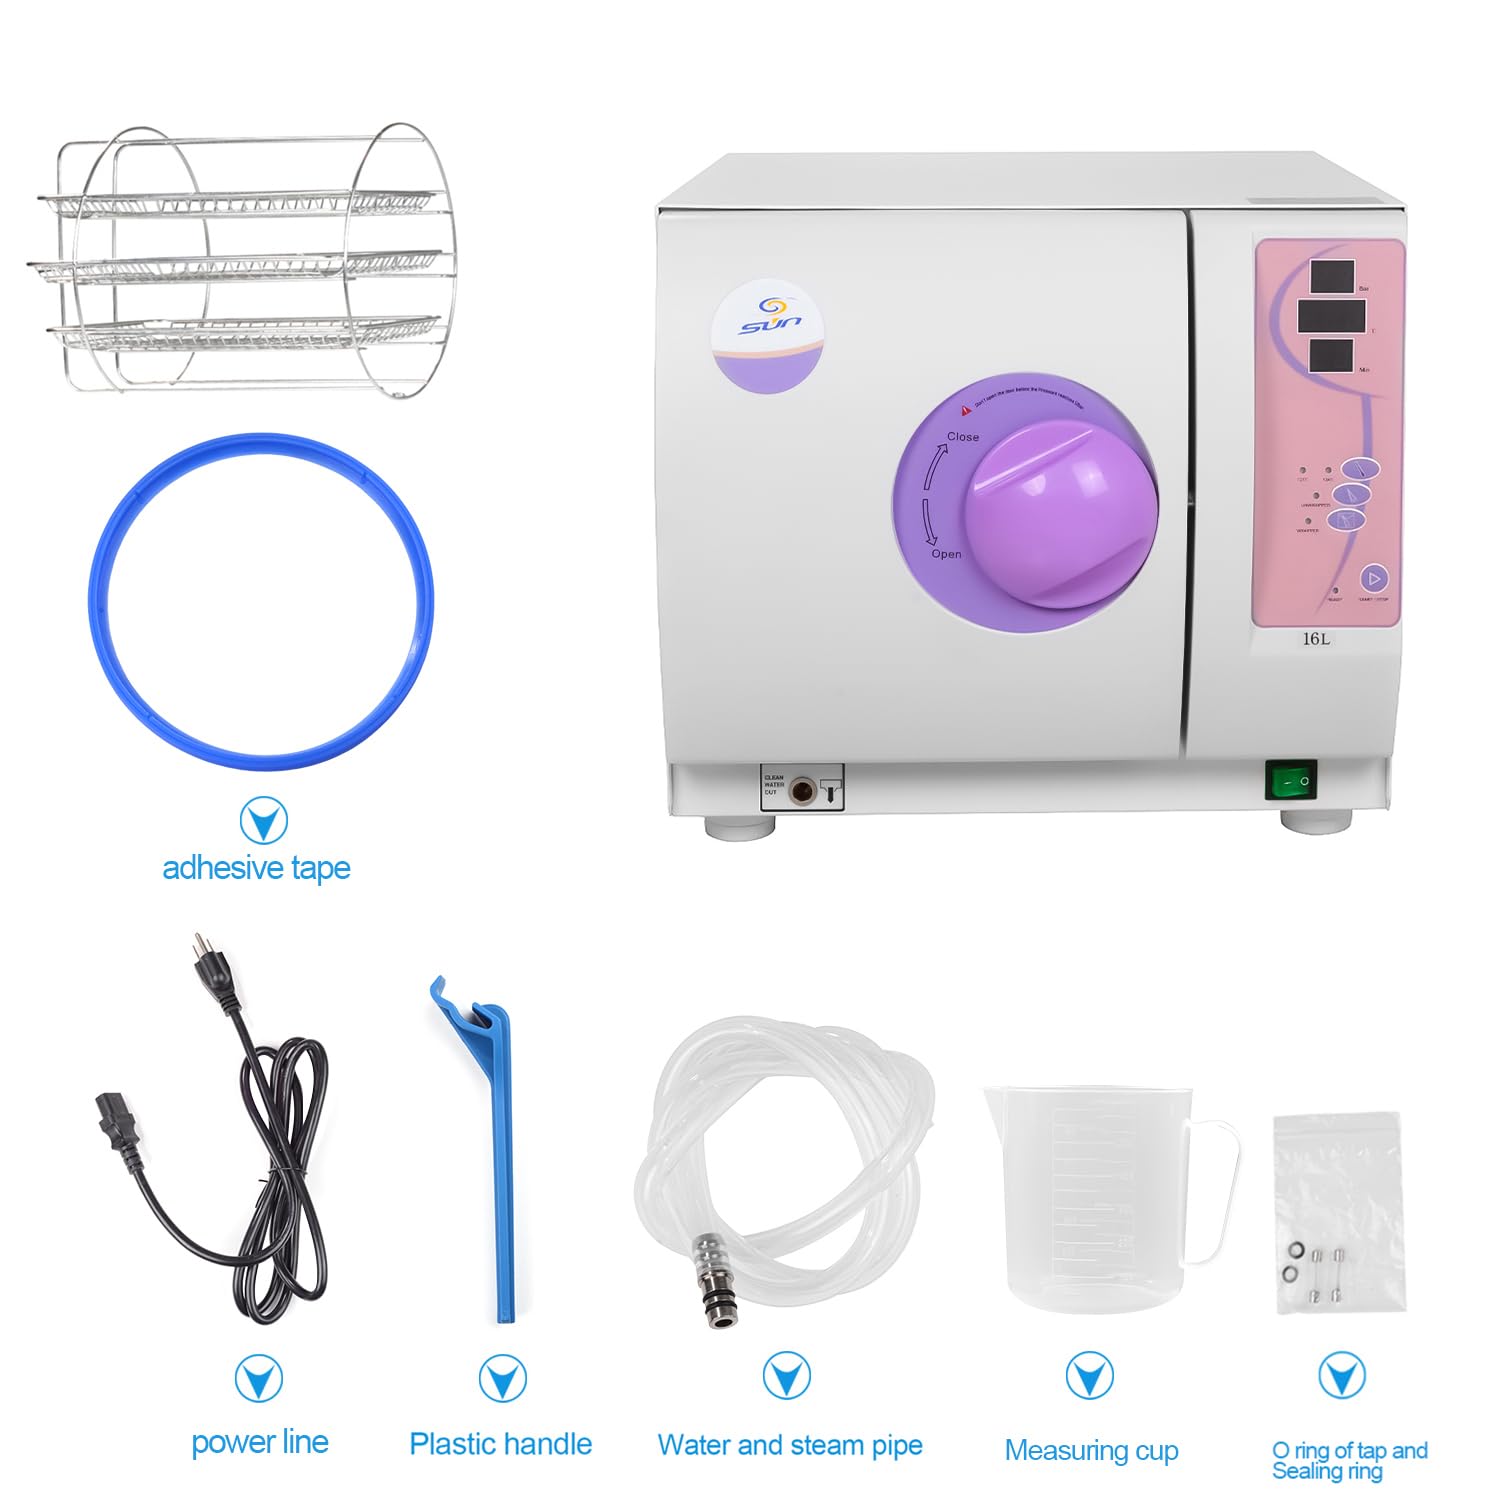
Figure 4: Rear panel showing power point and fuse installation.
- Drain Hose Connection:
Attach the water and steam pipe to the "USED WATER OUTLET" port, typically located at the front bottom of the unit. Direct the other end of the pipe into a suitable waste water collection container.

Figure 5: Used water outlet and power switch.
- Initial Water Fill:
Open the water reservoir cap (usually located on top or front) and fill with distilled or demineralized water using the measuring cup, up to the indicated maximum level. Do not overfill.
Video 1: Demonstration of initial setup steps including opening the door, connecting the power cord, and attaching the drain hose. This video shows a similar model (23L) but the steps are applicable.
5. Operating Instructions
Follow these steps for a typical sterilization cycle.
- Power On: Flip the main power switch to the ON position. The digital display will illuminate.
- Load Items: Place the instruments or materials to be sterilized onto the trays. Ensure items are arranged to allow proper steam circulation. Do not overload the chamber.
- Close Door: Close the autoclave door and rotate the handle clockwise until it is securely locked. Ensure the door is fully sealed to prevent steam leakage.
- Select Program: Use the program selection buttons on the control panel to choose the desired sterilization cycle (e.g., 121°C for unwrapped, 134°C for wrapped). The display will show the selected temperature and time.
- Start Cycle: Press the START/STOP button to begin the sterilization cycle. The "READY" indicator light will typically illuminate when the unit is ready to start or during the cycle.
- Monitoring: Monitor the pressure and temperature displays during the cycle. The autoclave will automatically proceed through the sterilization phases (heating, sterilization, drying).
- Cycle Completion: Once the cycle is complete, an audible alarm may sound, and an indicator light will signal completion. Allow the pressure to fully release before attempting to open the door.
- Unload Items: Carefully rotate the door handle counter-clockwise to open the door. Use the provided plastic handle to remove the hot trays and sterilized items. Allow items to cool before handling.
Video 2: Demonstration of operating the autoclave, including powering on, selecting a program, closing the door, and initiating a sterilization cycle. This video shows a similar model (23L) but the steps are applicable.
6. Maintenance
Regular maintenance ensures optimal performance and longevity of your autoclave.
- Daily Cleaning: Wipe down the exterior and interior of the chamber with a damp cloth. Remove any residue from the trays and chamber walls.
- Water Reservoir: Regularly drain and refill the water reservoir with fresh distilled or demineralized water. Do not reuse water from previous cycles.
- Door Seal: Inspect the door sealing ring for any signs of wear, cracks, or damage. Replace if necessary to maintain a proper seal. Clean the seal and the mating surface on the chamber.
- Trays and Rack: Clean the sterilization trays and rack after each use.
- Fuses: Check and replace fuses as needed. Refer to the rear panel for fuse specifications (e.g., T15A).
7. Troubleshooting
This section addresses common issues you might encounter.
| Problem | Possible Cause | Solution |
|---|---|---|
| Unit does not power on. | Power cord not connected, power switch off, blown fuse. | Check power cord connection, ensure switch is ON, inspect and replace fuses if necessary. |
| Cycle does not start. | Door not properly closed/locked, insufficient water in reservoir, program not selected. | Ensure door is securely locked, fill water reservoir, select a sterilization program. |
| Steam leakage from door. | Door not properly closed, damaged door seal. | Re-secure door handle, inspect and replace door seal if damaged. |
| Error code displayed. | Specific malfunction. | Refer to the specific error code in the full user manual (if available) or contact customer support. |
8. Specifications
Key technical specifications for the OUBO 16L Autoclave.
- Model: SUN 16L
- Capacity: 16 Liters
- Sterilization Standards: Europe Class N
- Sterilization Temperatures: 121°C, 134°C
- Working Pressure: -0.9 bar – 2.3 bar
- Maximum Working Temperature: 136°C
- Chamber Material: Special Stainless Steel #304
- Cycle Time: 15-30 minutes (depending on temperature and load)
- Safety Features: Safety valve, manual door lock, error self-test, overheat protector.
- Control: Computer-controlled digital display.
9. Warranty and Support
For warranty information, technical support, or service inquiries, please refer to the documentation provided with your purchase or contact OUBO customer service. Keep your purchase receipt as proof of purchase for warranty claims.