ORARAER TX9S
ORARAER Biometric Slider Gun Safe User Manual
Model: TX9S | Brand: ORARAER
1. Introduction
This manual provides essential information for the safe and effective use of your ORARAER Biometric Slider Gun Safe. Please read this manual thoroughly before installation and operation. Keep it for future reference.

Image: The ORARAER Biometric Slider Gun Safe, designed for quick access and secure storage of handguns. It features a biometric scanner, keypad, and key access, with a sliding drawer mechanism.
2. Safety Information
Always prioritize safety when handling firearms and operating your gun safe. Failure to follow these instructions may result in injury or unauthorized access.
- Keep the safe locked and keys stored in a secure location away from the safe and out of reach of children.
- Do not store loaded firearms in the safe unless specifically trained and authorized to do so, and always follow local laws and regulations.
- Ensure the safe is securely mounted to prevent unauthorized removal.
- Regularly check battery levels to ensure continuous operation.
- Do not share your PIN code or biometric data with unauthorized individuals.

Image: The safe is designed to protect loved ones by providing child-resistant storage, accessibility for seniors, and security for solo dwellers, ensuring safety in various situations.
3. Package Contents
Verify that all components are present before proceeding with installation.
- ORARAER Biometric Slider Gun Safe
- Back-up Keys (x2)
- Expansion Tubes (x2)
- Screws (x4)
- Buttstock Foam (x1)
- Type-C Power Cord (x1)
- User Manual (this document)

Image: A visual representation of the safe and its complete set of accessories, including mounting hardware and power cable, along with key dimensions for the safe and mounting plate.
4. Setup and Installation
4.1 Battery Installation
The safe requires batteries for operation. Batteries are not included.
- Locate the battery compartment on the exterior of the safe.
- Insert the required number of alkaline batteries (refer to the compartment for battery type and quantity).
- Close the battery compartment securely.
4.2 Mounting Options
The safe offers versatile mounting options to suit your preferred location.
- Under Counter Mount: Ideal for discreet installation under desks or shelves.
- Bedside Mount: Can be mounted beside a bed for quick access.
- Wall Mount: Securely attach to a wall for concealed storage.
To install, first fix the mounting bracket to your desired surface using the provided screws and expansion tubes. Then, attach the safe to the mounted bracket.

Image: Illustrations demonstrating the three primary mounting configurations: left-side, top-side, and right-side, emphasizing the flexibility of installation.

Image: Examples of the safe's versatile placement, including bedside, under a secretaire, inside a closet, and within a wardrobe, highlighting its discreet integration into various environments.

Image: Visual examples of how the safe can be discreetly installed in common household areas such as a bedside table, under a desk, or hidden within a wardrobe, blending into its surroundings.
4.3 Initial Access Setup
The safe supports multiple unlock methods: Fingerprint, PIN Code, and Key Access.

Image: A comprehensive overview of the safe's four access methods: biometric fingerprint scanning, personal keypad passcode, smartphone app control, and traditional backup keys for emergency use.

Image: Detailed views of the safe's quick access mechanisms: the fingerprint scanner for rapid biometric entry, the numeric keypad for passcode input, and the traditional keyhole for backup access.
4.3.1 Setting up Fingerprints
The safe can store up to 30 unique fingerprints.
- Refer to the detailed instructions in the included paper manual for specific steps on enrolling fingerprints.
- Ensure your finger is clean and dry for accurate scanning.
4.3.2 Setting up PIN Code
The keypad supports a 6-digit PIN code.
- Consult the paper manual for instructions on setting or changing your PIN code.
- Choose a memorable but secure PIN.
4.3.3 Key Access
The safe comes with backup keys for emergency access. Store these keys in a secure location away from the safe.
5. Operation
5.1 Unlocking the Safe
- Fingerprint: Place your enrolled finger on the biometric scanner. The safe will unlock in under 1.0 seconds.
- PIN Code: Enter your 6-digit PIN code on the keypad.
- Key Access: Insert the backup key into the keyhole and turn to unlock.
5.2 Sliding Drawer Mechanism
The safe features a quick-release slider mechanism for rapid deployment of your firearm.

Image: A detailed view of the safe's precision rail system, designed for smooth and rapid deployment of the stored firearm into a ready position.
5.3 Whisper-Quiet Entry (Silent Mode)
Enable Silent Mode for discreet access, preventing audible feedback during operation. Refer to the paper manual for instructions on activating/deactivating this feature.
5.4 Auto-Illuminated Interior
The built-in LED light illuminates the interior for easy visibility in complete darkness. The light automatically activates when the slider is opened.

Image: The interior LED light of the safe, which automatically illuminates when the drawer is opened, ensuring optimal visibility of contents in dim or dark environments.
6. Maintenance
6.1 Battery Replacement
When the batteries are low, the safe will provide a warning. Replace batteries promptly to ensure continuous functionality.
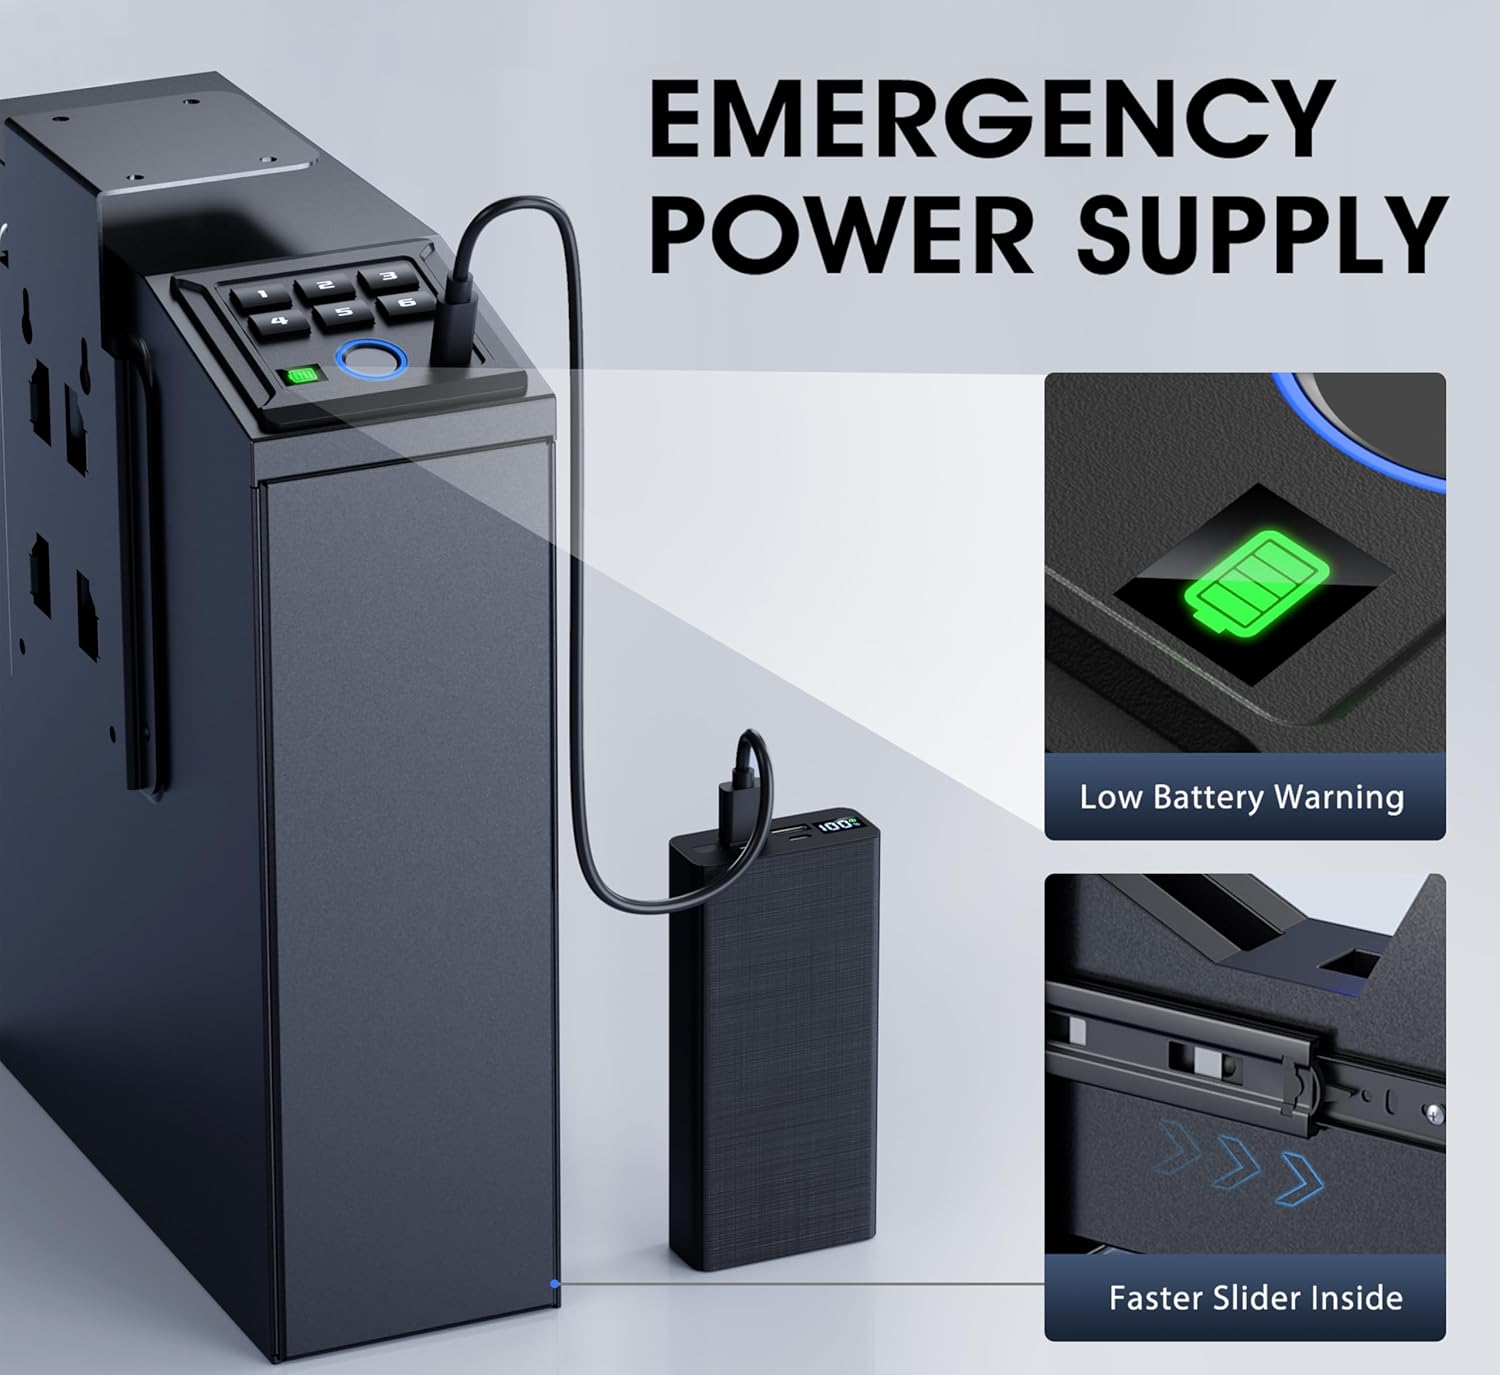
Image: The safe's emergency power supply feature, demonstrating how a Type-C cable can be used to power the unit externally, along with a visual indicator for low battery warnings.
The exterior battery compartment allows for quick swaps without needing to open the safe.
6.2 Cleaning
Wipe the exterior of the safe with a soft, damp cloth. Do not use abrasive cleaners or solvents. Ensure the fingerprint scanner and keypad are clean for optimal performance.
6.3 Foam Lining Care
The interior features a cuttable scratch-resistant foam lining. If the foam becomes dirty, gently clean it with a mild soap solution and allow it to air dry completely before placing firearms back inside.
7. Troubleshooting
- Safe not opening with fingerprint: Ensure your finger is clean and dry. Try re-enrolling your fingerprint if issues persist.
- Keypad not responding: Check battery levels. If batteries are low, replace them or use the emergency Type-C power cord.
- Safe not opening: Use the backup keys for emergency access.
- Slider mechanism is stiff: Ensure no obstructions are present. The precision rail system should operate smoothly.
8. Specifications
| Feature | Specification |
|---|---|
| Brand | ORARAER |
| Model Number | TX9S |
| Product Dimensions | 7.48"D x 3.23"W x 10.2"H |
| Item Weight | 12.43 pounds |
| Color | Black |
| Material | Alloy Steel |
| Lock Type | Biometric, Electronic Combination Lock, Key, Mechanical Code Lock |
| Special Features | Alarm System, Anti-Theft, Biometric Fingerprint, Combination Lock, Scratch Resistant |
| Mounting Type | Under Counter Mount |
| Handgun Capacity | Fits full-size handguns up to 9.0 inches in overall length |
| Batteries Required | Yes (not included) |

Image: A fitment guide illustrating different handgun sizes and confirming the safe's capacity to store full-size handguns up to 9 inches in overall length.

Image: An internal view of the safe's storage compartment, emphasizing its full-size capacity and high-density foam holster designed to protect handguns up to 9.0 inches.
9. Warranty and Customer Support
ORARAER is committed to providing reliable products and excellent customer service.
- Warranty Service: The product comes with a 365-day warranty.
- Money-Back & Replacement: Enjoy a 30-day money-back and replacement policy.
- After-Sales Service: Lifetime after-sales service is provided for all customers.
- Customer Support: Our dedicated support team is available to assist you with any setup or inquiries. We aim to respond within 48 hours.
For support, please refer to the contact information provided on the product packaging or the official ORARAER website.
Ask a question about this manual
Ask about setup, troubleshooting, compatibility, parts, safety, or missing instructions. Manuals+ will review the question and use this page’s manual context to help answer it.