1. Introduction
This manual provides essential information for the proper installation, operation, and maintenance of your Sawyer Auto Fuel Pump and Sender Assembly, model PG-601663. This unit is designed as a direct replacement for 2010-2016 Mercedes E350 vehicles, ensuring optimal fuel delivery and accurate fuel level readings. Please read this manual thoroughly before proceeding with installation or use.
2. Safety Information
WARNING: Working with fuel systems and electrical components can be hazardous. Improper installation or handling can lead to fire, explosion, serious injury, or death. Always observe the following safety precautions:
- Professional Installation Recommended: Due to the complexity and safety risks involved, installation by a certified automotive technician is strongly recommended.
- Disconnect Battery: Always disconnect the vehicle's negative battery terminal before beginning any work on the fuel system or electrical components.
- Relieve Fuel System Pressure: Before disconnecting any fuel lines, ensure that the fuel system pressure has been safely relieved according to the vehicle manufacturer's service manual.
- Work in a Well-Ventilated Area: Fuel vapors are highly flammable and toxic. Ensure adequate ventilation to prevent accumulation of fumes.
- No Open Flames or Sparks: Keep all sources of ignition, including open flames, sparks, and smoking materials, away from the work area.
- Wear Personal Protective Equipment (PPE): Use safety glasses, gloves, and appropriate clothing to protect against fuel exposure and potential injuries.
- Handle Fuel Carefully: Use approved containers for draining and storing fuel. Clean up any spills immediately.
3. Package Contents
Verify that all components are present and undamaged before beginning installation:
- 1 x Sawyer Auto Fuel Pump and Sender Assembly (PG-601663)
- 1 x Sealing Gasket/O-ring
- Integrated Fuel Sender Unit
- Integrated Pressure Regulator
4. Setup and Installation
This section outlines the general steps for installing the fuel pump and sender assembly. Refer to your vehicle's specific service manual for detailed instructions and torque specifications. Professional installation is highly recommended.
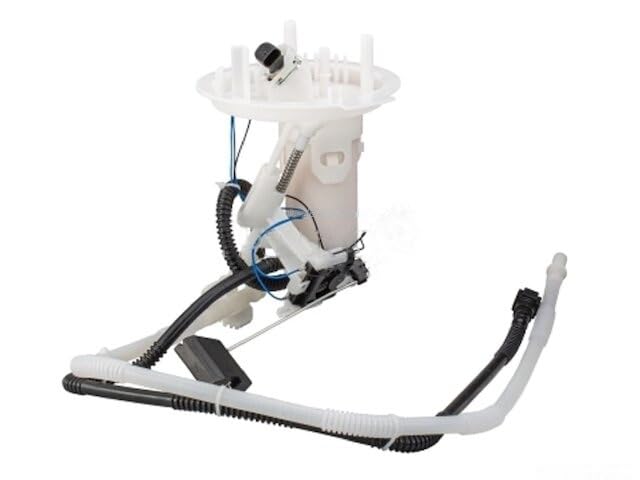
Image 1: Sawyer Auto Fuel Pump and Sender Assembly PG-601663. This image shows the complete assembly, including the pump, sender unit, and electrical connector.
- Preparation: Park the vehicle on a level surface. Engage the parking brake. Disconnect the negative battery terminal. Relieve fuel system pressure as per the vehicle manufacturer's guidelines.
- Access Fuel Tank: Depending on the vehicle model, access to the fuel pump assembly may require removing the rear seat, trunk carpet, or dropping the fuel tank. Follow your vehicle's service manual for proper access.
- Disconnect Components: Disconnect the electrical connector (3-pin connector for this model) and all fuel lines from the existing fuel pump assembly. Be prepared for residual fuel spillage.
- Remove Old Assembly: Carefully remove the retaining ring or bolts securing the old fuel pump and sender assembly. Extract the old unit from the fuel tank, ensuring no debris falls into the tank.
- Install New Assembly: Install the new Sawyer Auto Fuel Pump and Sender Assembly (PG-601663) into the fuel tank. Ensure the new sealing gasket/O-ring is properly seated to prevent leaks. Secure the assembly with the retaining ring or bolts, tightening to the manufacturer's specified torque.
- Reconnect Components: Reconnect all fuel lines and the 3-pin electrical connector. Double-check all connections for security.
- Final Checks: Reconnect the negative battery terminal. Turn the ignition to the 'ON' position (without starting the engine) for a few seconds to allow the fuel pump to prime the system. Check for any fuel leaks.
- Test Operation: Start the engine and check for proper operation and any warning lights.
5. Operating Instructions
Once correctly installed, the Sawyer Auto Fuel Pump and Sender Assembly operates automatically as part of your vehicle's fuel system. The fuel pump delivers fuel from the tank to the engine, while the sender unit accurately measures the fuel level and transmits this information to your vehicle's fuel gauge.
6. Maintenance
The fuel pump and sender assembly is designed for long-term reliability with minimal maintenance. However, adhering to general fuel system maintenance practices can prolong its lifespan and ensure optimal performance:
- Regular Fuel Filter Replacement: Ensure your vehicle's fuel filter is replaced at the intervals recommended by the vehicle manufacturer. A clogged fuel filter can put excessive strain on the fuel pump.
- Avoid Running on Low Fuel: Consistently running your vehicle with very low fuel levels can cause the fuel pump to overheat, as fuel acts as a coolant for the pump motor.
- Use Quality Fuel: Using clean, high-quality fuel helps prevent contaminants from entering and damaging the fuel system components.
7. Troubleshooting
If you experience issues after installation or during vehicle operation, consider the following common troubleshooting steps. If problems persist, consult a qualified automotive technician.
- Engine Cranks but Won't Start:
- Check for proper electrical connection to the fuel pump.
- Verify that the fuel pump fuse and relay are functional.
- Listen for the fuel pump priming sound when the ignition is turned to 'ON'.
- Rough Idling or Stalling:
- Could indicate inconsistent fuel pressure. Check fuel lines for kinks or leaks.
- Ensure the fuel filter is not clogged.
- Inaccurate Fuel Gauge Reading:
- Verify the electrical connection to the fuel sender unit.
- Ensure the sender unit float arm moves freely within the tank and is not obstructed.
- Fuel Leaks:
- Immediately address any fuel leaks. Recheck the sealing gasket/O-ring and all fuel line connections for proper seating and tightness.
8. Specifications
| Feature | Specification |
|---|---|
| Model Number | PG-601663 |
| Application | 2010-2016 Mercedes E350 |
| Connector Type | 3-pin electrical connector |
| Included Components | Fuel pump, fuel sender unit, pressure regulator, seal |
| Item Weight | 5 pounds |
| Package Dimensions | 10 x 10 x 10 inches |
9. Warranty and Support
Sawyer Auto products are manufactured to high-quality standards. For information regarding warranty coverage, claims, or technical support, please refer to the product packaging or contact Sawyer Auto customer service directly. Keep your purchase receipt as proof of purchase.


