1. Introduction
The Generic 2-in-1 Cordless Rivet Gun Set is a versatile tool designed for efficient rivet installation. This portable electric riveter operates on a 26V battery and is suitable for various applications in home, garage, and workshop environments. It supports M3-M12 inserts for riveting iron, aluminum, and stainless steel nuts. This manual provides instructions for safe operation, setup, maintenance, and troubleshooting to ensure optimal performance and longevity of your tool.
2. Safety Instructions
Always observe basic safety precautions when using electric tools to reduce the risk of fire, electric shock, and personal injury.
- Read the Manual: Familiarize yourself with all instructions and warnings before operating the tool.
- Wear Eye Protection: Always wear safety goggles or safety glasses with side shields.
- Keep Work Area Clean: Cluttered areas invite accidents. Ensure your workspace is well-lit.
- Avoid Dangerous Environments: Do not use power tools in damp or wet locations, or expose them to rain.
- Secure Workpiece: Always clamp or secure the workpiece to prevent movement during operation.
- Disconnect Power: Always disconnect the battery pack from the tool before making any adjustments, changing accessories, or storing the tool.
- Use Correct Rivet Head: Ensure the correct size rivet head is installed for the specific rivet nut being used.
- Maintain Tool: Keep the tool clean and in good working condition. Inspect for damage before each use.
3. Package Contents
Verify that all items are present upon unpacking:
- Cordless Rivet Gun
- 26V Lithium-ion Battery (5200mAh, quantity 2)
- Battery Charger
- M3, M4, M5, M6, M8, M10, M12 Rivet Heads (Mandrels)
- Wrench for changing rivet heads
- User Manual
4. Product Features
The Cordless Rivet Gun Set incorporates several features designed for efficiency and ease of use:
- 2-in-1 Functionality: Capable of both riveting and rivet nut installation.
- One-Touch Automatic Riveting: Simplifies the riveting process.
- Intelligent Stroke Adjustment: Adapts to different riveting requirements.
- Intelligent Memory Mode: Records and repeats riveting processes for consistency.
- Brushless Motor: Provides enhanced durability, efficiency, and longer tool life.
- LED Lighting: Illuminates the work area for improved visibility.
- Adjustable Speed: Offers High (H) and Low (L) speed settings for various applications.
- Fast Heat Dissipation System: Multiple cooling holes prevent overheating during extended use.
- Large-Capacity Lithium Battery: Provides extended operating time.

Image: Product details highlighting adjustable high and low speed gears, porous cooling system, instant LED light, and 26V large capacity lithium batteries.
5. Components and Parts Identification
Familiarize yourself with the different parts of your rivet gun:

Image: Labeled diagram of the cordless rivet gun, identifying key components such as the heat dissipation vent, gear adjustment, self-locking gun head, pull female head, LED lighting, start switch, anti-slip handle, smart button panel, battery removal switch, and lithium battery.
- Heat Dissipation Vent: For quick heat removal.
- Gear Adjustment: Controls the tool's speed.
- Self-locking Gun Head: Secures the rivet head.
- Pull Female Head: The part that engages with the rivet nut.
- LED Lighting: Illuminates the work area.
- Start Switch: Activates the tool.
- Anti-slip Handle: Provides a secure grip.
- Smart Button Panel: For mode selection and battery display.
- Battery Removal Switch: Releases the battery.
- Lithium Battery: Provides power to the tool.
6. Setup
6.1 Battery Installation and Charging
Charging the Battery:
- Connect the battery charger to a standard power outlet.
- Insert the battery pack into the charger.
- Allow 0.5 to 1 hour for a full charge. The charger indicator will signal when charging is complete.
Installing/Removing the Battery:
- To install, align the battery pack with the base of the rivet gun and slide it in until it clicks securely into place.
- To remove, press the battery removal switch located on the battery pack and slide the battery out.
6.2 Attaching Rivet Heads (Mandrels)
The tool comes with various rivet heads for M3-M12 rivet nuts.
- Select the appropriate rivet head size that matches your rivet nut.
- Unscrew the existing rivet head (if any) from the self-locking gun head.
- Insert the desired rivet head into the self-locking gun head and tighten it securely. Use the provided wrench if necessary to ensure it is firm.
7. Operating Instructions
7.1 Basic Operation and Riveting Process
The tool features a one-touch automatic riveting function.
- Ensure the correct rivet head is installed and the battery is charged.
- Insert the crimping nut onto the installed rivet head.
- Position the tool against the workpiece where the rivet nut is to be installed.
- Pull the start switch (trigger). The tool will automatically begin the riveting process.
- The riveting process typically completes in approximately 3 seconds. The tool will automatically perform nail removal after riveting.

Image: Close-up view illustrating the one-click automatic riveting and subsequent automatic nail removal after riveting, using an M5 rivet nut.
7.2 Smart Button Panel and Speed Adjustment
The smart button panel provides information and control over the tool's operation.

Image: Detailed view of the smart button panel, showing the battery indicator (Power Display 1, 2, 3 lights), Mode+Gear Switch Key, and Function Mode Light. It indicates that 3 lights mean full power, the first light flashing means insufficient power, and lights up in L or H position for speed.
- Battery Indicator (Power Display): Three lights indicate the battery charge level. If the first light flashes, it indicates insufficient power.
- Mode/Gear Switch Key: A short press of this button switches between memory mode and working mode.
- Function Mode Light: This light flashes when in memory mode and remains continuously on when in working mode.
- Speed Adjustment: The tool offers two speed settings: 'H' for high speed and 'L' for low speed. Select the appropriate speed based on the material and rivet size.
8. Maintenance
Proper maintenance ensures the longevity and reliable operation of your rivet gun.
- Cleaning: Regularly clean the tool's exterior with a soft, damp cloth. Ensure cooling vents are free from dust and debris to maintain efficient heat dissipation.
- Storage: Store the rivet gun and its accessories in a dry, secure place, away from direct sunlight, moisture, and extreme temperatures.
- Rivet Head Inspection: Periodically inspect the rivet heads for wear or damage. Replace worn rivet heads to ensure proper riveting performance.
- Battery Care: Store batteries in a cool, dry place. Do not store fully discharged batteries for extended periods.
9. Troubleshooting
Refer to the table below for common issues and their solutions:
| Problem | Possible Cause | Solution |
|---|---|---|
| Tool does not start | Battery is not charged or improperly installed. | Charge the battery fully. Ensure the battery is securely clicked into place. |
| Rivet nut not setting correctly | Incorrect rivet head size. Workpiece material too thick or too thin for the rivet nut. | Verify the rivet head matches the rivet nut size. Ensure the rivet nut is appropriate for the workpiece material and thickness. |
| Tool overheats during use | Extended continuous operation. Blocked heat dissipation vents. | Allow the tool to cool down. Clear any obstructions from the heat dissipation vents. |
| Rivet head gets stuck | Rivet head worn or damaged. Improperly installed rivet head. | Inspect and replace the rivet head if worn. Reinstall the rivet head securely. |
10. Specifications
Technical data for the Cordless Rivet Gun Set:
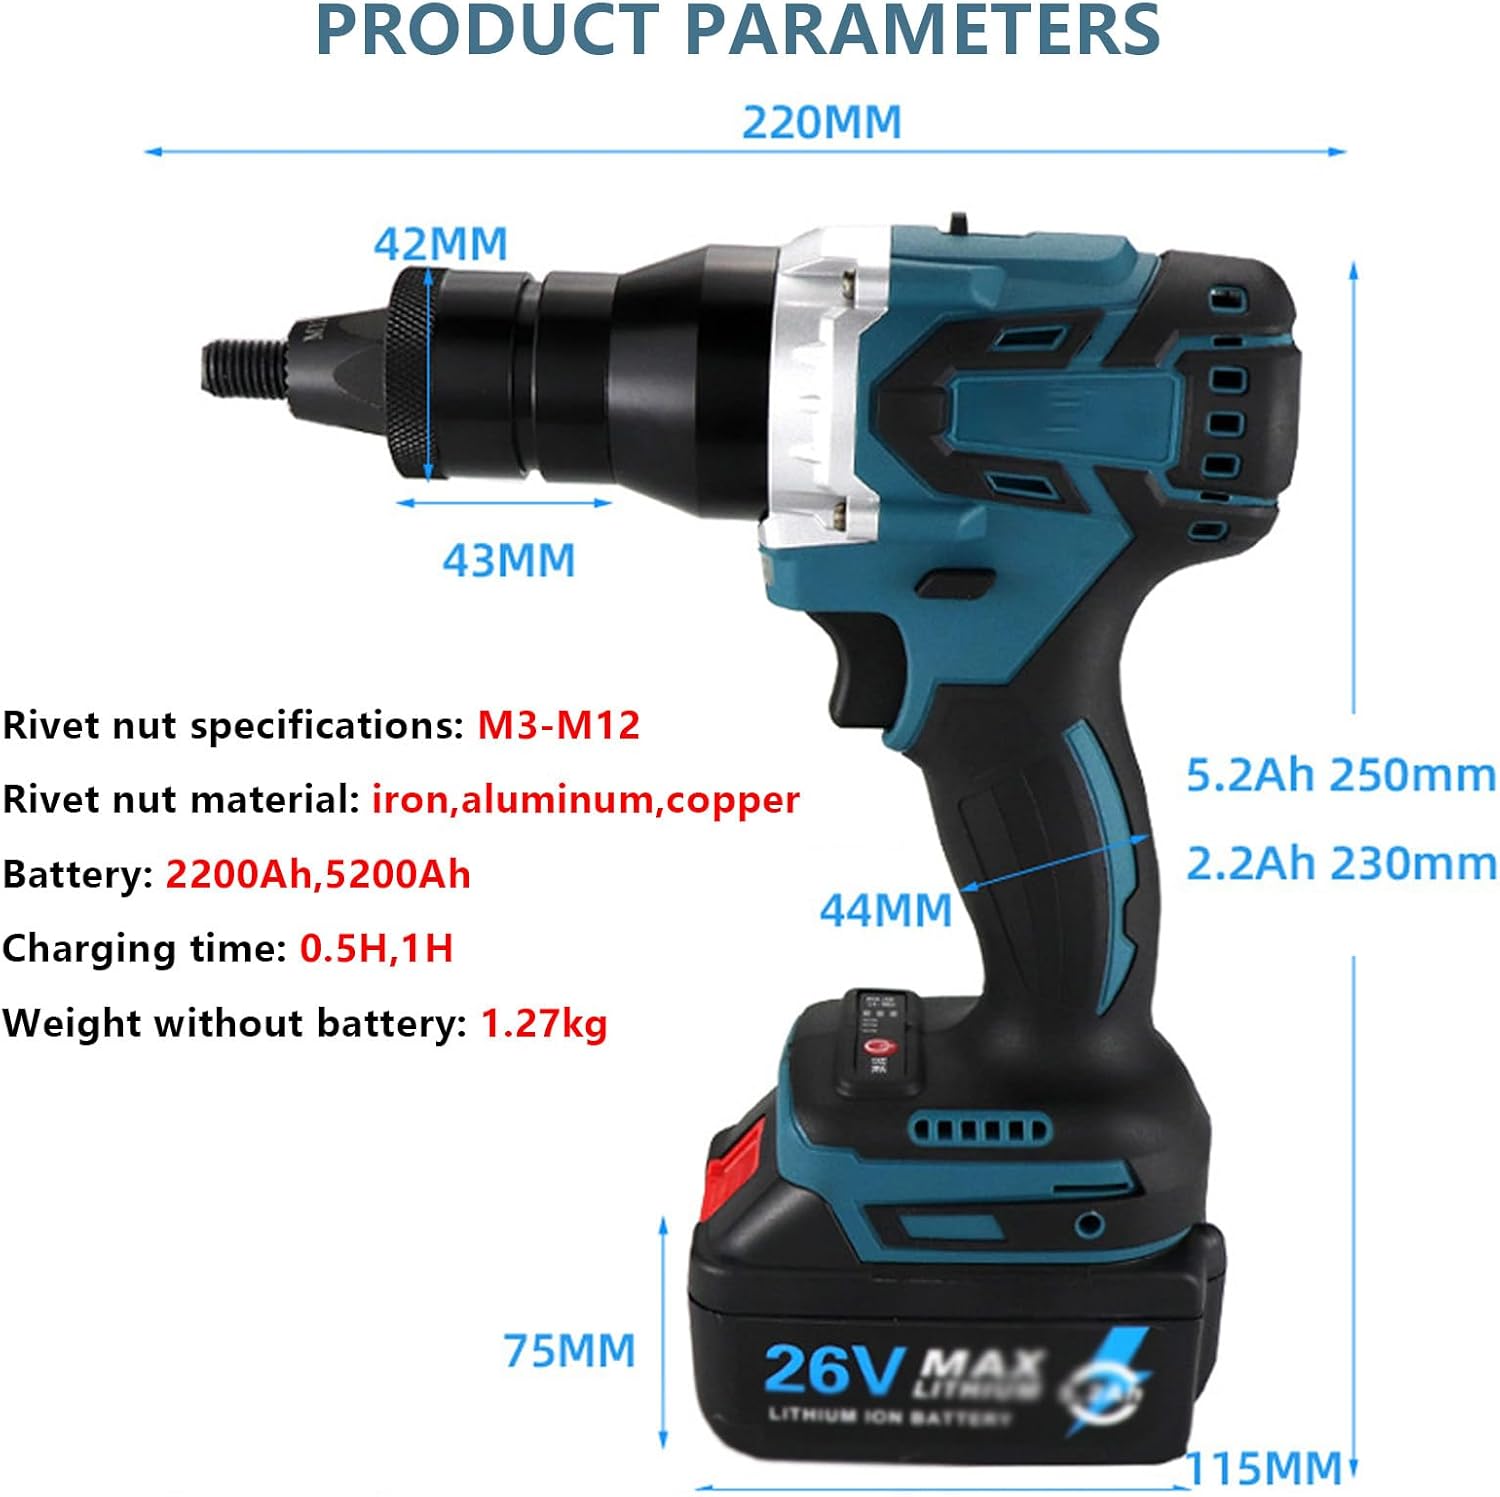
Image: Diagram showing the dimensions of the rivet gun (220mm length, 42mm head width, 43mm body width, 44mm handle width, 75mm battery height, 115mm battery length) and key specifications.
| Parameter | Value |
|---|---|
| Product Name | Lithium Battery Riveter |
| Battery Voltage | 26V |
| Battery Capacity (This Model) | 5200mAh (2 batteries included) |
| Speed Settings | H (High speed) / L (Low speed) |
| Rivet Nut Specifications | M3, M4, M5, M6, M8, M10, M12 |
| Compatible Rivet Nut Material | Iron, Aluminum, Stainless Steel |
| Charging Time | 0.5 - 1 Hour |
| Weight (without battery) | 1.27 kg |
| Packing Size | 35 x 25 x 10 cm |
10.1 Riveting Capacity (Iron and Aluminum Nuts)
| Rivet Size | 5200mAh Battery Capacity (Approx. Rivets) | 2200mAh Battery Capacity (Approx. Rivets) |
|---|---|---|
| M3 | 1500 | 800 |
| M4 | 1300 | 700 |
| M5 | 1000 | 600 |
| M6 | 800 | 500 |
| M8 | 600 | 400 |
| M10 | 400 | 300 |
| M12 | 300 | 200 |
11. Customer Support
For any questions or assistance regarding the use, maintenance, or troubleshooting of your Generic 2-in-1 Cordless Rivet Gun Set, please contact customer support. We aim to provide a response within 24 hours.