1. Introduction
This manual provides essential information for the installation, operation, and maintenance of the VUIPAJQC K310 CVT Transmission Valve Body. This component is designed for specific Toyota Corolla models to ensure optimal transmission performance. Please read this manual thoroughly before installation and use to ensure proper function and safety.
2. Product Overview
The K310 CVT Transmission Valve Body is a critical component within the automatic transmission system. It is responsible for directing hydraulic fluid to various parts of the transmission, controlling gear changes, and ensuring smooth operation. This unit includes integrated solenoids for precise electronic control.

Figure 2.1: Overall view of the K310 CVT Transmission Valve Body, showing its complex casting and integrated solenoids.
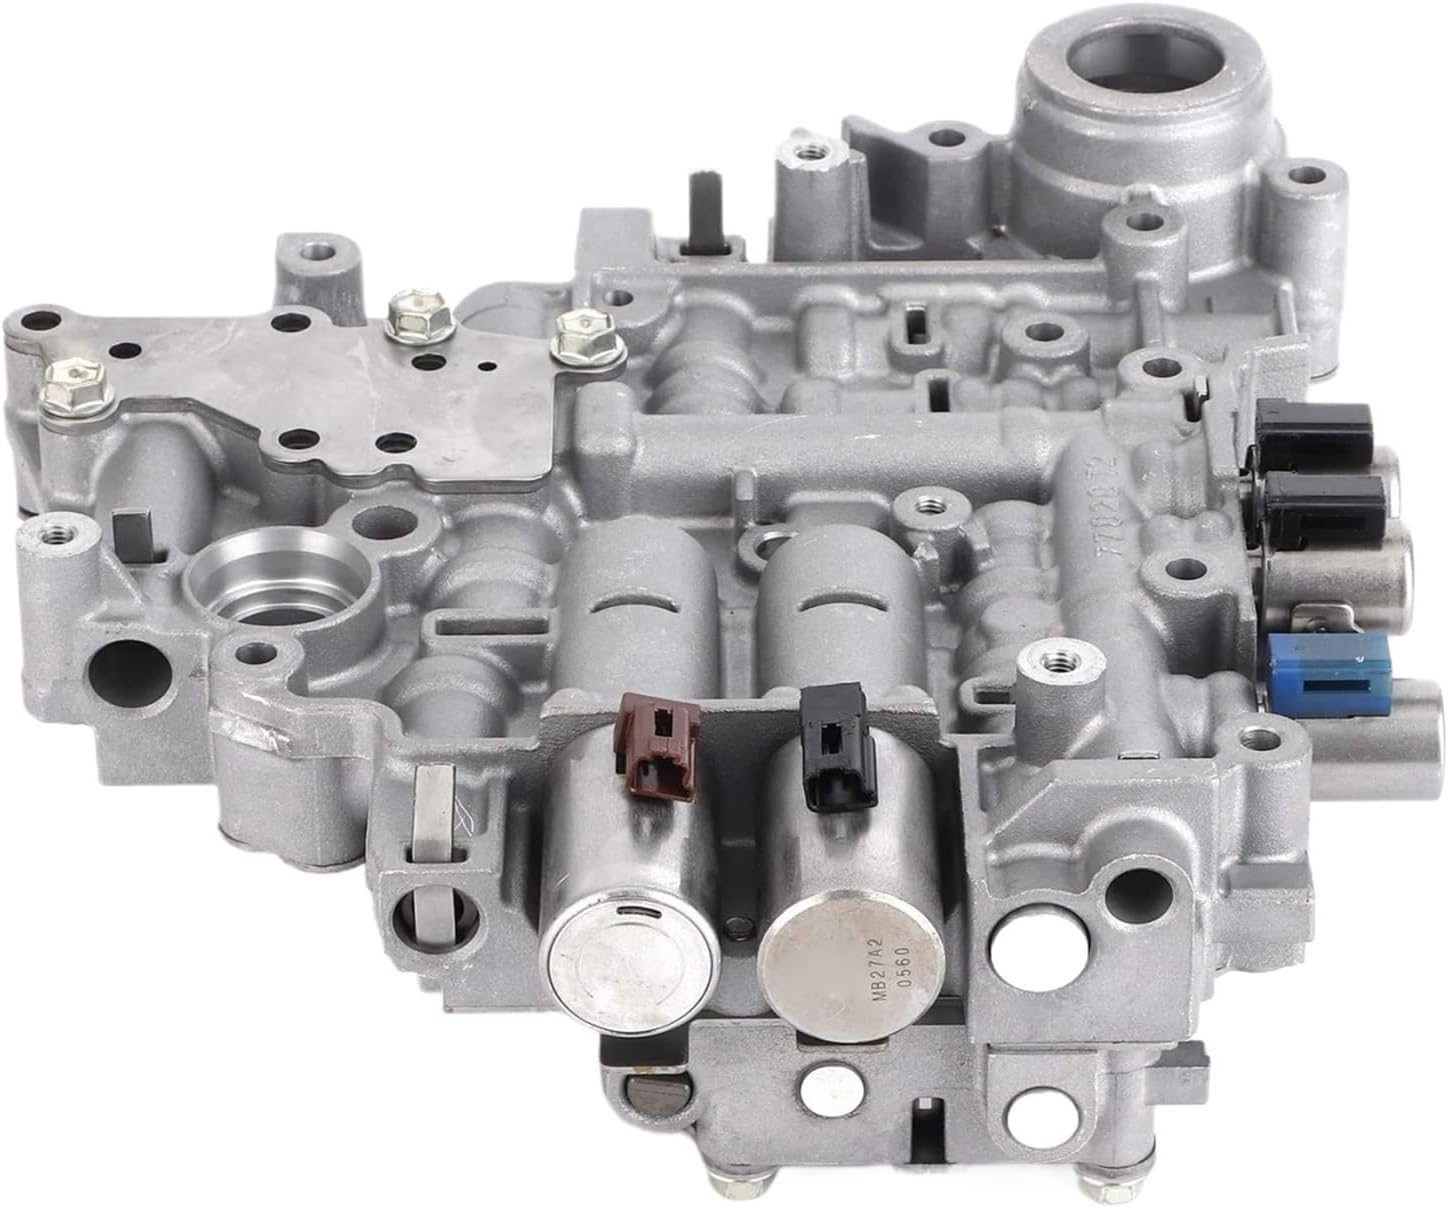
Figure 2.2: Angled perspective of the valve body, highlighting the various fluid passages and mounting points.

Figure 2.3: Bottom view of the valve body, illustrating the intricate network of channels and the base plate.

Figure 2.4: Top view of the valve body, clearly showing the arrangement of the control solenoids and electrical connectors.
3. Compatibility
This K310 CVT Transmission Valve Body is specifically designed for compatibility with the following Toyota Corolla models:
- Toyota Corolla L4 1.5L
- Toyota Corolla L4 1.8L
- Toyota Corolla L4 2.0L
Please verify your vehicle's make, model, engine size, and transmission type (CVT) before purchasing and installing this component to ensure proper fitment and function.
4. Key Features
- Accurate Control: The valve body is engineered to precisely adjust the shifting strategy based on vehicle speed and driving conditions, contributing to a comfortable and responsive driving experience.
- Premium Quality Construction: Manufactured from high-quality, durable materials to enhance reliability and longevity. The design ensures stable characteristics and high operational reliability under various conditions.
- Easy Installation: Designed to meet original equipment standards, this valve body serves as a direct replacement for the existing unit, facilitating a straightforward installation process and improving service efficiency.
- Strict Testing Standards: Each unit is manufactured according to original factory specifications and undergoes rigorous testing to ensure full adaptation and compatibility without requiring modifications.
5. Setup and Installation
WARNING: Installation of transmission components requires specialized tools, knowledge, and experience. Improper installation can lead to severe damage to the transmission and vehicle, and may void warranties. It is highly recommended that this component be installed by a certified automotive technician.
5.1. Pre-Installation Checks
- Ensure the vehicle is safely lifted and secured.
- Disconnect the vehicle's battery.
- Drain the transmission fluid according to the vehicle manufacturer's specifications.
- Inspect the new valve body for any visible damage or missing components.
- Confirm that the new valve body matches the original unit in terms of connectors and mounting points.
5.2. Installation Procedure (General Steps)
- Carefully remove the transmission oil pan and filter.
- Disconnect all electrical connectors from the existing valve body solenoids.
- Unbolt and carefully remove the old valve body. Be prepared for residual transmission fluid.
- Clean the transmission case mating surface thoroughly.
- Install the new VUIPAJQC K310 valve body, ensuring all mounting bolts are torqued to the vehicle manufacturer's specifications.
- Reconnect all electrical connectors to the solenoids. Ensure they are securely latched.
- Install a new transmission filter and gasket.
- Reinstall the transmission oil pan, ensuring the bolts are torqued correctly.
- Refill the transmission with the correct type and amount of CVT fluid as specified by Toyota.
- Reconnect the vehicle's battery.
5.3. Post-Installation
After installation, perform a thorough check for fluid leaks. Start the engine and cycle through all gear positions while the vehicle is stationary. Check the fluid level again and top off if necessary. Perform a road test to confirm proper transmission operation and shifting.
6. Operation
The K310 CVT Transmission Valve Body operates as the hydraulic control center of your vehicle's Continuously Variable Transmission (CVT). It receives electronic signals from the Transmission Control Unit (TCU) and uses these signals to modulate hydraulic pressure to the transmission's pulleys and clutches. This precise control allows the CVT to seamlessly adjust the gear ratio, providing optimal engine efficiency and smooth acceleration without traditional gear shifts.
Proper operation relies on clean transmission fluid and correctly functioning solenoids. Any irregularities in shifting, unusual noises, or warning lights should be addressed promptly by a qualified technician.
7. Maintenance
To ensure the longevity and optimal performance of your K310 CVT Transmission Valve Body and the entire transmission system, adhere to the following maintenance guidelines:
- Transmission Fluid Checks: Regularly check the transmission fluid level and condition according to your vehicle's owner's manual. Use only the specified CVT fluid type.
- Fluid Changes: Adhere to the manufacturer's recommended schedule for transmission fluid and filter changes. Contaminated or degraded fluid can severely impact valve body function.
- Professional Inspections: Have your transmission system professionally inspected during routine vehicle maintenance to identify and address potential issues early.
- Avoid Overheating: Ensure your vehicle's cooling system is functioning correctly, as excessive transmission temperatures can damage internal components, including the valve body.
8. Troubleshooting
If you experience issues with your transmission after installing the K310 CVT Transmission Valve Body, consider the following general troubleshooting steps. For complex issues, consult a certified automotive technician.
| Symptom | Possible Cause | Action |
|---|---|---|
| Harsh or delayed shifting | Low or incorrect transmission fluid level/type, faulty electrical connection, solenoid issue. | Check fluid level and type. Inspect electrical connectors for secure fit. Consult a technician for diagnostic scanning. |
| Transmission slipping | Low fluid pressure, worn clutches, internal valve body issue. | Verify fluid level. Professional diagnosis is required. |
| Check Engine Light / Transmission Warning Light | Electronic fault, sensor issue, solenoid malfunction. | Have the vehicle scanned for diagnostic trouble codes (DTCs) by a qualified technician. |
| Fluid leaks | Improperly sealed pan gasket, loose bolts, damaged seal. | Inspect the transmission pan gasket and bolts. Tighten to specification or replace gasket if damaged. |
9. Specifications
| Attribute | Detail |
|---|---|
| Brand | VUIPAJQC |
| Model | K310 CVT Transmission Valve Body |
| Compatible Vehicles | Toyota Corolla L4 1.5L, 1.8L, 2.0L |
| Material | Metal |
| Item Weight | Approximately 1.76 ounces (50 grams) |
| Package Dimensions | Approximately 1.18 x 0.79 x 0.39 inches |
| ASIN | B0DZ2LMV2F |
10. Safety Information
- Always wear appropriate personal protective equipment (PPE), including safety glasses and gloves, when working on vehicles.
- Ensure the vehicle is securely supported on jack stands or a lift before working underneath it. Never rely solely on a jack.
- Allow the transmission to cool down before servicing to prevent burns from hot fluid or components.
- Dispose of old transmission fluid and components responsibly, following local environmental regulations.
- Keep children and pets away from the work area.
- If you are unsure about any step of the installation or repair process, consult a professional mechanic.
11. Warranty and Support
For information regarding product warranty, returns, or technical support, please refer to the purchase documentation or contact the VUIPAJQC customer service department through the retailer where the product was purchased. Keep your proof of purchase for any warranty claims.