Introduction
The Vetroo ARGB & PWM Case Fan Hub with Remote is designed to centralize control over your PC's cooling fans and addressable RGB lighting. This hub supports up to 10 4-pin PWM fans for speed control and up to 10 3-pin 5V ARGB devices for lighting synchronization. Powered by SATA, it ensures stable operation and includes a remote control for convenient adjustments.
Product Overview
The Vetroo 10A10P hub provides multiple connection points for fans and ARGB devices, along with necessary power and signal inputs.

This image illustrates the various ports on the fan controller, including 10 ARGB/FAN ports, PWM/FG, PC IN, SATA power inputs, and LEDKEY.

The remote control allows for wireless adjustment of lighting effects, fan speed, and switching between controller and motherboard signal.
Included Components:
- Vetroo ARGB & PWM Case Fan Hub (Model 10A10P)
- Remote Controller
- SATA Power Cable (L=9.8")
- 5V 3-Pin ARGB Motherboard Sync Cable (L=23.6")
- 4-Pin PWM Motherboard Sync Cable (L=23.6")
Setup Instructions
Follow these steps to properly install and connect your Vetroo ARGB & PWM Case Fan Hub.
- Mount the Hub: The hub features magnets on its back for easy attachment to any metal surface inside your PC chassis. Choose a location that allows for easy cable management and access to ports.
- Connect SATA Power: Connect the provided SATA power cable from your power supply unit (PSU) to the SATA-A or SATA-B port on the hub. This provides power for both fans and ARGB lighting.
- Connect PWM Signal: Connect the 4-pin PWM cable from the hub's PWM/FG port to a 4-pin CPU_FAN or SYS_FAN header on your motherboard. This allows the motherboard to control fan speeds.
- Connect ARGB Signal (Optional): If you wish to synchronize ARGB lighting with your motherboard's software, connect the 3-pin 5V ARGB cable from the hub's PC IN port to a compatible 5V 3-pin ARGB header on your motherboard. Important: Do not connect to a 12V RGB header, as this will damage the ARGB devices. Ensure the arrows on the connectors and headers align correctly.
- Connect Fans and ARGB Devices: Connect your 4-pin PWM fans to the FAN-A1 through FAN-B5 ports and your 3-pin 5V ARGB devices to the ARGB-A1 through ARGB-B5 ports on the hub. The hub supports up to 10 fans and 10 ARGB devices simultaneously.
- Connect Reset/LED Button (Optional): If your PC case has a dedicated LED or reset button you wish to use for lighting control, connect it to the LEDKEY port on the hub.
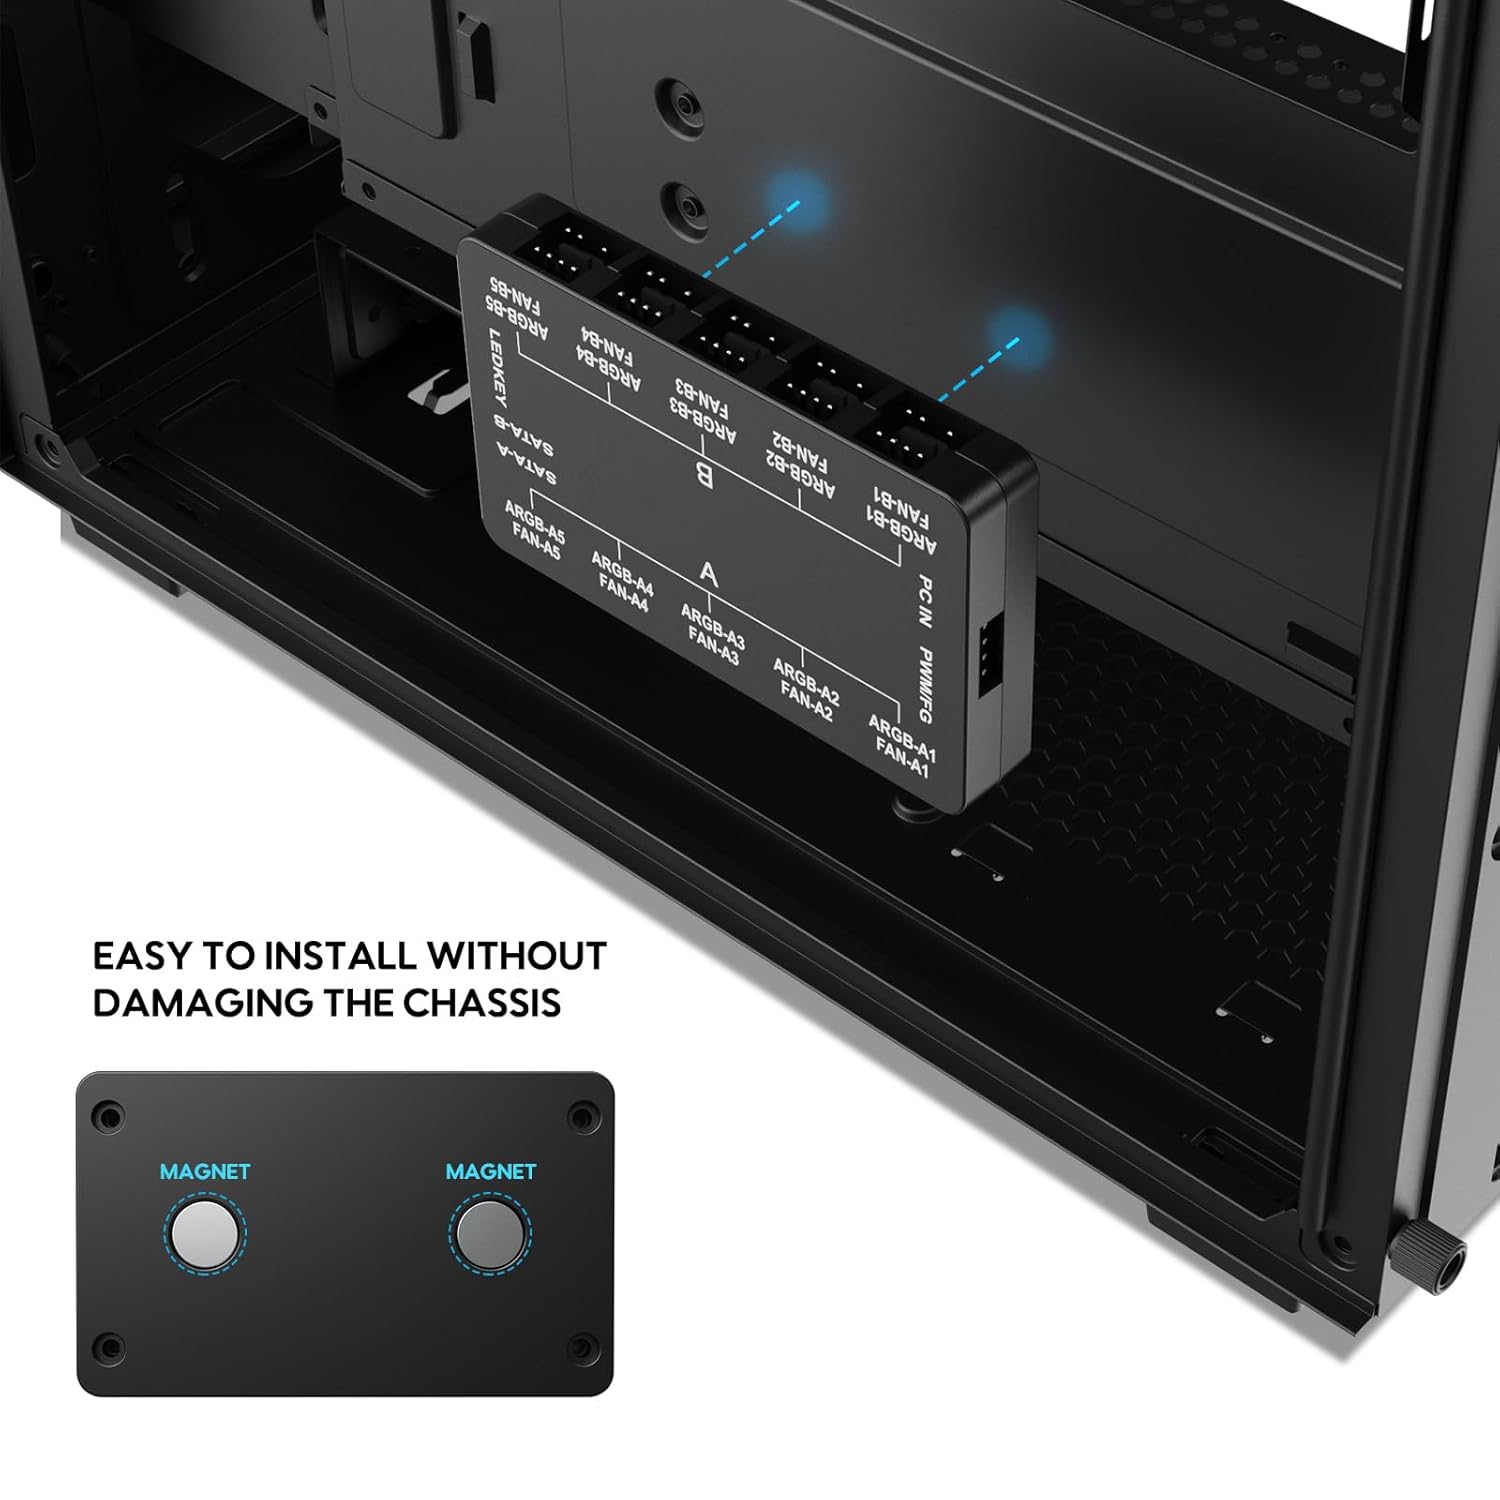
The hub can be easily mounted to the chassis using its integrated magnets.
Operating Instructions
The Vetroo fan hub offers flexible control options via the included remote or motherboard software.
Remote Control Functions:
Refer to Figure 2 for button layout.
- ON/OFF Lights: Powers the ARGB lighting on or off.
- SPEED +/-: Increases or decreases the fan speed.
- MODE +/-: Cycles through various ARGB lighting modes.
- AUTO: Activates an automatic cycle through all available lighting modes.
- Luminosity Adjustment: Adjusts the brightness of the ARGB lighting.
- Monochromatic Shortcut Keys (R, G, B, W): Directly sets the lighting to Red, Green, Blue, or White.
- Music Mode (1, 2, 3): Activates different music-reactive lighting effects.
- M/B (Motherboard & Controller Signal Switching Key): Toggles control between the remote and motherboard software.
Switching Control Modes:
When the controller is first connected to the 5V_ARGB port on the motherboard, the lighting effect will automatically switch to motherboard control. To switch back to remote control, press the ON/OFF button on the remote.
To switch control back to the motherboard from the remote, press and hold the ON/OFF button on the remote for approximately 2 seconds. The fan LEDs will flash white once, indicating that lighting control has been transferred to the motherboard.

The hub supports synchronization with motherboard ARGB software for unified lighting effects.

The hub enables the motherboard to intelligently control fan speeds based on system temperature.
Maintenance
To ensure optimal performance and longevity of your Vetroo fan hub and connected components, consider the following maintenance tips:
- Dust Removal: Periodically open your PC case and gently clean the fan hub and surrounding areas with compressed air to prevent dust buildup, which can hinder performance and airflow.
- Connection Check: Ensure all cables (SATA power, PWM, ARGB, fan, and LEDKEY) remain securely connected. Loose connections can lead to intermittent functionality or component failure.
- Environmental Conditions: Operate your PC in a well-ventilated area to prevent excessive heat buildup, which can stress electronic components.
Troubleshooting
If you encounter issues with your Vetroo ARGB & PWM Case Fan Hub, refer to the following common problems and solutions:
| Problem | Possible Cause | Solution |
|---|---|---|
| Fans or ARGB lights not working | No power to the hub; Loose connections; Incorrect ARGB voltage. | Ensure SATA power cable is securely connected to both PSU and hub. Check all fan and ARGB cable connections. Verify ARGB devices are 5V 3-pin and not connected to a 12V RGB header. |
| Remote control not responding | Battery depleted; Obstruction; Control switched to motherboard. | Replace remote battery. Ensure clear line of sight to the hub. Press the ON/OFF button on the remote to switch control back from the motherboard. |
| Fan speed not adjusting | PWM cable not connected; Motherboard control issue; Fan not PWM compatible. | Ensure the 4-pin PWM cable is connected from the hub to the motherboard's CPU_FAN/SYS_FAN header. Check motherboard BIOS settings for fan control. Confirm fans are 4-pin PWM type. |
| ARGB lighting not syncing with motherboard | ARGB sync cable not connected; Control set to remote; Software issue. | Connect the 3-pin 5V ARGB cable from the hub to the motherboard. Hold the ON/OFF button on the remote for 2 seconds to switch control to the motherboard. Update motherboard ARGB software. |
| System boot delays or no video until desktop | Potential power delivery or boot sequence conflict. | Ensure PSU has sufficient wattage for all components. Check all power connections. Consult motherboard manual for BIOS settings related to boot devices and power-on sequences. |
Specifications
Key technical specifications for the Vetroo ARGB & PWM Case Fan Hub (Model 10A10P).

This image provides a visual representation of the hub's physical size and the length of its power and signal cables.
| Feature | Specification |
|---|---|
| Model Number | 10A10P |
| Product Dimensions (L x W x H) | 3.74" x 2.28" x 0.78" |
| PWM Fan Ports | 10 (4-Pin) |
| ARGB Lighting Ports | 10 (3-Pin 5V Addressable RGB) |
| Power Input | SATA Power Connector |
| Compatible ARGB Voltage | 5 Volts (DC) |
| Compatible Fan Voltage | 12 Volts (DC) |
| Control Method | Remote Control / Motherboard Sync |
| Mounting | Magnetic |
| Material | Copper (internal components) |
Warranty and Support
For warranty information, technical assistance, or customer support regarding your Vetroo ARGB & PWM Case Fan Hub, please refer to the official Vetroo website or contact their customer service department directly. Keep your purchase receipt as proof of purchase for any warranty claims.