1. Introduction
This manual provides instructions for the installation, operation, and maintenance of the Generic Smart Fingerprint Door Lock, model FOGLLQFZL. This electronic keyless lock offers multiple access methods including fingerprint, password, M1 card, and mechanical key, designed for enhanced security and convenience in residential and commercial settings.

Image 1.1: Overview of the Smart Fingerprint Door Lock, highlighting its multiple unlocking methods: password, fingerprint, mobile app, M1 card, and traditional key.
The lock features a durable zinc alloy construction, a rechargeable lithium battery, and an integrated doorbell. It is suitable for various applications requiring secure and flexible access control.
2. Product Components
Familiarize yourself with the main components of the Smart Fingerprint Door Lock:

Image 2.1: Detailed diagram illustrating the various parts of the Smart Fingerprint Door Lock, including the front and back panels with their respective functions and interfaces.
- Front Panel: Fingerprint Area, Display Screen, Touch Keypad, Card Reading Area, Doorbell, Hidden Key Hole, Front Handle, USB Interface.
- Back Panel: Battery Box, Back Handle, One Touch Lock, One Touch Unlock, Manual Unlock Knob, Deadbolt.
3. Specifications
| Feature | Detail |
|---|---|
| Model Name | FOGLLQFZL |
| Lock Type | Biometric |
| Material | Zinc Alloy |
| Dimensions (L x W x H) | 1.18 x 0.79 x 0.39 inches (Product) |
| Weight | 4.41 pounds (2000 Grams) |
| Power Source | Rechargeable Lithium Battery |
| Fingerprint Capacity | Up to 200 |
| Password Capacity | Up to 200 |
| Included Components | Mechanical key, power band, M1 card |
| Recommended Use | Residential, Commercial, Outdoor, Shared Spaces |
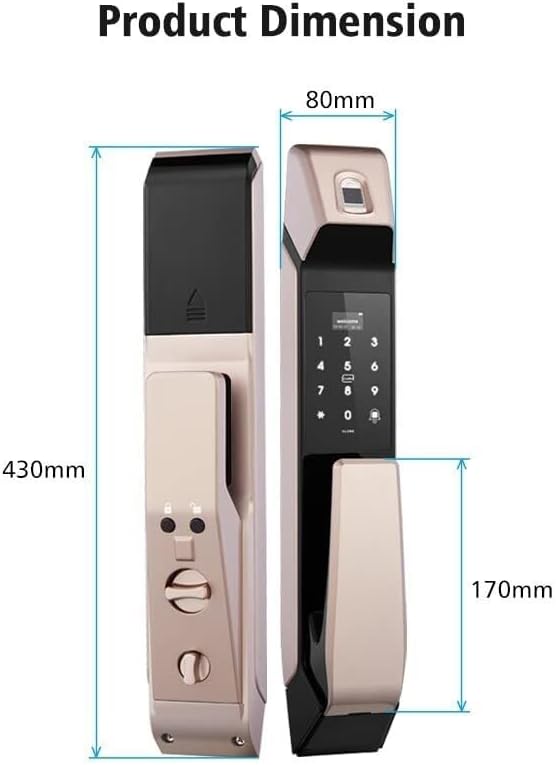
Image 3.1: Product dimensions for the Smart Fingerprint Door Lock, indicating height, width, and handle extension.
4. Installation Guide
Proper installation is crucial for the optimal performance and security of your smart lock. It is recommended to consult a professional locksmith if you are unsure about any steps. Ensure your door meets the required dimensions for the lock body.
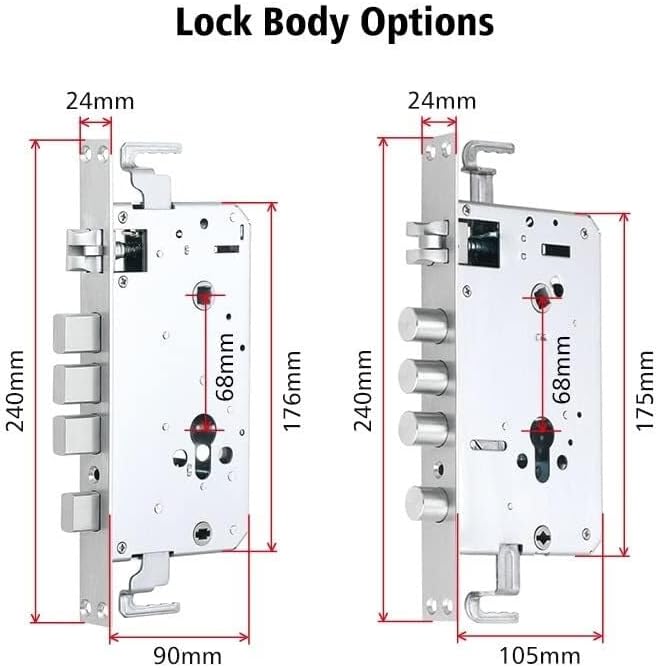
Image 4.1: Lock body options with detailed measurements, important for ensuring compatibility with your door.
General Installation Steps:
- Prepare the Door: Ensure the door is clean and the existing mortise (if any) is compatible with the new lock body. Refer to Image 4.1 for lock body dimensions.
- Install the Mortise: Insert the lock body (mortise) into the door edge and secure it with screws.
- Install the Front Panel: Connect the necessary cables from the front panel through the door and position the front panel.
- Install the Back Panel: Connect the cables to the back panel, ensuring proper alignment. Secure the back panel to the front panel using the provided screws.
- Insert Battery: Open the battery box on the back panel and insert the rechargeable lithium battery.
- Test Functionality: After installation, test all unlocking methods and the manual lock/unlock knob to ensure proper operation.
5. Operating Instructions
The Smart Fingerprint Door Lock offers multiple convenient ways to access your property.
5.1. Fingerprint Unlocking
The lock uses semiconductor fingerprint recognition for fast and secure access. Ensure your registered fingerprint is clean and dry.

Image 5.1: Demonstrates the fingerprint unlocking process, highlighting the speed and security of semiconductor recognition.
- Place your registered finger firmly on the fingerprint sensor located on the top of the front panel.
- The lock will identify your fingerprint within approximately 0.8 seconds.
- Once recognized, the lock will disengage, allowing you to open the door.
5.2. Password Unlocking (Virtual Password)
To enhance security, the lock supports virtual password unlocking, allowing you to enter random numbers before or after your actual password to prevent onlookers from guessing your code.

Image 5.2: Illustration of the virtual password feature, demonstrating how to input random numbers before and after the correct password for added security.
- Touch the keypad to activate it.
- Enter any random numbers (optional).
- Enter your registered password.
- Enter any random numbers again (optional).
- Press '#' to confirm. The lock will disengage if the password is correct.
5.3. M1 Card Unlocking
Use a registered M1 card for quick and convenient access.

Image 5.3: Demonstrates the M1 card unlocking method by placing the card near the designated reading area on the lock.
- Hold your registered M1 card close to the card reading area on the front panel.
- The lock will beep and disengage upon successful recognition.
5.4. Mechanical Key Unlocking
In case of battery depletion or electronic malfunction, the mechanical key provides a reliable backup access method.

Image 5.4: Illustrates the emergency unlocking methods, including using a mechanical key and the USB power supply interface for temporary power.
- Locate the hidden keyhole on the front panel (refer to Image 2.1).
- Insert the provided mechanical key into the keyhole.
- Turn the key to unlock the door.
6. Maintenance
Regular maintenance ensures the longevity and reliable operation of your smart lock.
- Battery Charging: The lock is powered by a rechargeable lithium battery. When the battery level is low, the lock will provide an alert. Connect a power bank to the USB power supply interface (refer to Image 5.4) for emergency power or remove the battery for charging.
- Cleaning: Wipe the lock's surface with a soft, dry cloth. Avoid using abrasive cleaners or solvents that could damage the finish or electronic components.
- Fingerprint Sensor: Keep the fingerprint sensor clean and free of dirt or moisture for optimal performance.
- Keyhole: Ensure the mechanical keyhole remains unobstructed.
7. Troubleshooting
Refer to the following common issues and their potential solutions:
- Lock not responding: Check battery level. If low, charge the battery or use the mechanical key. Ensure the lock is properly installed and all connections are secure.
- Fingerprint not recognized: Ensure your finger is clean and dry. Try re-registering your fingerprint if the issue persists.
- Password not working: Verify the correct password is being entered. Ensure you are pressing '#' after the password. Try resetting the password if necessary.
- M1 Card not recognized: Ensure the card is correctly placed over the reading area. Verify the card is registered to the lock.
- Doorbell not working: Check connections to the doorbell component.
For issues not covered here, please contact customer support.
8. Warranty and Support
For warranty information, technical support, or service inquiries, please refer to the documentation provided with your purchase or contact the manufacturer directly. Keep your proof of purchase for warranty claims.
Manufacturer: Generic