CHAIN PEAK Q Revo S, Q Revo Pro, Q Revo MaxV, Q Revo Plus
CHAIN PEAK Replacement Accessories Kit Instruction Manual
For Roborock Qrevo S, Qrevo Pro, Qrevo MaxV, QRevo Plus Robot Vacuum Cleaners
1. Introduction
This manual provides essential information for the installation, maintenance, and optimal use of your CHAIN PEAK 30-piece replacement accessories kit. This kit is designed to maintain the performance of your compatible Roborock robot vacuum cleaner.
2. Package Contents
The CHAIN PEAK 30-piece replacement accessories kit includes the following components:
- 2 x Roller Brushes: Designed to effectively absorb pet hair, dirt, dust, and debris from various floor types.
- 8 x White Side Brushes: Engineered to reach deep into corners and along walls for thorough cleaning.
- 8 x Dust Bags: Large-capacity bags for collecting garbage, hair, and dust, improving the vacuum cleaner's efficiency.
- 8 x HEPA Filters: High-efficiency filters capable of capturing up to 99.9% of dirt, pollen, and small dust particles.
- 4 x Mop Pads: Made from high-quality microfiber materials for effective removal of stubborn stains.

Image 2.1: Complete 30-piece accessory kit.
3. Compatibility
This replacement accessories kit is perfectly compatible with the following Roborock robot vacuum cleaner models:
- Roborock Qrevo S
- Roborock Qrevo Pro
- Roborock Qrevo MaxV
- Roborock QRevo Plus
Note: This is not an OEM product. Any use of the brand name or model name is intended solely to demonstrate compatibility.
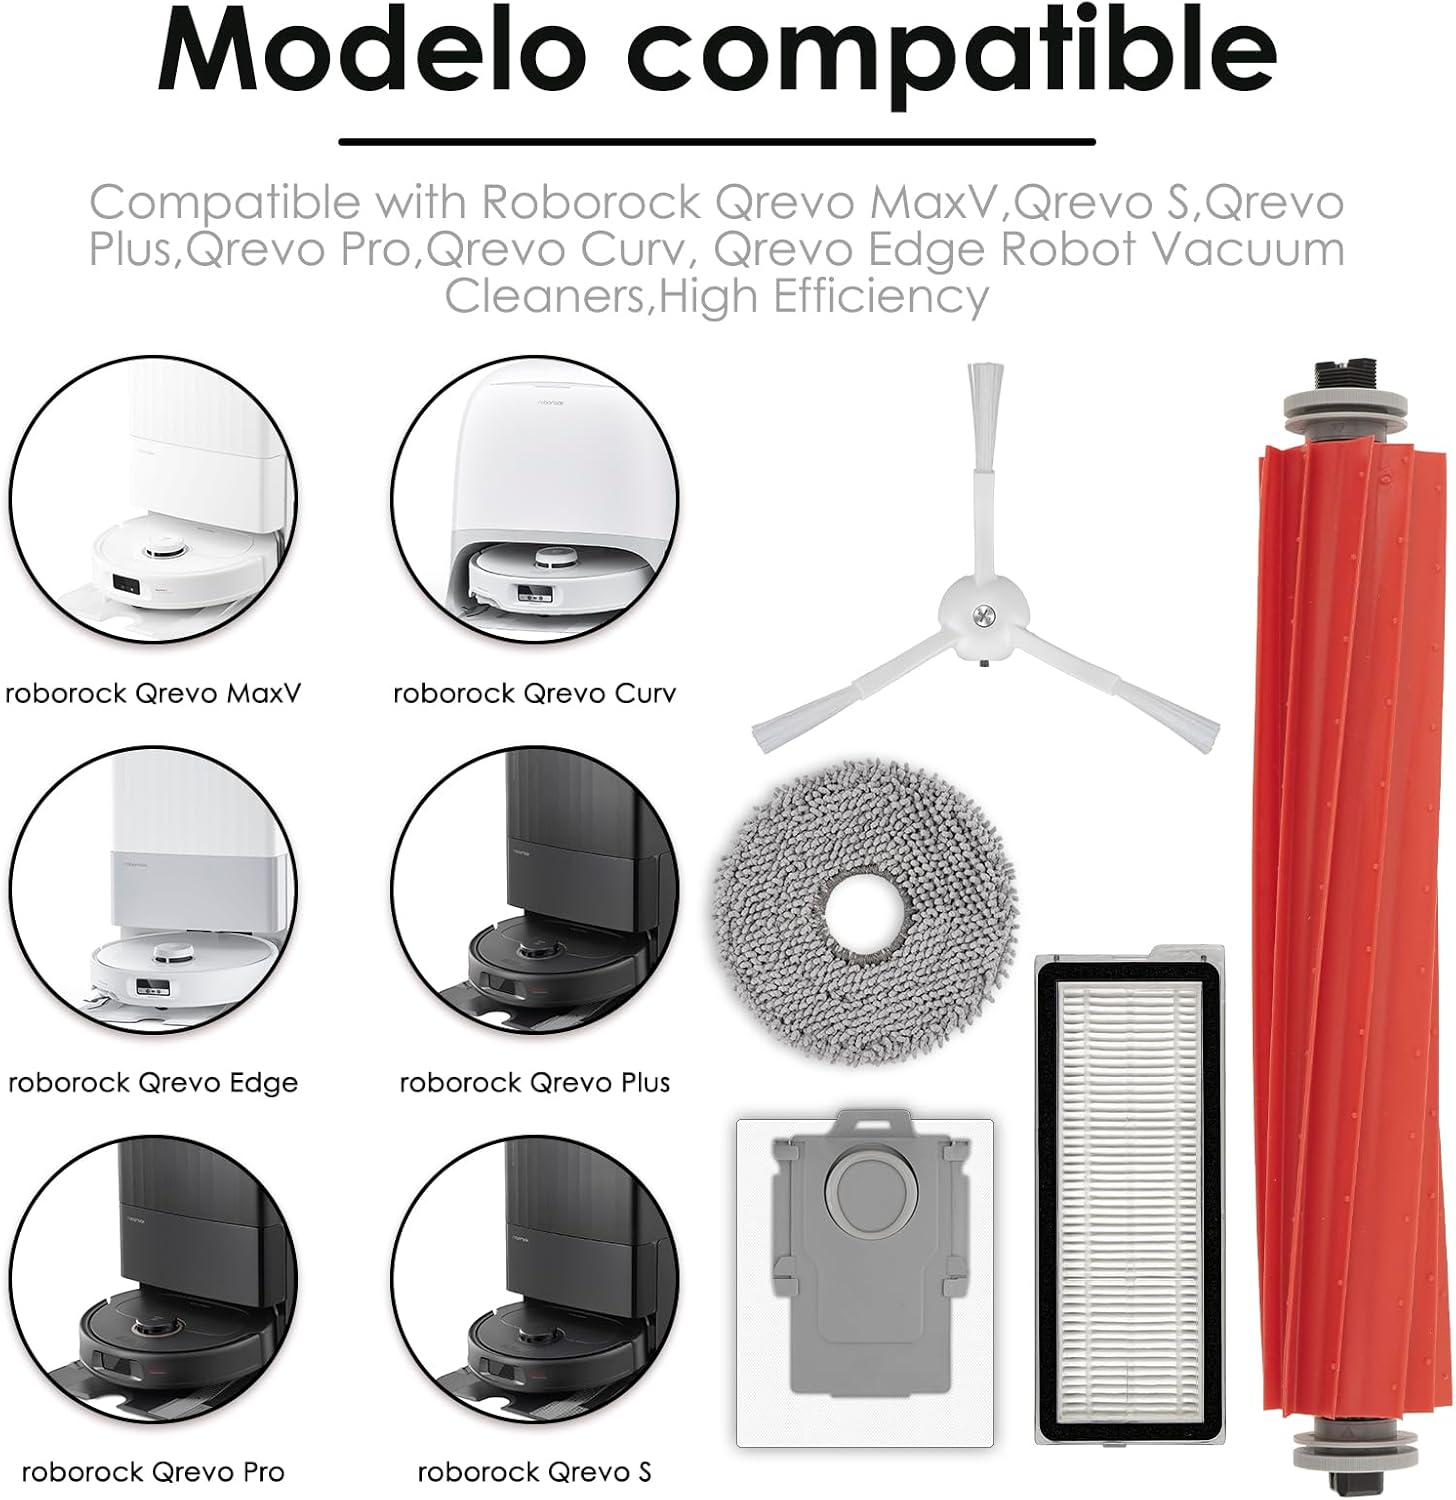
Image 3.1: Compatible Roborock models with the accessory kit.
4. Installation Instructions
Before installing any replacement parts, ensure your robot vacuum cleaner is powered off and unplugged from its charging dock.
4.1. Roller Brush Installation
- Turn the robot vacuum over to access the main brush compartment.
- Press the release tabs on the brush guard to open it.
- Remove the old roller brush.
- Insert the new roller brush, ensuring the ends align with the slots.
- Close the brush guard until it clicks into place.

Image 4.1: Roller brush function and compatibility with various floor types.
4.2. Side Brush Installation
- Turn the robot vacuum over.
- Locate the side brush. Depending on your model, it may be secured with a screw.
- If applicable, unscrew and remove the old side brush.
- Align the new side brush with the post and press it down firmly, or secure it with the screw.

Image 4.2: Side brush operation for corner cleaning.
4.3. HEPA Filter Installation
- Open the dustbin compartment on your robot vacuum.
- Remove the dustbin.
- Locate the filter housing within the dustbin and remove the old HEPA filter.
- Insert the new HEPA filter into the housing, ensuring it is seated correctly.
- Reinstall the dustbin into the robot vacuum.

Image 4.3: High-efficiency filter capturing various particles.
4.4. Dust Bag Installation
- Open the auto-empty dock's dustbin compartment.
- Carefully remove the full dust bag from its slot.
- Dispose of the old dust bag responsibly.
- Slide the new dust bag into the slot until it is fully seated.
- Close the dustbin compartment.
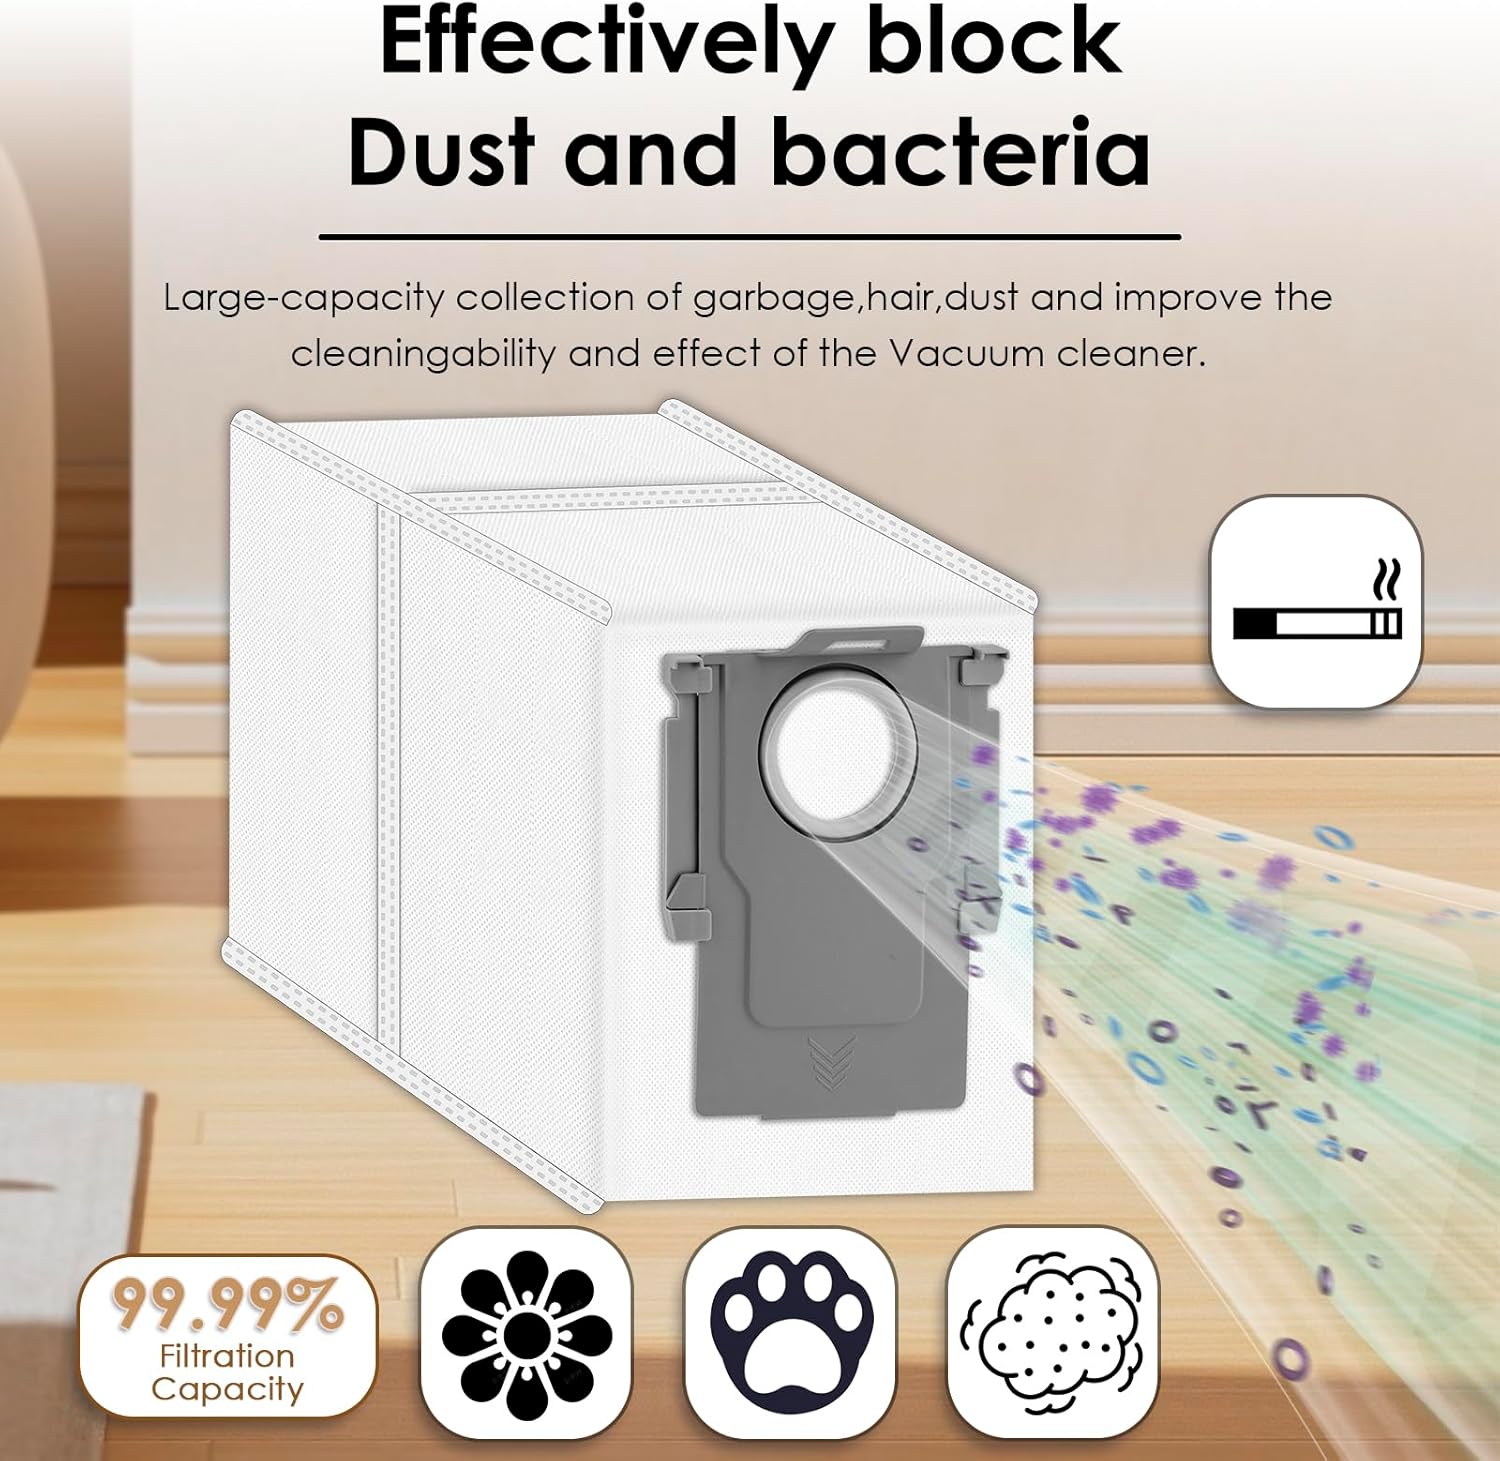
Image 4.4: Dust bag capacity and filtration effectiveness.
4.5. Mop Pad Installation
- Remove the dirty mop pad from the mop module on the robot vacuum.
- Attach a clean mop pad to the mop module, ensuring it is securely fastened (usually via Velcro or clips).
- Ensure the mop pad is evenly spread and not bunched up.

Image 4.5: Mop pads cleaning different floor types.
5. Maintenance and Care
Regular maintenance of your replacement parts ensures optimal performance and extends the lifespan of your robot vacuum.
5.1. Roller Brush Maintenance
- Inspect the roller brush weekly for tangled hair or debris.
- Use the cleaning tool (if provided with your vacuum) to cut and remove any tangled hair.
- Wipe the brush with a dry cloth. Do not wash the roller brush with water.
5.2. Side Brush Maintenance
- Check the side brushes bi-weekly for wear, bending, or entanglement.
- Remove any hair or debris caught in the bristles.
- If bristles are bent, you can gently reshape them by soaking them in warm water for a few minutes.
5.3. HEPA Filter Maintenance
- Tap the filter gently over a trash can to remove loose dust after each use or as needed.
- Do not wash HEPA filters with water, as this can damage the filter material.
- It is recommended to replace the HEPA filter every 1-2 months to maintain filtration efficiency and prevent dust from entering the engine.
5.4. Dust Bag Maintenance
- Replace the dust bag when the robot vacuum or auto-empty dock indicates it is full, or approximately every 4-8 weeks depending on usage.
- Dust bags are disposable and should not be emptied and reused.
5.5. Mop Pad Maintenance
- Remove the mop pad after each mopping session.
- Wash the mop pad by hand with mild detergent or machine wash on a gentle cycle.
- Allow the mop pad to air dry completely before reattaching it to the mop module.
6. Specifications
| Component | Quantity | Material | Key Feature |
|---|---|---|---|
| Roller Brushes | 2 | Rubber | Anti-tangle design, effective on various floor types |
| Side Brushes | 8 | Nylon bristles | Innovative structural design, deep corner cleaning |
| Dust Bags | 8 | Melt-blown fiber filter layer, non-woven fabrics | 99.99% filtration capacity, environmentally friendly materials |
| HEPA Filters | 8 | Filter media | Filters up to 99.9% of dirt, pollen, and small particles |
| Mop Pads | 4 | Microfiber materials | Effective stain removal, super absorbency |
- Item Weight: 1.47 pounds
- Product Dimensions: 1 x 1 x 1 inches (packaging)
7. Troubleshooting
If you encounter issues with your replacement parts, consider the following common solutions:
- Parts do not fit: Double-check the compatibility section (Section 3) to ensure your Roborock model is listed. Verify that you have the correct orientation for installation.
- Reduced cleaning performance: Ensure all brushes and filters are clean and free of debris. Replace filters and dust bags according to the recommended maintenance schedule (Section 5).
- Unusual noises: Check roller and side brushes for any foreign objects or tangled hair that might be causing obstruction. Ensure all parts are securely installed.
8. Warranty and Support
For any questions regarding the CHAIN PEAK replacement accessories kit, please refer to the retailer where the product was purchased or contact CHAIN PEAK customer support directly. Specific warranty information may vary by region and retailer.
Ask a question about this manual
Ask about setup, troubleshooting, compatibility, parts, safety, or missing instructions. Manuals+ will review the question and use this page’s manual context to help answer it.