Introduction
This manual provides detailed instructions for the installation, operation, and maintenance of your SMAAIR 52-inch Smart Ceiling Fan with Lights. Please read this manual thoroughly before installation and use to ensure safe and efficient operation. Keep this manual for future reference.
Safety Information
WARNING: To reduce the risk of fire, electric shock, or personal injury, always follow these instructions:
- Turn off power at the circuit breaker or fuse box before beginning installation.
- All wiring must be in accordance with national and local electrical codes. Consult a qualified electrician if you are unsure about wiring.
- Ensure the installation site can support the weight of the fan (approximately 15.52 lbs).
- Do not bend the blade holders during installation, balancing, or cleaning.
- Keep hands clear of the fan blades when the fan is operating.
- This fan is designed for indoor use only.
Package Contents
Verify that all components are present before beginning installation. If any parts are missing or damaged, contact SMAAIR customer support.
- Ceiling Fan Motor Assembly
- Fan Blades (5)
- Light Kit Assembly
- Remote Control with Wall Mount Holder (AAA batteries not included)
- Mounting Bracket
- Hardware Pack (screws, wire nuts, washers)
- Instruction Manual
Setup and Installation
Detailed installation instructions are included in the product package. The following provides a general overview and important considerations.
Pre-Installation
- Ensure power is OFF at the circuit breaker.
- Prepare the electrical box and ensure it is securely mounted and capable of supporting the fan.
Mounting Options
This fan is designed for flush mount installation only. It is not suitable for angled or sloped ceilings.

Image: The fan supports flush mount installation only. Angled mounting is not compatible.
Wiring and Assembly
- Attach the mounting bracket to the electrical box.
- Hang the fan motor assembly onto the mounting bracket (this often allows for easier wiring).
- Connect the electrical wires according to the provided wiring diagram in the separate installation guide. Ensure all connections are secure.
- Secure the fan motor assembly to the mounting bracket.
- Attach the fan blades to the motor housing.
- Install the light kit assembly and secure the light cover.

Image: Fan dimensions for installation planning. The fan has a diameter of 52 inches and a height of 10.2 inches.
Operating Instructions
Your SMAAIR Smart Ceiling Fan offers multiple control methods for convenience.
Control Methods Overview

Image: The fan can be controlled via voice commands, a smartphone app, or the included remote control.
Remote Control
The included remote control allows for direct operation of the fan and light functions.
- Pairing: After restoring power to the fan, immediately press and hold the pairing button on the remote within one minute to pair. Ensure AAA batteries are installed.
- Functions: Fan On/Off, Fan Speed Up/Down (10 speeds), Light On/Off, Light Dimming, Color Temperature Change, Natural Breeze Wind mode, Reverse Mode.
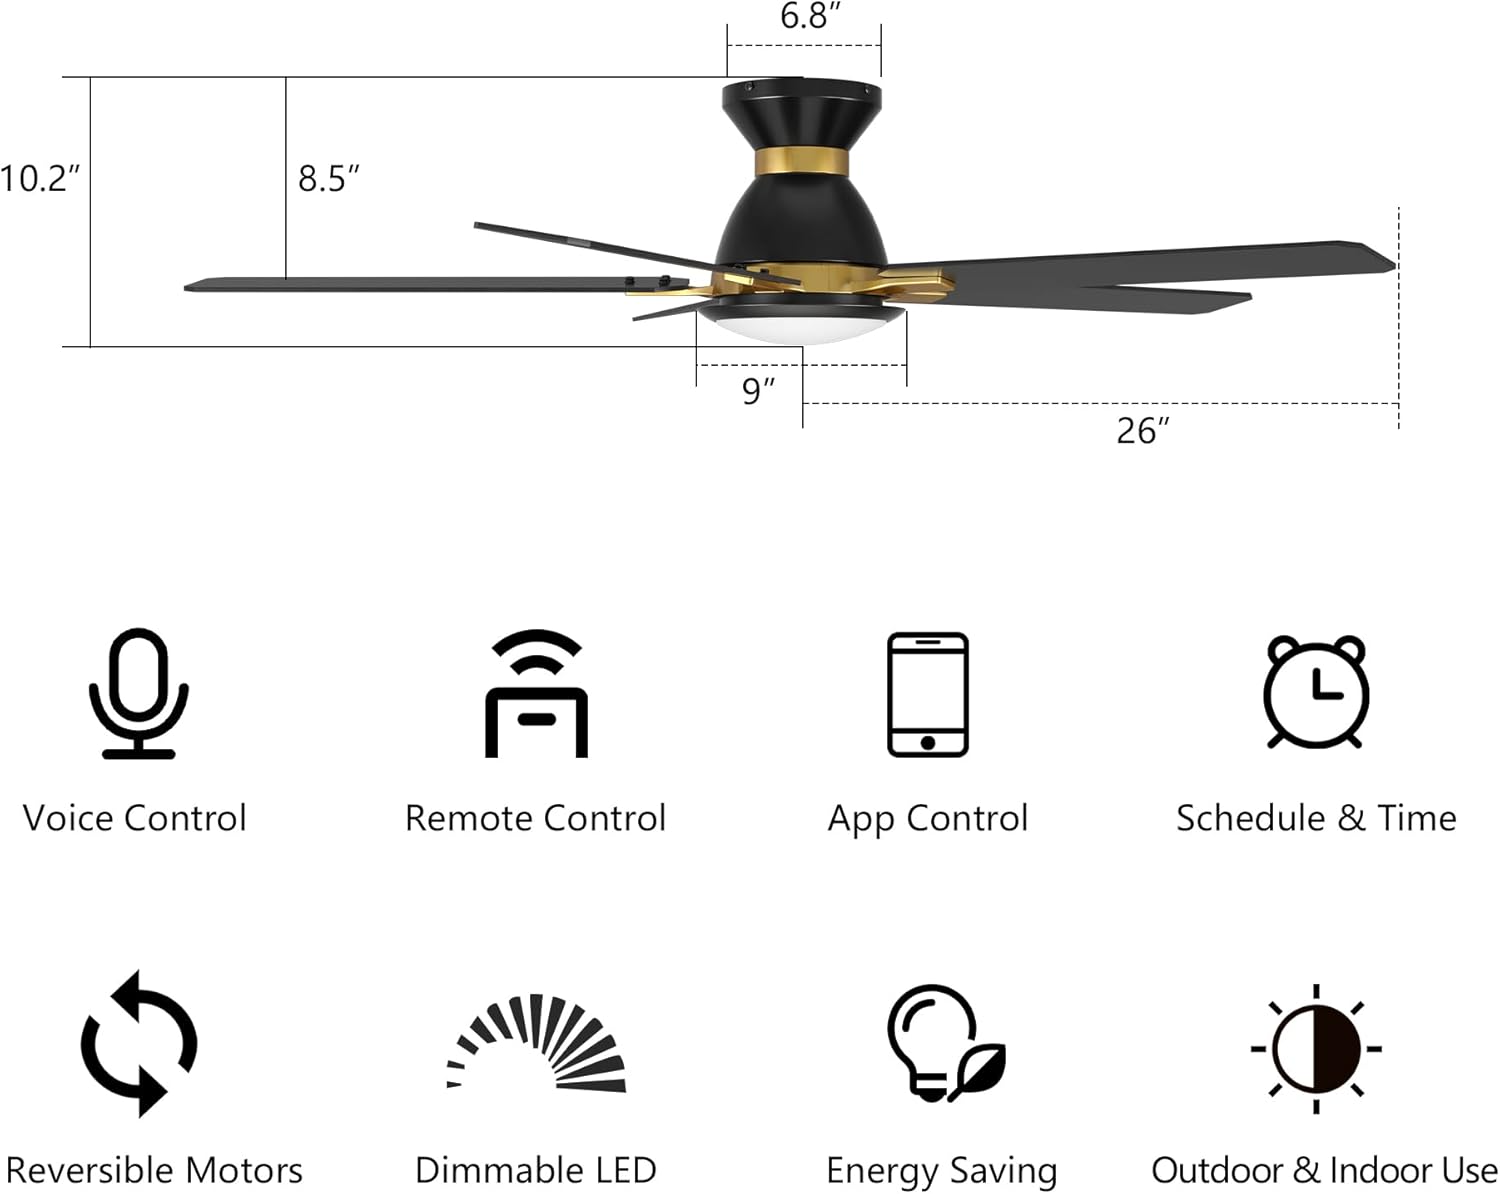
Image: The remote control features buttons for fan speed, light control, and mode selection.
App Control
Download the SMAAIR app (or CARRO APP) from the App Store or Google Play to control your fan from your smartphone.
- Features: Full control over 10 fan speeds, separate yellow and white light adjustment, wind mode changes (Summer/Winter, Natural, Sleep), 8-hour sleep timer, and 24-hour scheduling.
- Remote Access: Control your fan settings even when away from home.

Image: The smartphone app provides comprehensive control over fan and light settings.
Voice Control
Integrate your fan with smart home assistants for convenient voice commands.
- Compatibility: Works with Amazon Alexa, Google Assistant, and Siri Shortcuts.
- Setup: Follow the instructions within the SMAAIR app to connect your fan to your preferred voice assistant.
- Commands: Control fan speed, turn the light on/off, adjust light brightness, and change light color temperature using simple voice commands.

Image: Voice control integration allows for hands-free operation of your smart ceiling fan.
Fan Modes and Speeds
The fan features a 10-speed reversible DC motor for optimal airflow and energy efficiency.
- 10 Speeds: Adjust airflow from a silent breeze (speeds 1-3) to an energetic wind (speeds 8-10).
- Common Mode: Standard fan operation with 10 adjustable speeds.
- Natural Mode: Simulates a gentle outdoor breeze by varying fan speeds.
- Sleep Mode: Provides a gentle breeze at low speeds for restful sleep.
- Reverse Mode (Summer/Winter):
- Summer (Downdraft): Blades rotate counter-clockwise to create a cooling breeze.
- Winter (Updraft): Blades rotate clockwise to circulate warm air trapped near the ceiling, making the room feel warmer.

Image: The reversible motor allows for both summer cooling and winter heat circulation.
Lighting Control
The integrated LED light offers adjustable color temperature and brightness.
- Color Temperatures: Warm White (2700K), Natural White (3500K), and Day Light (4000K).
- Dimming: Adjust brightness from 1% to 100% to suit your preference.

Image: Select from three color temperatures and dim the light from 1% to 100%.
Scheduling and Timer
Use the app to set schedules and timers for automated operation.
- 8-Hour Sleep Timer: Set the fan to turn off automatically after a specified duration.
- 24-Hour Schedule: Program the fan and light to turn on or off at specific times, individually or in groups, for different rooms.

Image: Create custom schedules for your fan and light using the smartphone app.
Maintenance
Regular maintenance ensures the longevity and optimal performance of your ceiling fan.
- Cleaning: Use a soft, damp cloth to clean the fan blades and motor housing. Do not use abrasive cleaners or solvents. Ensure power is off before cleaning.
- Blade Balance: If the fan wobbles, check that all blade screws are tight and blades are properly aligned. A balancing kit (not included) may be used if necessary.
- Light Cover: Periodically remove and clean the light cover to maintain optimal light output.
- Connections: Annually check all electrical connections and mounting hardware for tightness.
Troubleshooting
If you encounter issues with your SMAAIR Smart Ceiling Fan, refer to the following common solutions:
| Problem | Possible Cause | Solution |
|---|---|---|
| Fan does not operate / Light does not turn on | No power supply; Loose wiring; Remote not paired. | Check circuit breaker. Ensure all wiring connections are secure. Re-pair the remote control (see Remote Control section). |
| Remote control not working | Dead batteries; Remote not paired; Obstruction. | Replace AAA batteries. Re-pair the remote control immediately after turning power back on. Ensure no obstructions between remote and fan. |
| App control not working / Fan offline | Wi-Fi connectivity issue; Incorrect app setup. | Ensure your home Wi-Fi is active and the fan is within range. Check app settings and re-connect the fan if necessary. Reset the fan by turning power off and on at the switch. |
| Fan wobbles | Loose blades or mounting; Unbalanced blades. | Ensure all blade screws and mounting screws are tight. Check for bent blades. A balancing kit may be required. |
| Light is dim or flickering | Incorrect dimming setting; Loose connection. | Adjust brightness settings via remote or app. Check light kit wiring connections. |
Specifications
| Feature | Specification |
|---|---|
| Brand | SMAAIR |
| Model Name | 4ceb91c3-36ec-4d56-84cb-3969310cf3df |
| Size | 52 Inch |
| Product Dimensions | 52"D x 52"W x 10.2"H |
| Item Weight | 15.52 pounds |
| Color | Black/Gold |
| Number of Blades | 5 |
| Blade Length | 23.3 Inches |
| Motor Type | DC (Brushless) |
| Number of Power Levels | 10 |
| Air Flow Capacity | 5000 Cubic Feet Per Minute |
| Voltage | 120 Volts |
| Power Source | AC/DC |
| Control Method | Remote, App, Voice (Alexa, Google Assistant, Siri) |
| Light Output | Max. 22W Integrated LED |
| Color Temperature | 2700K (Warm), 3500K (Natural), 4000K (Daylight) |
| Dimming | 1% - 100% |
| Installation Type | Flush Mount |
| Indoor/Outdoor Usage | Indoor |
| Certification | UL |
Warranty and Support
SMAAIR is committed to providing high-quality products. For specific warranty details, please refer to the warranty card included with your product or contact SMAAIR customer support directly. If you have any questions, require technical assistance, or need to report a missing or damaged part, please contact our support team through the official SMAAIR website or the contact information provided in your product packaging.