1. Introduction
Thank you for choosing the EliteBloom FJ3566M Smart Weather Station. This device provides comprehensive weather information, including indoor and outdoor temperature and humidity, atmospheric pressure, weather forecasts, and time functions. Please read this manual carefully before use to ensure proper operation and to maximize the product's features.
2. Package Contents
Upon unpacking, please verify that all items listed below are present and in good condition:
- 1 x EliteBloom FJ3566M Weather Station (Main Unit)
- 1 x Wireless Outdoor Sensor
- 1 x USB Power Cable
- 1 x User Manual (Multi-language)
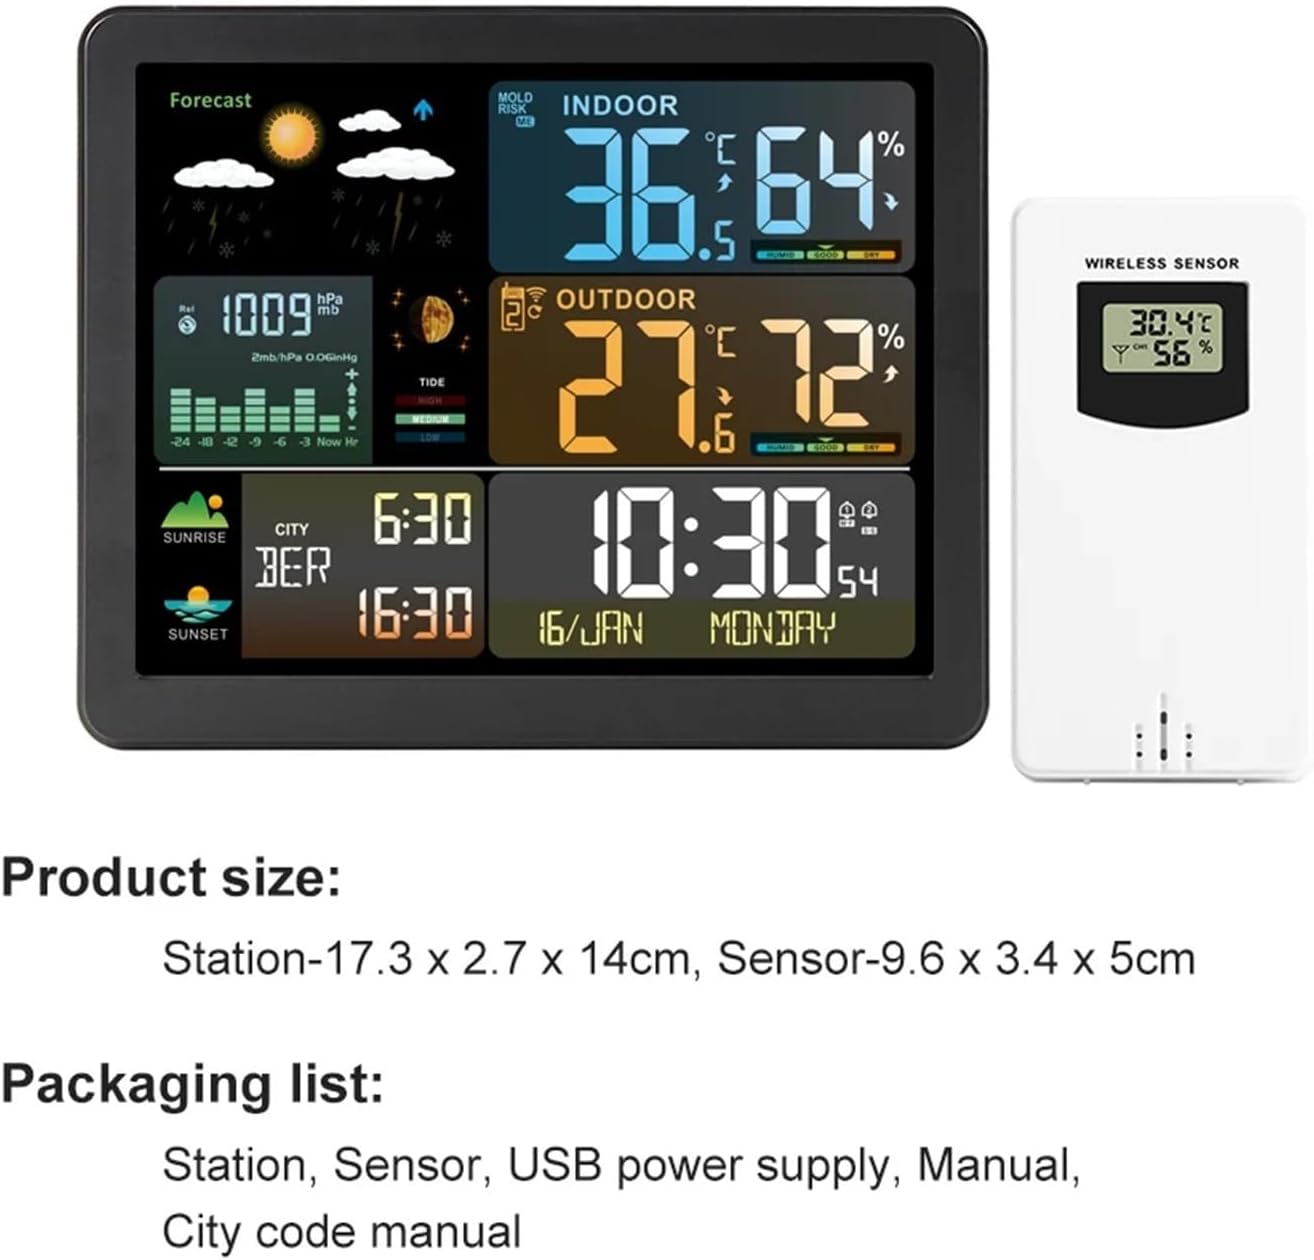
Image: The weather station main unit, wireless sensor, USB power cable, and user manual are included in the package.
3. Product Overview
3.1 Main Unit Features
The main unit features a large color screen displaying various information:
- Time, Calendar, and Weekday
- Indoor and Outdoor Temperature and Humidity
- Weather Forecast (6 types: sunny, cloudy, cloudy, drizzle, rain, snow)
- Atmospheric Pressure and Trend Prediction
- Moon Phase and Tide Information
- Comfort Index and Indoor Mold Risk Warning
- Local Sunrise and Sunset Times
3.2 Wireless Outdoor Sensor
The wireless outdoor sensor transmits temperature and humidity data to the main unit. It can be wall-mounted or placed on a table. The sensor operates on a 433.92MHz transmitting frequency with a range of up to 60 meters in an open area. The weather station supports connection with up to 3 wireless outdoor sensors (one sensor is included in the package).
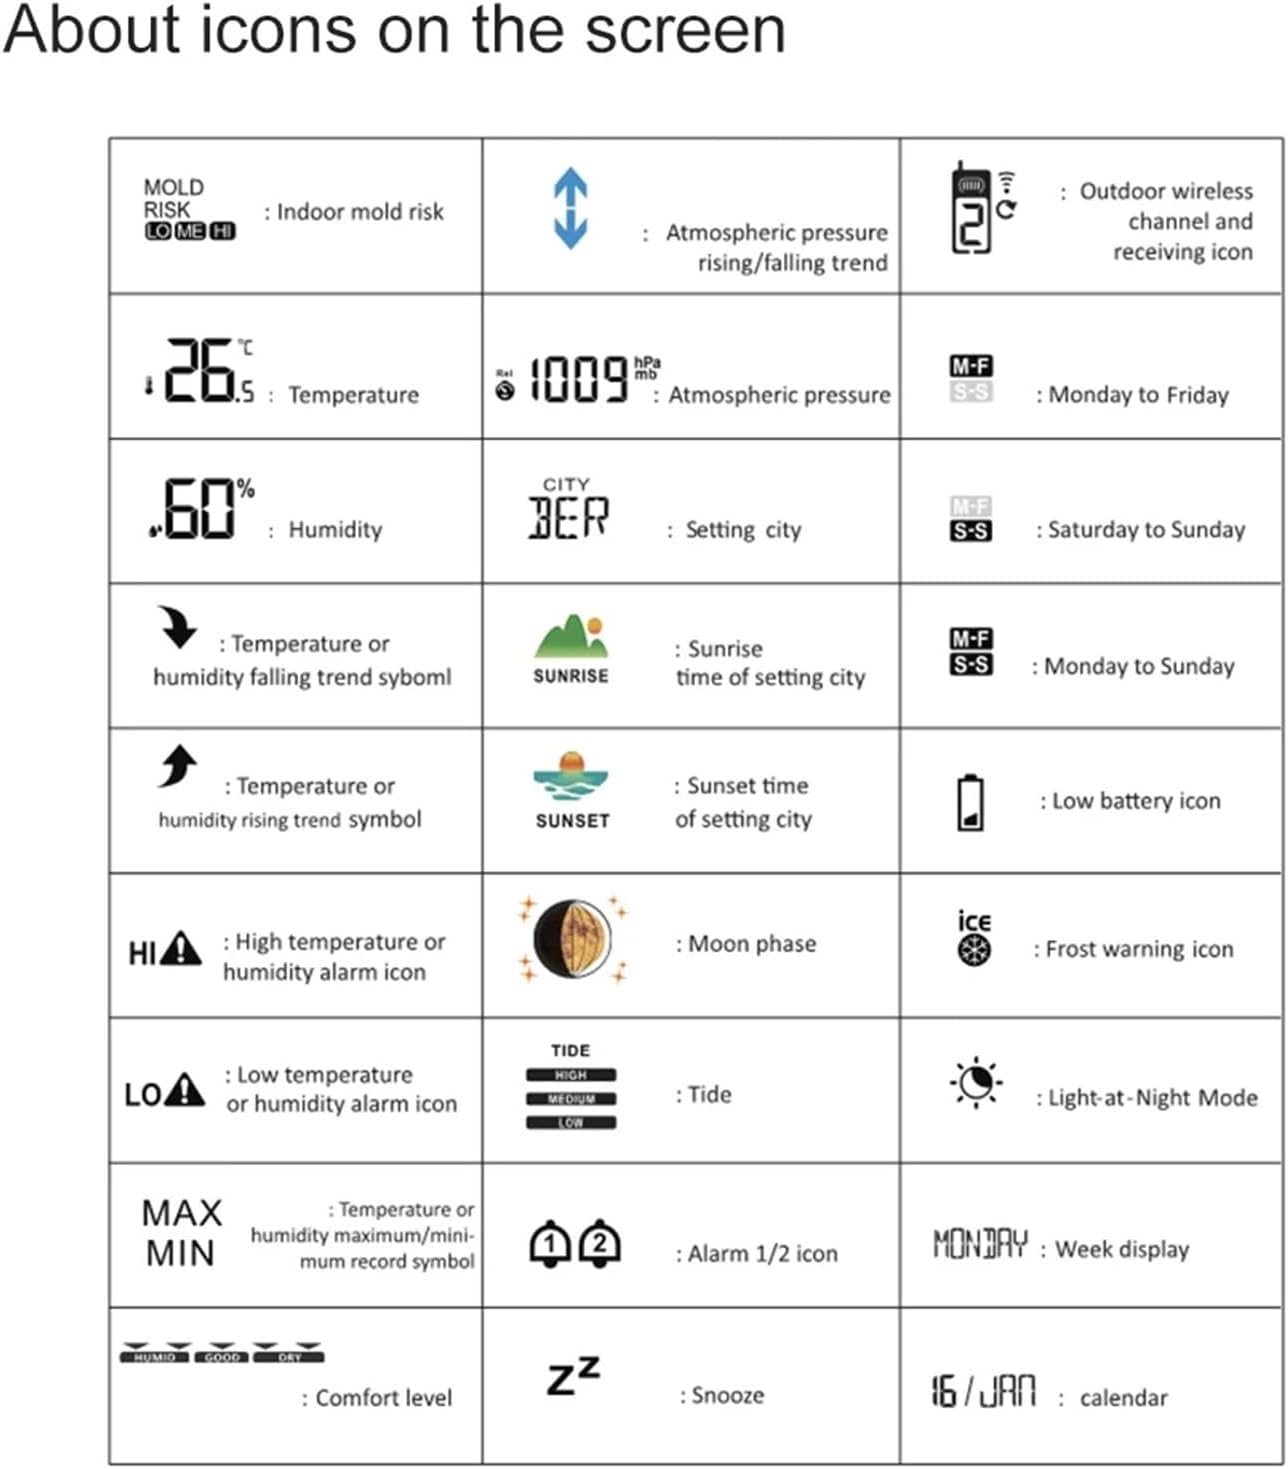
Image: The weather station main unit and its wireless outdoor sensor, demonstrating the wireless connectivity and placement options.
3.3 Screen Icons Reference
The following table explains the various icons displayed on the weather station screen:
| Icon | Description |
|---|---|
| MOLD RISK | Indoor mold risk indicator (Low, Medium, High) |
| ↑↓ | Atmospheric pressure rising/falling trend |
| 📶 | Outdoor wireless channel and receiving icon |
| °C / °F | Temperature unit |
| hPa / inHg | Atmospheric pressure unit |
| M-F | Monday to Friday alarm |
| % | Humidity percentage |
| CITY | City setting indicator |
| S-S | Saturday to Sunday alarm |
| ↗ | Temperature or humidity rising trend symbol |
| SUNRISE | Sunrise time of setting city |
| M-F S-S | Monday to Sunday alarm |
| ↘ | Temperature or humidity falling trend symbol |
| SUNSET | Sunset time of setting city |
| 🔌 | Low battery icon |
| HI Δ | High temperature or humidity alarm icon |
| 🌙 | Moon phase |
| ❄ | Frost warning icon |
| LO Δ | Low temperature or humidity alarm icon |
| TIDE | Tide indicator (High, Mid, Low) |
| 🌕 | Light-at-Night Mode |
| MAX MIN | Temperature or humidity maximum/minimum record symbol |
| 🕑 🕒 | Alarm 1/2 icon |
| MONDAY | Week display |
| HUMID GOOD DRY | Comfort level indicator |
| ZZ | Snooze function |
| 16/JAN | Calendar display |

Image: A detailed diagram illustrating the various icons displayed on the weather station's color screen and their corresponding functions.
4. Setup
4.1 Powering the Weather Station
The main unit can be powered by either batteries or the included USB power cable.
- Battery Power: Insert 2 x LR03 AAA batteries (not included) into the main unit's battery compartment. When powered by batteries, the backlight will illuminate for 15 seconds when the top button is touched.
- Adapter Power: Connect the USB power cable to the DC 5V 600mA input port on the weather station and plug it into a suitable power source. When connected to the power supply, the backlight can operate continuously, and the automatic backlight function can be used.
4.2 Powering the Wireless Outdoor Sensor
Insert 2 x LR6 AA batteries (not included) into the wireless outdoor sensor's battery compartment. Ensure correct polarity.
4.3 Sensor Pairing
Once both the main unit and the sensor are powered, the main unit will automatically attempt to connect with the sensor. Ensure the sensor is within the 60-meter transmission range in an open area. If connection is not established, refer to the troubleshooting section or the full user manual for manual pairing instructions.
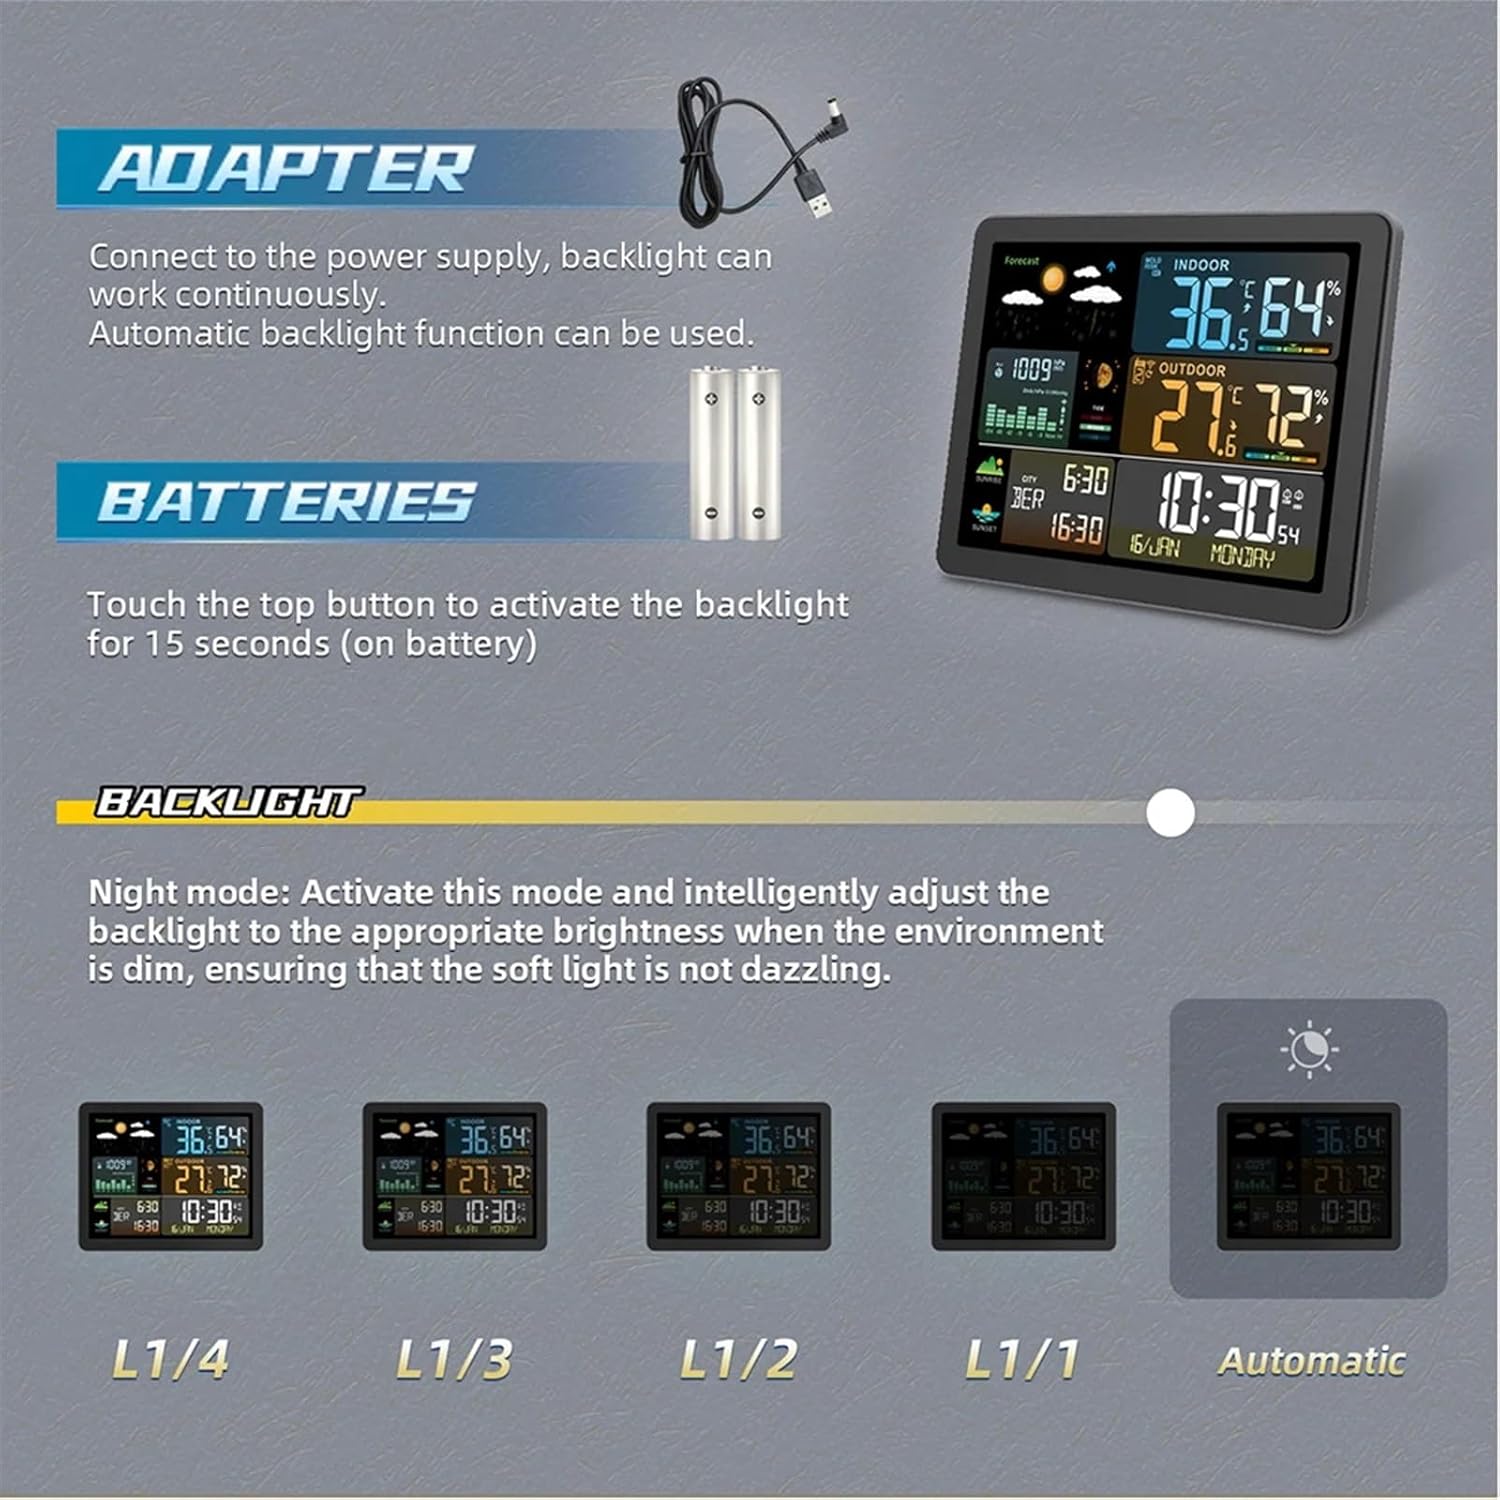
Image: Illustration of connecting the weather station to an adapter for continuous power and backlight, and inserting batteries for portable use with a 15-second backlight activation.
5. Operating Instructions
5.1 Setting Time and Date
Refer to the detailed user manual for specific button presses to set the time (12/24HR format) and date. The device supports dual alarms with a snooze function (adjustable from OFF or 5 to 60 minutes).
5.2 Adjusting Backlight Brightness
The weather station offers 5 levels of backlight brightness (high, low, 4 intermediate levels, and closed). It also features a night mode that intelligently adjusts backlight brightness when the environment is dim to prevent dazzling. This continuous backlight feature is available only when the device is powered by the adapter.
5.3 Changing Measurement Units
You can switch between different measurement units:
- Temperature: Alternately display in Celsius (°C) or Fahrenheit (°F).
- Atmospheric Pressure: Alternately display in inHg or hPa/mb.
5.4 Weather Forecast
The weather station provides a forecast for the next 12-24 hours based on atmospheric pressure changes. It displays one of six weather icons: sunny, cloudy, cloudy, drizzle, rain, or snow.
5.5 Sunrise and Sunset Times
The product supports sunrise and sunset time display for 251 cities. After receiving the product, you can set it according to the city code provided in the instruction manual. You can also manually set your time.

Image: The weather station screen showing sunrise and sunset times, with a background image of a sunrise/sunset over water.
5.6 Alarms and Warnings
The weather station is equipped with several alarm functions:
- Indoor and outdoor temperature and humidity upper and lower limit alarms.
- Frost point alarms.
- Indoor level 3 mold risk warning.
- Indoor and outdoor level 5 comfort level display.
6. Maintenance
- Clean the weather station and sensor with a soft, damp cloth. Do not use abrasive cleaners or solvents.
- Avoid exposing the main unit to direct sunlight, extreme temperatures, or moisture.
- Replace batteries in both the main unit and the sensor when the low battery indicator appears to ensure continuous and accurate readings.
- For optimal outdoor sensor performance, place it in a shaded, well-ventilated area, protected from direct rain and sunlight.
7. Troubleshooting
- No display on main unit: Check if batteries are inserted correctly or if the USB power cable is properly connected.
- Outdoor temperature/humidity not displayed: Ensure the outdoor sensor has fresh batteries and is within range of the main unit. Try repositioning the sensor or main unit. Re-pair the sensor if necessary (refer to the full manual for pairing instructions).
- Inaccurate readings: Ensure the sensor is not exposed to direct sunlight or heat sources. Allow time for readings to stabilize after initial setup or battery replacement.
- Backlight not continuous: Ensure the main unit is connected to the USB power cable. Continuous backlight is not available when running on battery power.
8. Specifications
| Feature | Specification |
|---|---|
| Indoor Temperature Range | -9.9°C to 50°C (15°F to 122°F) |
| Outdoor Temperature Range | -40°C to 70°C (-40°F to 158°F) |
| Indoor/Outdoor Humidity Range | 20%RH to 95%RH |
| Atmospheric Pressure Range | 17.72 inHg to 32.50 inHg (600 hPa/mb to 1100 hPa/mb) |
| Weather Forecasts | 6 types: Sunny, Cloudy, Drizzle, Rain, Snow |
| Main Unit Power Supply | 2 x LR03 AAA batteries (not included), DC 5V 600mA adapter |
| Wireless Sensor Power Supply | 2 x LR6 AA batteries (not included) |
| Wireless Transmission Frequency | 433.92MHz |
| Wireless Transmission Range | Up to 60 meters (open area) |
| Material | ABS |
| Weather Station Size | 17.2 x 14 x 2.7 cm (6.77 x 5.51 x 1.06 inches) |
| Sensor Size | 9.7 x 3.2 x 5 cm (3.82 x 1.26 x 1.97 inches) |
9. Warranty and Support
EliteBloom products are designed for reliability and performance. For warranty information, technical support, or service inquiries, please refer to the warranty card included in your package or contact EliteBloom customer service directly. Please retain your proof of purchase for warranty claims.