
1. Introduction
This manual provides detailed instructions for the installation, operation, and maintenance of the Wengart TBT7-A1 Multi-function Delay Time Relay. This advanced time relay integrates various delay control functions to meet diverse application needs. It is widely used in industrial automation, intelligent buildings, mechanical equipment, electrical control, and other fields. It is particularly suitable for complex process control, sequential control of multiple devices, and delay protection of precision instruments, where various delay control functions and high-precision delay control are required.

Front view of the Wengart TBT7-A1 Delay Time Relay, showing its compact design and control knobs.
2. Product Features
- Versatile Delay Range: This multi-function SPDT time relay offers a delay time range from 0.1 seconds to 10 days, accommodating various delay control requirements.
- 10 Delay Functions: Features 10 distinct delay functions including Delay On, Delay Off, Cycle Delay (Off/On Start), Delay Off (Rising Edge/Falling Edge Trigger), Rising Edge Trigger Closing Delay Off, On-Off Delay, Pulse Conversion, and Pulse Output, satisfying diverse control needs.
- Wide Voltage Compatibility: Adopts a wide voltage design with a universal range of 12-240V AC and DC, making it suitable for various electrical environments.
- LED Indicator: Equipped with an LED indicator light that clearly displays the relay's operating status. When power is supplied, the indicator light illuminates, allowing for quick assessment of normal relay operation and simplifying troubleshooting and maintenance.
- DIN Rail Mounting: Features a standard 18mm width design for easy installation on industry-standard 35mm DIN rails. This mounting method simplifies installation and replacement, optimizing space.
3. Product Components Overview
Familiarize yourself with the main components of the TBT7-A1 relay for proper installation and operation.

Diagram identifying key components of the Wengart TBT7-A1 relay, including trigger terminal, supply terminal, LED indicators, time range selections, time percentage setting, function selection, model number, and output contacts.
- A1, A2: Supply Terminals
- S: Trigger Terminal
- Un (Green LED): Power Supply Indicator
- R (Red LED): Output Indicator
- Knob 1 (Top): 10 Time Range Selections (1s, 10s, 1m, 10m, 1h, 10h, 1d, 10d, ON, OFF)
- Knob 2 (Middle): Time Percentage Setting (10% to 100%)
- Knob 3 (Bottom): Function Selection (A-J)
- 15, 16, 18: 1st Output Contact (1SPDT)
4. Setup and Installation
4.1. Rail Mounting
The TBT7-A1 relay is designed for easy installation on a standard 35mm DIN rail. Simply clip the relay onto the rail until it locks securely.

The Wengart TBT7-A1 relay mounted on a standard DIN rail, highlighting its easy installation mechanism.
4.2. Wiring Diagram
Refer to the following diagram for proper electrical connections. Ensure all connections are secure and comply with local electrical codes.

A simplified wiring diagram for the TBT7-A1 relay, demonstrating how to connect power supply, load (e.g., a bulb), and the trigger signal (S terminal) for a reset function. L and N represent Live and Neutral lines respectively.
- Connect the power supply (AC/DC 12-240V) to terminals A1 and A2.
- Connect the load to terminals 15 and 18 (normally open) or 15 and 16 (normally closed).
- The 'S' terminal is for external trigger signals, if required by the selected function.
5. Operating Instructions
5.1. Function Selection
The TBT7-A1 offers 10 different delay functions. Rotate the bottom knob to select the desired function (A through J).

Detailed view of the function selection dial on the Wengart TBT7-A1 relay, illustrating the 10 available delay modes (A-J) and their descriptions.
Available Functions:
- A: On Delay (Power On)
- B: Interval (Power On)
- C: Repeat Cycle (Starting Off)
- D: Repeat Cycle (Starting On)
- E: Off Delay (S Break)
- F: Single Shot
- G: Single Shot Trailing Edge (Non-Retriggerable)
- H: On/Off Delay
- I: Latching Relay
- J: Pulse Generator
5.2. Setting Time
The delay time is set using two knobs: the top knob for time range selection and the middle knob for percentage adjustment within that range.
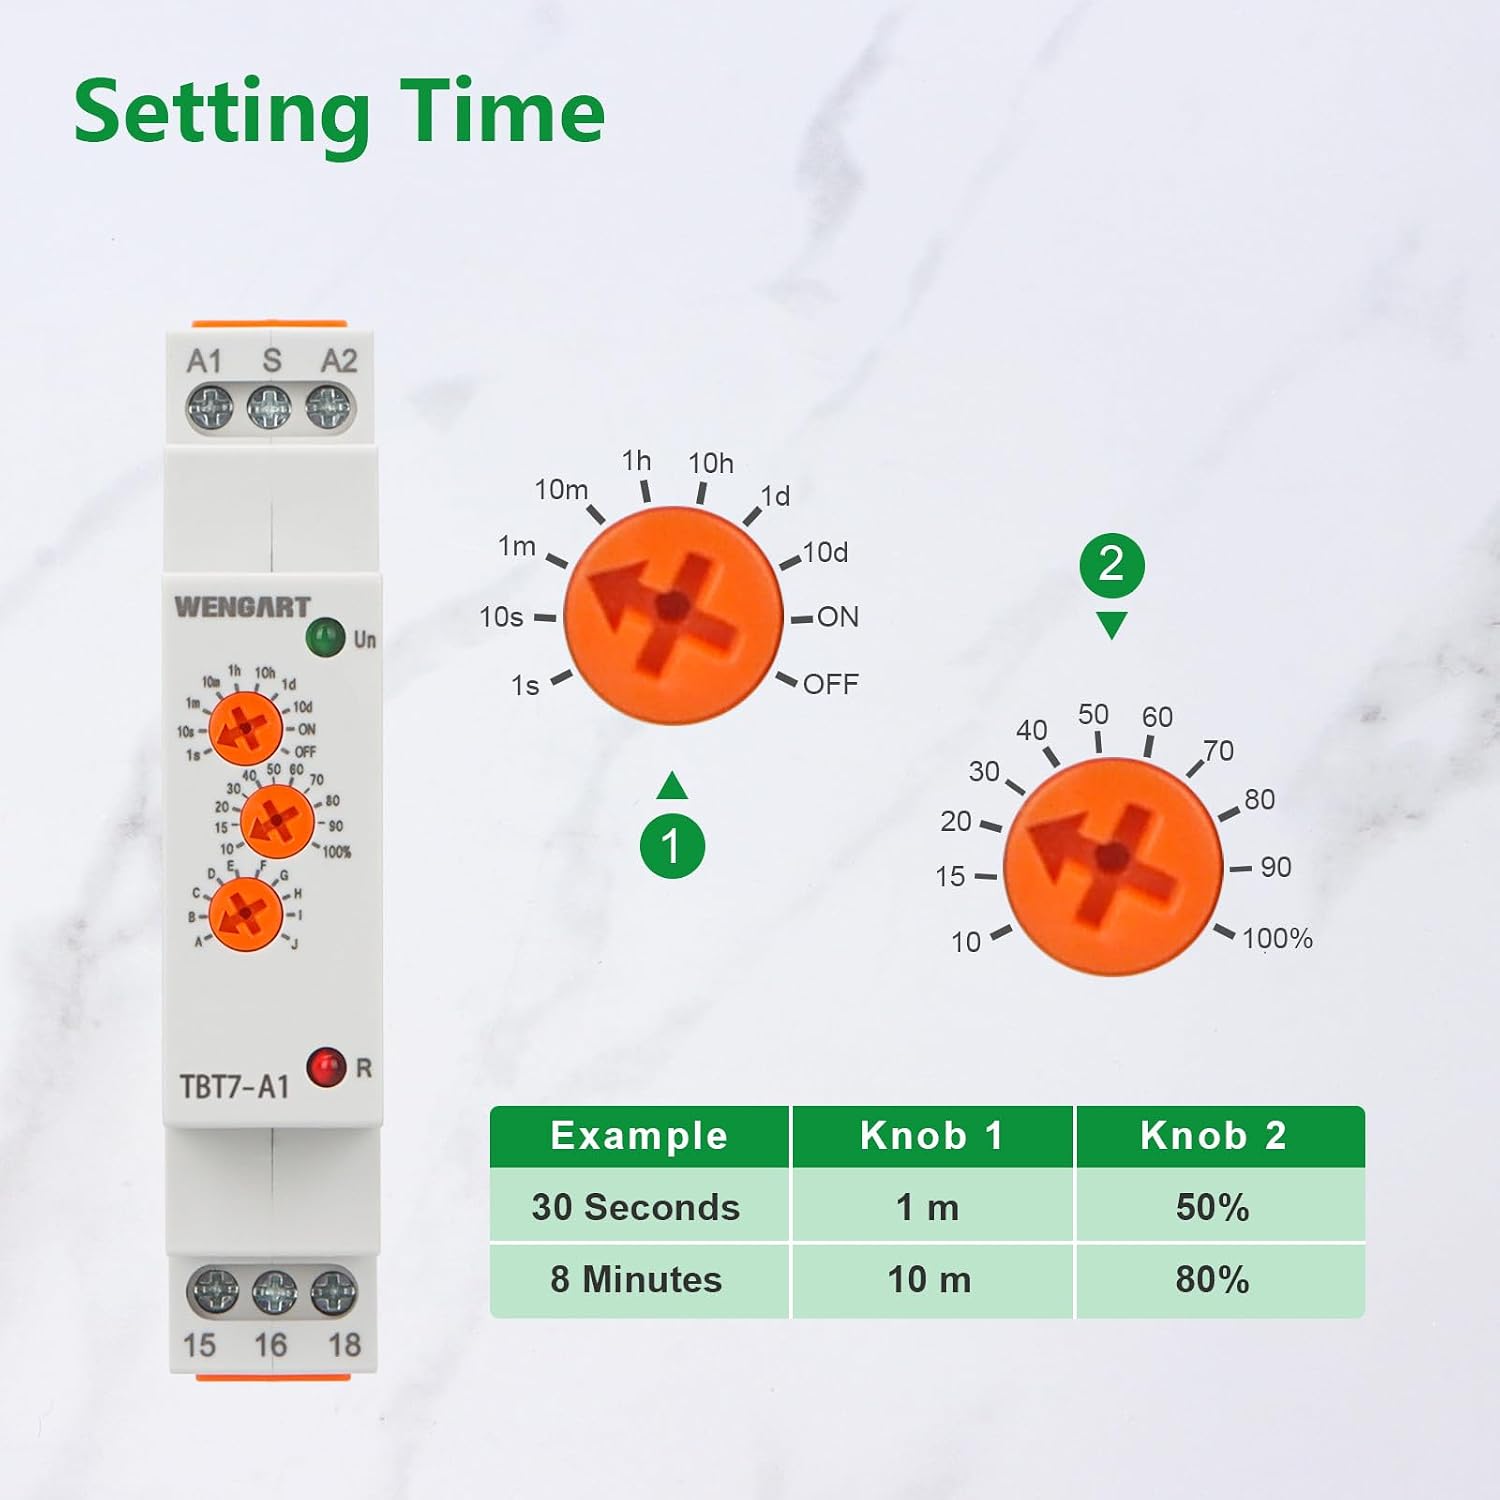
Image showing the two time setting knobs on the Wengart TBT7-A1 relay, with an example table for setting specific durations like 30 seconds or 8 minutes.
- Time Range Knob (Top): Selects the base time unit (e.g., 1s, 10s, 1m, 10m, 1h, 10h, 1d, 10d).
- Percentage Knob (Middle): Adjusts the time as a percentage of the selected range (10% to 100%).
Example: To set a delay of 30 seconds:
- Set the Time Range knob to '1m' (1 minute).
- Set the Percentage knob to '50%' (50% of 1 minute = 30 seconds).
Example: To set a delay of 8 minutes:
- Set the Time Range knob to '10m' (10 minutes).
- Set the Percentage knob to '80%' (80% of 10 minutes = 8 minutes).
6. Specifications
| Parameter | Value |
|---|---|
| Rated Voltage | AC/DC 12-240V |
| Output | 1SPDT |
| Time Setting Range | 0.1 seconds to 10 days |
| Rated Current | 1x16A (AC1) |
| Mechanical Life | 10 million cycles |
| Electrical Life (AC1) | 100,000 cycles |
| Mounting Type | DIN Rail Mount |
| Contact Material | Copper |
| Operating Mode | Automatic |
| Minimum Switching Voltage | 12V (DC) |
6.1. Product Dimensions

Image displaying the physical dimensions of the Wengart TBT7-A1 relay, showing its height (64mm), length (90mm), and width (18mm).
7. Applications
The Wengart TBT7-A1 Delay Time Relay is suitable for a wide range of applications requiring precise timing and control.

Collage of images illustrating various applications for the Wengart TBT7-A1 relay, such as street lamps, neon lights, factory automation, warehouses, and irrigation systems.
- Industrial Automation
- Intelligent Building Systems
- Mechanical Equipment Control
- Electrical Control Panels
- Street Lighting Control
- Irrigation Systems
- Sequential Control of Multiple Devices
- Delay Protection for Precision Instruments
8. Troubleshooting
If you encounter issues with your Wengart TBT7-A1 Delay Time Relay, refer to the following common troubleshooting steps:
- No Power Indication (Green LED Off): Check the power supply connections to A1 and A2. Ensure the voltage is within the specified AC/DC 12-240V range.
- Relay Not Activating:
- Verify the selected function (Knob 3) is correct for your application.
- Check the time setting (Knobs 1 and 2) to ensure the delay period is not excessively long or incorrectly set.
- If using a trigger (S terminal), ensure the trigger signal is correctly applied and within specifications.
- Inspect the load connections (15, 16, 18) for proper wiring and continuity.
- Incorrect Timing: Re-check the time range and percentage settings. Ensure the knobs are firmly set to the desired positions.
- Output LED (Red) Not Illuminating: This indicates the relay output is not active. Review the function, time settings, and trigger conditions.
If problems persist after following these steps, contact customer support.
9. Maintenance
The Wengart TBT7-A1 Delay Time Relay is designed for reliable operation with minimal maintenance. Follow these guidelines to ensure longevity:
- Keep Clean: Periodically clean the exterior of the relay with a dry, soft cloth. Avoid using abrasive cleaners or solvents.
- Environmental Conditions: Ensure the relay is operated within its specified environmental conditions (temperature, humidity) to prevent damage.
- Connection Checks: Periodically inspect electrical connections for tightness and signs of corrosion. Loose connections can lead to intermittent operation or overheating.
- Avoid Physical Stress: Do not subject the relay to excessive physical shock or vibration.
No user-serviceable parts are inside the unit. Do not attempt to open or repair the relay yourself, as this may void the warranty and pose safety risks.
10. Warranty and Support
Wengart products are manufactured to high-quality standards. This product comes with a standard manufacturer's warranty against defects in materials and workmanship. The specific warranty period may vary by region and retailer. Please retain your proof of purchase for warranty claims.
For technical support, warranty inquiries, or service, please contact your retailer or the official Wengart customer service channel. When contacting support, please provide the product model number (TBT7-A1) and a detailed description of the issue.
Contact Information: Refer to the contact details provided by your point of purchase or the official Wengart website.