1. Important Safety Instructions
Please read this manual thoroughly before operating the Aokia Cordless Weed Wacker. Failure to follow these instructions may result in injury or damage to the product.
- Always wear appropriate safety gear, including eye protection and sturdy shoes. Be aware of potential flying debris.
- Use the double-switch safety lock function to prevent accidental activation. You need to hold down the lock button before holding down the trigger to start the weed mower.
- Do not operate the tool without proper training and understanding of its functions.
- Use only original batteries and chargers. Charge in a ventilated area away from flammables.
- Clear the work area of any obstacles or debris before operation.
- Do not use in wet conditions.
- Power off the tool after use and store it properly in a dry, secure location.
2. Package Contents
Verify that all items are present in your package:
- Aokia Cordless Weed Wacker main unit
- 2.0Ah 12V Rechargeable Battery
- Battery Charger
- Metal Blades (recommended for 99% of scenarios)
- Plastic Blades
- Circular Saw Blade
- Protective Bar
- Protective Cover
- Wheels (for wheeled operation)
- Adjustable Handle
- Connecting Rods (2 detachable extension poles)
- Safety Goggles
- Work Gloves
- Assembly Tools (wrench, screws)
3. Setup and Assembly
Follow these steps to assemble your Aokia Cordless Weed Wacker:
- Install the Protective Bar: Attach the protective bar to the main unit as shown. This helps prevent damage to the unit and surrounding objects.
- Install the Wheels: Securely attach the wheels to the protective cover using the provided screws and tools. The wheels help disperse the weight and maintain balance during operation.
- Install the Protective Cover: Align the protective cover with the main unit and secure it with the screws.
- Install the Blade: Carefully attach your desired blade (metal, plastic, or saw blade) to the unit. Ensure it is securely fastened using the provided wrench and screws. Always wear gloves when handling blades.
- Install the Handle: Attach the adjustable handle to the connecting rod. This handle is ergonomically designed for comfort and control.
- Install the Connecting Rod: Connect the main unit (with blade and wheels) to the handle assembly using the connecting rods. Ensure the connection is firm and secure. The unit can be adjusted to 32, 48, or 65 inches in length.
- Install the Battery: Slide the charged 12V 2.0Ah battery into the designated slot on the handle. Ensure it clicks into place.
Visual Assembly Guide
Refer to the following video for a step-by-step visual guide on assembly:
Video: How to install the Cordless Weed Wacker. This video demonstrates the complete assembly process of the Aokia Cordless Weed Wacker, including attaching the protective bar, wheels, cover, blade, handle, and connecting rods.
Video: Weed Wacker Installation steps. This video provides additional visual instructions for installing various components of the weed wacker.
Assembly Images


4. Operating Instructions
Your Aokia Cordless Weed Wacker is designed for versatile use in various gardening tasks.
Starting the Unit
To start the weed wacker, press and hold the red safety lock button, then press the main trigger. Release the safety lock button while keeping the trigger pressed to maintain continuous operation.
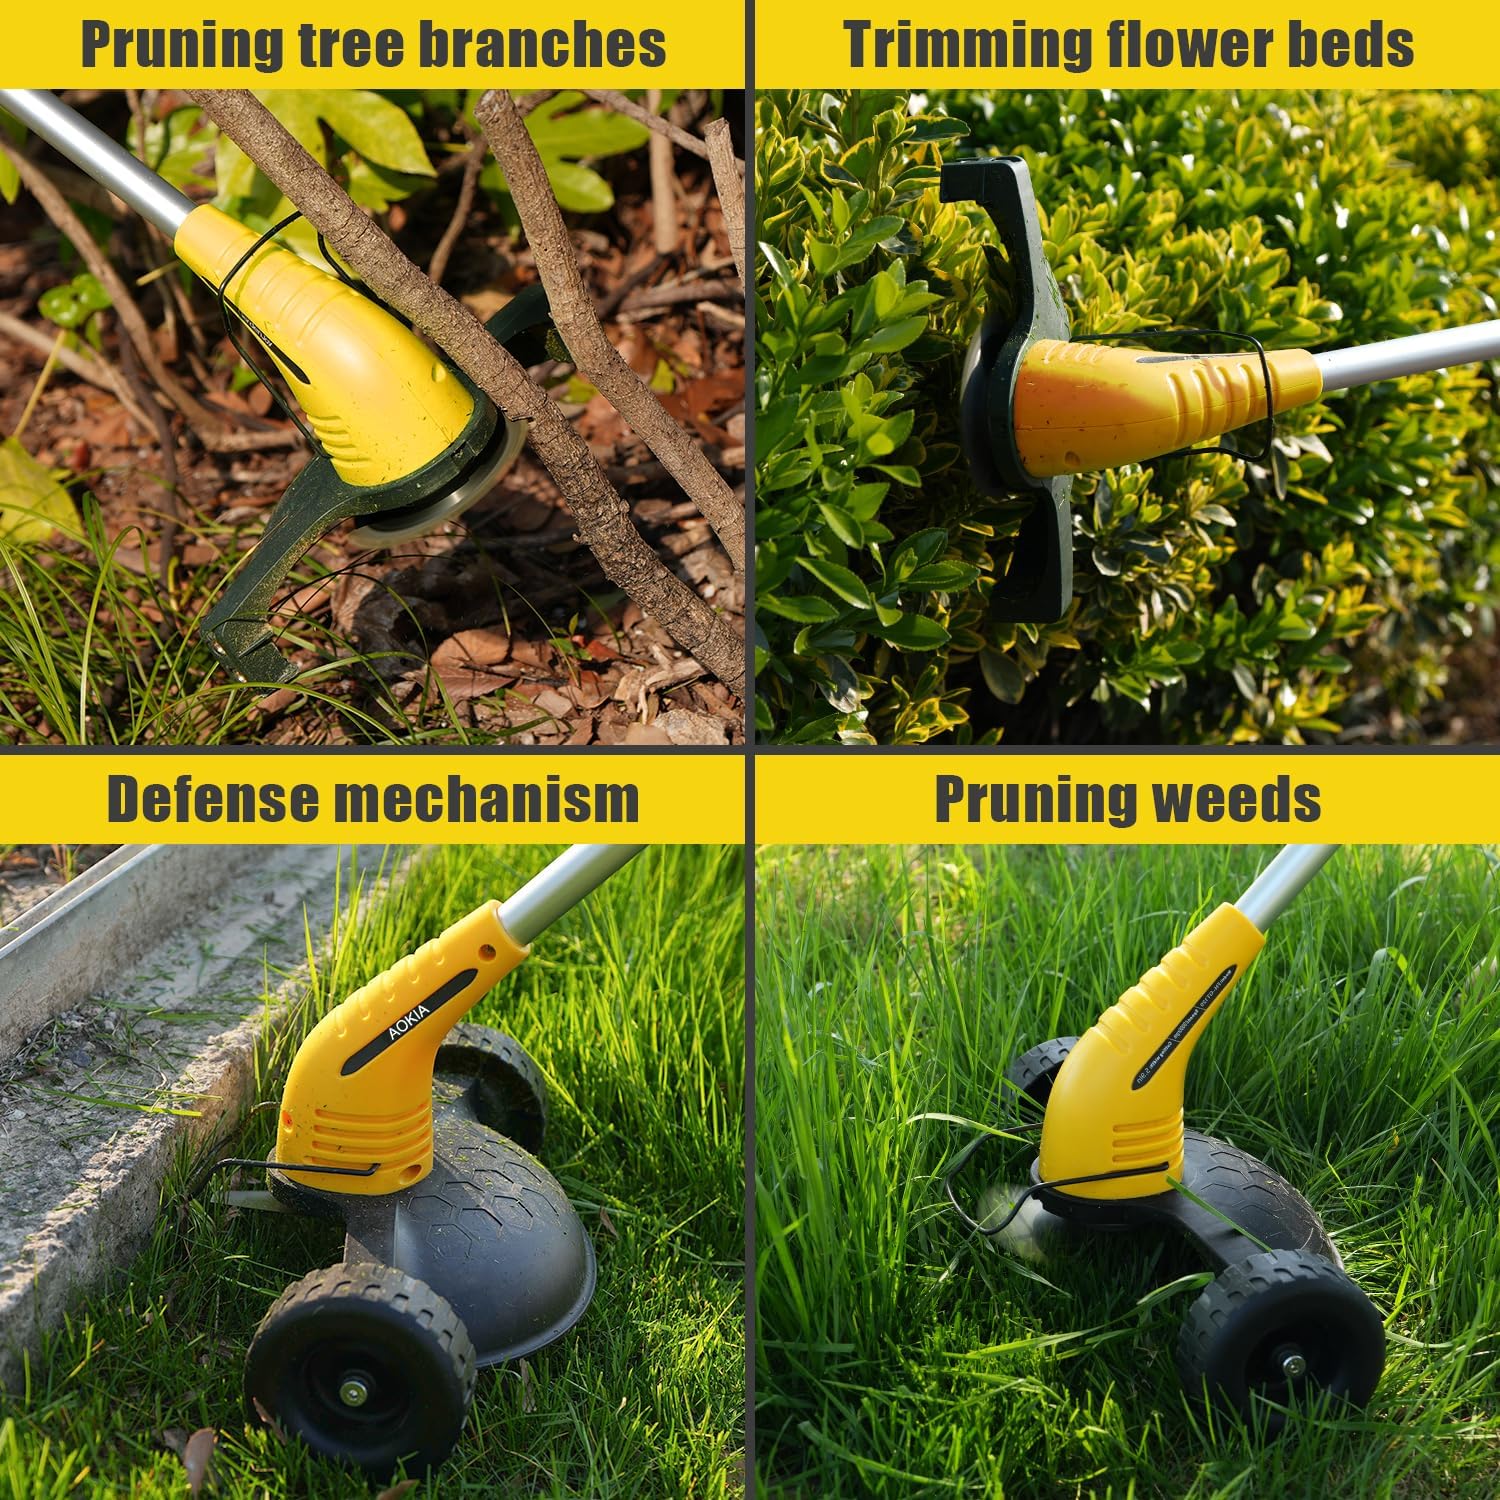
Operating Modes and Applications
- Wheeled Operation: For general lawn weeding and edging, attach the wheels and use the unit like a small mower. This provides stability and reduces effort.
- Handheld Operation: For trimming bushes, flower beds, or reaching tight spots, detach the wheels for a lightweight, portable experience.
- Blade Selection: Use metal blades for tough grass and weeds, and the circular saw blade for pruning tree branches. Plastic blades are suitable for lighter trimming tasks.
- Adjustable Length: Adjust the length of the connecting rod (32, 48, or 65 inches) to suit your height and the specific task, reducing back strain.
Usage Videos
Video: Weed Wacker for Lawn String Trimmers for Garden Worker. This video demonstrates the weed wacker in action for general lawn maintenance.
Video: Aokia Weed Wacker Cordless. This video showcases the cordless operation and versatility of the Aokia weed wacker.
Operating Images


5. Maintenance
Proper maintenance ensures the longevity and optimal performance of your Aokia Cordless Weed Wacker.
- Cleaning: After each use, clean the unit, especially around the blade area, to remove grass clippings and debris.
- Blade Replacement: Regularly inspect blades for wear and damage. Replace dull or damaged blades promptly to maintain cutting efficiency and safety. Always wear gloves when replacing blades.
- Battery Care: Always use original batteries and chargers. Charge batteries in a well-ventilated area away from flammable materials. Do not store batteries in extremely hot or cold conditions.
- Storage: Store the weed wacker in a dry, secure location, out of reach of children.
6. Troubleshooting
If you encounter issues with your Aokia Cordless Weed Wacker, try the following solutions:
- Unit Not Turning On: Ensure the battery is fully charged and correctly inserted. Verify that the safety lock button is pressed simultaneously with the trigger.
- Reduced Cutting Performance: Check the blade for dullness or damage and replace if necessary. Ensure the correct blade type is used for the material being cut.
- Battery Not Charging: Ensure the charger is properly connected to both the battery and a working power outlet. Check for any damage to the charger or battery.
- Excessive Vibration: This may indicate a damaged or improperly installed blade. Power off immediately, inspect the blade, and replace or re-install it correctly.
If problems persist, please contact Aokia customer support.
7. Specifications
| Feature | Specification |
|---|---|
| Brand | Aokia |
| Power Source | Battery Powered (12V 2.0Ah) |
| Color | Yellow |
| Item Weight | 4.4 Pounds (approx. 3.72 lbs without battery) |
| Cutting Width | 8 Inches |
| Product Dimensions | 17"L x 4"W (compacted) |
| Adjustable Lengths | 32, 48, 65 Inches |
| Motor Speed | Up to 10,000 RPM |
| Battery Run Time | Up to 30 minutes (per 2.0Ah battery) |
Battery Information

8. Warranty and Support
Aokia provides all-round after-sales service for its products. From the moment the products are delivered, a professional after-sales team is always on standby to assist you with any questions or concerns.
For support, please refer to the contact information provided in your product packaging or visit the official Aokia website.

