Introduction
Thank you for choosing the VEVOR Hydraulic Spa Cover Lift. This manual provides essential information for the safe and efficient installation, operation, and maintenance of your new spa cover lift. Please read these instructions thoroughly before assembly and use, and retain them for future reference.

Image: VEVOR Hydraulic Spa Cover Lift installed on a hot tub, demonstrating its function.
Safety Information
- Always ensure the spa cover lift is securely installed according to the instructions before use.
- Do not allow children to operate or play near the spa cover lift.
- Keep hands and clothing clear of moving parts during operation.
- Inspect the lift regularly for any signs of wear, damage, or loose fasteners. Do not use if damaged.
- Ensure adequate clearance around the hot tub for safe operation of the lift.
- This lift is designed for hot tub covers only. Do not use it for other purposes or with excessive weight.
Product Overview
Features
- Easy Operation: Single-side installation design for effortless flipping and folding of the spa cover.
- Sturdy and Durable Construction: Made with aluminum alloy tubes, offering strong load-bearing capacity, resistance to deformation, wear, and corrosion.
- Adjustable U-shaped Arm: Allows for comfortable grip and height adjustment of the hot tub cover.
Compatibility
This hot tub cover lift is compatible with various sizes of rectangular hot tubs. Please confirm your hot tub dimensions:
- Length: 74.8 in - 98.4 in (1900 - 2500 mm)
- Width: 53.1 in - 92.5 in (1350 - 2350 mm)
- Height: 33.1 in - 41.3 in (840 - 1050 mm)
When measuring the corner radius, measure at the widest point and round each measurement to the nearest half-inch. Note: Not suitable for sunken bathtubs.
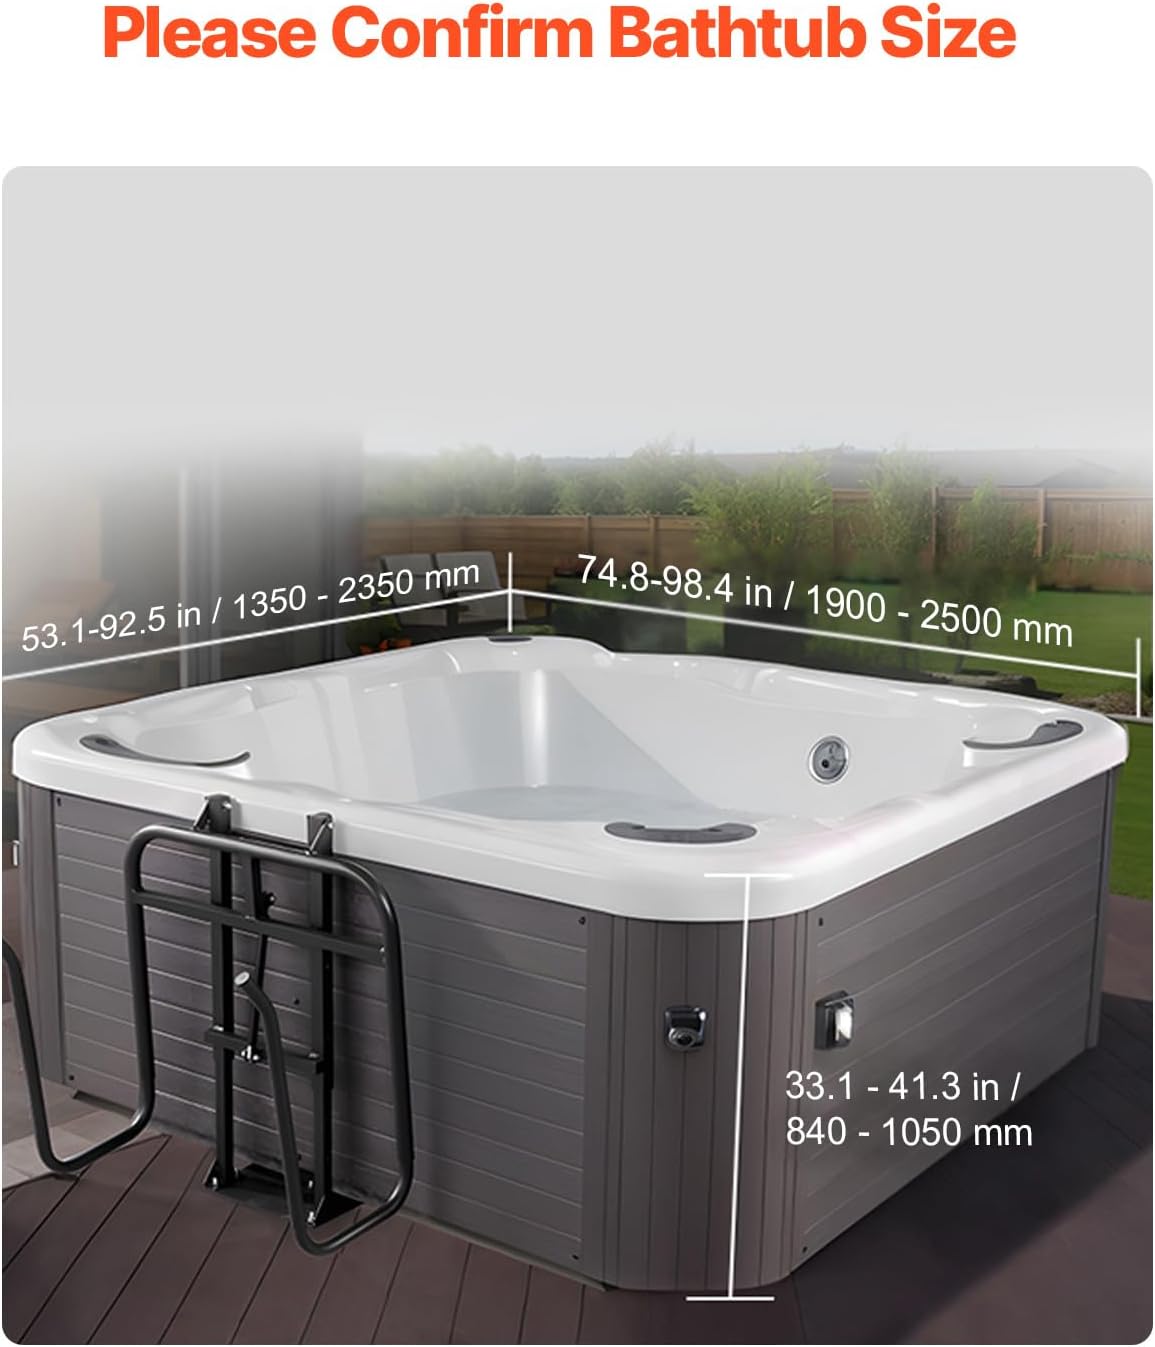
Image: Hot tub dimensions for compatibility.

Image: Details of the sturdy and durable construction of the lift.

Image: VEVOR Hydraulic Spa Cover Lift, general product view.
Setup and Installation
The installation process is straightforward. Follow these steps carefully to ensure proper assembly and function.
- Step 1: Assemble Base and Square Tube Post. Insert the square tube post into the bottom of the bathtub. Secure with M8 screws, nuts, flat washers, and countersunk screws M8x16.
- Step 2: Assemble Flip Bracket. Adjust the bracket to align with the highest position of the bathtub. Secure with countersunk self-tapping screws 5x20.
- Step 3: Drill Holes and Secure Bracket. Drill holes and secure the bracket to the bathtub using countersunk self-tapping screws 5x50 (above) and 5x30 (below).
- Step 4: Insert U-shaped Tube. Insert the U-shaped tube until the ball bearing pops out of the small hole to complete the installation.
Important Note: Leave sufficient space for the hot tub cover to ensure smooth operation. A minimum of 35.4 inches (900 mm) clearance is required at the back of the hot tub.

Image: Required rear clearance for installation and operation.

Image: Step-by-step installation instructions.
Operating Instructions
The hydraulic system of this lift makes opening and closing your spa cover easy.
- To Open the Cover: Gently lift the spa cover from the side where the lift is installed. The hydraulic rod will assist in lifting and folding the cover to its open position, resting securely on the lift arms.
- To Close the Cover: Carefully pull the cover back over the spa. The hydraulic system will guide the cover smoothly back into place.
- Adjusting Height: The U-shaped arm is retractable. To adjust the height, locate the ball positioning mechanism and adjust as needed to fix the height for optimal cover placement.
Image: Demonstrating the convenient opening and folding of the spa cover.

Image: Bathtub lid height adjustment design with ball positioning.
Maintenance
Regular maintenance will ensure the longevity and optimal performance of your VEVOR Hydraulic Spa Cover Lift.
- Cleaning: Clean the lift components periodically with mild soap and water. Avoid abrasive cleaners that could damage the finish.
- Lubrication: Apply a silicone-based lubricant to the hydraulic rod and pivot points annually or as needed to ensure smooth operation.
- Inspection: Regularly check all fasteners (screws, nuts) to ensure they are tight. Inspect the aluminum alloy tubes for any signs of corrosion, bends, or cracks. Check the hydraulic rod for leaks or damage.
- Winterization: In freezing climates, ensure the hydraulic rod is clean and lubricated. If possible, remove the lift or cover it to protect it from extreme weather conditions.
Troubleshooting
| Problem | Possible Cause | Solution |
|---|---|---|
| Lift is difficult to operate or stiff. | Lack of lubrication; debris in moving parts; hydraulic rod issue. | Clean and lubricate all moving parts, especially the hydraulic rod. Check for obstructions. If the hydraulic rod is damaged, contact customer support. |
| Lift feels wobbly or unstable. | Loose fasteners; improper installation; damaged components. | Check and tighten all screws and bolts. Review installation steps to ensure correct assembly. Inspect for bent or broken parts and replace if necessary. |
| Cover does not sit correctly on the lift arms. | Incorrect height adjustment; cover not positioned properly. | Adjust the U-shaped arm height using the ball positioning mechanism. Ensure the cover is centered and balanced on the lift arms. |
Specifications
| Attribute | Detail |
|---|---|
| Model | SCL-03 |
| Structure Type | Hydraulic |
| Installation Location | Bathtub Side and Below the Platform |
| Main Material | 6063-T5 Aluminum Alloy |
| Product Weight | 13.2 lbs / 6 kg (±4%) |
| Product Dimensions | 27.2" x 30.3" x 30.1" / 690 x 770 x 765 mm |
| Adjustable Height | 33.1 to 41.3 in |
| Adjustable Width | 53.1 to 92.5 in |
| Color | Black |
| UPC | 197988343134 |
Package Content
Image: Package contents and parts list.
- 2 x Curved Pipes
- 1 x Main Frame
- 2 x Square Tube Columns
- 1 x Aluminum Plate
- 1 x Right-Angle Piece
- 2 x Countersunk Self-Tapping Screw 5x50
- (4+2) x Countersunk Self-Tapping Screw 5x30
- (6+2) x Countersunk Self-Tapping Screw 5x20
- 6 x Countersunk Screw M8x16
- 6 x M8 Screw Caps
- (10+4) x Screw Caps
- 6 x M8 Washers
- 1 x Wind Batch Head
- 1 x Φ3.2 Drill Bit
- 1 x Hex Key
- 1 x Instruction Manual
Warranty Information
VEVOR products are designed and manufactured to high-quality standards. For specific warranty details, please refer to the warranty card included with your product or visit the official VEVOR website. Keep your purchase receipt as proof of purchase for any warranty claims.
Customer Support
If you have any questions, require technical assistance, or need to report a problem with your VEVOR Hydraulic Spa Cover Lift, please contact VEVOR customer support through their official website or the contact information provided in your product packaging. Please have your model number (SCL-03) and purchase details ready when contacting support.