1. Introduction
Thank you for choosing the Lancoon LK-AE51 Digital Thermohygrometer with LCD Alarm Clock. This device provides accurate readings of indoor temperature and humidity, along with time and date display. Its compact design and multiple placement options make it suitable for various environments such as homes, offices, and living rooms. Please read this manual carefully to ensure proper use and optimal performance of your device.
2. Safety Information
- Do not expose the device to extreme temperatures, direct sunlight, or high humidity.
- Avoid dropping the device or subjecting it to strong impacts.
- Keep the device away from water and other liquids.
- Do not attempt to disassemble or repair the device yourself. Contact customer support if issues arise.
- Dispose of used batteries responsibly according to local regulations.
3. Package Contents
The package includes the following items:
- 1 x Lancoon Digital Alarm Clock (Thermohygrometer)
- 1 x User Manual
Note: 1 x AAA battery is required for operation and is not included in the package.
4. Product Overview
The Lancoon LK-AE51 features a clear LCD display for easy reading of environmental data and time information.

Figure 4.1: Front view of the Lancoon LK-AE51 displaying temperature (23.8°C), humidity (68%), and date/time (12.08.20:38).
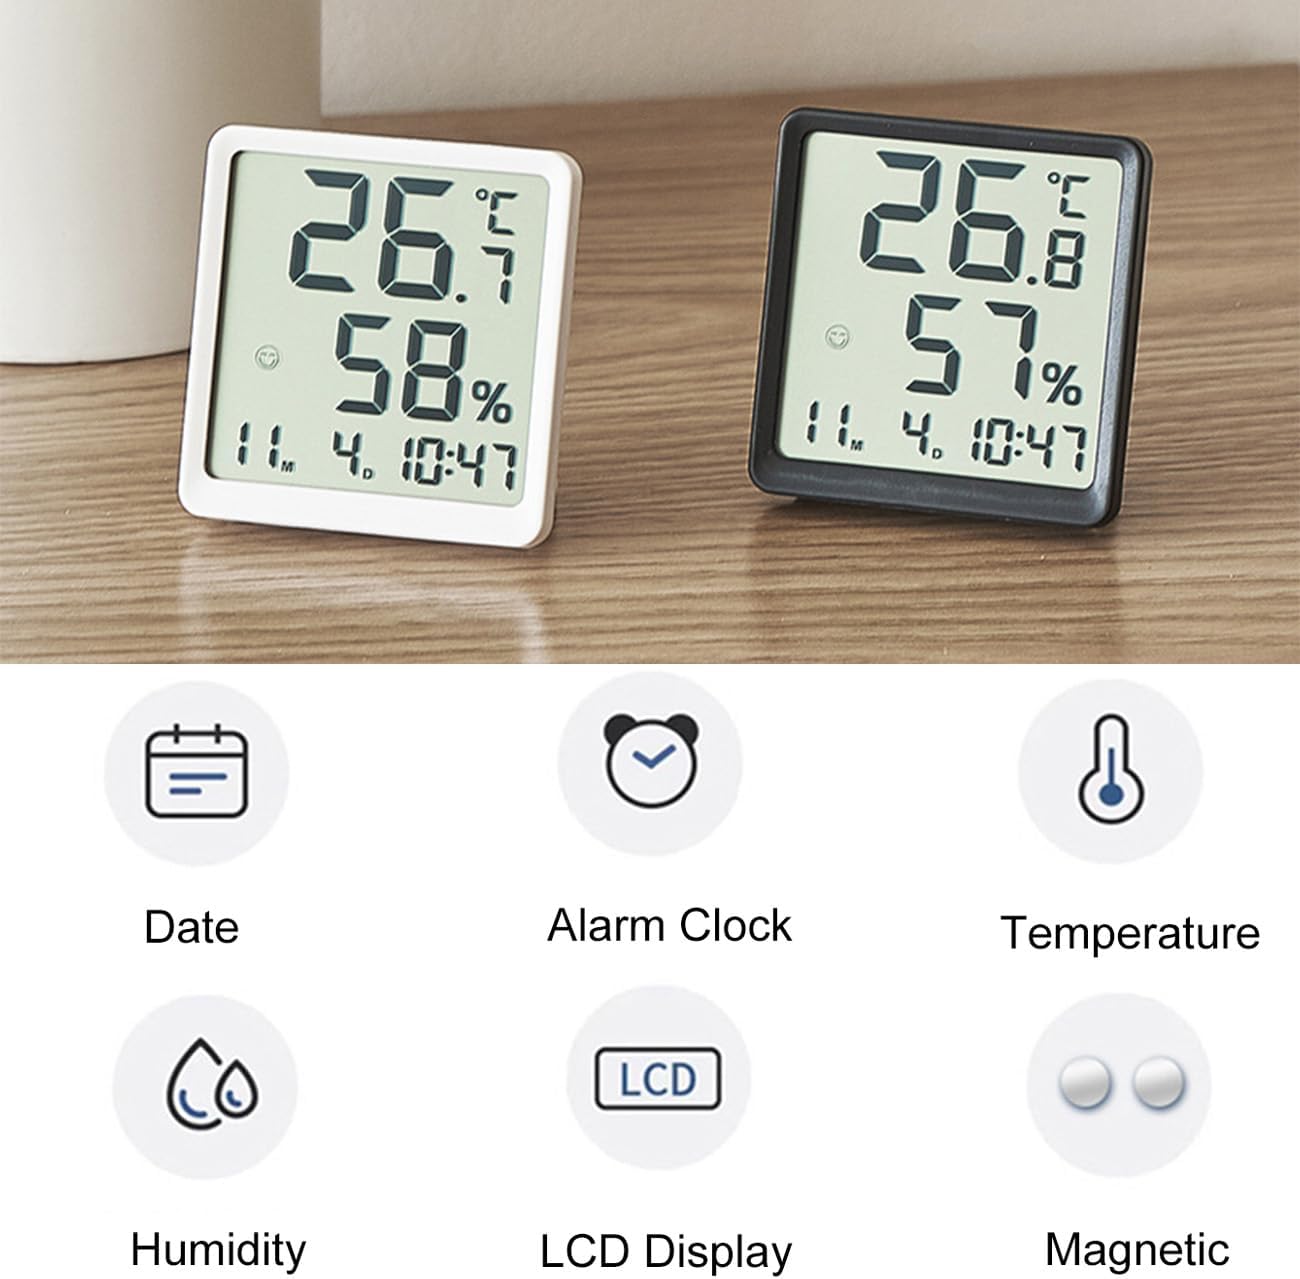
Figure 4.2: Key features of the device, including Date, Alarm Clock, Temperature, Humidity, LCD Display, and Magnetic mounting capability.
Key Features:
- Large LCD Display: Clearly shows temperature, humidity, time, and date.
- Temperature & Humidity Monitoring: Provides real-time environmental conditions.
- 12/24 Hour Format Switch: Allows selection between 12-hour and 24-hour time display.
- °C/°F Unit Switch: Easily switch between Celsius and Fahrenheit temperature units.
- Multiple Placement Options: Can be wall-mounted, placed on a desk using the integrated bracket, or magnetically attached to metal surfaces.
- Magnetic Design: Built-in magnet for secure attachment to refrigerators or other metal furniture.
5. Setup
5.1 Battery Installation
- Locate the battery compartment on the back of the device.
- Open the battery compartment cover.
- Insert one AAA battery, ensuring the correct polarity (+ and -).
- Close the battery compartment cover securely.
The device will power on automatically and display current temperature, humidity, time, and date.
6. Operating Instructions
The device typically has buttons on the back or side for adjustments. Common buttons include MODE, UP/+, DOWN/-.
6.1 Setting Time and Date
- Press and hold the MODE button (or similar button) for a few seconds until the time display starts flashing.
- Use the UP/+ or DOWN/- buttons to adjust the hour.
- Press MODE again to move to the minute setting, then adjust with UP/+ or DOWN/-.
- Continue pressing MODE to cycle through year, month, and day settings, adjusting each with UP/+ or DOWN/-.
- Once all settings are complete, press MODE one last time or wait for a few seconds for the device to exit setting mode.
6.2 Switching Temperature Units (°C/°F)

Figure 6.1: The device displaying temperature in both Celsius and Fahrenheit, illustrating the switch function.
To switch between Celsius (°C) and Fahrenheit (°F), locate the dedicated °C/°F button (or a button with similar function, often combined with another setting button) on the back or side of the device. Press it once to toggle the temperature unit.
6.3 Switching 12/24 Hour Format

Figure 6.2: The device displaying time in both 12-hour (8:38) and 24-hour (20:38) formats, demonstrating the switch function.
To switch between 12-hour and 24-hour time display, locate the dedicated 12/24H button (or a button with similar function) on the back or side of the device. Press it once to toggle the time format.
6.4 Placement Options
The device offers three convenient placement methods:
- Desk Stand: Utilize the integrated bracket on the back to stand the device upright on any flat surface.
- Wall Mount: Use the hanging hole on the back to mount the device on a wall using a nail or screw (not included).
- Magnetic Attachment: The built-in magnet allows the device to be securely attached to metal surfaces like refrigerators.

Figure 6.3: The device shown magnetically attached to a refrigerator, demonstrating one of its versatile placement options.
7. Maintenance
- Cleaning: Wipe the device with a soft, dry cloth. Do not use abrasive cleaners or solvents.
- Battery Replacement: When the display becomes dim or the device stops functioning, replace the AAA battery as described in Section 5.1.
- Storage: If storing the device for an extended period, remove the battery to prevent leakage.
8. Troubleshooting
- No Display: Ensure the battery is inserted correctly with the right polarity. Replace the battery if it is depleted.
- Incorrect Readings: Allow the device to stabilize for 15-30 minutes after initial setup or relocation. Ensure it is not placed near heat sources, direct sunlight, or vents that could affect readings.
- Buttons Not Responding: Remove and reinsert the battery to perform a soft reset. If the issue persists, replace the battery.
9. Specifications

Figure 9.1: Physical dimensions of the device, approximately 8cm (3.15in) wide, 8.2cm (3.22in) high, and 2cm (0.79in) deep.
| Parameter | Value |
|---|---|
| Model Number | LK-AE51 |
| Material | ABS Plastic |
| Product Dimensions | 8 x 2 x 8.2 cm (3.15 x 0.79 x 3.22 inches) |
| Item Weight | 55 g |
| Power Supply | 1 x AAA Battery (not included) |
| Temperature Range | -10°C to 60°C (14°F to 140°F) |
| Humidity Range | 10% to 99% RH |
| Display Type | LCD |
| Placement Options | Wall Mounted, Desk Stand, Magnetic |
10. Warranty and Support
Lancoon products are designed for reliability and performance. For any questions, technical support, or warranty claims, please contact your retailer or the manufacturer directly. Please retain your proof of purchase for warranty purposes.