1. Introduction
Thank you for choosing the VGVGV KPS305DF DC Power Supply. This device is a single-output, high-precision, double-display switching DC power supply designed for laboratory and industrial applications. It features complete operating protection functions, high performance, low ripple, high stability, and a compact, lightweight design. This manual provides essential information for the safe and efficient operation of your power supply.
2. Product Overview
Key Features:
- Complete operating protection functions.
- Highly efficient with low ripple and noise.
- Compact volume and light weight.
- Double display for voltage and current with high precision.
- Voltage stabilization and current limiting capabilities.
- Simple operation.
- Dual voltage input (110V/220V) for convenient choice.
- Temperature-controlled fan for heat dissipation and low noise operation.
- Dual potentiometers for more precise adjustment of voltage and current.
Front Panel Description:
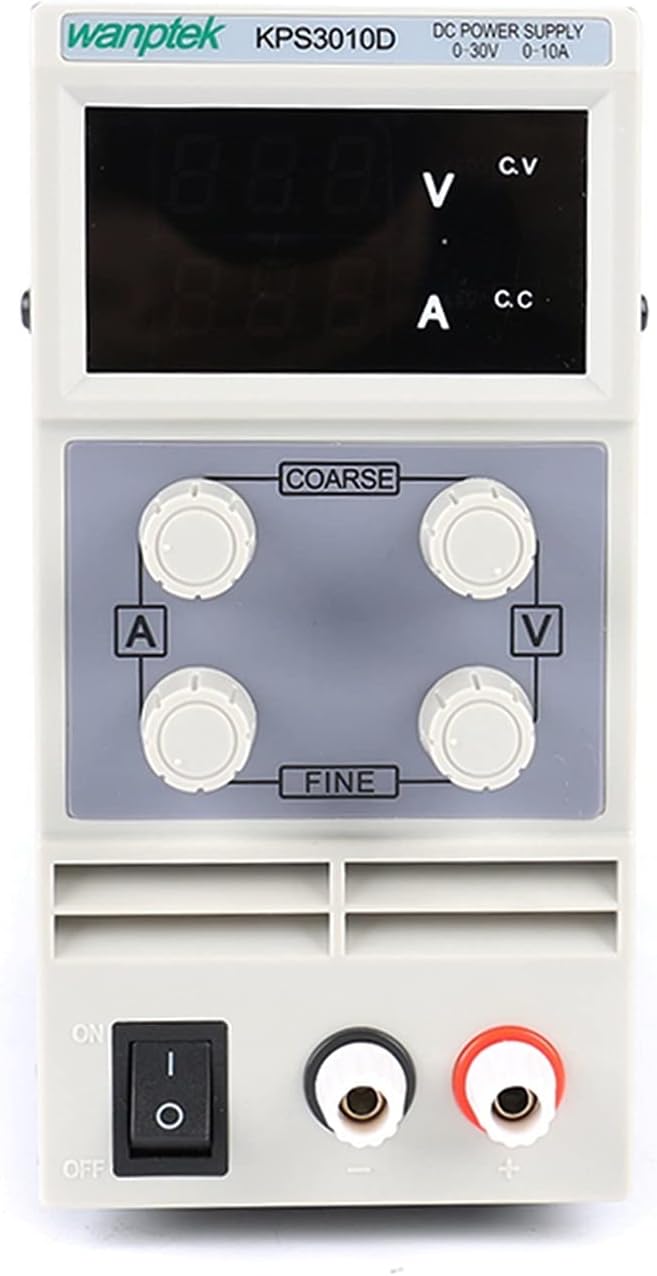
The image above displays the front panel of the DC Power Supply. It features a digital display for voltage (V) and current (A), along with indicators for Constant Voltage (CV) and Constant Current (CC) modes. Four rotary knobs are present: two for 'COARSE' and 'FINE' adjustment of current (A), and two for 'COARSE' and 'FINE' adjustment of voltage (V). A power ON/OFF switch is located at the bottom left, and output terminals (red for positive, black for negative) are at the bottom right.
Rear Panel Description:

The image shows the rear panel of the DC Power Supply. It includes a cooling fan for heat dissipation, a power input socket for the AC power cord, and a red switch for selecting the input voltage between 220V and 110V. Ensure this switch is set correctly for your local power supply before connecting the unit.
3. Safety Instructions
- Always ensure the input voltage selector on the rear panel matches your local power supply (110V or 220V) before connecting the power cord. Incorrect voltage selection can damage the unit.
- Do not operate the power supply in wet or damp conditions.
- Ensure proper ventilation around the unit. Do not block the cooling fan or vents.
- Do not open the casing of the power supply. There are no user-serviceable parts inside, and doing so may expose you to dangerous voltages.
- Always turn off the power supply and disconnect the load before making or changing connections.
- Use appropriate test leads and ensure they are in good condition.
- Avoid short-circuiting the output terminals for extended periods, even though the unit has current limiting protection.
4. Setup
4.1 Unpacking and Inspection
Carefully remove the power supply and all accessories from the packaging. Inspect the unit for any signs of physical damage. If any damage is found, contact your supplier immediately.
4.2 Input Voltage Selection
- Locate the red voltage selector switch on the rear panel of the power supply.
- Using a small screwdriver, slide the switch to the position corresponding to your local AC mains voltage (110V or 220V).
- Important: Ensure this is set correctly before plugging in the power cord.
4.3 Connecting Power
- Ensure the power switch on the front panel is in the 'OFF' position.
- Connect the provided AC power cord to the power input socket on the rear panel.
- Plug the other end of the AC power cord into a grounded mains outlet.
4.4 Connecting the Load
- Ensure the power supply is OFF.
- Connect the positive (+) terminal of your load to the red output terminal on the power supply.
- Connect the negative (-) terminal of your load to the black output terminal on the power supply.
- For sensitive loads, ensure proper polarity to prevent damage.
5. Operating Instructions
5.1 Power On/Off
Press the power switch on the front panel to the 'ON' position to power on the unit. The digital displays will illuminate. Press the switch to 'OFF' to power down.
5.2 Adjusting Voltage and Current
The KPS305DF features separate coarse and fine adjustment knobs for both voltage and current.
- Voltage Adjustment: Use the 'COARSE V' knob for large changes in voltage and the 'FINE V' knob for precise adjustments. Rotate clockwise to increase voltage, counter-clockwise to decrease.
- Current Adjustment: Use the 'COARSE A' knob for large changes in current and the 'FINE A' knob for precise adjustments. Rotate clockwise to increase current, counter-clockwise to decrease.
5.3 Constant Voltage (CV) and Constant Current (CC) Modes
This power supply operates in two modes:
- Constant Voltage (CV) Mode: When the load resistance is high, the output voltage remains constant at the set value, and the output current changes with the load. The 'CV' indicator will be lit.
- Constant Current (CC) Mode: When the load resistance is low, the output current remains constant at the set value, and the output voltage changes with the load. The 'CC' indicator will be lit. This mode protects the load from excessive current.
To set the current limit (CC mode):
- With the power supply ON and no load connected, turn the 'COARSE V' knob to its maximum clockwise position.
- Short-circuit the output terminals using a test lead (briefly). The 'CC' indicator should light up.
- Adjust the 'COARSE A' and 'FINE A' knobs to set the desired maximum current limit.
- Remove the short circuit. The power supply is now set to limit current at the desired value when a load is connected.
6. Maintenance
6.1 Cleaning
Disconnect the power supply from the mains before cleaning. Use a soft, dry cloth to wipe the exterior of the unit. Do not use abrasive cleaners or solvents.
6.2 Ventilation
Ensure the cooling fan and vents on the rear panel remain clear of dust and obstructions. The fan operates based on internal temperature, so it may not run continuously at lower loads.
6.3 Storage
When not in use for extended periods, store the power supply in a cool, dry place, away from direct sunlight and excessive humidity.
7. Troubleshooting
- No Power: Check the AC power cord connection, the mains outlet, and the input voltage selector switch on the rear panel. Ensure the front panel power switch is ON.
- No Output Voltage/Current: Ensure the output terminals are correctly connected to the load. Check if the current limit (CC mode) is set too low for the load.
- Overheating: Ensure the cooling fan and vents are not obstructed. Reduce the load if operating at maximum capacity for extended periods in a high ambient temperature.
- Unstable Output: Check all connections for looseness. Ensure the load is not drawing current beyond the unit's capabilities.
If problems persist, discontinue use and contact customer support.
8. Specifications
| Parameter | Value |
|---|---|
| Input Voltage | AC 110V/220V (switchable), 50/60Hz |
| Output Voltage | 0 - 30V |
| Output Current | 0 - 5A |
| Voltage Resolution | 0.01V |
| Current Resolution | 0.01A |
| Power Effect (CV) | ≤1%+10mV |
| Effect of Load (CV) | ≤1%+10mV |
| Ripple and Noise (Vp-p) | ≤1% |
| Voltage Display Precision | ±1%+1 digit |
| Current Display Precision | ±1%+2 digits |
| Net Weight | 2.0 KG (approx. 4.4 lbs) |
| Volume (W x H x L) | 81mm x 165mm x 220mm (approx. 3.2" x 6.5" x 8.7") |
| Operating Humidity | <90% RH |
| Working Time | Long time continuous operation |

The image illustrates the physical dimensions of the power supply, showing a width of 81mm, a height of 165mm, and a length of 220mm.
9. Package Contents
The standard package includes the following items:
- 1 x DC Power Supply (KPS305DF)
- 1 x User Manual (this document)
- 1 x Test line
- 2 x Test line clamps
- 2 x Probes
- 1 x Power line (EU/AU/US type, depending on region)

This image shows the VGVGV KPS305DF DC Power Supply alongside its packaging box and the various accessories included in the package, such as the power cord, test leads, and probes.
10. Warranty and Support
For warranty information or technical support, please refer to the documentation provided with your purchase or contact your retailer. Keep your purchase receipt as proof of purchase.