
1. Important Safety Information
Please read and understand all instructions before assembly and use. Keep this manual for future reference.
- Anti-Tip Kit: Always install the included anti-tip kit to prevent serious injury or death from furniture tip-over. Secure the dresser to a wall stud using the provided hardware.
- Weight Limits: Do not exceed the recommended weight limits for the tabletop or drawers. Overloading can cause instability and damage.
- Electrical Safety: The integrated power outlets and LED lights are designed for indoor use only. Do not expose to moisture. Ensure the power cord is not pinched or damaged during assembly or use. Do not attempt to modify the electrical components.
- Assembly: Assemble on a soft, clean surface to prevent scratches. Ensure all parts are correctly aligned and fasteners are tightened securely before use.
- Children: Keep small parts and packaging materials away from children during assembly. Do not allow children to climb on or play with the dresser.
2. Package Contents
Verify that all components are present before beginning assembly. If any parts are missing or damaged, please contact customer support.
- Top Panel
- Side Panels (Left & Right)
- Back Panels
- Drawer Fronts (various sizes)
- Drawer Side & Back Panels
- Drawer Bottoms
- Drawer Knobs
- Drawer Slides (Left & Right)
- LED Light Strip with Remote Control
- Power Outlet Unit with USB and Type-C ports
- Fabric Side Pocket
- Anti-Tip Kit
- Assembly Hardware (screws, dowels, cam locks, etc.)
- Instruction Manual
3. Assembly Instructions
Follow these steps carefully. It is recommended to have two people for assembly.
- Unpack and Identify Parts: Lay out all components on a soft, clean surface. Compare them with the parts list in your manual to ensure everything is present and undamaged.
- Assemble the Main Frame: Attach the side panels to the base and top panels using the provided hardware (e.g., cam locks and dowels). Ensure all connections are secure.
- Install Drawer Slides: Secure the drawer slides to the inner side panels of the dresser frame. Pay attention to the left and right designations.
- Assemble Drawers: Construct each drawer by attaching the front, side, and back panels, then sliding in the drawer bottom. Install the drawer knobs. Attach the corresponding drawer slides to the assembled drawers.
- Insert Drawers: Carefully slide each assembled drawer into its designated slot in the dresser frame. Ensure they operate smoothly.
- Install Back Panels: Secure the back panels to the rear of the dresser frame using the small nails or screws provided.
- Install Power Outlet Unit: Mount the power outlet unit into its designated cutout on the dresser. Connect the power cord.
- Install LED Light Strip: Adhere the LED light strip to the designated area, typically within the open storage compartment. Connect it to the power source.
- Attach Fabric Side Pocket: Secure the fabric side pocket to the side of the dresser as shown in the diagrams.
- Install Anti-Tip Kit: This is a critical safety step. Secure the anti-tip bracket to the back of the dresser and then to a wall stud using the provided screws and anchors. Refer to the specific anti-tip kit instructions for detailed guidance.
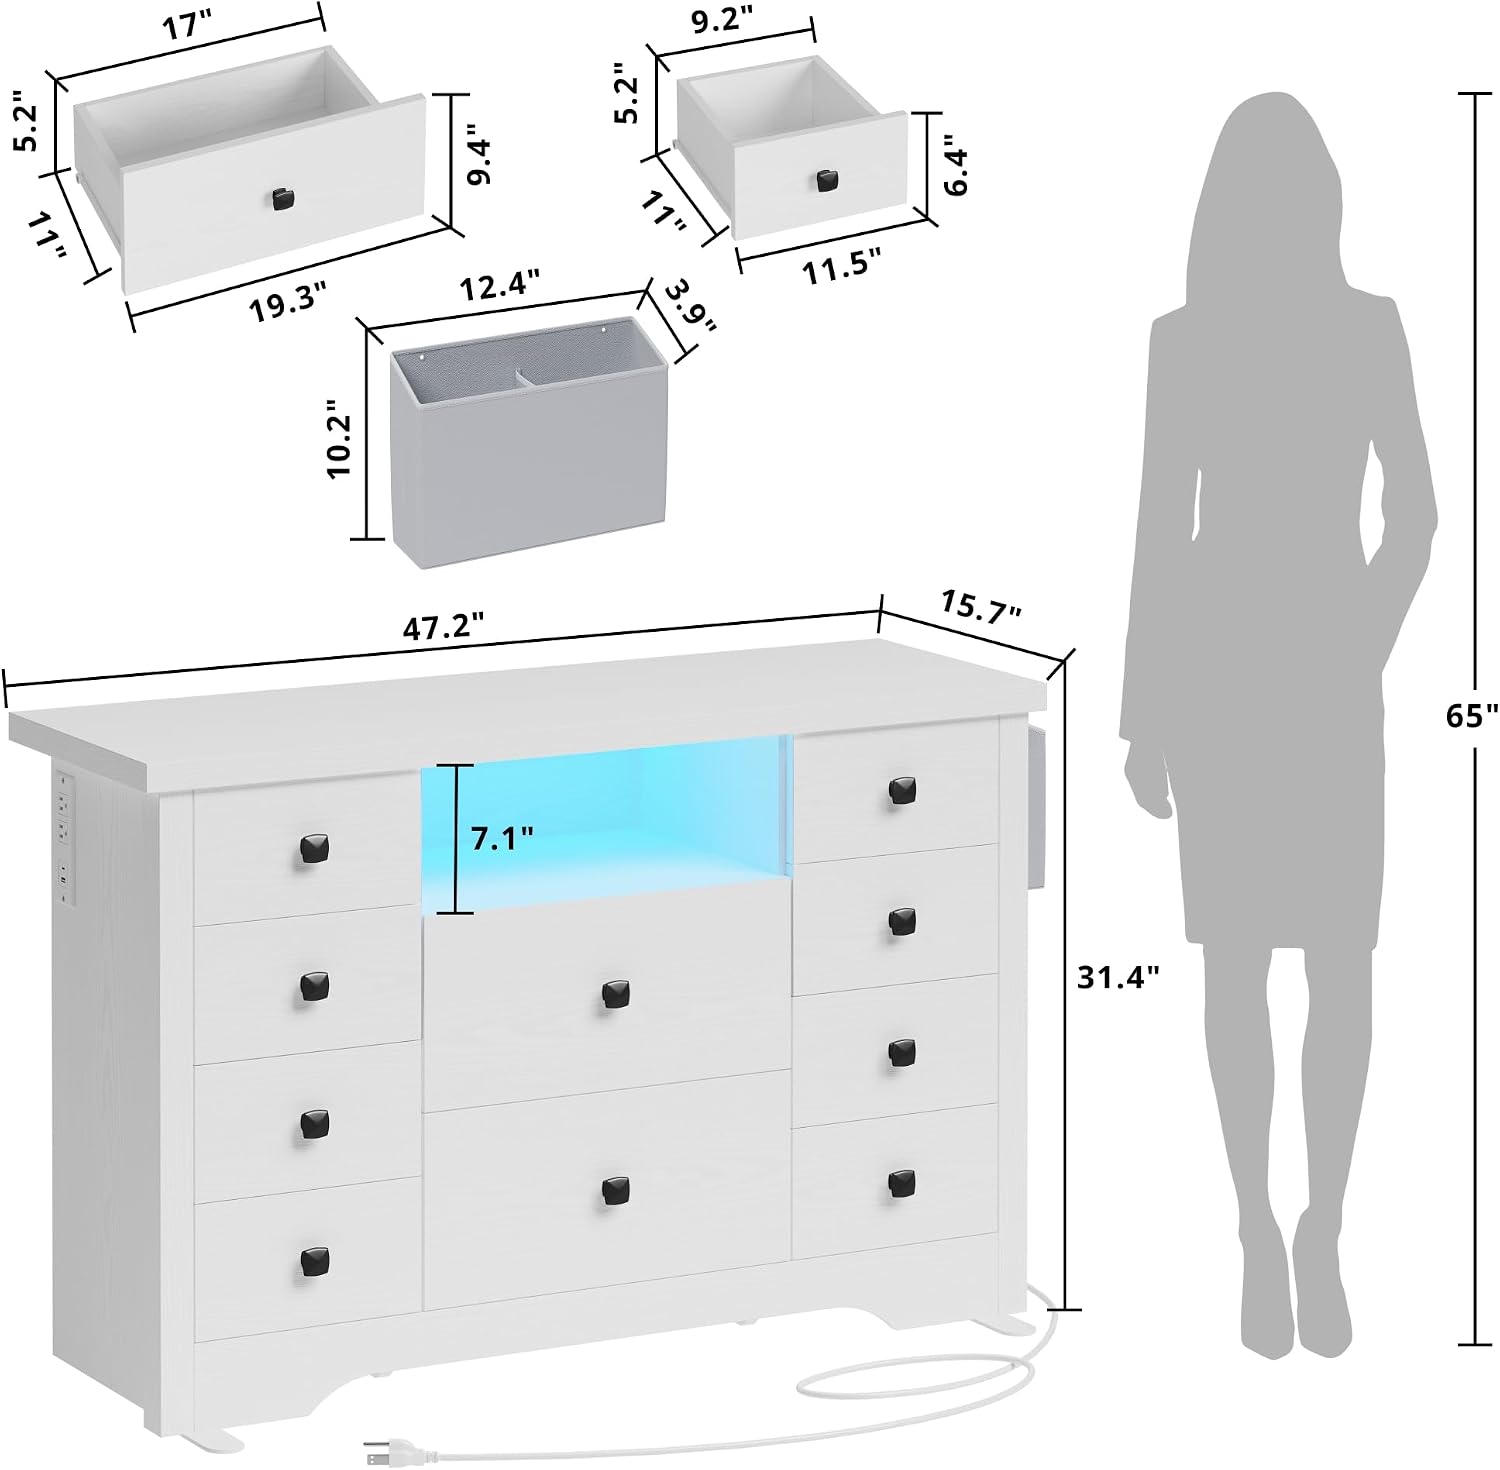
Image 3.1: Diagram illustrating the overall dimensions of the dresser and individual drawer sizes. The dresser measures approximately 47.2 inches wide, 15.7 inches deep, and 31.4 inches high. Various drawer dimensions are also shown.

Image 3.2: An overhead view of the dresser with several drawers pulled open, highlighting the internal storage capacity and the open shelf with LED lighting. The fabric side pocket is also visible.

Image 3.3: A close-up view of the anti-tipping device installed at the bottom rear of the dresser, demonstrating how it secures the unit to the floor or wall for stability.
4. Operating Instructions
4.1 LED Lights
The integrated LED lights offer customizable illumination for the open storage compartment.
- Power On/Off: Use the provided remote control or a compatible smartphone app (if applicable) to turn the lights on or off.
- Color Selection: Cycle through multiple colors using the remote or app.
- Brightness Adjustment: Adjust the light intensity to your preference.
- Modes: Explore various lighting modes such as static color, fading, flashing, or music synchronization (if available).
- Time Setting: Some models may offer a timer function for automatic shut-off.

Image 4.1: The dresser with its LED lights illuminated in a blue hue, showcasing a smartphone wirelessly charging on the tabletop. The open shelf with the LED strip is clearly visible.
4.2 Charging Station
The built-in charging station provides convenient power access for your electronic devices.
- AC Outlets: Two standard 120V/12A AC outlets are available for plugging in lamps, laptops, or other small appliances.
- USB & Type-C Ports: One 5V/2A USB port and one Type-C port are provided for charging smartphones, tablets, and other USB-powered devices.
- Power Cord: The charging station is powered by a 4.92 ft power cord that needs to be plugged into a wall outlet.

Image 4.2: A detailed view of the integrated charging station, showing two standard AC outlets, one USB port, and one Type-C port. The power cord extending from the unit is also visible.
5. Maintenance
Proper care will extend the life and appearance of your dresser.
- Cleaning: Wipe the dresser surfaces with a dry, soft cloth. Avoid abrasive cleaners or harsh chemicals that may damage the finish.
- Spills: Immediately wipe up any spills with a dry cloth to prevent staining or damage to the wood finish.
- Drawer Care: Periodically check drawer slides for smooth operation. If drawers become stiff, a small amount of silicone lubricant can be applied to the slides.
- Hardware: Occasionally check and tighten any loose screws or fasteners to maintain structural integrity.
6. Troubleshooting
Refer to this section for common issues and their solutions.
| Problem | Possible Cause | Solution |
|---|---|---|
| LED lights do not turn on. | Power cord unplugged, remote battery dead, loose connection. | Ensure power cord is securely plugged into a wall outlet. Check remote battery. Verify LED strip connection to power source. |
| Power outlets/USB ports not working. | Dresser power cord unplugged, device not properly connected. | Confirm the dresser's main power cord is plugged into a live wall outlet. Ensure devices are correctly inserted into the ports. |
| Drawers are difficult to open/close or appear crooked. | Improperly installed drawer slides, loose hardware, uneven assembly. | Recheck drawer slide installation, ensuring they are aligned and securely fastened. Tighten all drawer assembly hardware. Ensure the dresser is on a level surface. |
| Dresser feels unstable. | Anti-tip kit not installed, loose frame connections. | Immediately install the anti-tip kit if not already done. Tighten all frame assembly hardware. Ensure the dresser is on a level surface. |
7. Specifications
- Brand: LIKIMIO
- Model Name: HK-DCD-23
- Product Dimensions: 15.75"D x 47.24"W x 31.5"H
- Color: White
- Room Type: Bedroom, Living Room
- Furniture Finish: MDF
- Item Weight: 86.3 Pounds
- Power Outlets: 2 AC Outlets (120V/12A)
- USB Ports: 1 USB Port (5V/2A)
- Type-C Ports: 1 Type-C Port (5V/2A)
- Power Cord Length: 4.92 Ft
- Assembly Required: Yes
- Product Care Instructions: Wipe with Dry Cloth

Image 7.1: The LIKIMIO 10-drawer dresser in a bedroom, showcasing its white finish, black square knobs, and the illuminated open shelf. A lamp and decorative items are placed on top, and a phone is charging wirelessly.

Image 7.2: The dresser functioning as a TV stand in a living room setting, with a television placed on top. The image indicates suitability for TVs up to 55 inches, demonstrating its versatility.
8. Warranty and Customer Support
LIKIMIO products are manufactured with quality and care. For any questions, missing parts, or concerns regarding your dresser, please contact LIKIMIO customer support. Have your model number (HK-DCD-23) and purchase information ready for faster service.
Contact information can typically be found on the LIKIMIO official website or through your purchase platform.