1. Introduction
This instruction manual provides detailed guidance for the installation, maintenance, and general use of spare parts for the Generic KF610 Z908 Pro drone. It covers essential components such as arms, propellers, motors, and propeller guards, designed to assist users in replacing damaged parts and ensuring the continued optimal performance of their drone.
2. Package Contents
The spare parts package for the KF610 Z908 Pro drone typically includes the following components. Please verify all items upon receipt.
- Drone Arms (with integrated motors and wiring)
- Propellers (clockwise and counter-clockwise rotation)
- Propeller Guards
- Motors (if provided separately)
- Gears and other small mechanical components
- Obstacle Avoidance Modules (if applicable)
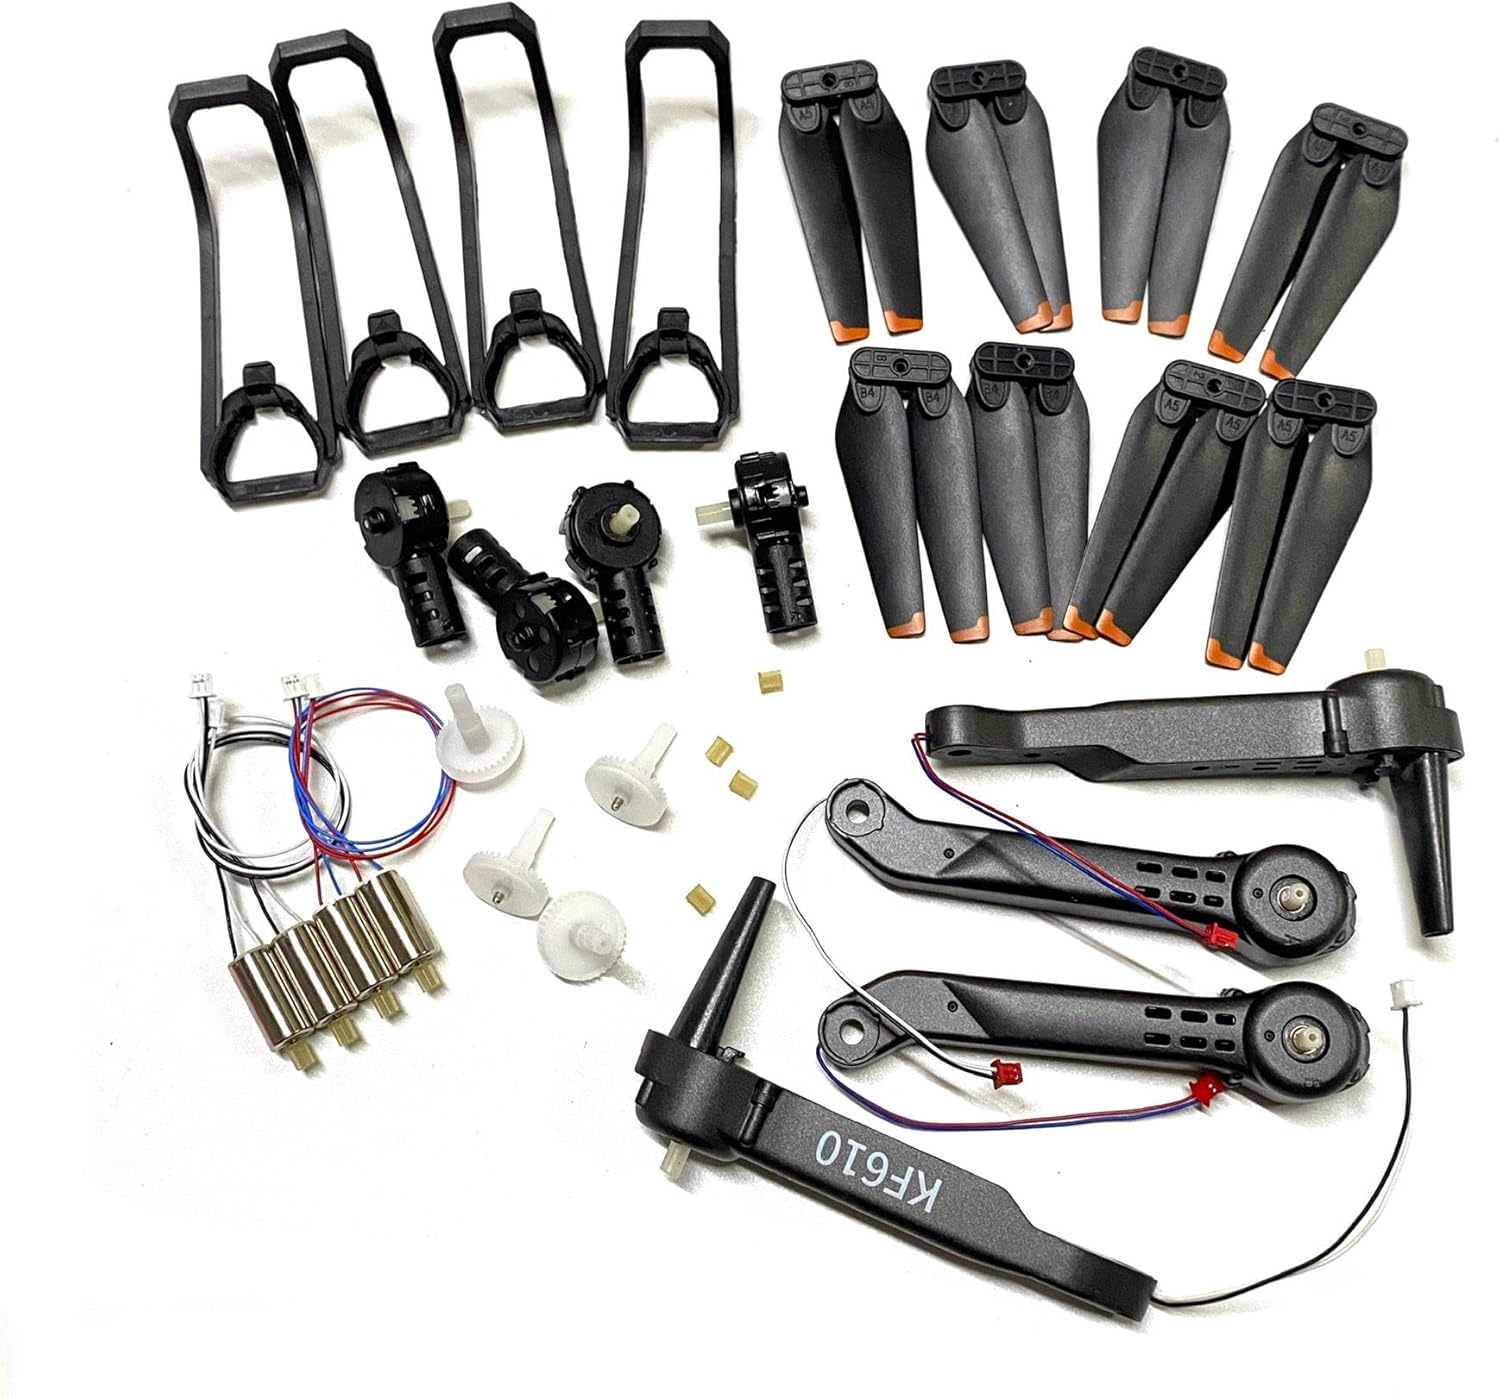
Figure 2.1: Complete set of KF610 Z908 Pro drone spare parts, including arms, propellers, motors, and protective guards. This image displays various components such as four drone arms (two black, two grey), multiple sets of black propellers with orange tips, four propeller guards, several small motors, gears, and other small connectors.

Figure 2.2: Close-up view of KF610 Z908 Pro drone propellers, propeller guards, and gears. This image focuses on eight black propellers with orange tips, four black propeller guards, and several white plastic gears with small brass pins.

Figure 2.3: Detailed view of KF610 Z908 Pro drone black arms, propellers, and obstacle avoidance modules. This image shows two black drone arms with "KF610" marking, four black propellers, two small black modules (likely obstacle avoidance sensors), and several white gears.
3. Setup and Installation
Before beginning any installation, ensure the drone's power is off and the battery is disconnected. Use appropriate small tools (e.g., miniature screwdrivers) for disassembly and assembly.
3.1. Propeller Installation
- Identify the correct propeller type: Propellers are typically marked with 'A' or 'B' (or similar indicators) to denote their rotation direction. Match these markings to the corresponding motor arms on the drone.
- Align the propeller: Carefully align the propeller's central hole with the motor shaft.
- Secure the propeller: Gently push the propeller onto the shaft until it clicks into place or secure it with the provided screw, depending on the drone's design. Ensure it is firmly attached but can still rotate freely without excessive wobble.
- Verify rotation: After installation, manually spin each propeller to ensure it rotates smoothly without obstruction.
3.2. Motor and Arm Replacement
Replacing a motor or an entire arm requires careful disassembly and reassembly. Refer to your drone's original user manual for specific disassembly instructions if available.
- Disassembly:
- Remove any screws securing the drone's top or bottom shell.
- Carefully separate the drone's casing to expose the internal wiring and circuit board.
- Locate the motor or arm to be replaced. Note how its wires are connected to the main circuit board.
- Gently disconnect the motor wires from the circuit board. If soldered, desolder them carefully.
- Remove any screws or clips holding the arm or motor in place.
- Installation:
- Position the new arm or motor in its designated slot.
- Secure it with screws or clips, ensuring it is stable.
- Connect the motor wires to the correct terminals on the circuit board. Ensure polarity is correct if applicable (usually indicated by wire colors). If soldering, ensure clean and secure connections.
- Before reassembling the casing, perform a quick test (if safe to do so) to ensure the motor spins correctly.
- Reassembly:
- Carefully reassemble the drone's casing, ensuring no wires are pinched.
- Secure all screws.
3.3. Propeller Guard Installation
Propeller guards provide protection against impacts. They typically snap into place or are secured with small screws.
- Identify the correct guard for each arm.
- Align the guard with the mounting points on the drone arm.
- Gently push or screw the guard into place until it is securely attached.
4. Maintenance
Regular maintenance of your drone's spare parts ensures longevity and reliable performance.
- Propeller Inspection: Regularly check propellers for cracks, bends, or chips. Even minor damage can affect flight stability and efficiency. Replace damaged propellers immediately.
- Motor Cleaning: Keep motors free from dust, dirt, and debris. Use a soft brush or compressed air to clean around the motor housing. Avoid using liquids.
- Arm Integrity: Inspect drone arms for any signs of stress, cracks, or loose connections. Ensure all screws are tight.
- Storage: Store spare parts in a clean, dry environment, away from direct sunlight and extreme temperatures.
5. Troubleshooting
If you encounter issues after replacing parts, consider the following common troubleshooting steps:
- Drone unstable after propeller replacement:
- Verify that the correct 'A' and 'B' propellers are installed on the corresponding motor arms.
- Ensure propellers are securely attached and not loose.
- Check for any bent or damaged propellers that might have been overlooked.
- Motor not spinning:
- Check all wire connections to the motor and the circuit board. Ensure they are secure and correctly polarized.
- Inspect for any visible damage to the motor itself or its wiring.
- If multiple motors are not spinning, check the drone's battery level and main power connections.
- Drone not responding to controls:
- Ensure all internal connections made during part replacement are secure.
- Re-calibrate the drone if your model supports it, as per its original manual.
6. Specifications
The following specifications apply to the KF610 Z908 Pro drone spare parts:
| Feature | Detail |
|---|---|
| Model Number | Z908 Pro |
| Compatible Vehicle Type | Helicopters (Drones) |
| Plastic Type | PC (Polycarbonate) |
| Material | Plastic |
| Color (as supplied) | Black (some components may vary) |
| Recommended Age | 12+ years, 14+ years |
| Included Parts | Arms, Propellers, Motors, Blades, Obstacle Avoidance Modules, Propeller Guards, Gears |
7. Warranty and Support
Specific warranty information for these spare parts is not provided in the product details. For any warranty claims, technical support, or further assistance, please contact the original seller or manufacturer directly. Retain your proof of purchase for any inquiries.