
Introduction
This manual provides instructions for the installation, operation, and maintenance of the QXCIVR TM915H-10A Programmable Digital Timer Switch. This device is designed to automatically control electrical equipment based on programmed schedules, offering convenience and energy efficiency. Please read this manual thoroughly before use.
Safety Information
- Ensure the power supply is disconnected before installation or maintenance.
- Installation should be performed by a qualified electrician.
- Do not expose the device to moisture or extreme temperatures.
- Verify voltage compatibility (85-265V AC for this model) before connecting.
Product Overview
The QXCIVR TM915H-10A is a digital timer switch featuring an LCD display and control buttons for programming. It supports up to 18 ON/OFF programs per day and offers 7-day weekly programming.

Figure 1: Front view of the QXCIVR TM915H-10A Digital Timer Switch, showing the LCD display and control buttons.
Key Features:
- Easy-to-read LCD display with LED indicators.
- 18 ON/OFF programs per day, 15 combinations per week.
- 24 hours / 7 days a week programmable.
- Countdown function (Max 24 hours countdown to OFF).
- Manual ON/OFF control.
- Panel mounted design.
Specifications
| Parameter | Value |
|---|---|
| Power Supply | 85-265V AC (for this model) |
| Capacity | 10A, 2500W |
| Timing Range | 1 minute to 168 hours |
| Programs | 18 ON/OFF per day |
| Power Consumption | <5VA |
| Time Error | <2 seconds/day |
| Temperature Range | -10°C to 50°C |
| Humidity | <95% RH |
| Dimensions | Approx. 1.18 x 0.79 x 0.39 inches (Package) |
| Item Weight | Approx. 80 Grams (2.82 ounces) |
Setup and Installation
The TM915H-10A is designed for panel mounting. Ensure proper wiring according to local electrical codes.

Figure 2: Exploded view showing the timer switch, mounting frame, and protective cover.
Wiring Diagram:
Refer to the diagram below for correct wiring connections. Connect the power input to terminals L and N, and the load to the output terminals.
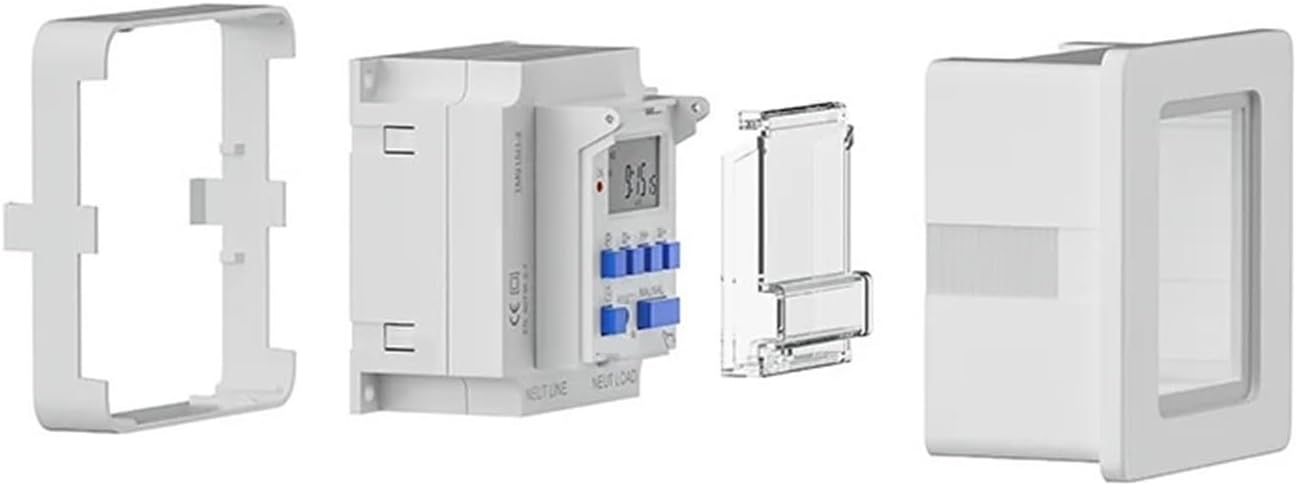
Figure 3: Wiring diagram for the TM915H-10A timer switch. Ensure correct connection of live (L), neutral (N), and load wires.
- Mount the timer switch securely into a compatible panel cutout.
- Connect the power supply (85-265V AC) to the designated input terminals.
- Connect the electrical load to the output terminals.
- Ensure all connections are tight and insulated.
- Replace the protective cover after wiring.
Operating Instructions
Initial Setup:
- Power On: Connect the timer to power. The LCD display will illuminate.
- Reset: Press the RESET button (small hole, use a pointed object) to clear all previous settings and reset the device.
- Set Current Time:
- Press the CLOCK button.
- Press D+ to set the current day of the week.
- Press H+ to set the current hour.
- Press M+ to set the current minute.
- Release the CLOCK button to save.
Programming ON/OFF Schedules:
The timer supports up to 18 ON/OFF programs.
- Press the PROG button once. The display will show "1 ON".
- Press D+ to select the day(s) for the first ON event. You can choose individual days, weekdays, weekends, or all days.
- Press H+ and M+ to set the desired ON time.
- Press PROG again. The display will show "1 OFF".
- Press D+ to select the day(s) for the first OFF event (usually the same as ON).
- Press H+ and M+ to set the desired OFF time.
- Repeat steps 1-6 for additional ON/OFF programs (up to 18).
- To exit programming mode and save settings, press the CLOCK button.
Manual Control:
Press the MAUNAL (Manual) button to cycle through different modes:
- AUTO ON: The timer is currently ON and will follow the next programmed OFF event.
- AUTO OFF: The timer is currently OFF and will follow the next programmed ON event.
- ON: The timer is forced ON, ignoring programmed events.
- OFF: The timer is forced OFF, ignoring programmed events.
Countdown Function:
The timer features a countdown function, allowing a maximum of 24 hours countdown to OFF.
- While in normal time display, press the CLOCK button and then the PROG button simultaneously to activate countdown mode.
- Use H+ and M+ to set the desired countdown duration.
- The timer will count down and then switch OFF.
Sleep Mode:
To enter sleep mode, press the DAY button and HOUR button simultaneously.
Maintenance
- Keep the device clean and free from dust.
- Do not use abrasive cleaners or solvents.
- Periodically check wiring connections for tightness.
- The internal battery (if present) is typically non-replaceable by the user and maintains settings during power outages.
Troubleshooting
| Problem | Possible Cause | Solution |
|---|---|---|
| Display is blank | No power supply; internal battery depleted. | Check power connections. If power is present, the internal battery may need charging (connect to power for several hours). |
| Timer not switching ON/OFF as programmed | Incorrect program settings; manual override active; incorrect current time. | Verify program settings. Check manual mode (MAUNAL button) is set to AUTO ON/OFF. Ensure current time is set correctly. |
| Buttons unresponsive | Device frozen; low power. | Perform a RESET. Ensure stable power supply. |
Warranty and Support
For warranty information or technical support, please contact QXCIVR customer service. Refer to your purchase documentation for specific warranty terms.
Manufacturer: QXCIVR
Model Number: TM915H-10A
ASIN: B0DYGC33HG