1. Introduction
This manual provides essential information for the installation, operation, and maintenance of the Genuine Lenovo Motherboard, part number 5B20U54553. This motherboard is designed for Lenovo IdeaCentre Gaming 5-14IOB6 and Creator 5-14IOB6 desktop computers. Please read these instructions carefully before proceeding with installation to ensure proper function and to prevent damage to the component or your system.
2. Safety Information
Always observe the following safety precautions when handling computer components:
- Electrostatic Discharge (ESD) Prevention: Always wear an anti-static wrist strap or frequently touch a grounded metal object (like the computer chassis) before handling the motherboard. ESD can severely damage electronic components.
- Power Disconnection: Ensure the computer is completely powered off and disconnected from the main power outlet before opening the chassis or installing any components.
- Handle with Care: Hold the motherboard by its edges. Avoid touching components, pins, or circuit traces directly.
- Ventilation: Ensure adequate ventilation around the computer to prevent overheating.
- Professional Installation: If you are unsure about any step, seek assistance from a qualified technician.
3. Package Contents
Verify that your package contains the following items:
- Lenovo IdeaCentre Gaming 5-14IOB6 / Creator 5-14IOB6 Motherboard (Part No. 5B20U54553)
- Note: Additional accessories such as SATA cables, I/O shields, or driver CDs may not be included with a replacement part and might need to be reused from your original system or purchased separately.
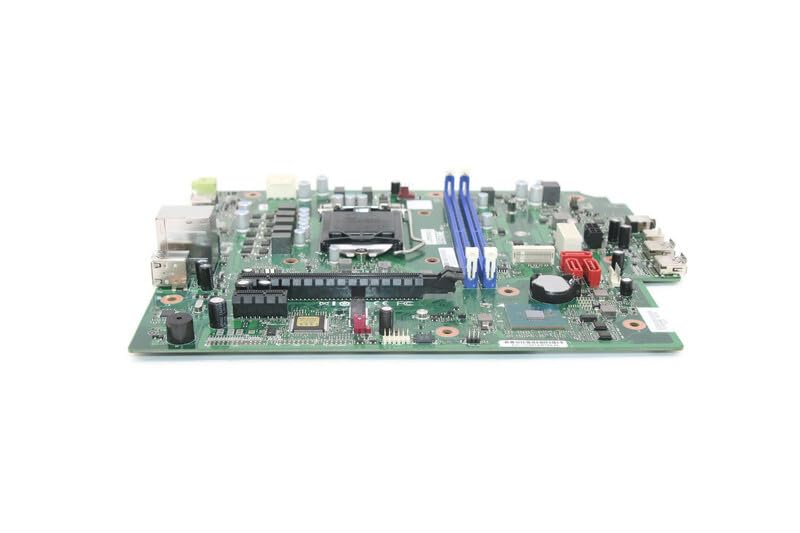
Image 1: Genuine Lenovo IdeaCentre Gaming 5-14IOB6 Motherboard (Part No. 5B20U54553). This image displays the motherboard with various ports, slots, and components visible, including the CPU socket, RAM slots, and PCIe slots.
4. Setup and Installation
Follow these steps for proper installation of the motherboard:
- Prepare Your Workspace: Ensure a clean, well-lit, and static-free environment. Gather necessary tools such as a Phillips head screwdriver, anti-static wrist strap, and thermal paste (if reusing CPU).
- Power Down and Disconnect: Shut down your computer, unplug the power cord, and disconnect all peripheral cables.
- Open the Chassis: Remove the side panel(s) of your computer case to access the internal components.
- Remove Old Motherboard (if applicable): Disconnect all cables connected to the old motherboard (power, SATA, front panel, USB, audio, etc.). Unscrew the motherboard from the standoffs and carefully remove it. Remove CPU, RAM, and any expansion cards from the old motherboard if they are to be transferred.
- Install CPU and Cooler: If not pre-installed, carefully open the CPU socket lever, align the CPU with the socket (matching the triangle/arrow indicators), gently place it in, and close the lever. Apply thermal paste and install the CPU cooler.
- Install RAM: Open the clips on the RAM slots, align the RAM modules with the notches, and press firmly until the clips snap into place.
- Install New Motherboard: Carefully place the new motherboard into the chassis, aligning it with the standoffs. Secure it with screws.
- Connect Cables: Reconnect all necessary cables:
- Main Power (24-pin ATX): Connect the large power connector from the power supply.
- CPU Power (4/8-pin EPS): Connect the smaller power connector near the CPU.
- SATA Cables: Connect storage drives (HDD/SSD) to the SATA ports.
- Front Panel Connectors: Connect power button, reset button, HDD LED, power LED, and front USB/audio headers. Refer to your chassis manual for specific pin layouts if needed.
- Fan Headers: Connect case fans and CPU fan to the appropriate headers.
- Expansion Cards: Install any graphics cards or other PCIe cards into their respective slots and secure them.
- Close Chassis: Once all components are connected and secured, replace the side panel(s).
- Initial Boot: Reconnect the power cord and peripherals. Power on the computer. The system should boot to the BIOS/UEFI or operating system.
5. Operating the Motherboard
The motherboard functions as the central hub of your computer, facilitating communication between all components. Once installed correctly, its operation is largely automatic, managed by the BIOS/UEFI firmware and the operating system.
- BIOS/UEFI Settings: To access the BIOS/UEFI setup, press the designated key (often Del, F2, F10, or F12) during startup. Here you can configure boot order, system time, hardware settings, and monitor system status.
- Driver Installation: Ensure all necessary drivers for the motherboard's chipsets, integrated graphics (if applicable), network, and audio are installed. These are typically provided by Lenovo or can be downloaded from their official support website.
- System Updates: Keep your operating system and drivers updated to ensure optimal performance and security.
6. Maintenance
Proper maintenance helps prolong the life of your motherboard and overall system:
- Dust Removal: Regularly clean the interior of your computer case to prevent dust buildup on components, which can impede airflow and cause overheating. Use compressed air or a soft brush.
- Temperature Monitoring: Use software tools to monitor CPU and chipset temperatures. Ensure they remain within safe operating limits.
- Firmware Updates: Periodically check the Lenovo support website for BIOS/UEFI updates. Only update if necessary and follow the instructions precisely.
- Cable Management: Ensure cables are neatly routed to improve airflow and prevent interference.
7. Troubleshooting
If you encounter issues after installation, consider the following:
- No Power: Double-check all power connections (24-pin ATX, 4/8-pin EPS). Ensure the power supply is switched on and the wall outlet is functional.
- No Display: Verify that the monitor is connected to the correct graphics output (either integrated or dedicated GPU). Reseat the graphics card and RAM modules.
- System Not Booting / POST Errors: Listen for beep codes (if your system has a speaker) or check for diagnostic LEDs on the motherboard. Consult the Lenovo documentation for beep code meanings. Reseat RAM, CPU, and expansion cards.
- Peripheral Issues: If USB ports or other peripherals are not working, check their connections and ensure drivers are installed.
- Operating System Problems: If the OS fails to load, try booting into safe mode or using recovery options. A fresh installation of the operating system might be necessary after a motherboard replacement.
8. Specifications
Key specifications for the Lenovo IdeaCentre Gaming 5-14IOB6 Motherboard (Part No. 5B20U54553):
| Feature | Detail |
|---|---|
| Manufacturer | Lenovo |
| Model Name | IdeaCentre Gaming 5-14IOB6 |
| Part Number | 5B20U54553 |
| CPU Socket | BGA 437 |
| Compatible Devices | Personal Computer |
| RAM Memory Technology | DDR4 |
| Memory Slots Available | 2 |
| Chipset Type | Intel B75 Express |
| Platform | Windows 10 |
| Item Weight | 3 pounds |
9. Warranty and Support
This motherboard is a genuine replacement part for Lenovo systems. For warranty information, please refer to the terms and conditions provided by your seller or the original Lenovo product warranty documentation for your IdeaCentre Gaming 5-14IOB6 or Creator 5-14IOB6 system.
For technical support, driver downloads, and further documentation, please visit the official Lenovo support website and search for your specific system model (IdeaCentre Gaming 5-14IOB6 or Creator 5-14IOB6) or the motherboard part number (5B20U54553).
Lenovo Support Website: https://support.lenovo.com


