SASKATE 898D
SASKATE 898D Air Gun Soldering Station User Manual
Model: 898D | Brand: SASKATE
1. Introduction
Thank you for choosing the SASKATE 898D Air Gun Soldering Station. This manual provides essential information for the safe and efficient operation, setup, and maintenance of your device. Please read it thoroughly before use and retain it for future reference.
2. Safety Instructions
To prevent injury or damage to the product, always observe the following safety precautions:
- Always operate the soldering station in a well-ventilated area to avoid inhaling fumes.
- Wear appropriate personal protective equipment, including safety glasses and heat-resistant gloves.
- Do not touch the hot air gun nozzle or soldering iron tip during operation or immediately after shutdown, as they remain hot for a period.
- Ensure the power cord is undamaged and properly grounded.
- Keep the workstation clean and free of flammable materials.
- Never leave the soldering station unattended while it is powered on.
- Disconnect the power supply before cleaning or performing maintenance.
- Keep out of reach of children.
- When the work can be completed, try to use the lowest temperature and large air volume, which will help to extend the life of the heating of the desoldering station and ensure the safety of the desoldering chip.
3. Product Overview
3.1 Components
The SASKATE 898D Air Gun Soldering Station includes the following main components:
- Main Control Unit (with Digital Display)
- Hot Air Gun
- Soldering Iron
- Hot Air Gun Bracket
- Soldering Iron Stand with Sponge
- Power Cord
- Air Gun Nozzles (3 sizes: 5mm, 8mm, 10mm)

Figure 1: All included components of the SASKATE 898D Air Gun Soldering Station, including the main unit, hot air gun, soldering iron, stands, power cord, and various nozzles.
3.2 Key Features
- Digital Display: Provides clear temperature readings for precise control.
- Adjustable Air and Temperature: Allows for fine-tuning of air volume and temperature for various applications.
- Sensor Closed Loop Control: Ensures accurate and stable temperature output.
- Induction Switch Handle: Automatically activates working mode when picked up and enters standby when placed in the holder, saving power and extending component life.
- Automatic Cooling Function: Extends the life of the hot air gun's heating element and protects the unit.
- Brushless Draught Fan: Offers long service life and low noise operation.
- Versatile Application: Suitable for desoldering various components such as SOIC, CHIP, QFP, PLCC, BGA.
4. Specifications
| Parameter | Value |
|---|---|
| Brand | SASKATE |
| Model | 898D |
| Material | Aluminum Alloy |
| Whole Machine Power | 750W ± 10% (maximum) |
| Working Environment | 0-40℃, relative temperature < 80% |
| Storage Temperature | -20-80℃, relative temperature < 80% |
| Hot Air Gun Output Power | 700W ± 10% |
| Hot Air Gun Temperature Range | 100℃-450℃ |
| Hot Air Gun Air Flow | 120L/min (maximum) |
| Hot Air Gun Temperature Stability | ±2℃ (static) |
| Nozzles Caliber | Approx. 5mm, 8mm, 10mm |
| Soldering Station Output Power | 50W ± 10% |
| Soldering Station Temperature Range | 200℃-480℃ |
| Soldering Station Temperature Stability | ±2℃ (static) |
| Item Weight | 5.87 pounds |
| Package Dimensions | 11.81 x 9.84 x 6.69 inches |
5. Setup Instructions
Follow these steps to set up your soldering station:
- Unpack: Carefully remove all components from the packaging. Inspect for any damage.
- Position the Main Unit: Place the main control unit on a stable, heat-resistant, and level surface. Ensure adequate ventilation around the unit.
- Connect Hot Air Gun: Connect the hot air gun cable to the designated port on the main unit. Secure it firmly.
- Install Hot Air Gun Bracket: Attach the hot air gun bracket to the side of the main unit. This bracket is essential for the induction switch to function correctly.
- Connect Soldering Iron: Connect the soldering iron cable to its designated port on the main unit.
- Assemble Soldering Iron Stand: Place the soldering iron stand on your workbench. Insert the heat sponge into the designated tray and dampen it slightly with water.
- Attach Nozzle: Select the appropriate hot air gun nozzle (5mm, 8mm, or 10mm) for your task and securely attach it to the hot air gun.
- Power Connection: Ensure the main power switch on the back of the unit is in the OFF position. Connect the power cord to the main unit and then to a grounded power outlet.

Figure 2: The SASKATE 898D Air Gun Soldering Station fully assembled with hot air gun and soldering iron in their respective stands.
6. Operating Instructions
6.1 General Operation
- Power On: Flip the main power switch on the back of the unit to the ON position. The digital display will illuminate.
- Select Tool: Use the individual power switches on the front panel to turn on either the hot air gun or the soldering iron, or both.
- Adjust Settings: Use the rotary knobs to adjust the temperature and air volume (for the hot air gun) to your desired settings. The digital display will show the set temperature and then the actual temperature as it heats up.
- Pre-heat: Allow the tool to reach the set temperature before beginning work.
6.2 Hot Air Gun Operation
- Ensure the hot air gun power switch is ON.
- Adjust the temperature knob (100℃-450℃) and air volume knob to suit your desoldering or heating task.
- Pick up the hot air gun from its bracket. The unit will automatically begin heating and blowing air.
- Direct the hot air stream onto the component to be worked on. Maintain a safe distance to avoid overheating the component or surrounding areas.
- When finished, place the hot air gun back into its bracket. The unit will automatically enter cooling mode, blowing cool air until the temperature drops, then entering standby.

Figure 3: Front panel of the SASKATE 898D showing the digital display, temperature and air volume controls, and power switches.
6.3 Soldering Iron Operation
- Ensure the soldering iron power switch is ON.
- Adjust the temperature knob (200℃-480℃) to the desired soldering temperature.
- Allow the soldering iron tip to heat up.
- Before use, clean the tip on the damp sponge to remove any oxidation or old solder.
- Apply solder to the joint, ensuring good heat transfer from the tip to the components.
- When not in use, always place the soldering iron back into its stand.
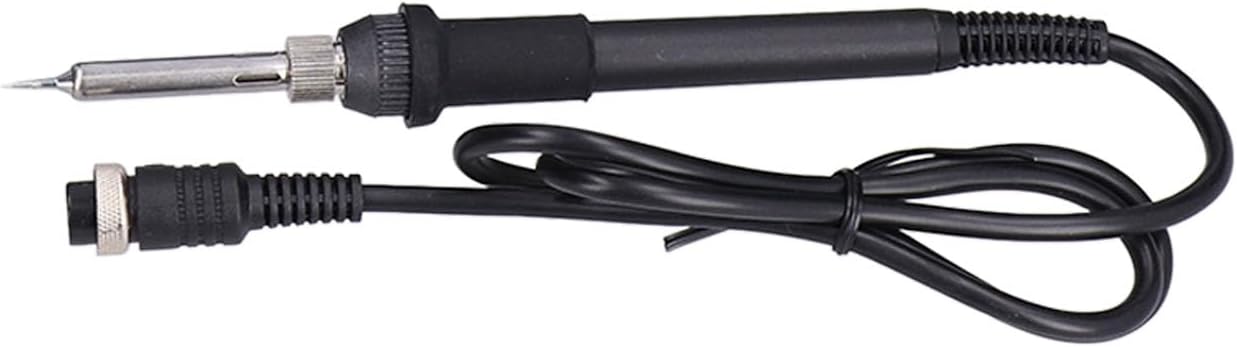
Figure 4: Close-up view of the soldering iron with its tip.
7. Maintenance
Regular maintenance ensures optimal performance and extends the lifespan of your soldering station.
- Cleaning the Soldering Tip: Regularly clean the soldering iron tip with the damp sponge to remove solder residue. For stubborn residue, use a brass wire cleaner.
- Tip Tinning: After cleaning and before storage, tin the soldering iron tip with a small amount of fresh solder to prevent oxidation.
- Nozzle Cleaning: Ensure hot air gun nozzles are free from debris. Clean them gently if necessary.
- Unit Cleaning: Wipe the main unit and tools with a soft, dry cloth. Do not use abrasive cleaners or solvents.
- Power Off: Always turn off the main power switch and unplug the unit when not in use or before performing any maintenance.
- Storage: Store the unit in a dry, dust-free environment.
8. Troubleshooting
| Problem | Possible Cause | Solution |
|---|---|---|
| Unit does not power on. | No power supply; main switch OFF; faulty power cord. | Check power outlet; ensure main switch is ON; inspect power cord for damage. |
| Hot air gun not heating or blowing. | Hot air gun switch OFF; not placed in bracket correctly (induction switch); faulty heating element/fan. | Ensure hot air gun switch is ON; place gun firmly in bracket; contact support if issue persists. |
| Soldering iron not heating. | Soldering iron switch OFF; faulty heating element. | Ensure soldering iron switch is ON; contact support if issue persists. |
| Temperature unstable. | Sensor issue; environmental factors. | Ensure stable environment; contact support. |
| Poor soldering results. | Incorrect temperature; dirty tip; old solder. | Adjust temperature; clean and tin tip; use fresh solder. |
9. Warranty and Support
For warranty information or technical support, please refer to the documentation provided with your purchase or contact SASKATE customer service through your retailer.
Please have your model number (898D) and purchase date ready when contacting support.
Ask a question about this manual
Ask about setup, troubleshooting, compatibility, parts, safety, or missing instructions. Manuals+ will review the question and use this page’s manual context to help answer it.