Introduction
This manual provides detailed instructions for the installation, operation, and maintenance of your Volam 1080P Front and Rear Dual Dash Cam. This device is designed to record video footage from both the front and interior of your vehicle, offering enhanced security and evidence in case of incidents. It features advanced functions such as parking monitoring, G-sensor emergency lock, loop recording, and infrared night vision.
Package Contents
- 1 x Front Dual Dash Cam
- 1 x Car Charger
- 1 x Suction Cup Holder
- 1 x User Manual
- 4 x Cable Clamps
- 1 x Crowbar
- 1 x 64GB SD Card (included)

Image: The Volam Dual Dash Cam, showing the main unit, suction cup mount, and a 64GB SD card.
Product Features
Dual 1080P FHD Recording & Wide Angle Coverage
The dash cam features a 170° front camera and a 150° indoor camera, allowing simultaneous recording in 1080P + 1080P resolution. This dual camera system captures a wide field of view, reducing blind spots both inside and outside the vehicle, providing comprehensive video evidence.

Image: Illustration of the dual 1080P FHD video recording capability, showing simultaneous views from the front and inside the car.

Image: Diagram illustrating the wide-angle coverage of the dash cam, with 170-degree front and 150-degree interior viewing angles.
Infrared Night Vision & HDR Technology
Equipped with a super image sensor, 6-layer lens, and HDR technology, the dash cam performs effectively in both strong and low light conditions. The interior camera includes 4 infrared lights for clear recording of occupants even in complete darkness. HDR technology ensures balanced exposure for clearer video.
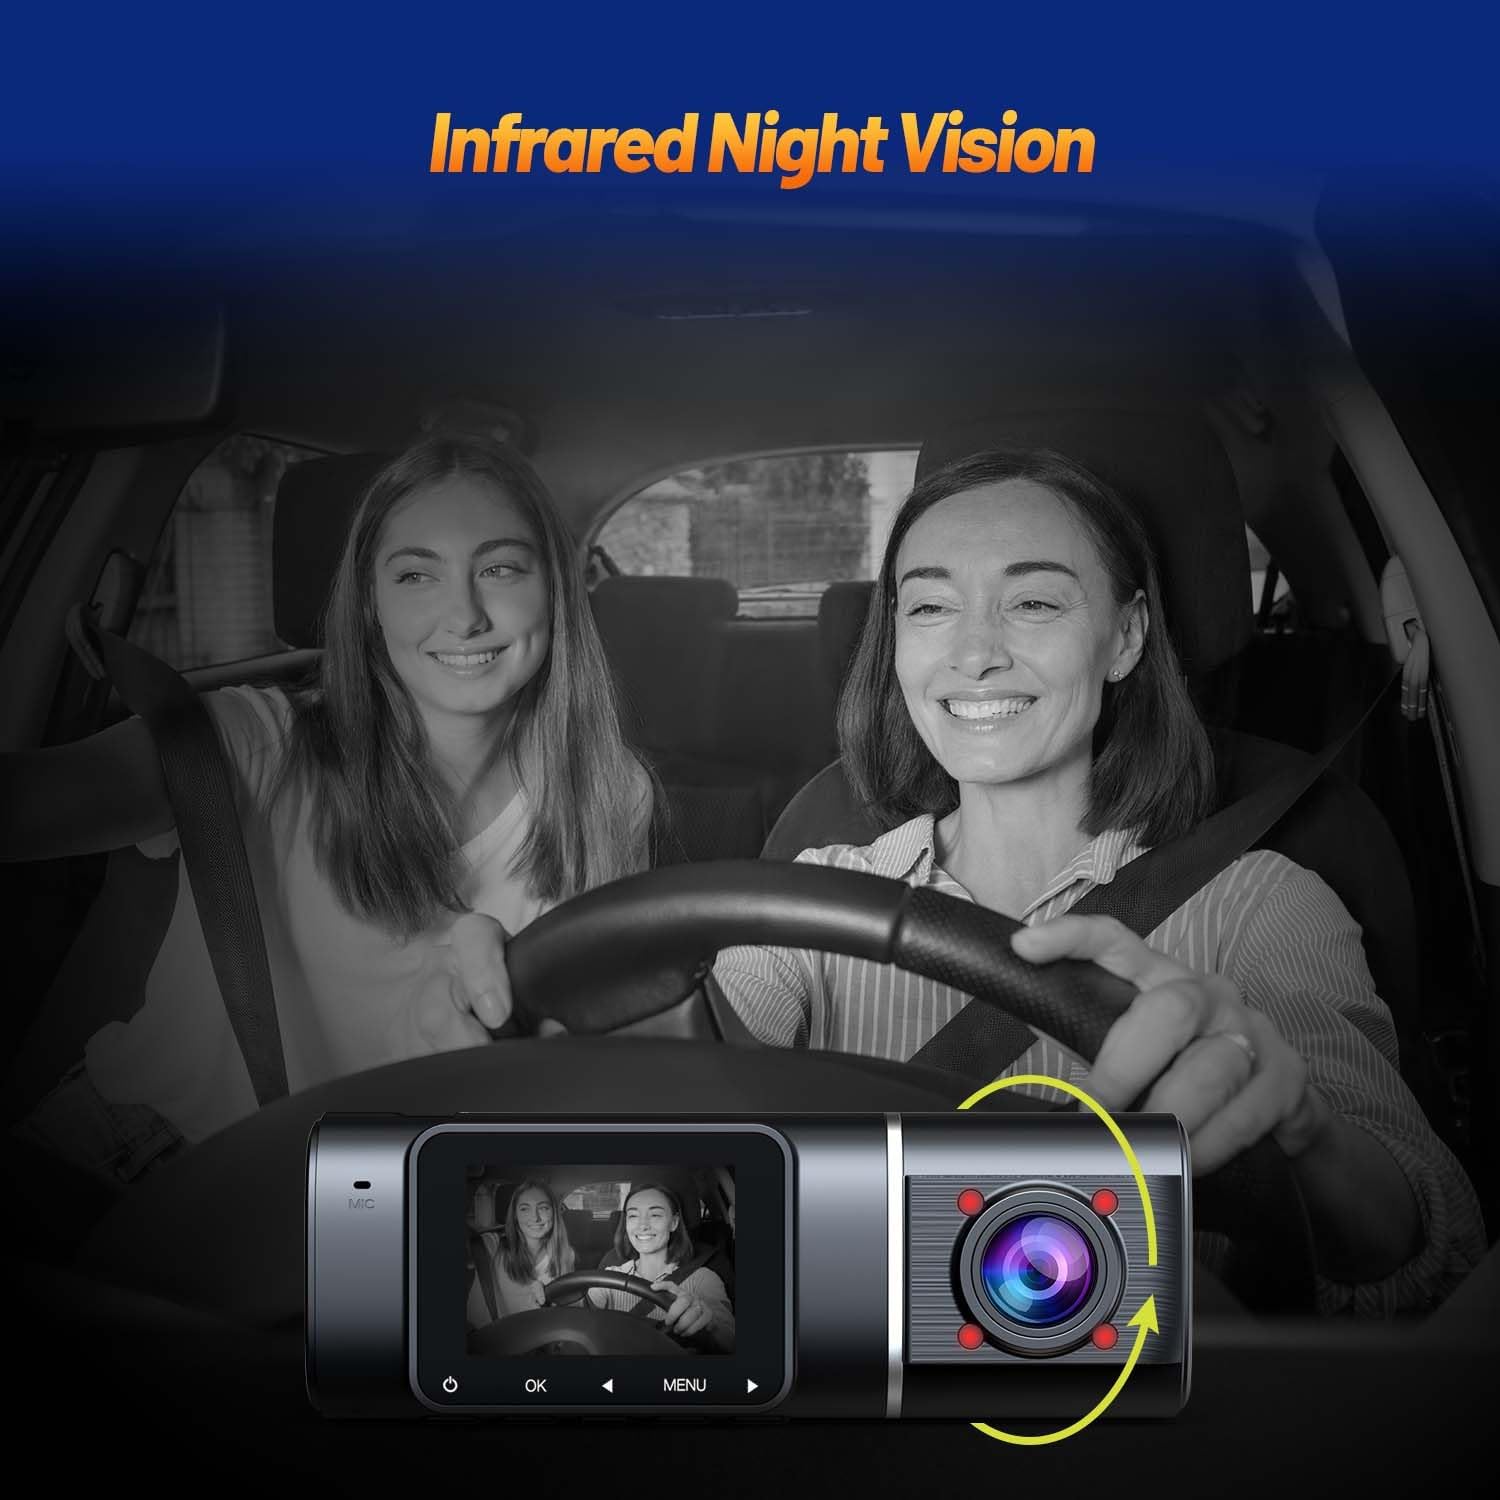
Image: A visual representation of the dash cam's infrared night vision, showing clear visibility inside a dark car cabin.

Image: A comparison demonstrating the effect of HDR technology, showing improved image clarity in varying light conditions from dark to light.
G-Sensor & Emergency Lock
The built-in G-sensor automatically detects sudden movements, impacts, or collisions. When triggered, it locks the currently recorded video file to prevent it from being overwritten by loop recording, ensuring critical evidence is preserved. It is recommended to set the G-sensor sensitivity to 'Low' to prevent excessive locking of files.

Image: A sequence of images depicting various collision scenarios and how the loop recording and emergency lock features function to save critical video evidence.
24-Hour Parking Monitoring & Motion Detection
With 24-hour parking monitoring, the dash cam automatically starts recording if a vibration is detected while the vehicle is parked and turned off. Motion detection allows the dash cam to record only when movement is detected within the recording area, saving storage space. Note: Do not activate motion detection while driving, as it can interrupt continuous recording.

Image: An illustration of the smart parking monitor feature, showing the dash cam detecting vibration and initiating recording while the car is parked.
Loop Recording
When the SD card reaches its full capacity, the loop recording function automatically overwrites the oldest unlocked video files with new recordings. This ensures continuous recording without manual intervention. Locked videos (triggered by G-sensor) are protected from being overwritten and must be manually deleted if no longer needed.
Setup
Installation
- Prepare the SD Card: Insert the included 64GB SD card into the dash cam's memory card slot. Ensure it is inserted correctly.
- Choose Mounting Location: Select a location on your windshield, typically behind the rearview mirror, that does not obstruct your view. The compact design allows for discreet placement.
- Attach Mount: Use either the suction cup holder or the 3M adhesive mount to secure the dash cam to the windshield. Ensure the surface is clean and dry before applying the adhesive mount. The bracket can be rotated 360 degrees for flexible positioning.
- Connect Power: Connect the included car charger to the dash cam's Type-C USB interface and plug the other end into your vehicle's cigarette lighter socket. Use the provided cable clamps and crowbar to neatly route the power cable along the vehicle's interior trim.
- Adjust Camera Angle: Power on the dash cam and adjust the front and interior camera angles to ensure optimal recording coverage.
Operating Instructions
Basic Operation
- Power On/Off: The dash cam will automatically power on and begin recording when connected to power and the vehicle ignition is turned on. It will power off automatically when the ignition is turned off.
- Recording: Once powered on, the dash cam automatically starts continuous loop recording.
- Emergency Lock: During recording, if the G-sensor detects a collision or sudden braking, the current video segment will be automatically locked and saved to a protected folder.
- Playback: Use the dash cam's display and navigation buttons to review recorded videos.
Parking Monitoring
To enable 24-hour parking monitoring, ensure the feature is activated in the dash cam's settings. When the vehicle is parked and the ignition is off, the dash cam will enter parking monitoring mode. If a vibration or impact is detected, it will automatically wake up and record a short video clip.
Motion Detection
Motion detection can be enabled in the settings. When active, the dash cam will only record when it detects movement in its field of view. This feature is primarily for parking surveillance to save storage space. It is strongly advised not to use motion detection while driving, as it can lead to fragmented recordings.
Maintenance
To ensure optimal performance and clear image quality, it is recommended to clean the dash cam's screen and lenses occasionally. Use a simple glasses cleaning solution and a soft microfibre cloth. Avoid abrasive materials or harsh chemicals that could damage the lenses or screen.
Troubleshooting
- SD Card Fills Up Quickly:
- Ensure the G-sensor sensitivity is set to 'Low'. High sensitivity can cause too many videos to be locked, filling the card.
- Regularly manually delete locked videos that are no longer needed. Loop recording only overwrites unlocked videos.
- Interrupted Recording / Dash Cam Turns Off:
- Do not enable motion detection while driving. This feature is designed for parking and will cause recording interruptions.
- Ensure motion detection and automatic shutdown are not activated simultaneously, as this can cause the dash cam to frequently turn off.
- Unclear Image:
- Clean the camera lenses and screen with a soft cloth and appropriate cleaning solution.
Specifications
| Feature | Detail |
|---|---|
| Display | 1.5 inch IPS LCD |
| Video Format | MP4 |
| Video Encoding Format | H.265 |
| Front + Cabin Resolution | 1080P + 1080P Max |
| Wide Angle (Front) | 170° |
| Wide Angle (Inside) | 150° |
| Car Charger | DC 5V 2A |
| External Memory | Includes 64GB SD card |
| Product Dimensions | 3.5 x 10.9 x 4 cm |
| Product Weight | 370 g |
| Special Features | Compact Design, G-Sensor, Loop Recording, Night Vision, Parking Monitor |
Warranty and Support
Your Volam Dash Cam comes with a 12-month warranty. For any issues or support inquiries, please contact the professional team from Volam. They are committed to assisting you within 24 hours.
For further assistance, please refer to the contact information provided with your product packaging or visit the official Volam support website.