SKDW GD340
SKDW GD340 4-Channel Dash Cam
User Manual
1. Introduction
Thank you for choosing the SKDW GD340 4-Channel Dash Cam. This advanced dash camera system provides comprehensive 360° coverage for your vehicle, recording from the front, rear, and both sides simultaneously. Equipped with 4K resolution for the front camera, built-in GPS, 5G WiFi, voice control, enhanced night vision, and 24/7 parking mode, the GD340 ensures your journey is well-protected and documented. This manual will guide you through the installation, operation, and maintenance of your new dash cam.

Image: The SKDW GD340 4-Channel Dash Cam, showcasing its main unit with front, side, and rear cameras, along with a 128GB microSD card and a smartphone displaying the companion app interface.
2. Package Contents
Please verify that all items are present in your package:
- SKDW GD340 Dash Cam Unit
- Rear Camera
- Car Charger Power Cable
- Rear Camera Extension Cable
- 128GB MicroSD Card
- 3M Adhesive Mounts (for main unit and rear camera)
- Installation Pry Bar
- Static Stickers
- Instruction Manual
- Quick Start Guide (Cue Card)

Image: A detailed layout of all components included in the SKDW GD340 dash cam package, such as the main unit, rear camera, cables, mounting accessories, and the 128GB microSD card.
3. Installation Guide
Follow these steps to properly install your dash cam:
- Prepare the Mounting Area: Clean the windshield area where the dash cam will be mounted. Ensure it is free of dust and grease.
- Attach Static Stickers: Apply the static stickers to the windshield first, then attach the 3M adhesive mount for the main dash cam unit onto the static sticker. This allows for easier removal without leaving residue.
- Mount the Main Unit: Securely attach the main dash cam unit to the mounted bracket on the windshield, typically near the rearview mirror for optimal front view.
- Install the Rear Camera: Mount the rear camera on the rear windshield using its 3M adhesive. Ensure the view is clear and unobstructed.
- Connect Cables:
- Connect the rear camera to the main unit using the provided rear camera extension cable.
- Connect the car charger power cable to the main unit's Type-C port and plug the other end into your vehicle's cigarette lighter socket.
- Route Cables: Use the installation pry bar to neatly tuck the power and rear camera cables along the edges of your car's interior trim to keep them out of sight and prevent interference with driving.
- Insert MicroSD Card: Insert the included 128GB microSD card into the designated slot on the dash cam. Ensure it clicks into place.
- Adjust Camera Angles: The side cameras are 180° rotatable, and the rear camera is 360° rotatable. Adjust them to cover desired angles (front, left cabin, right cabin, rear).

Image: A visual guide demonstrating the simple installation process of the dash cam, including cable routing along the car's interior and the connection points for the main unit, rear camera, and car charger.
4. Operating Instructions
4.1 Power On/Off
The dash cam will automatically power on and begin recording when connected to your vehicle's power supply (e.g., when you start the engine). It will power off automatically when the power supply is cut off.
4.2 Recording Modes & Coverage
The GD340 offers comprehensive recording with its four cameras:
- Front Camera: Records in 4K (3840*2160) resolution with a 166° wide angle.
- Left & Right Cabin Cameras: Record in 1080P with 244° coverage each, monitoring the interior and side windows.
- Rear Camera: Records in 1080P with 158° coverage, monitoring the rear of the vehicle.
This setup provides a groundbreaking 360° full-guard coverage without blind spots.
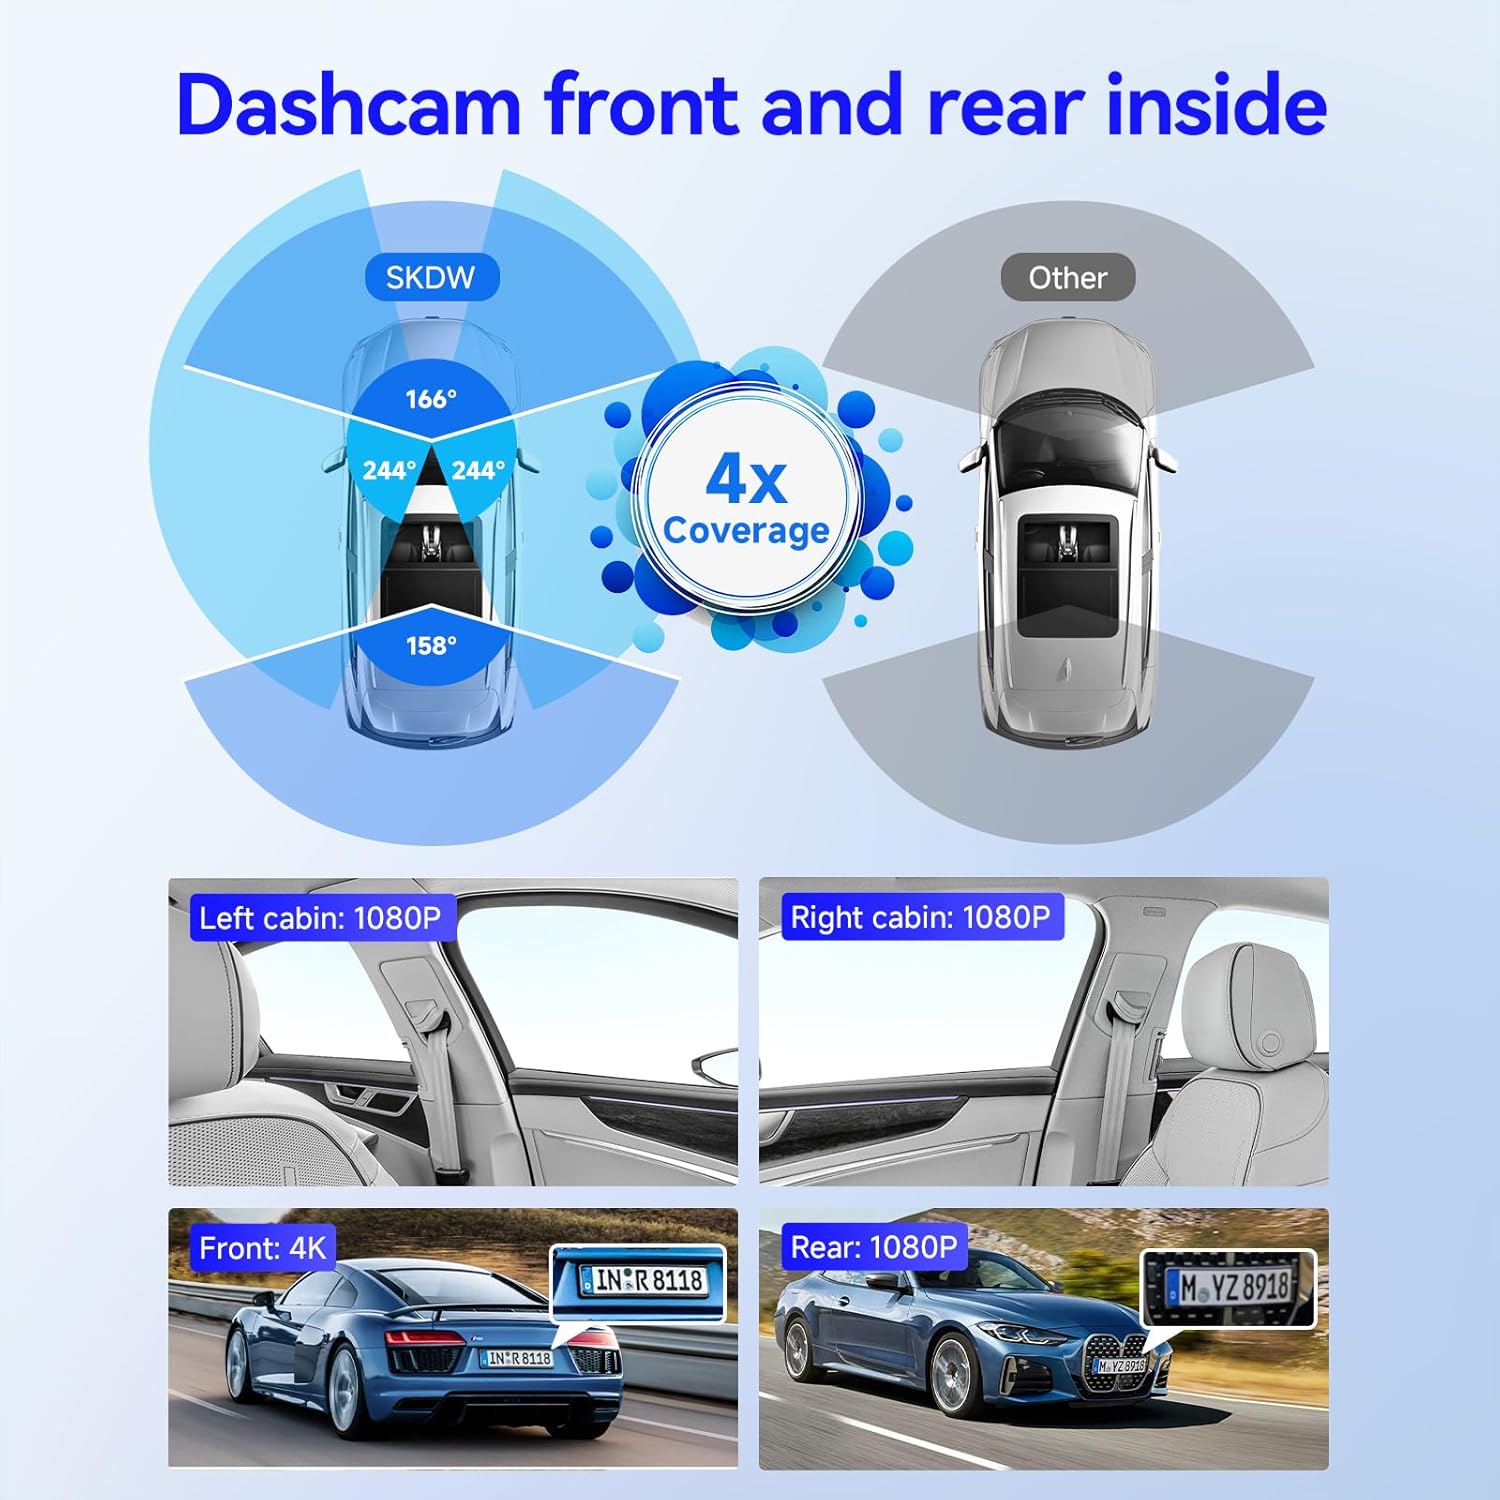
Image: An overhead diagram illustrating the 360° coverage provided by the SKDW GD340 dash cam, showing the wide-angle views of the front, rear, and internal left/right cameras.
4.3 Loop Recording
The dash cam supports seamless loop recording. When the memory card is full, the oldest unlocked video files will be automatically overwritten by new recordings. The included 128GB microSD card provides ample storage for extended recording periods.

Image: A visual representation highlighting the inclusion of a free 128GB microSD card and the dash cam's ability to record 4K UHD front footage along with three 1080P streams for 360° side view.
4.4 Emergency Video Lock (G-Sensor)
In the event of a collision or sudden impact, the built-in G-sensor will automatically detect the event and lock the current video segment (typically 5 seconds before and 15 seconds after the event). These locked files are protected from being overwritten by loop recording, ensuring critical evidence is preserved.
4.5 24/7 Parking Mode
The GD340 offers two customizable 24-hour parking monitoring options:
- Time-lapse Recording: Records video at one frame per second, compressing long periods into short, viewable clips to save memory card space.
- Collision Detection: The G-sensor triggers recording when an impact is detected, capturing the event.
Note: A hardwire kit (ASIN: B0FBVYV3W4, sold separately) is required to enable 24/7 parking mode and prevent car battery drain.

Image: A visual explanation of the 24/7 parking monitoring feature, showing how the G-sensor locks critical event videos and the option for time-lapse recording, along with a reminder that a hardwire kit is needed.
4.6 Voice Control Commands
Control your dash cam hands-free using simple voice commands. This feature enhances driving safety by allowing you to focus on the road.
- "Lock the video"
- "Take picture"
- "Start video"
- "Turn on/off audio"
- "Turn on/off WiFi"
- "Turn on/off screen"

Image: A driver interacting with the dash cam using voice commands, with examples of commands like "Lock the video," "Take picture," "Open screen," "Turn on WiFi," and "Turn off recording" displayed.
4.7 Wi-Fi & App Control (Viidure App)
The GD340 features built-in dual-band 5GHz and 2.4GHz WiFi for fast and stable connection to your smartphone. Download the "Viidure" app (available on App Store and Google Play) to view, manage, and download recordings directly on your device.
- Turn on the logger WiFi setting switch on the dash cam.
- Scan the QR code displayed on the dash cam screen to download the Viidure App.
- Install the Viidure App on your smartphone.
- Connect to the dash cam's WiFi network in your phone's settings (turn off cellular data and VPN for best connection). The WiFi name will be "GD340_XXXX" with a default password (usually 12345678).
- Open the Viidure App and click "Add Dashcam" to connect.
- Once connected, you can start recording, view live footage, and access recorded files.

Image: Step 1 of the APP WiFi connection guide, showing the dash cam screen with WiFi settings and the option to turn on the WiFi switch.

Image: Step 2 of the APP WiFi connection guide, showing the dash cam screen displaying a QR code for downloading the Viidure App.

Image: Steps 3, 4, and 5 of the APP WiFi connection guide, illustrating the process of installing the Viidure App, connecting to the dash cam's WiFi, and opening the app to add the dash cam.
4.8 Built-in GPS Tracking
The integrated GPS module records your driving route, speed, and location data. This information can be reviewed and played back via the Viidure App or a compatible GPS player on your computer, with synchronized views from all cameras.

Image: The dash cam unit alongside a laptop and smartphone, both displaying map interfaces with route tracking, illustrating the built-in GPS tracking feature.
4.9 Night Vision
The GD340 features superior night vision capabilities with an ultra-large F1.5 aperture and 8 infrared (IR) lights for the front inside and rear inside cameras. This allows for clear recording of license plates and cabin images even in low-light or unlit environments, significantly improving nighttime driving safety.

Image: A comparison showing the effectiveness of the dash cam's 4K Super Night Vision with WDR and 8 IR lights, capturing clear details in low-light conditions, including license plates and cabin views.
4.10 Video Overview
Watch this official product video for a visual overview of the SKDW 4-Channel Dash Cam's features and capabilities.
Video: An official video demonstrating the key features of the SKDW 4-channel dash cam, including its 4K recording, 360° coverage, rotatable cameras, voice control, and parking monitor capabilities.
5. Maintenance
- Cleaning: Use a soft, dry cloth to clean the camera lenses and the main unit's screen. Do not use abrasive cleaners or solvents.
- MicroSD Card: Regularly format the microSD card (at least once a month) through the dash cam's settings to ensure optimal performance and prevent data corruption. Back up important files before formatting.
- Firmware Updates: Check the SKDW official website or the Viidure app periodically for firmware updates. Keeping your dash cam's firmware updated ensures the best performance and access to new features.
- Storage: When not in use for extended periods, store the dash cam in a cool, dry place away from direct sunlight.
6. Troubleshooting
| Problem | Possible Cause | Solution |
|---|---|---|
| Dash cam does not power on. | No power supply; loose connection; faulty car charger. | Check car charger connection to cigarette lighter. Ensure vehicle's power outlet is working. Try a different power source if available. |
| Recording stops or freezes. | MicroSD card full or corrupted; low-quality microSD card; firmware issue. | Format the microSD card. Use a high-speed (Class 10 or U3) microSD card. Update firmware if available. |
| Wi-Fi connection issues. | Incorrect password; cellular data/VPN interfering; distance too far. | Ensure correct WiFi password. Turn off cellular data/VPN on your phone. Move closer to the dash cam (effective distance is 25ft). |
| GPS not tracking. | Poor satellite signal; GPS module issue. | Ensure the dash cam has a clear view of the sky. Wait for GPS signal acquisition (may take a few minutes). |
| Voice control not responding. | Loud background noise; unclear pronunciation; feature disabled. | Speak clearly and directly to the dash cam. Reduce background noise. Check settings to ensure voice control is enabled. |
7. Specifications
| Feature | Detail |
|---|---|
| Model Number | GD340 |
| Video Capture Resolution | 4K (3840*2160) Front +1080Px2 Left Right+1080 Rear |
| Field Of View | 360 Degrees Balling |
| Connectivity Technology | Wi-Fi (5.8GHz & 2.4GHz) |
| Control Method | App, Voice |
| Mounting Type | Windshield Mount |
| Product Dimensions | 7.6 x 5.6 x 3.9 inches |
| Item Weight | 1.67 pounds |
| Special Feature | 360 Degree, Night Vision, G-Sensor, Loop Recording, Parking Monitor, GPS |
8. Warranty and Support
SKDW products are designed and manufactured to the highest quality standards. For warranty information, technical support, or any inquiries regarding your GD340 Dash Cam, please refer to the contact information provided on the product packaging or visit the official SKDW website. Please retain your proof of purchase for warranty claims.
Ask a question about this manual
Ask about setup, troubleshooting, compatibility, parts, safety, or missing instructions. Manuals+ will review the question and use this page’s manual context to help answer it.