1. Introduction
The GEARGO Smart RV Leveling System is designed to provide real-time leveling status for your RV or travel trailer, ensuring a stable and comfortable experience. This system features a compact transmitter and a dedicated display, eliminating the need for a smartphone application. It offers precise angle measurements for both roll and pitch, simplifying the leveling process.
This manual provides detailed instructions for the proper installation, operation, and maintenance of your GEARGO Smart RV Leveling System. Please read this manual thoroughly before using the product to ensure safe and efficient operation.
2. Safety Information
- Always ensure your RV is parked on a stable, flat surface before attempting any leveling adjustments.
- Do not attempt to install or operate the system while the RV is in motion.
- Keep the device away from water and extreme temperatures.
- Use only the provided charging cables and power supply.
- Ensure the transmitter is securely mounted to prevent detachment during travel.
- Regularly check the system for any signs of damage or malfunction.
3. Package Contents
Verify that all items listed below are included in your package:
- Display (1)
- Transmitter (1)
- Car power supply cable (3M) (1)
- Type-C charging cable (1.5M) (1)
- Bracket (1)
- Screws (2)
- Double-sided adhesive tape (1)
- User Manual (1)
- PE bag (1)

Image: All components included in the GEARGO Smart RV Leveling System package. This includes the display unit, transmitter, various cables, mounting bracket, screws, double-sided tape, and the user manual.
4. Product Overview
The GEARGO Smart RV Leveling System consists of two primary units:
- Transmitter: This unit is installed on your RV and measures the roll and pitch angles. It wirelessly transmits this data to the display.
- Display: This unit receives data from the transmitter and shows the real-time leveling status. It can be placed in your vehicle's cabin for easy monitoring.
5. Setup and Installation
Follow these steps for proper installation of your GEARGO Smart RV Leveling System:
- Park the RV on a Flat Area: Before installation, park your caravan or RV on an open, flat, and level area. This is crucial for accurate calibration.
- Install the Transmitter:
The transmitter unit should be mounted securely inside your RV. Ensure the arrows on the transmitter are pointing upwards and towards the front of the RV. You can use the provided double-sided adhesive tape or screws for mounting. Choose a location that is stable and allows for clear signal transmission to the display unit. - Install the Display:
Mount the display unit in your vehicle's cabin using the provided bracket. Choose a position that does not obstruct your view while driving and is easily accessible for monitoring. The bracket allows for angle adjustment. - Initial Calibration:
Once both units are installed and the RV is on a level surface, power on both the transmitter and the display. The system will perform an initial calibration. Ensure the display shows '0.0' for both roll and pitch when the RV is perfectly level. If not, refer to the operating instructions for manual calibration or adjustment.

Image: Visual guide for the installation process, showing parking the RV on a flat area, mounting the transmitter with arrows pointing up, installing the display with its bracket, and calibrating the monitor.
6. Operating Instructions
The GEARGO Smart RV Leveling System provides real-time feedback to assist you in leveling your RV.
6.1 Powering On/Off
- To power on the display, press and hold the power button until the screen illuminates.
- To power off, press and hold the power button until the screen turns off.
- The transmitter typically powers on automatically when connected to power or when its internal battery is charged.
6.2 Understanding the Display
The display shows two main readings: Roll and Pitch. These indicate the side-to-side and front-to-back angles of your RV, respectively. A value of 0.0 for both indicates a perfectly level position. The display also shows battery status for both the display and the transmitter.

Image: The GEARGO display unit showing real-time roll and pitch angles, battery indicators, and signal strength. It highlights the system's accuracy and auto-calibration feature.
6.3 Leveling Your RV
Once the system is powered on and connected, follow these steps to level your RV:
- Monitor the Display: Observe the roll and pitch readings on the display from your driver's seat or a convenient location.
- Adjust Roll (Side-to-Side): Use your RV's leveling blocks or hydraulic jacks to adjust the side-to-side tilt until the 'Roll' reading approaches 0.0.
- Adjust Pitch (Front-to-Back): Similarly, adjust the front-to-back tilt using your leveling equipment until the 'Pitch' reading approaches 0.0.
- Fine-Tune: Make small adjustments as needed until both roll and pitch are as close to 0.0 as possible. The system provides real-time updates, allowing for precise leveling.
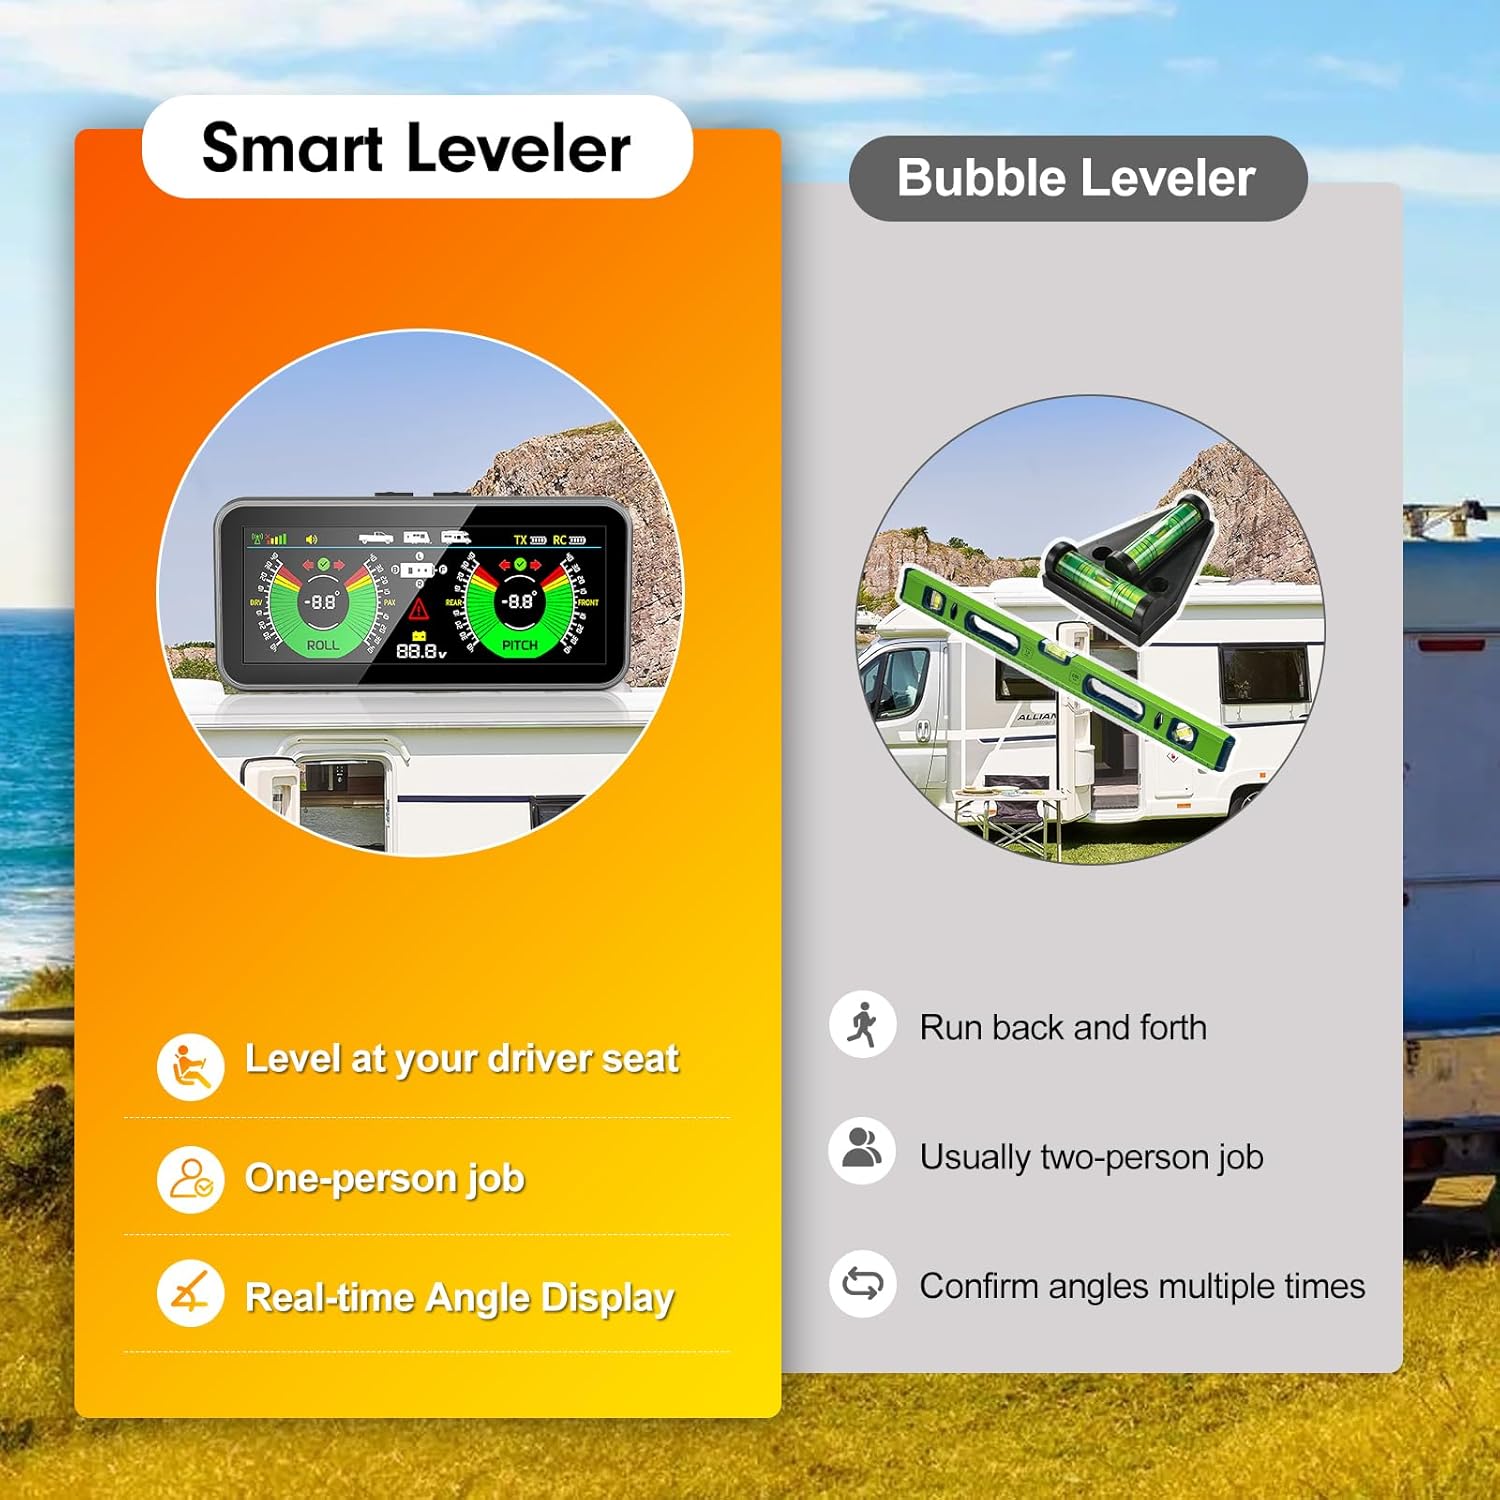
Image: A comparison illustrating the benefits of the Smart Leveler (leveling from the driver's seat, one-person job, real-time display) versus a traditional bubble leveler (requiring multiple trips, often two people, and repeated checks).
7. Maintenance
- Cleaning: Wipe the display and transmitter with a soft, dry cloth. Do not use abrasive cleaners or solvents.
- Battery Care: Recharge the display and transmitter regularly using the provided Type-C charging cable. Avoid fully discharging the batteries for extended periods.
- Storage: When not in use for extended periods, store the system in a cool, dry place.
- Firmware Updates: Check the manufacturer's website periodically for any available firmware updates.
8. Troubleshooting
| Problem | Possible Cause | Solution |
|---|---|---|
| Display not turning on | Low battery; Power button not pressed correctly | Charge the display unit; Press and hold the power button for 3 seconds. |
| No signal from transmitter | Transmitter off; Out of range; Obstruction | Ensure transmitter is powered on and charged; Move display closer to transmitter; Check for metal obstructions. |
| Inaccurate readings | Improper calibration; Loose mounting | Recalibrate the system on a known level surface; Ensure both units are securely mounted. |
| Battery not charging | Faulty cable; Power source issue | Try a different Type-C cable; Ensure the power source is functional. |
9. Specifications
| Feature | Specification |
|---|---|
| Model | AM50-PRO |
| Product Dimensions | 19.3 x 10.6 x 7.4 cm |
| Item Weight | 522 g |
| Manufacturer | GEARGO |
| Connectivity | Wireless |
| Leveling Accuracy | ±0.1° (typical) |
| Power Source | Rechargeable internal battery, Car power supply |
10. Warranty and Support
For warranty information and technical support, please refer to the contact details provided on the GEARGO official website or the product packaging. Keep your purchase receipt as proof of purchase for warranty claims.


