1. Introduction
This manual provides detailed instructions for the safe installation, operation, and maintenance of your CHESUR 54-inch Flush Mount Ceiling Fan. Please read this manual thoroughly before installation and retain it for future reference. This ceiling fan features a modern design, a quiet DC motor, dimmable LED lighting with adjustable color temperature, six wind speeds, and reversible functionality, controllable via remote or a dedicated mobile application.

Figure 1: CHESUR 54-inch Flush Mount Ceiling Fan with remote and app control.
2. Safety Information
- Ensure power is disconnected at the circuit breaker before installation or maintenance.
- All wiring must be in accordance with national and local electrical codes. If you are unfamiliar with wiring, consult a qualified electrician.
- The mounting bracket must be securely fastened to a ceiling joist or a suitable support structure capable of supporting the fan's weight.
- Do not bend the blade holders during installation or cleaning.
- Maintain a minimum clearance of 7 feet from the floor to the bottom of the fan blades.
- Do not operate the fan if any part is damaged.
3. Package Contents
Verify that all components are present and undamaged before beginning installation.
- Fan Motor Assembly
- Fan Blades (5)
- LED Light Kit
- Remote Control
- Mounting Bracket
- Hardware Pack (screws, wire nuts, etc.)
- Instruction Manual
4. Specifications
| Feature | Specification |
|---|---|
| Brand | CHESUR |
| Model Name | 8231-Brown-54 |
| Size | 54 inches |
| Number of Blades | 5 |
| Motor Type | DC Motor |
| Light Type | Dimmable LED (3 Color Temperatures) |
| Wattage | 29 watts |
| Control Method | Remote Control, App Control |
| Wind Speeds | 6 |
| Reversible Function | Yes |
| Indoor/Outdoor Usage | Indoor, Covered Outdoor |
| Product Dimensions | 8"D x 8"W x 10"H (Fan body, not including blades) |
| Item Weight | 17.51 pounds |

Figure 2: Fan dimensions and key components.
5. Installation
5.1. Pre-Assembly
Most functional parts are pre-assembled. Ensure you have all necessary tools (screwdriver, wire strippers, ladder, etc.) and that the power supply to the installation area is turned off at the circuit breaker.
5.2. Blade and Light Assembly
- Attach the five fan blades to the motor assembly using the provided screws. Each blade typically requires two screws.
- Connect the LED light kit to the fan motor assembly. This is a plug-and-play connection.
- Secure the LED light cover by twisting it into place.
5.3. Mounting Bracket Installation
- Secure the mounting bracket to the ceiling junction box or a suitable support structure using the provided hardware. Ensure the bracket is firmly attached.
- Pull the electrical wiring from the ceiling through the center hole of the mounting bracket.
5.4. Wiring Connections
- Hang the fan motor assembly from the hook on the mounting bracket. This allows for hands-free wiring.
- Connect the household electrical wires to the fan's wiring according to the marked terminals (L for Live, N for Neutral, and Ground). Use appropriate wire nuts.
- Install the remote control transmitter. This is a plug-and-play connection to the fan's internal wiring.
5.5. Final Mounting
- Once wiring is complete, carefully lift the fan assembly and align the mounting holes with the screws on the bracket.
- Twist the fan assembly to lock it into place, then tighten all screws to secure the fan to the mounting bracket.
6. Operating Instructions
6.1. Remote Control and App Control
The fan can be operated using the included remote control or via the "Fan Light Pro" mobile application. Ensure the remote is paired after installation (refer to troubleshooting if pairing issues occur).

Figure 3: Remote and App Control Interface.
Remote/App Functions:
- Power On/Off: Turns the fan and light on or off.
- Fan Speed: Select from 6 adjustable wind speeds (1-6).
- Light Control: Stepless dimming to adjust brightness.
- Color Temperature (3CCT): Switch between Warm Light (3000K), Natural Light (4500K), and Cold Light (6000K).
- Night Light Mode: Activates a low-intensity light setting.
- Timer: Set a 2-hour timer for automatic shutdown.
- Reversible Function (F/R): Changes the direction of blade rotation.

Figure 4: Dimmable LED with 3 Color Temperatures.
6.2. Reversible Fan Function
The fan features a reversible DC motor, allowing for year-round use.
- Summer Mode: Blades rotate counter-clockwise to create a downward airflow, providing a cooling effect.
- Winter Mode: Blades rotate clockwise to create an upward airflow, circulating warm air trapped near the ceiling and enhancing air circulation without a direct draft.
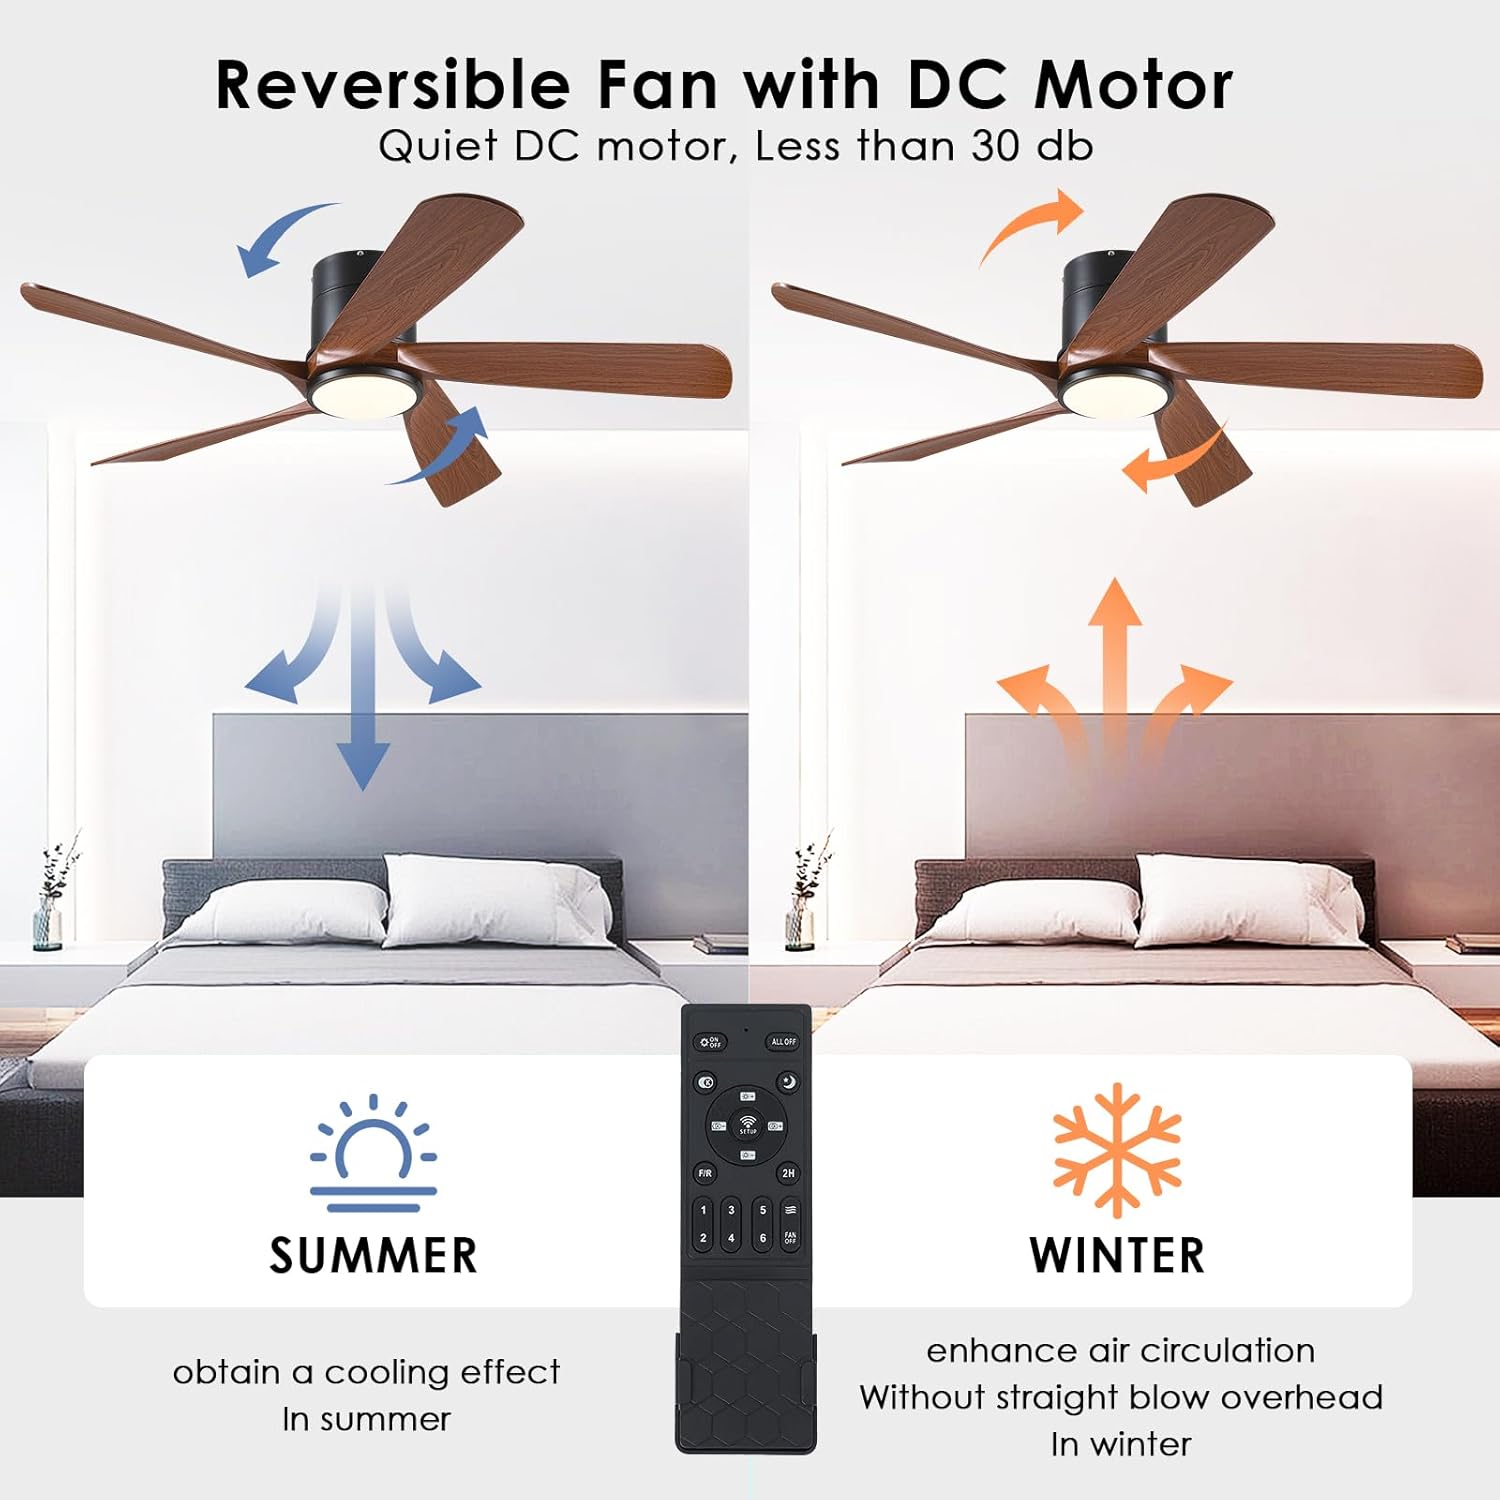
Figure 5: Reversible Fan with DC Motor for Summer and Winter.
6.3. Quiet Operation and Night Light
The fan's DC motor operates quietly, especially at lower speeds, making it suitable for bedrooms and other quiet environments. The night light mode provides a soft illumination.

Figure 6: Quiet operation and night light for a good night's sleep.
7. Maintenance
- Cleaning: Periodically clean the fan blades and motor housing with a soft, damp cloth. Do not use abrasive cleaners or solvents.
- Inspection: Regularly check all connections and screws for tightness.
- Light Source: The LED light source is integrated and not user-replaceable. Contact customer service if the light fails.
8. Troubleshooting
- Fan does not operate:
- Check that power is supplied to the fan.
- Ensure all wiring connections are secure.
- Verify the remote control batteries are functional and the remote is paired with the fan.
- Light does not work:
- Check power supply.
- Ensure light kit connections are secure.
- If the LED light is completely non-functional, contact customer service.
- Remote control not pairing/responding:
- Ensure batteries are correctly inserted and charged.
- To pair: Turn off the main power to the fan for at least 10 seconds. Turn the power back on. Within 5 seconds, press and hold the 'Pair' button on the remote until the fan light blinks, indicating successful pairing.
- For app control, download the "Fan Light Pro" app. Scan the QR code provided in the app's instructions to add the device. Follow in-app steps to connect. Download Fan Light Pro App
- Fan wobbles:
- Ensure all blade screws and mounting bracket screws are tightened.
- Check that blades are not bent or damaged.
9. Warranty and Support
CHESUR provides a 1-year service for free replacement for this modern ceiling fan. Additionally, lifetime service support is available. If you encounter any quality defects or require assistance, please contact CHESUR customer service. We aim to respond within 24 hours.