VEVOR BL-W6024V-L
VEVOR 6000W Pure Sine Wave Inverter Charger User Manual
Model: BL-W6024V-L
1. Introduction
Thank you for choosing the VEVOR 6000W Pure Sine Wave Inverter Charger. This device is designed to provide stable and reliable AC power from a DC source, and also functions as a battery charger. It is ideal for off-grid solar systems, RVs, and as a backup power solution for homes. Please read this manual thoroughly before installation and operation to ensure proper use and safety.

Figure 1.1: The VEVOR 6000W Pure Sine Wave Inverter Charger, showcasing its robust black casing, control panel, and connection terminals.
2. Safety Instructions
Always observe the following safety precautions to prevent injury or damage to the unit:
- Ensure proper grounding of the unit.
- Do not expose the inverter to rain, snow, spray, or any liquids.
- Do not disassemble the unit. Refer all servicing to qualified personnel.
- Keep the inverter away from flammable materials and gases.
- Ensure adequate ventilation around the unit to prevent overheating.
- Verify that the input DC voltage matches the inverter's specifications (24V DC).
- Disconnect all power sources before performing any maintenance or wiring.
3. Product Overview
3.1 Key Features
- 6000W Pure Sine Wave Output: Provides clean and stable power suitable for sensitive electronics and appliances.
- Multiple Working Modes: Includes Unattended Mode, Grid Priority Mode, Battery Priority Mode, Energy Saving Mode, and Generator Mode for versatile applications.
- Wide Battery Compatibility: Supports 24V LiFePO4, Lithium-ion, AGM, Sealed Lead Acid, and Flooded Lead Acid batteries.
- Remote Control: Features a detachable controller with a 10m (32.8 ft) cable for convenient remote monitoring and operation.
- Comprehensive Protection: Built-in safeguards against overload, short circuit, over-temperature, over-current, high/low battery voltage, and high/low grid voltage.
3.2 Power Capacity and Applications

Figure 3.1: Illustration of the 6000W continuous power output, demonstrating its capability to power various household appliances such as refrigerators, coffee makers, and kettles.
3.3 Inverter and Charger Functionality

Figure 3.2: Depiction of the unit's dual functionality: converting DC to AC for power supply and charging batteries to ensure continuous power availability.
3.4 Battery Compatibility
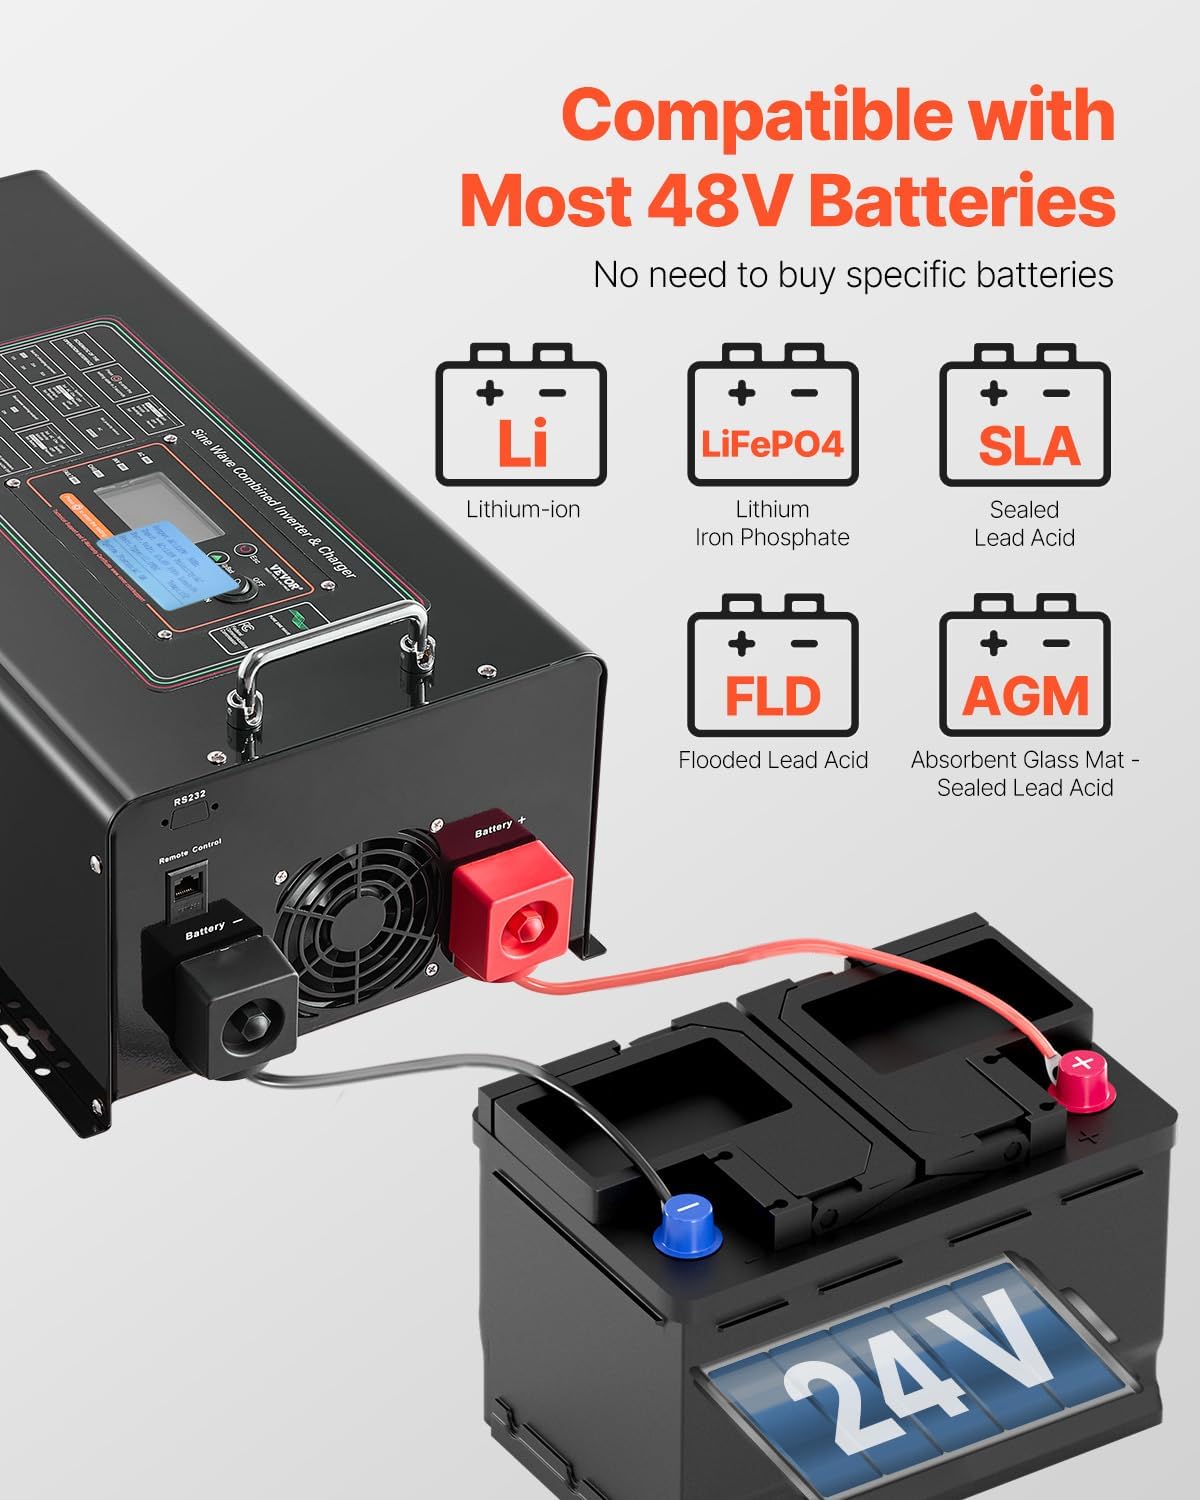
Figure 3.3: Visual representation of the inverter charger's compatibility with various 24V battery types, including Lithium-ion, LiFePO4, Sealed Lead Acid (SLA), Flooded Lead Acid (FLD), and Absorbent Glass Mat (AGM) batteries.
4. Setup
4.1 Unpacking and Inspection
Carefully unpack the inverter charger and inspect it for any shipping damage. Report any damage to your dealer immediately. Ensure all components listed in the packing list are present.
4.2 Mounting the Unit
Choose a dry, well-ventilated location for mounting the inverter. Ensure there is sufficient clearance around the unit for airflow. Mount the unit securely using appropriate fasteners.
4.3 Wiring Connections
Before making any connections, ensure all power sources are disconnected. Follow the wiring diagram carefully.
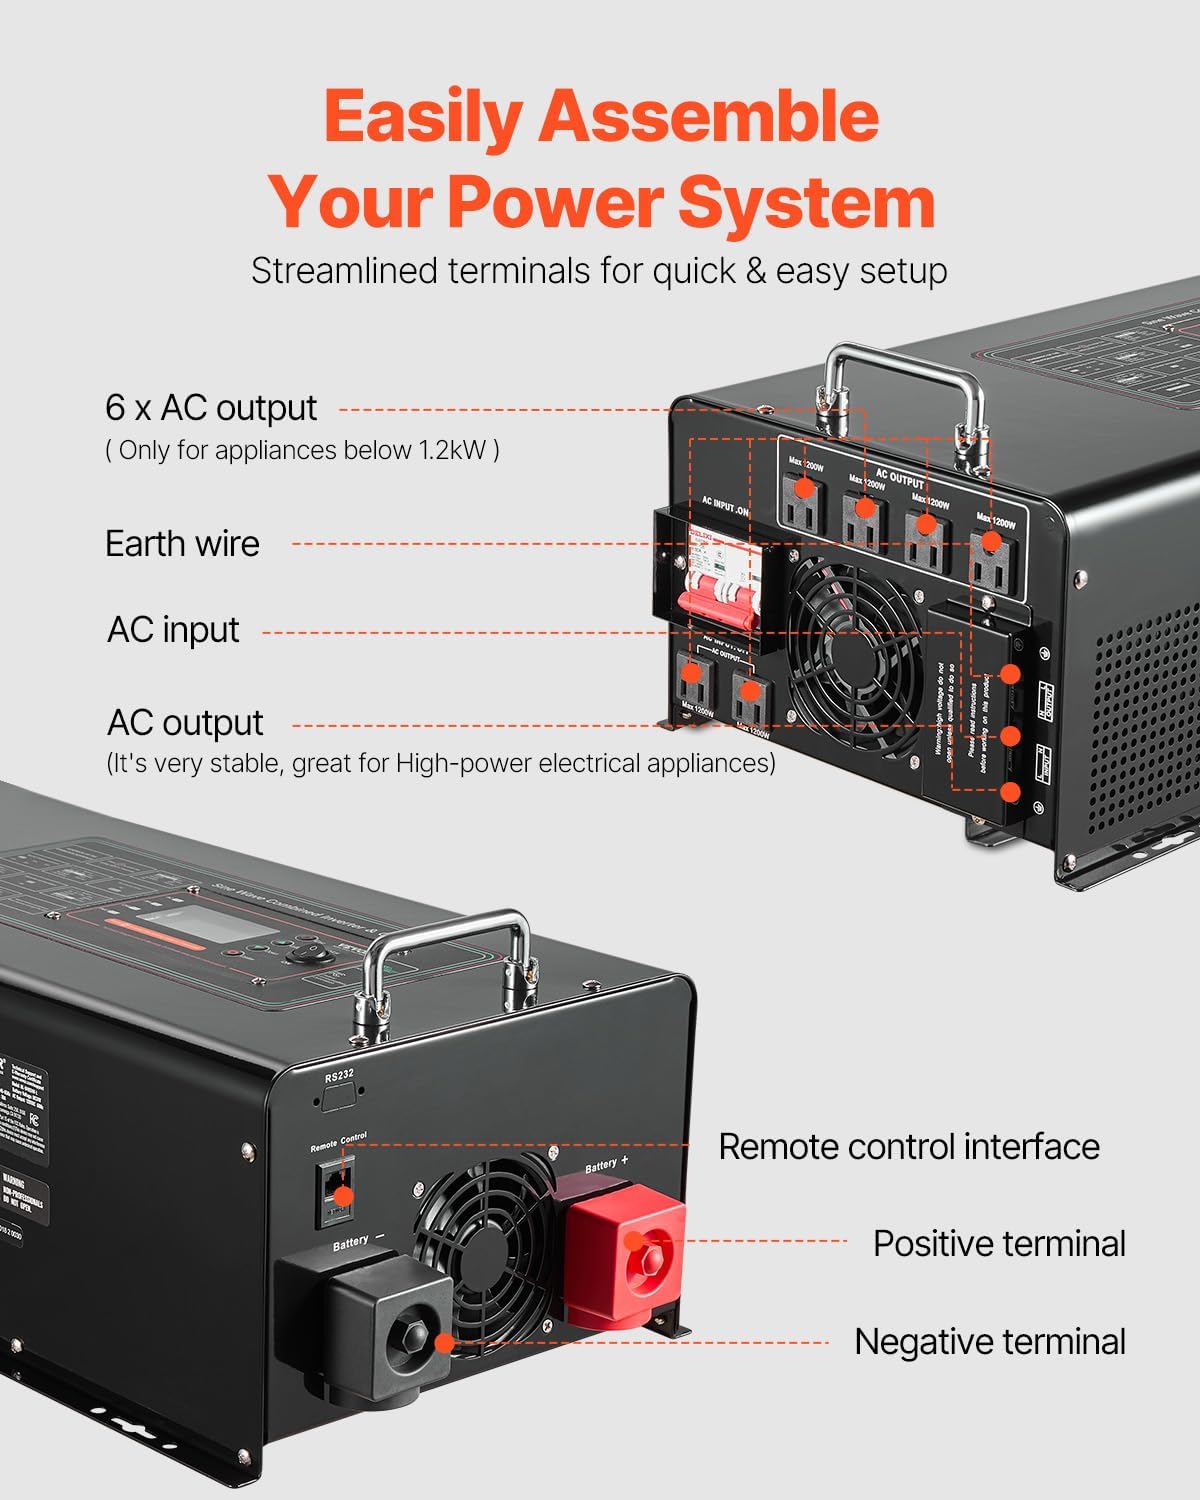
Figure 4.1: Detailed view of the streamlined terminals for quick and easy setup, including AC input, AC output (6x outlets, max 1.2KW per outlet), earth wire, remote control interface, positive battery terminal, and negative battery terminal.
- Battery Connection: Connect the positive (+) battery cable to the red terminal and the negative (-) battery cable to the black terminal. Ensure a secure connection.
- AC Input: Connect the AC grid power supply to the AC input terminals.
- AC Output: Connect your appliances to the AC output receptacles. Note that each output is recommended to be below 1.2 KW.
- Earth Wire: Connect the earth wire to a proper ground point.
- Remote Control: Connect the remote control cable to the designated remote control interface.
5. Operating
5.1 Initial Power-Up
After all connections are secure, switch on the battery breaker, then the AC input breaker (if applicable), and finally the inverter's power switch. The LCD display will illuminate, showing system status.
5.2 Remote Control Operation
The detachable remote control allows for convenient monitoring and adjustment of settings from a distance.

Figure 5.1: The remote control unit connected via a 10m (32.8 ft) cable, allowing users to monitor and control the power system from a distance. The display shows input/output voltage, battery status, and operating mode.
5.3 Working Modes
The inverter charger offers five distinct working modes:
- Unattended Mode: Automatic operation based on power availability.
- Grid Priority Mode: Prioritizes grid power, switching to battery/inverter only when grid power is unavailable.
- Battery Priority Mode: Prioritizes battery power, switching to grid only when battery voltage is low.
- Energy Saving Mode: Reduces power consumption when no load is detected.
- Generator Mode: Optimized for use with a generator as an AC input source.
Refer to the detailed instructions on the LCD display and remote control for selecting and configuring these modes.
6. Maintenance
Regular maintenance ensures optimal performance and longevity of your inverter charger.
- Cleaning: Keep the unit clean and free of dust. Use a dry cloth to wipe the exterior. Do not use liquid cleaners.
- Ventilation: Ensure ventilation openings are clear and not obstructed.
- Connections: Periodically check all electrical connections for tightness and corrosion.
- Battery Health: Monitor battery voltage and health according to battery manufacturer guidelines.
7. Troubleshooting
This section provides solutions to common issues. If the problem persists, contact customer support.
| Problem | Possible Cause | Solution |
|---|---|---|
| No output power | Inverter off; Low battery voltage; Overload | Turn on inverter; Charge battery; Reduce load |
| Overload alarm | Connected load exceeds capacity | Reduce total load; Check individual output limits (1.2KW) |
| Over-temperature warning | Insufficient ventilation; High ambient temperature | Ensure clear airflow; Move to cooler location |
| Battery not charging | AC input issue; Battery connection issue | Check AC input power; Verify battery connections |
8. Specifications
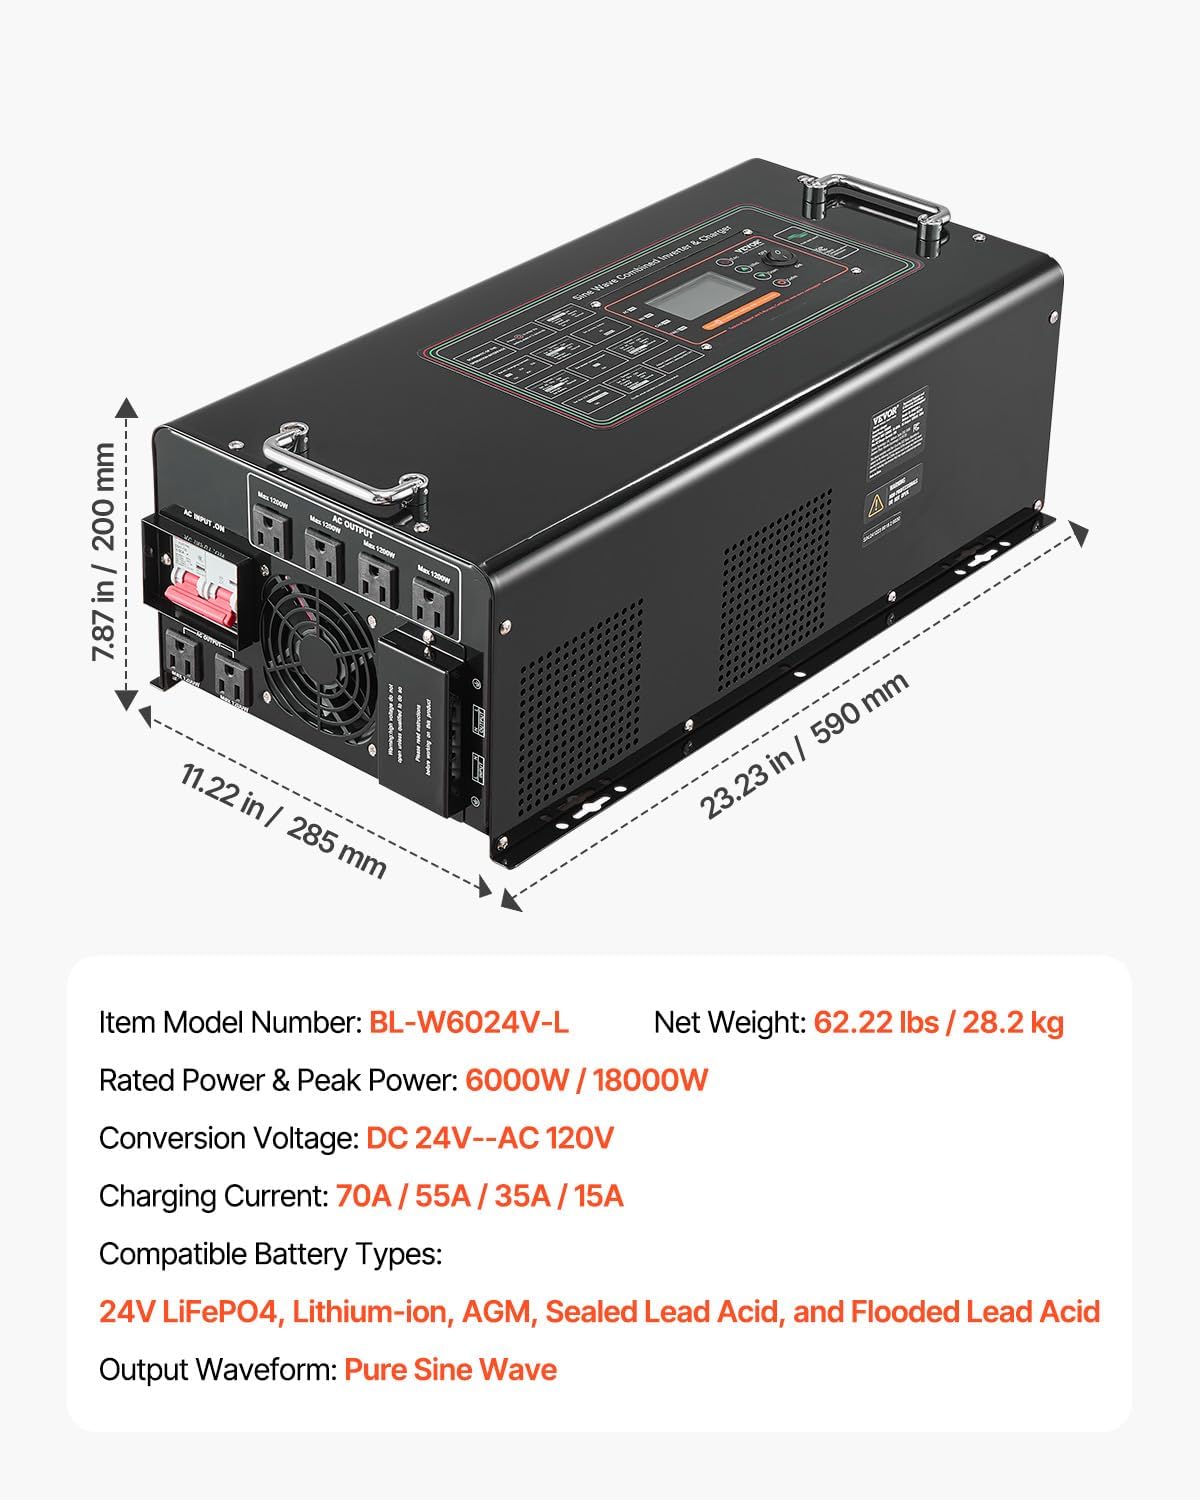
Figure 8.1: Diagram showing the physical dimensions of the VEVOR Inverter Charger and a summary of its key technical specifications.
| Parameter | Value |
|---|---|
| Model Number | BL-W6024V-L |
| Rated Power | 6000W |
| Peak Power | 18000W |
| Conversion Voltage | DC 24V to AC 120V |
| Output Waveform | Pure Sine Wave |
| Frequency | 60 Hz |
| Charging Current | 70A / 55A / 35A / 15A (selectable) |
| Compatible Battery Types | 24V LiFePO4, Lithium-ion, AGM, Sealed Lead Acid, Flooded Lead Acid |
| Dimensions (L x W x H) | 590 mm x 285 mm x 200 mm (23.23 in x 11.22 in x 7.87 in) |
| Net Weight | 28.2 kg (62.17 lbs) |
9. Warranty and Support
VEVOR products come with a standard warranty. For specific warranty terms and conditions, please refer to the warranty card included with your product or visit the official VEVOR website. For technical support, troubleshooting assistance, or spare parts, please contact VEVOR customer service through their official channels. When contacting support, please have your model number (BL-W6024V-L) and purchase information ready.
Ask a question about this manual
Ask about setup, troubleshooting, compatibility, parts, safety, or missing instructions. Manuals+ will review the question and use this page’s manual context to help answer it.