1. Introduction
This manual provides detailed instructions for the assembly, operation, and maintenance of your Okinos Mirage 4 Black MATX PC Case. Please read this manual thoroughly before beginning installation to ensure proper setup and to maximize the performance and longevity of your system components.

Image 1.1: The Okinos Mirage 4 Black MATX PC Case, showcasing its panoramic design and internal component visibility.
2. Package Contents
Please verify that all items listed below are present in your package:
- Okinos Mirage 4 Black MATX PC Case
- Pre-installed 2 x 120mm H12R ARGB 3-Pin Fans (bottom)
- Pre-installed 1 x 120mm H12 ARGB 3-Pin Fan (rear)
- 4-port ARGB Fan Controller
- 1-to-3 3-Pin Splitter Cable
- Accessory Box (containing additional standoffs, screws, and cable ties)
- Instruction Manual
3. Key Features
- 270-Degree Panoramic Design: Enhances aesthetics and openness with a tool-free tempered glass panel.
- Optimized Vertical Airflow: Supports up to 5 fans for efficient bottom-to-top thermal management.
- Enhanced Right Panel Airflow: Features a 1.2mm mesh for superior cooling performance.
- Pre-installed ARGB Fans: Includes 2 x 120mm H12R ARGB 3-Pin (bottom) and 1 x 120mm H12 ARGB 3-Pin (rear) with a 4-port ARGB fan controller and splitter cable.
- 5-Slot PCIe Layout: Improves GPU compatibility and cooling space.
- Effortless Setup: Pre-locked copper standoffs and included accessory for easy installation.
- Magnetic Dust Filters: Full-size filters on top and bottom for clean airflow and easy maintenance.
- Generous Cable Management: 95mm on the right and 45mm on the left for a tidy build.
- Cable Grommets: Equipped with rubber grommets for a sleek and professional cable routing.
4. Setup & Installation
4.1. Panel Removal
The front and left side panels utilize a tool-free fixing stud design for easy removal. Gently pull the panels outwards to detach them. This simplifies assembly and disassembly while reducing the risk of glass breakage.

Image 4.1: Illustration of the tool-free panel removal mechanism.
4.2. Motherboard Installation
The case supports Micro-ATX and Mini-ITX motherboards. Six copper standoffs are pre-installed. Additional standoffs for ITX compatibility are included in the accessory box.
- Align your motherboard with the pre-installed standoffs.
- Secure the motherboard using the provided screws.

Image 4.2: Motherboard standoff locations and compatibility.
4.3. CPU Cooler Installation
The case supports CPU air coolers with a maximum height of 155mm. For liquid cooling, the top panel supports a 240mm radiator.

Image 4.3: CPU air cooling compatibility.

Image 4.4: Vertical airflow system and top 240mm radiator support.
4.4. GPU Installation
The case features a 5-slot PCIe layout, providing ample space for graphics cards up to 325mm in length and 60mm in width, with 30mm of cooling space below.

Image 4.5: GPU compatibility and cooling space.
4.5. Power Supply Unit (PSU) Installation
The case offers extra-wide space for PSUs, supporting units up to 240mm in length. This provides 60mm of additional space compared to standard designs, facilitating easier installation and cable routing.

Image 4.6: PSU extra-wide space for easier installation.
4.6. Storage Device Installation
The case supports multiple storage configurations:
- Two SSDs can be installed on the outer side of the bracket.
- One HDD can be installed on the inner side of the bracket.
- One additional SSD can be installed on the right side of the motherboard.
When installing SSDs/HDDs, ensure the interface faces up to avoid interference with the PSU.
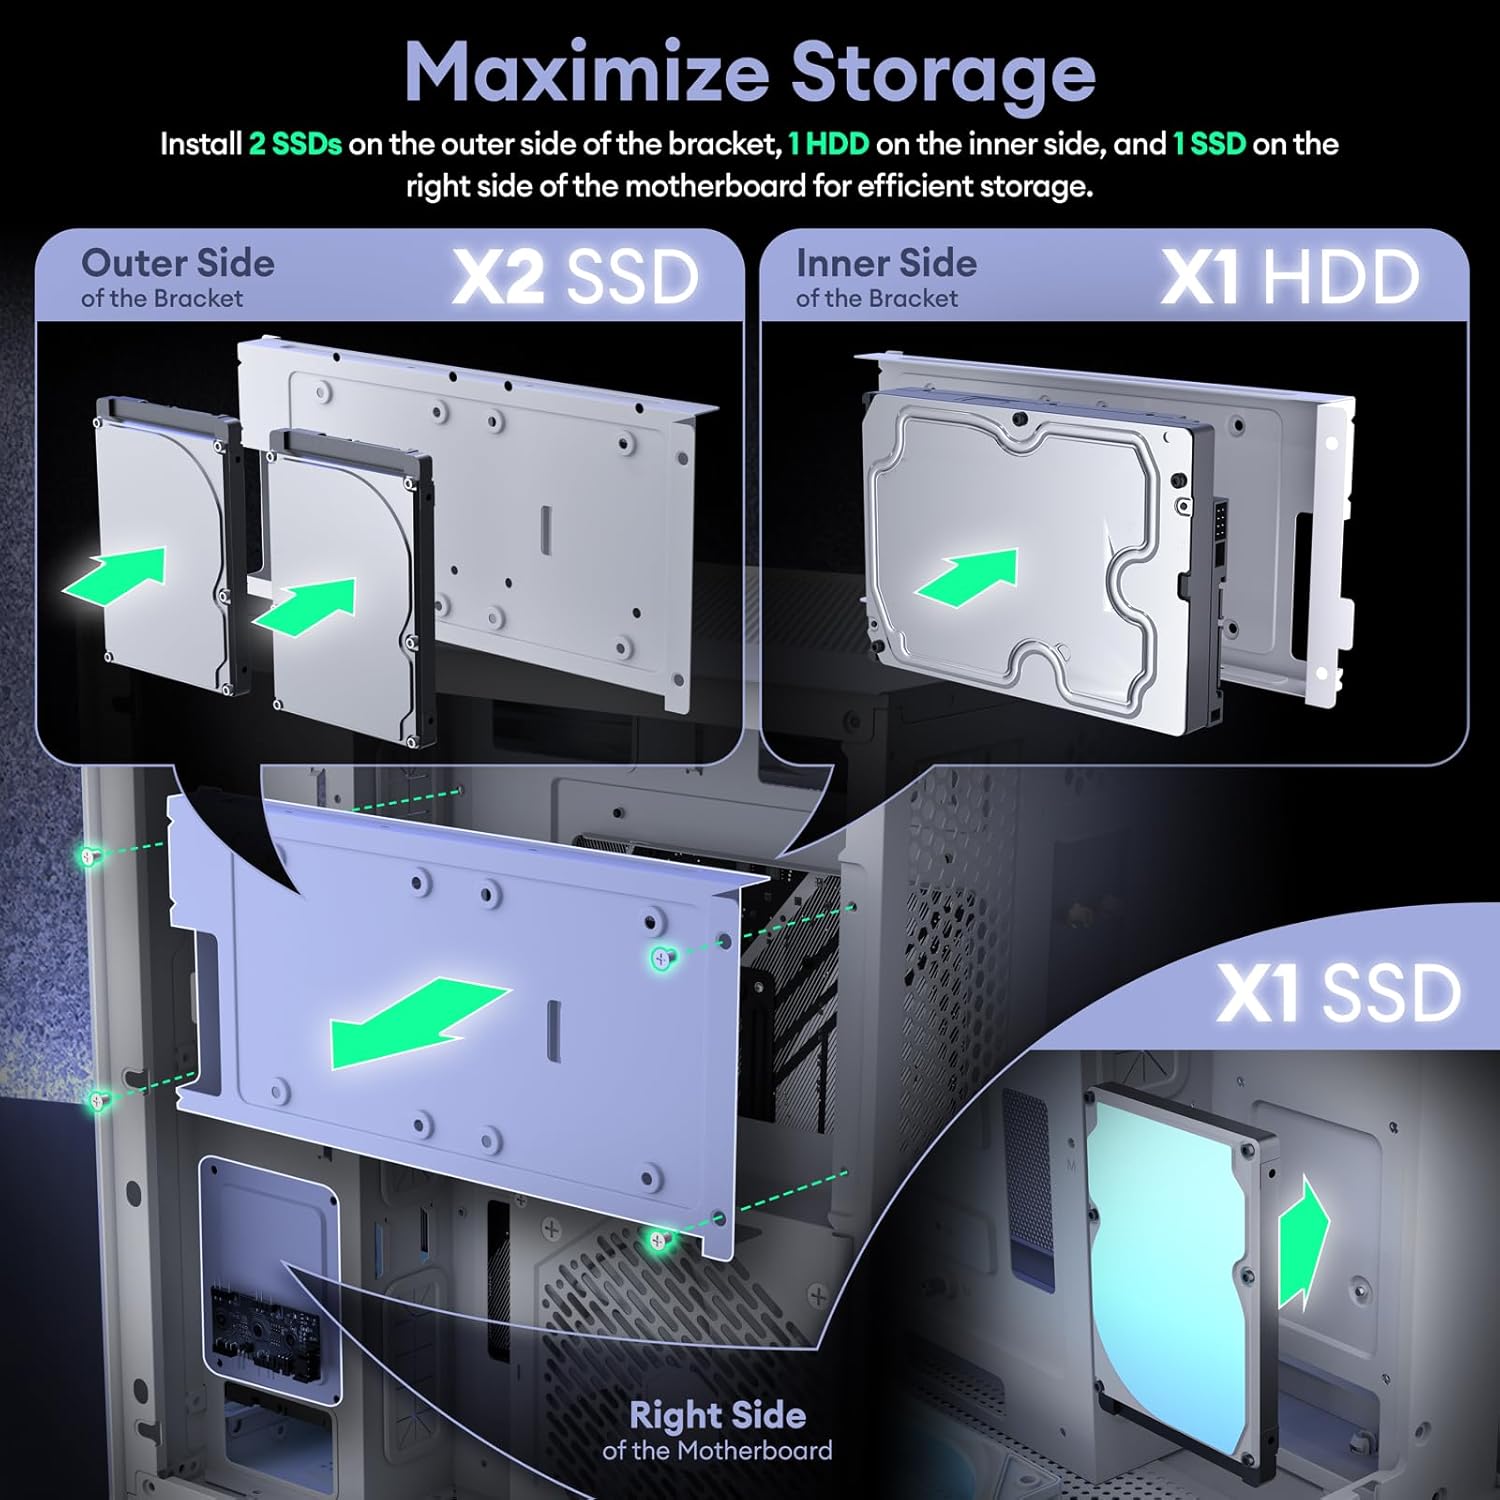
Image 4.7: Storage maximization options.
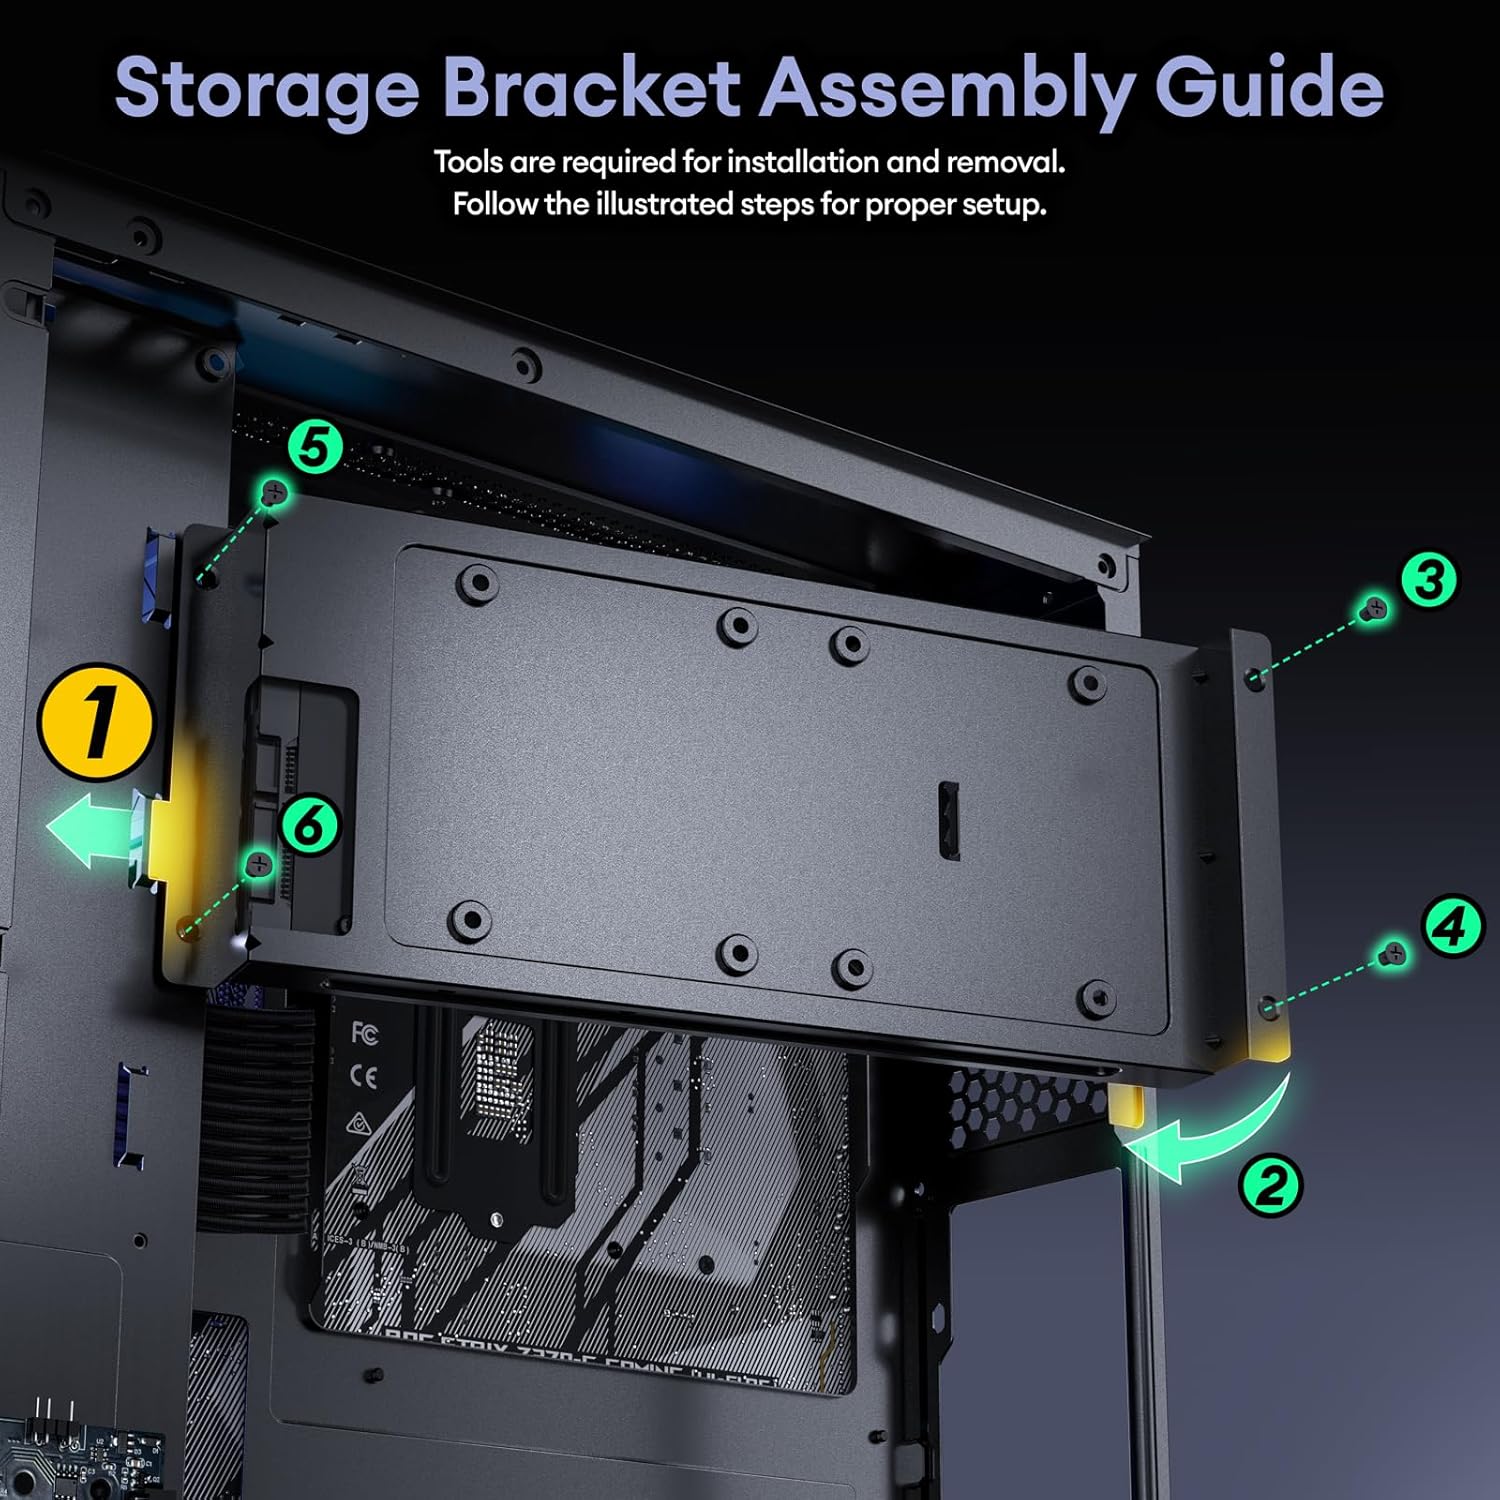
Image 4.8: Storage bracket assembly guide.
4.7. Fan & Radiator Installation
The case comes with three pre-installed ARGB fans: two 120mm H12R reverse fans at the bottom and one 120mm H12 fan at the rear. A 4-port ARGB fan hub and a 1-to-3 3-pin splitter cable are included for fan control and synchronization.
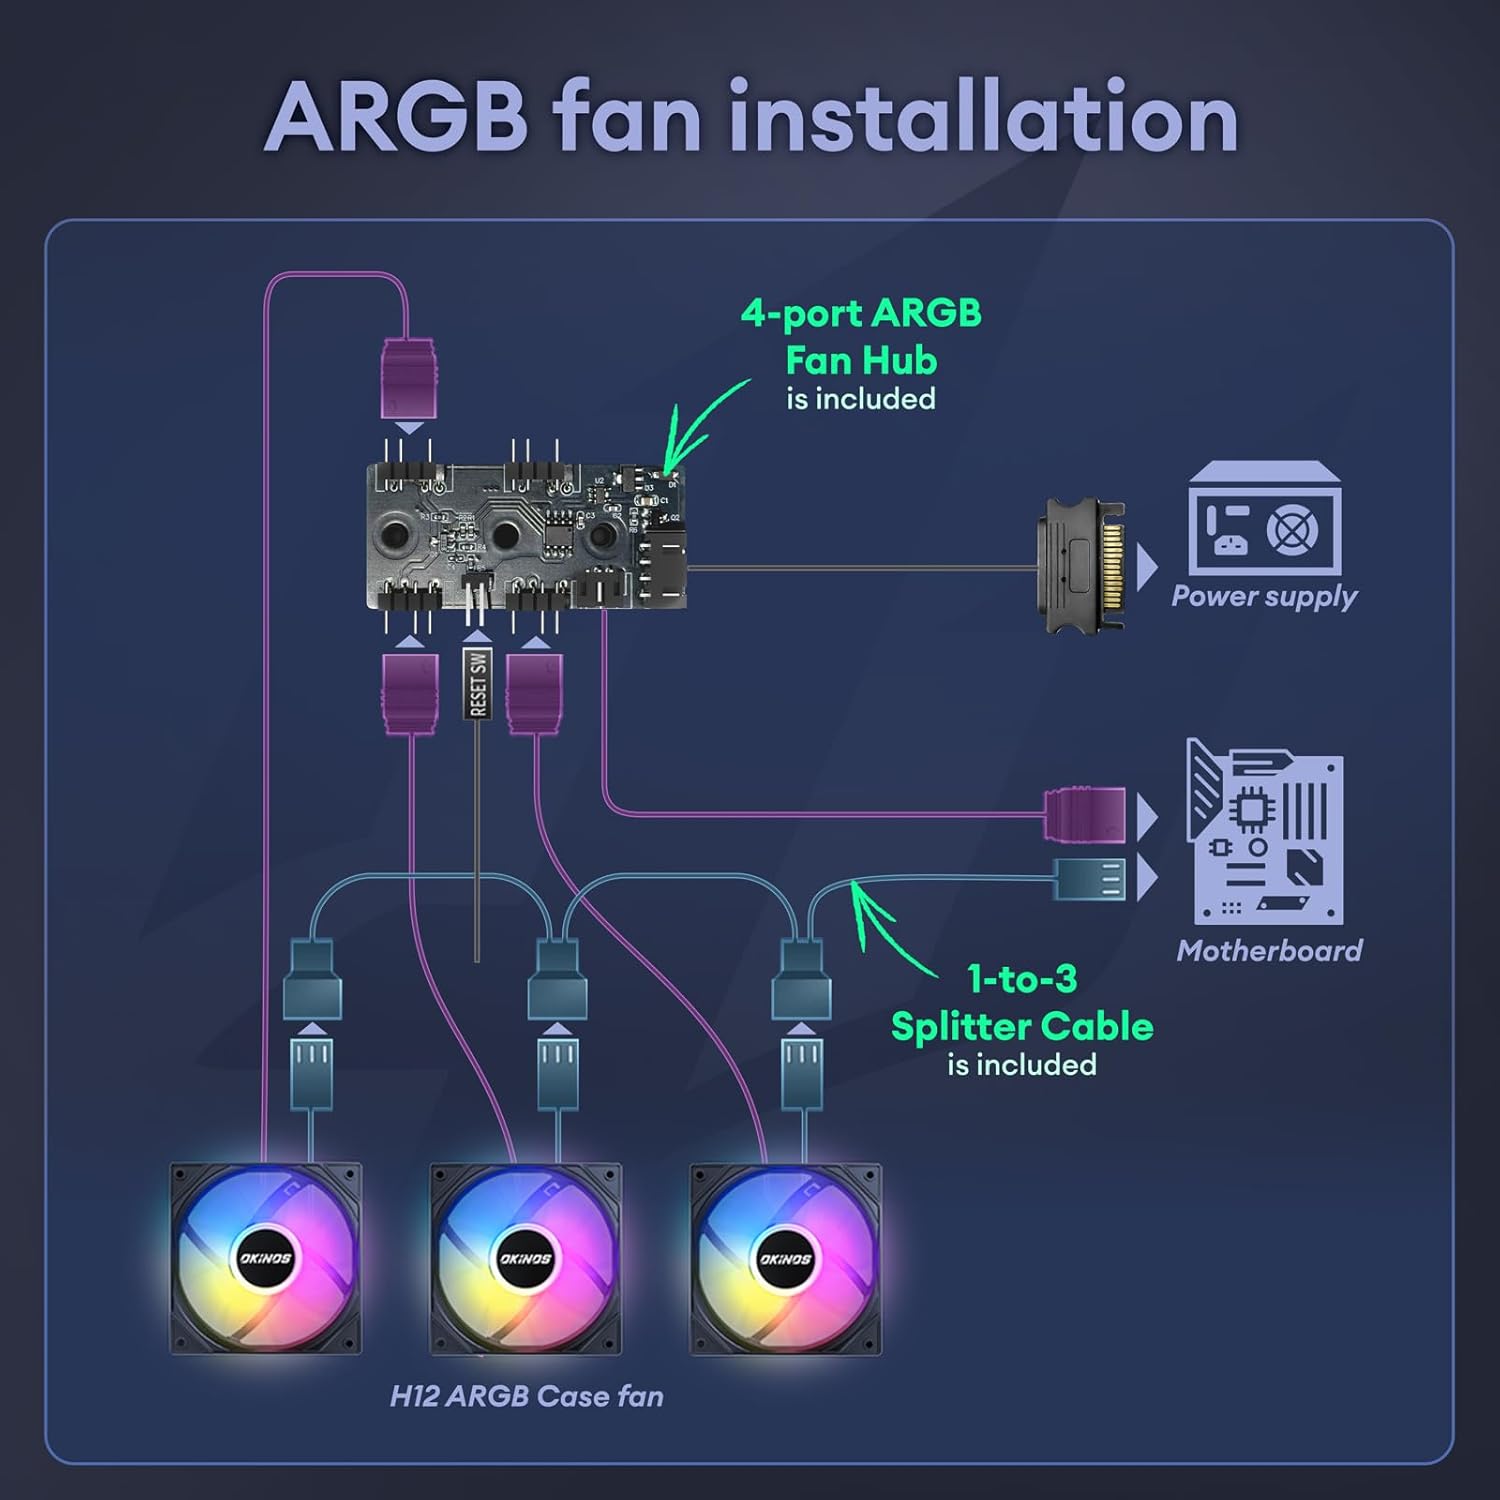
Image 4.9: ARGB fan installation diagram.

Image 4.10: Fan and radiator support locations.
4.8. Cable Management
The Mirage 4 offers generous cable management space: 95mm on the right side and 45mm on the left side, ensuring a clean and efficient build. Rubber grommets are provided to keep cables tidy and professional.

Image 4.11: Generous cable management space.
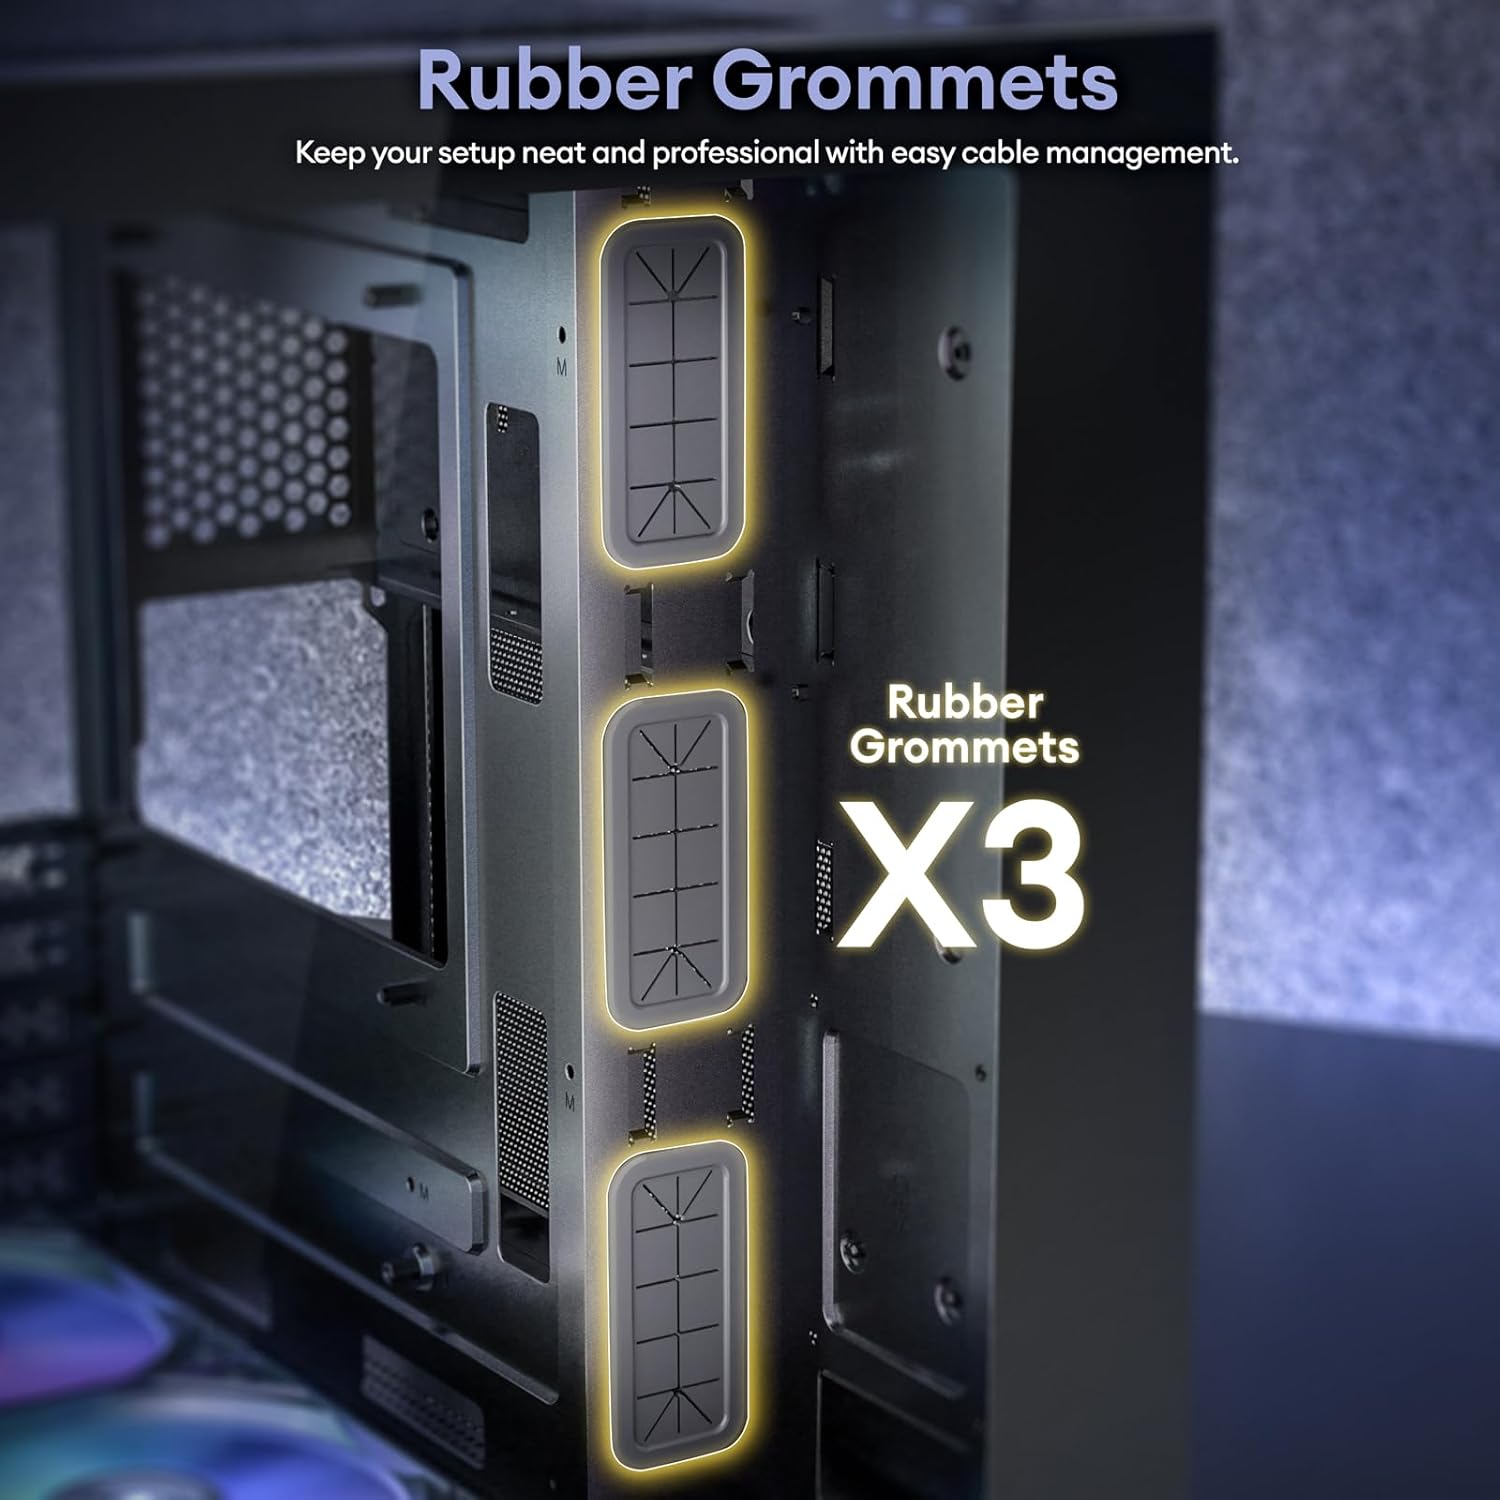
Image 4.12: Rubber grommets for organized cables.

Image 4.13: Cable management diagram for main power and data cables.

Image 4.14: Cable management diagram for storage devices.
5. Operating Instructions
5.1. Front Panel I/O
The multi-function zone on the top panel provides readily accessible ports for user interaction:
- Power Button: To turn the system on or off.
- LED Control Button: To cycle through ARGB lighting modes.
- Headphone/Mic Combo Jack: For audio input/output.
- USB 3.0 Ports: For high-speed data transfer.
- Type-C 3.2 Gen 2 (10Gbps) Port: For high-speed data transfer.
Note: USB ports are primarily for data transfer and are not recommended for power charging, as most motherboards' USB ports support a maximum voltage of 5V.

Image 5.1: Front panel I/O layout.
5.2. Powering On
After all components are securely installed and cables connected, press the power button on the front panel to start your system.
6. Maintenance
6.1. Dust Filter Cleaning
The Okinos Mirage 4 case is equipped with full-size magnetic dust filters on both the top and bottom panels. Regular cleaning of these filters is essential to maintain optimal airflow and prevent dust buildup inside your PC.
- Gently remove the magnetic dust filters from the top and bottom of the case.
- Clean the filters using compressed air, a soft brush, or by rinsing them with water (ensure they are completely dry before reattaching).
- Reattach the magnetic filters to their respective positions.

Image 6.1: Magnetic dust filters for easy maintenance.
6.2. General Cleaning
For external cleaning, use a soft, damp cloth. Avoid abrasive cleaners or solvents that may damage the finish or tempered glass panels.

Image 6.2: The 1.2mm mesh on the right panel, which should be kept clear for optimal airflow.
7. Troubleshooting
If you encounter issues during or after assembly, consider the following common solutions:
- No Power: Ensure the PSU is properly connected to the wall outlet and the motherboard. Check all power cables (24-pin, CPU, GPU) are securely seated.
- Fans Not Spinning/No ARGB: Verify that the fans are correctly connected to the ARGB fan hub and the hub is powered via SATA. Ensure the ARGB splitter cable is connected to a compatible motherboard header if you wish to control lighting via software.
- No Display: Confirm the graphics card is fully seated in its PCIe slot and power cables are connected. Ensure the monitor cable is plugged into the graphics card, not the motherboard's integrated graphics port (unless using integrated graphics).
- Loose Panels: Ensure the tool-free panels are properly aligned and pushed firmly into place until the fixing studs engage.
For further assistance, please refer to the support section.
8. Specifications
| Feature | Specification |
|---|---|
| Model Name | Mirage 4 |
| Case Type | Mini-Tower |
| Motherboard Compatibility | Micro-ATX, Mini-ITX |
| Dimensions (LxWxH) | 13.62 x 10.83 x 13.94 inches (34.6 x 27.5 x 35.4 cm) |
| Item Weight | 9.79 pounds (4.44 kg) |
| Material | Tempered Glass, Steel |
| GPU Max Length | 325 mm |
| CPU Cooler Max Height | 155 mm |
| PSU Max Length | 240 mm (without cable) |
| PCIe Slots | 5 |
| Fan Support | Top: 2x 120mm, Rear: 1x 120mm, Bottom: 2x 120mm |
| Radiator Support | Top: 240mm |
| Pre-installed Fans | 2x 120mm ARGB (bottom), 1x 120mm ARGB (rear) |
| Front I/O | 1x USB 3.2 Gen 2 Type-C, 2x USB 3.0, Headphone/Mic Combo, Power, LED Control |
| Drive Bays | 2x 2.5" SSD, 1x 3.5" HDD, 1x 2.5" SSD (right side) |
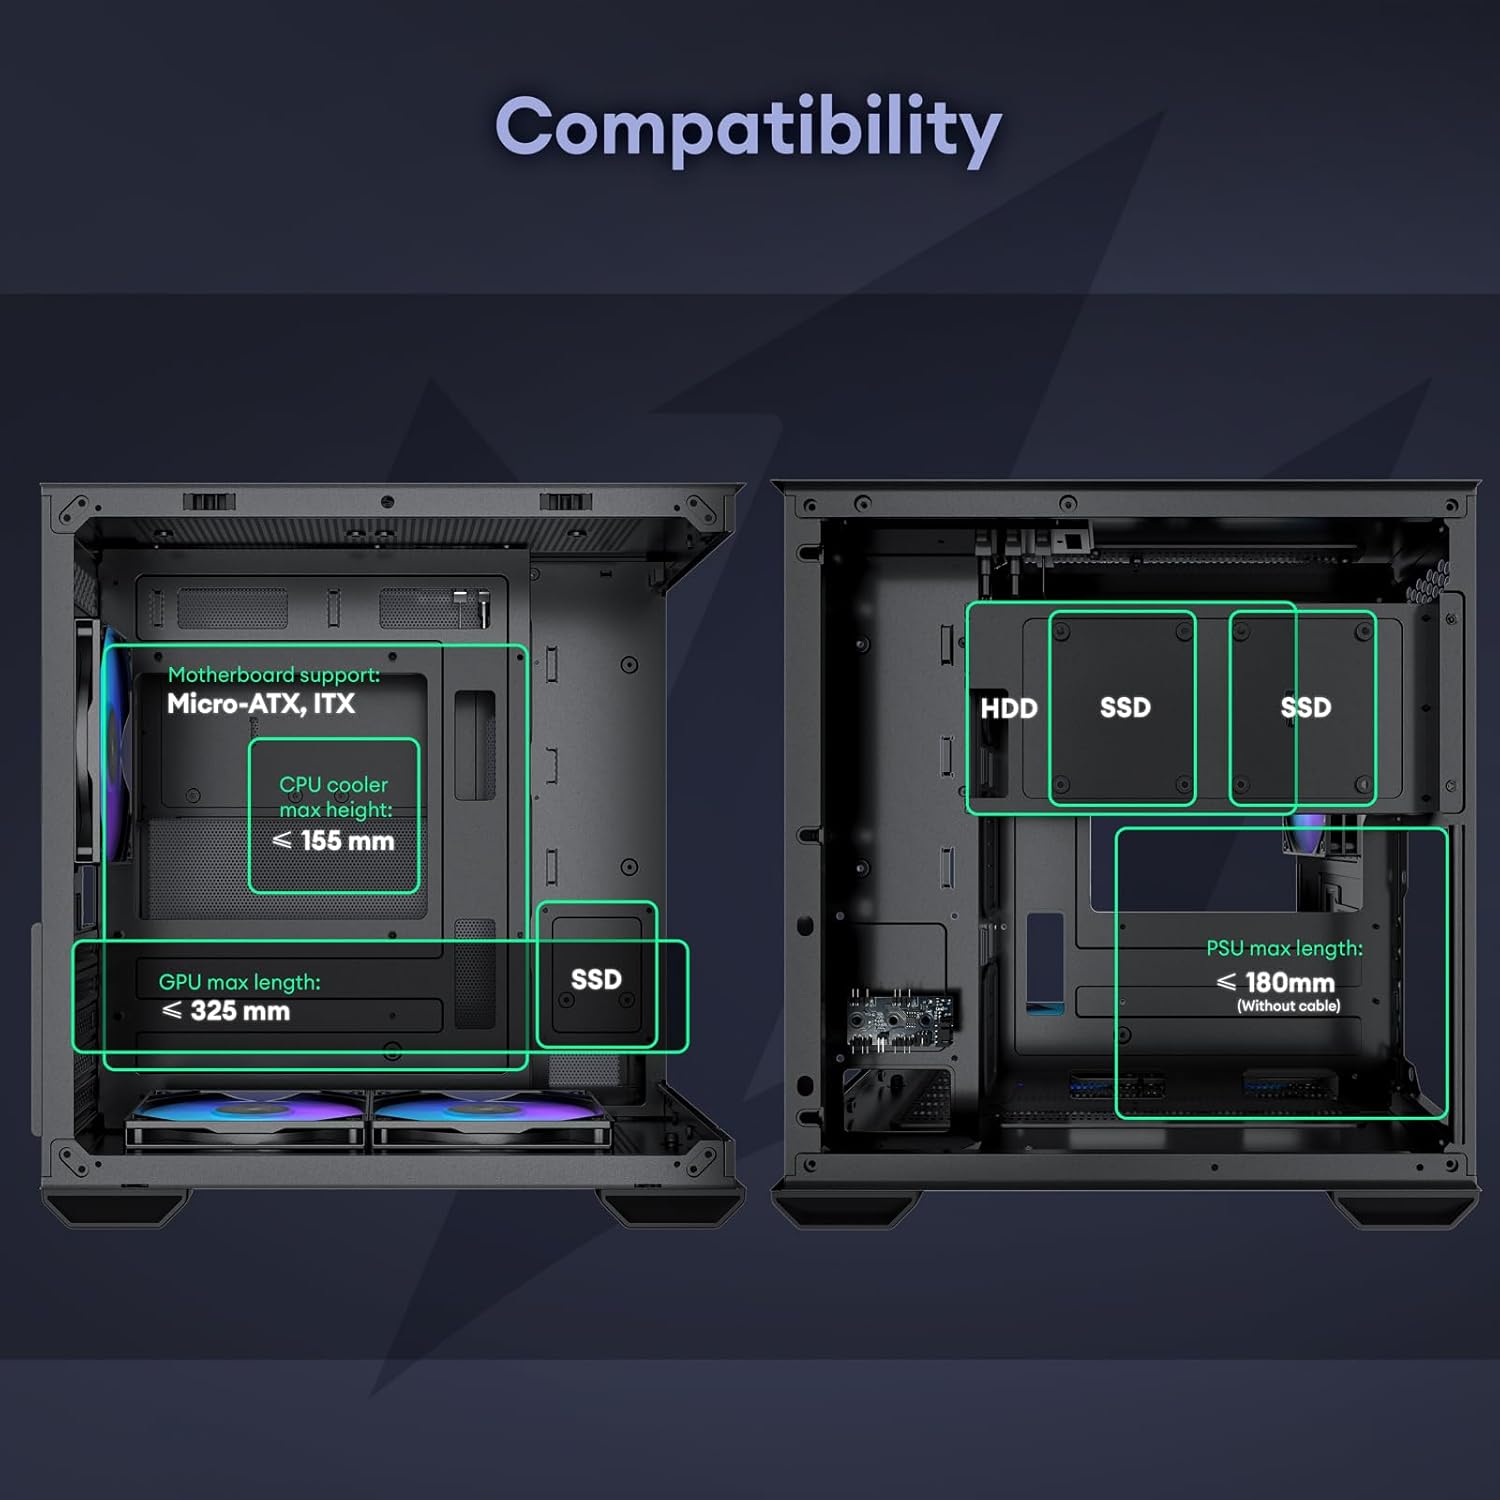
Image 8.1: Overall component compatibility overview.
9. Warranty & Support
9.1. Warranty Information
Okinos products are manufactured to high-quality standards. For specific warranty terms and conditions, please refer to the warranty card included with your product or visit the official Okinos website. Keep your proof of purchase for warranty claims.
9.2. Customer Support
If you require technical assistance or have questions regarding your Okinos Mirage 4 PC Case, please contact Okinos customer support through their official website or the contact information provided in your product packaging. When contacting support, please have your product model (Mirage 4) and purchase details ready.


