1. Introduction
This manual provides detailed instructions for the installation, operation, and maintenance of your Hikity 4 Channel Dash Cam (Model RM). This device is designed to record video footage from multiple angles around and within your vehicle, enhancing driving safety and providing evidence in case of incidents. Please read this manual thoroughly before using the product to ensure proper function and longevity.
2. Product Features
- 4-Channel Recording System: Simultaneously captures video from front, rear, left, and right perspectives.
- 3.0-inch IPS Display: Provides clear real-time viewing and playback of recorded footage.
- 1080P High-Definition Video: Records sharp and detailed video, crucial for capturing license plates and road signs.
- 360° Wide-Angle Coverage: Minimizes blind spots for comprehensive surveillance around your vehicle.
- Built-in WiFi & App Control: Connect wirelessly to the Viidure APP for easy video download, real-time viewing, sharing, and photo capture.
- 24-Hour Parking Monitoring: Initiates recording upon motion detection when the vehicle is parked. Requires an optional hardwire kit for continuous power.
- Super Night Vision: Equipped with a powerful chipset, F2.0 aperture, and 4-layer glass lens for clear video in low-light conditions.
- Loop Recording: Automatically overwrites the oldest video files with new ones when the memory card is full, ensuring continuous recording.
- G-Sensor: Detects sudden impacts or collisions and automatically locks the current video footage to prevent it from being overwritten.
- Adjustable Cameras: The main unit offers 360° horizontal rotation, while the left and right cameras can rotate 180° horizontally and 120° vertically for optimal angle adjustment.
3. What's in the Box
Please check the package contents upon receipt:
- 1 x DVR (Dash Cam Main Unit)
- 1 x Backup Camera
- 1 x Camera Cable (for Backup Camera)
- 1 x Power Cable (Car Charger)
- 1 x User Manual
- 1 x Bracket (Suction Cup Mount)
- 2 x Screws
- 1 x TF Card (64GB)
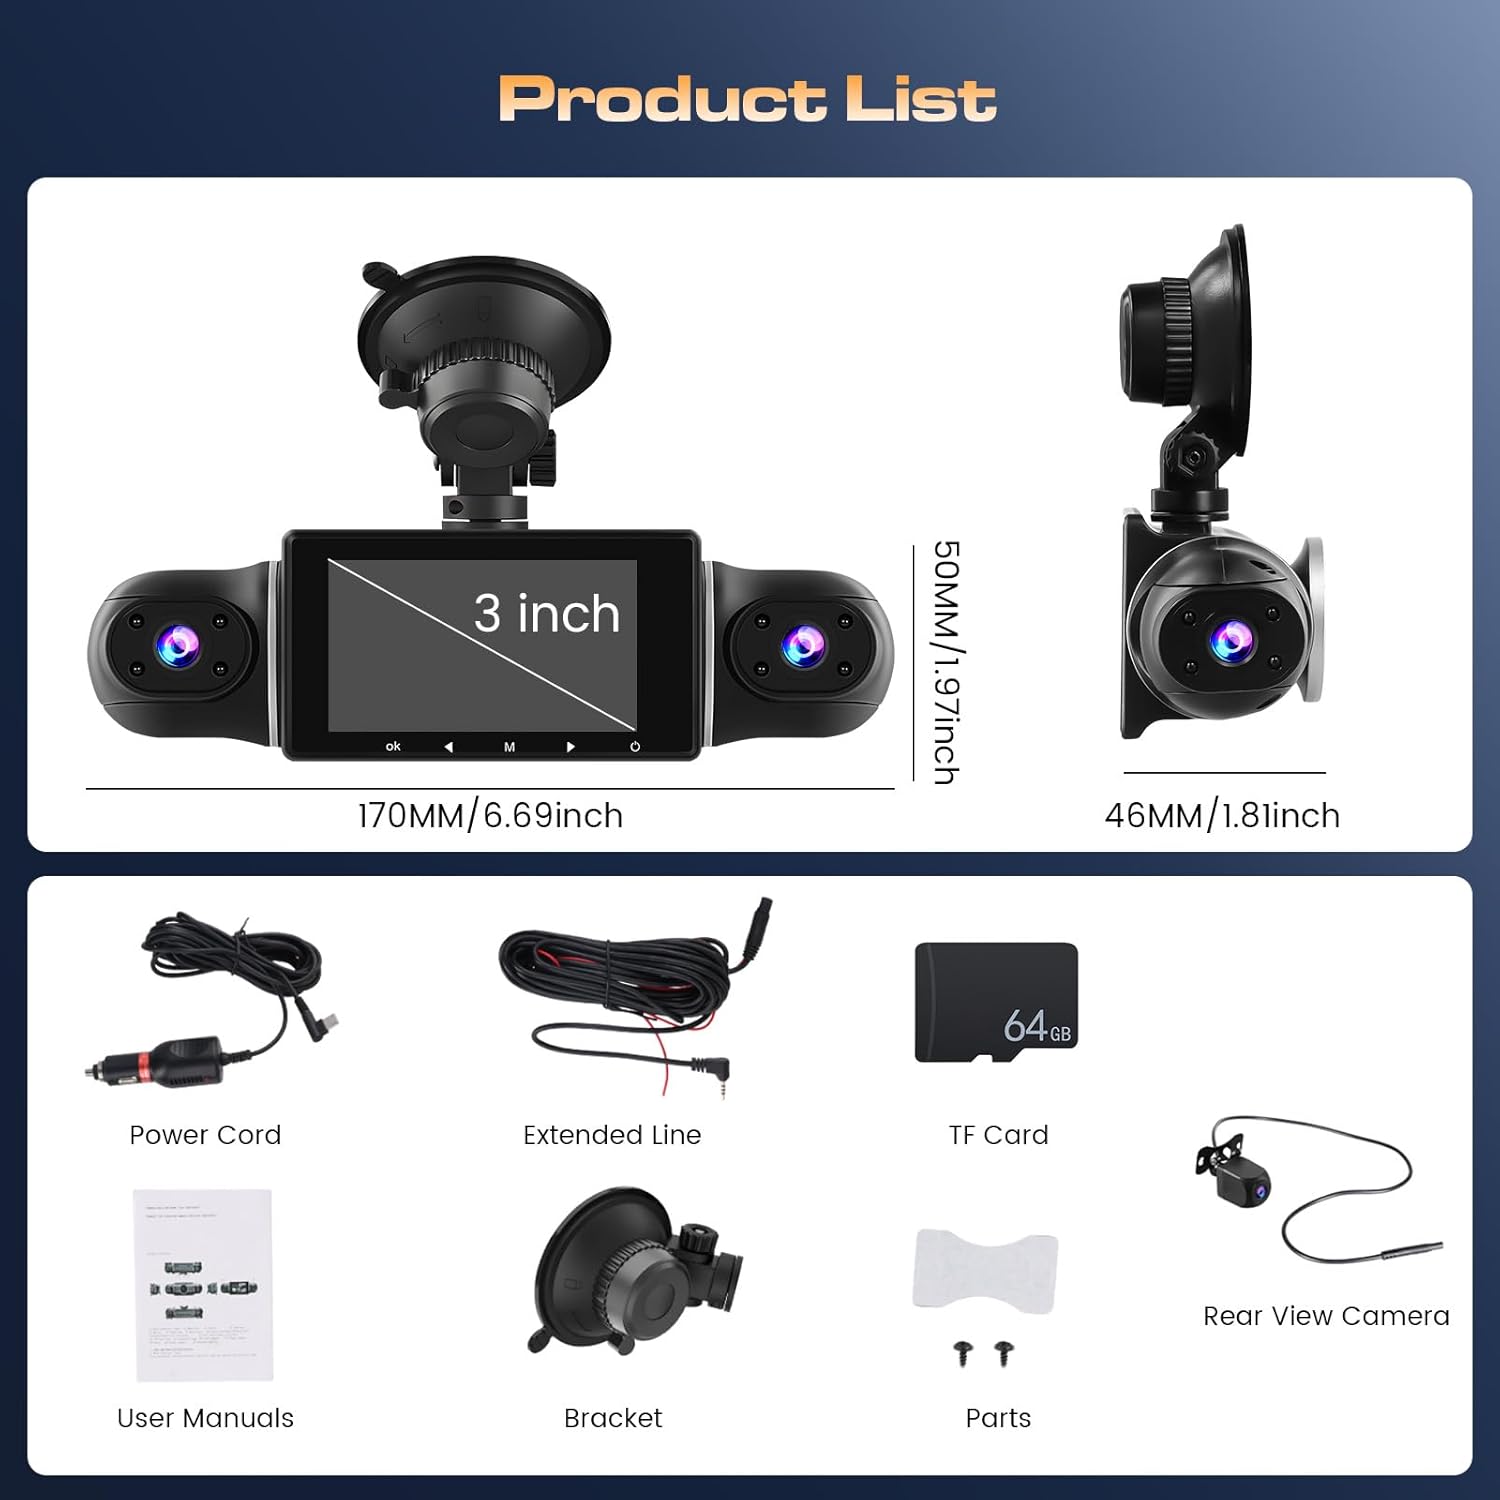
Image: Contents of the product package, showing the dash cam, rear camera, power cable, camera cable, TF card, user manual, bracket, and screws.
4. Setup and Installation
Follow these steps to properly install your Hikity 4 Channel Dash Cam:
- Step 1: Prepare the Windshield
Clean the area on your windshield where you intend to mount the dash cam. Ensure it is free of dust and grease for optimal suction cup adhesion.
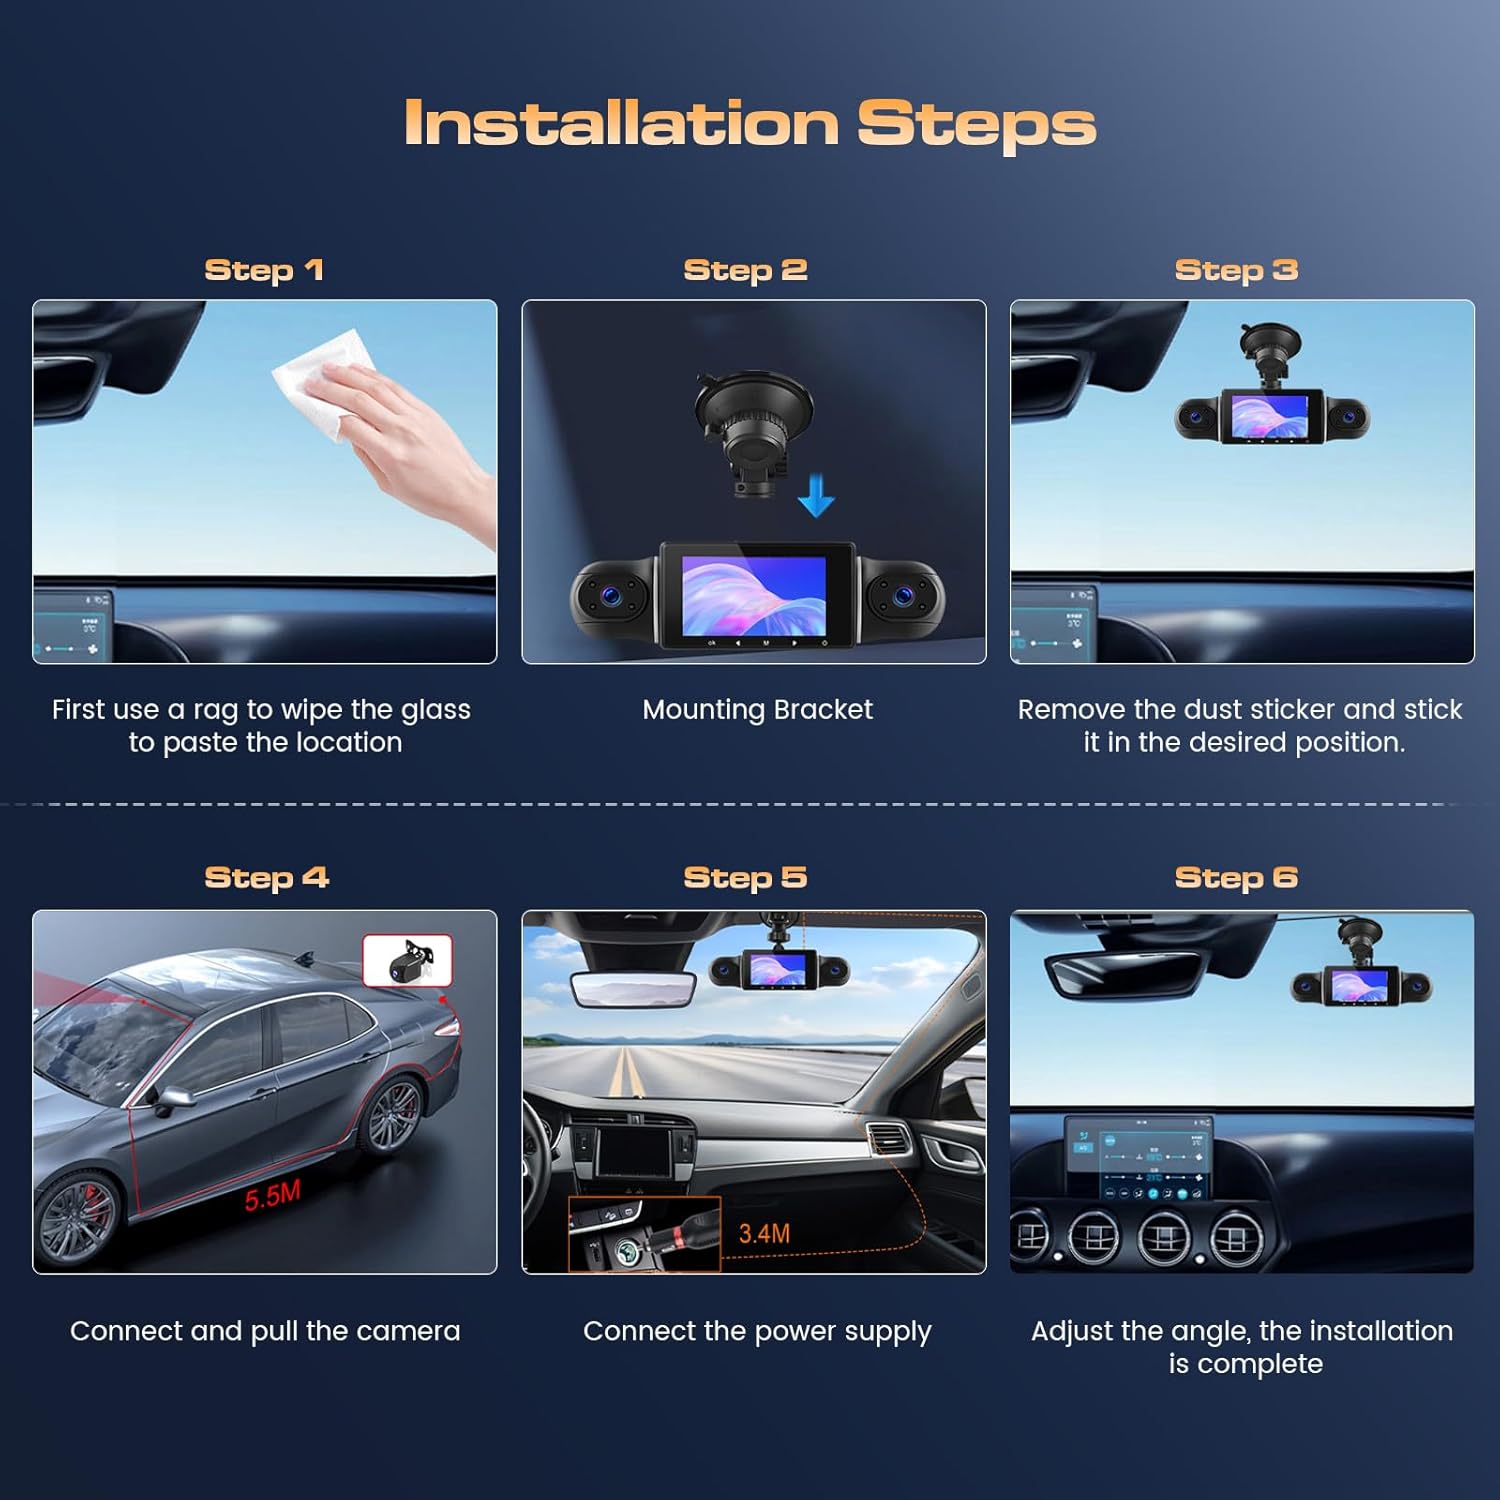
Image: A hand cleaning the car windshield with a rag, preparing for dash cam installation.
- Step 2: Assemble the Dash Cam and Mount
Attach the suction cup bracket to the top slot of the main DVR unit. Ensure it clicks securely into place. The bracket allows for 360° horizontal rotation of the main unit.

Image: The main dash cam unit being assembled with its suction cup mount, demonstrating the 360-degree rotation capability.
- Step 3: Mount the Dash Cam to the Windshield
Remove the protective film from the suction cup. Press the suction cup firmly against the cleaned area of the windshield and engage the locking mechanism to secure it. Adjust the angle of the dash cam as needed.
- Step 4: Connect the Power Cable
Insert the car charger end of the power cable into your vehicle's cigarette lighter socket. Connect the other end to the power input port on the dash cam. The device will typically power on automatically with the car's ignition.
- Step 5: Connect the Rear Camera (Optional)
If using the backup camera, route its cable from the dash cam to the desired mounting location at the rear of your vehicle. Connect the cable to the designated port on the dash cam. Ensure the cable is neatly tucked away to avoid obstruction.
- Step 6: Adjust Camera Angles
Once powered on, adjust the main unit's horizontal rotation up to 360°. The left and right side cameras can be rotated horizontally up to 180° and vertically up to 120° to capture the desired views.
Installation Video Guide
Video: A step-by-step guide demonstrating the physical installation of the Hikity 4 Channel Dash Cam, including mounting the main unit, connecting power, and attaching the rear camera.
5. Operating Instructions
5.1 Basic Operation
- Power On/Off: The dash cam will automatically power on and begin recording when your vehicle's ignition is turned on. It will power off automatically when the ignition is turned off.
- Recording: Continuous loop recording starts automatically upon power-on. The 3.0-inch IPS screen displays real-time footage from the selected camera views.
- G-Sensor (Emergency Recording): In the event of a sudden impact or collision, the built-in G-Sensor will detect the event and automatically lock the current video file, preventing it from being overwritten by loop recording. These files are stored in a separate folder.
- Loop Recording: When the memory card is full, the dash cam will automatically delete the oldest unlocked video files to make space for new recordings, ensuring uninterrupted recording.
- Night Vision: The dash cam features Super Night Vision technology, utilizing an F2.0 aperture and 4-layer glass lens to provide clear video quality even in low-light conditions.

Image: Visual representation of G-Sensor, Loop Recording, and App Control features.
5.2 Parking Monitoring
The 24-hour parking monitoring feature allows the dash cam to record events even when your vehicle is parked. When motion is detected within the dash cam's field of view, recording will begin. For continuous parking monitoring, a hardwire kit (not included) is required to provide constant power to the device.

Image: Depiction of parking monitoring features including time-lapse, theft detection, and collision detection.
5.3 WiFi & App Control (Viidure APP)
The dash cam features built-in WiFi for seamless connection to your smartphone via the Viidure APP. This allows you to:
- Download: Transfer recorded videos and photos directly to your phone.
- Real-time View: See live footage from the dash cam on your smartphone screen.
- Share: Easily share your driving moments or incident footage.
- Take Photos: Capture still images remotely.
To connect:
- Download the Viidure APP from your smartphone's app store or by scanning the QR code provided in the dash cam's interface or packaging. A direct link is also available: Viidure APP Download.
- Power on the dash cam and enable its WiFi function. Note the WiFi name (SSID) and password displayed on the dash cam screen.
- On your smartphone, go to WiFi settings and connect to the dash cam's WiFi network.
- Open the Viidure APP, add your camera device, and establish the connection.

Image: Steps for WiFi and App Control setup, showing the app interface and connection process.
6. Maintenance
- Cleaning: Regularly clean the dash cam lenses and screen with a soft, lint-free cloth. Avoid using abrasive cleaners that could scratch the surfaces.
- SD Card Care: It is recommended to format the microSD card every 2-4 weeks to maintain optimal recording performance and prevent data corruption. Do this through the dash cam's menu settings.
- Temperature: Avoid exposing the dash cam to extreme temperatures for prolonged periods. High temperatures can affect battery life and device performance.
- Firmware Updates: Check the Hikity official website periodically for any available firmware updates. Updating the firmware can improve performance and add new features.
7. Troubleshooting
If you encounter issues with your Hikity Dash Cam, please refer to the following common solutions:
- Device Stuck or Unresponsive: If the dash cam becomes unresponsive or displays unusual patterns (e.g., flashing colors), try resetting the device. Locate the reset button (often a small pinhole) and press it with a paperclip for a few seconds.
- Incorrect Language Displayed: If the dash cam's menu language changes unexpectedly (e.g., to Japanese), navigate through the menu options to find the language settings. Look for an icon that typically represents settings (often a gear or wrench) and then an option for language. Select English.
- Recording Issues:
- Ensure the microSD card is properly inserted and formatted.
- Check if the card is full; if so, loop recording should overwrite old files, but manual formatting can resolve issues.
- Verify that the power connection is stable.
- App Connectivity Problems:
- Ensure WiFi is enabled on both the dash cam and your smartphone.
- Confirm you are connected to the dash cam's specific WiFi network.
- Restart both the dash cam and your smartphone, then try connecting again.
- Parking Monitor Not Working: Ensure a hardwire kit is installed and correctly connected to provide continuous power for parking monitoring.
If problems persist, please contact Hikity customer support.
8. Specifications
| Feature | Specification |
|---|---|
| Product Dimensions | 1.8 x 6.69 x 1.97 inches |
| Item Weight | 1.12 pounds |
| Connectivity Technology | Wi-Fi |
| Special Features | 360 Degree, APP Control, Night Vision, 4 Camera, Loop Recording, G-Sensor |
| Video Capture Resolution | 1080p |
| Mounting Type | Windshield Mount |
| Control Method | App |
| Color | Black |
| Manufacturer | Hikity |
| Model Name | RM |
| Vehicle Service Type | Car |
9. Warranty and Support
Your Hikity 4 Channel Dash Cam comes with a 1 Year Quality Assurance. For any product-related inquiries, technical assistance, or support, please contact our customer service team.
We offer 24-hour Premium Customer Service to assist you with any questions or issues you may have.
Customer Support Email: hikitysales@163.com