Introduction
This manual provides detailed instructions for the assembly, operation, maintenance, and troubleshooting of your WLIVE 6-Drawer Dresser with LED Light and Power Outlets. Please read this manual thoroughly before assembly and use to ensure proper function and safety.

Image: The WLIVE 6-Drawer Dresser in Light Oak, featuring six spacious drawers, an open top shelf with integrated LED lighting, and a built-in power outlet and USB charging station. Various items are displayed on top and within the open shelf, including a tablet, headphones, and decorative elements.
Safety Information
Your safety is paramount. Please adhere to the following safety guidelines:
- Anti-Tip Device: Always install the included anti-tip device to prevent the dresser from tipping over, especially in households with children or pets. Failure to do so can result in serious injury or death.
- Electrical Safety: The integrated power outlets and USB ports are UL/ETL certified. Do not overload the outlets. Ensure the power cord is not pinched or damaged during assembly or use. Disconnect power before cleaning or maintenance.
- Assembly: It is recommended that two people assemble this unit. Follow all assembly steps precisely. Do not use power tools unless explicitly instructed, as overtightening screws can damage the material.
- Placement: Place the dresser on a flat, stable surface. Avoid placing it in areas with high humidity or direct sunlight, which can affect the wood material.
- Weight Capacity: Do not exceed the maximum weight capacity of the dresser (up to 228 lbs for the entire cabinet). Distribute weight evenly in drawers and on shelves.

Image: A diagram illustrating the proper installation of the anti-tip kit, showing the dresser secured to the wall. An adjacent image shows a child attempting to climb the dresser, with a red 'X' indicating the danger of tipping without the anti-tip device.
Package Contents
Before beginning assembly, verify that all parts and hardware are present. Refer to the assembly diagram for identification.

Image: A comprehensive diagram showing all components and hardware included with the WLIVE 6-Drawer Dresser, labeled for easy identification during assembly.
If any parts are missing or damaged, please contact WLIVE customer service for assistance.
Assembly Instructions
Follow these steps carefully for proper assembly. It is recommended to have a second person assist with assembly.
Assembly Video Guide
For a visual guide, please refer to the official assembly video:
Video: An official WLIVE assembly video demonstrating the step-by-step process for constructing the 6-Drawer LED Dresser. This video provides visual guidance for each stage of assembly, from attaching hardware to installing drawers and connecting the LED lighting system.
Step-by-Step Assembly
- Prepare Base Panels: Attach cam bolts (A) and wooden dowels (B) to the main base panels as indicated in the diagram.
- Install Drawer Slides: Secure the left (CL) and right (CR) drawer slides to the side panels using screws (G). Ensure they are oriented correctly.
- Assemble Frame: Connect the side panels to the base panels using cam locks (C) and additional dowels. Gradually build the main frame of the dresser.
- Attach Top Panel: Secure the top panel, which includes the pre-drilled holes for the LED light and power outlets, to the assembled frame using cam bolts and cam locks.
- Install Back Panels: Fasten the back panels (N) to the rear of the dresser frame using screws (F) and plastic caps (Q).
- Connect Power Unit: Connect the power unit (R) for the LED lights and charging station. Ensure all cables are properly routed and secured.
- Assemble Drawers: For each drawer, assemble the sides, front, and back panels using cam bolts (A) and cam locks (C). Insert the drawer bottom (E) into the grooves.
- Attach Drawer Slides to Drawers: Secure the drawer slides (DL, DR) to the sides of each assembled drawer using screws (G).
- Install Drawer Handles: Attach the handles (H) to the front of each drawer using screws (I).
- Insert Drawers: Carefully slide each assembled drawer into its corresponding slot in the dresser frame.
- Final Touches: Attach any remaining support bars (M) or decorative elements as per the instructions.
Operating Instructions
LED Light Operation
The integrated LED light offers customizable ambiance for your room.
- Control: The LED light can be controlled via a remote control (if included) or a dedicated mobile application. Refer to the separate LED light instruction sheet for app download and pairing details.
- Modes: Explore 12 scene modes and over 6000 colors. Adjust brightness and speed to suit your preference.
- Music Sync: The light can synchronize with music, providing a dynamic visual experience.

Image: A visual representation of the LED light features, including 6000+ RGB colors, mic mode, music mode, timing mode, key control, and app control, with the dresser displaying blue LED lighting.
Power Outlets and USB Ports
The dresser is equipped with a built-in charging station for convenience.
- AC Outlets: Two 125V/12A AC outlets are available for powering electronic devices such as TVs, game consoles, or lamps.
- USB Ports: Two 5V/2A USB ports are provided for charging mobile phones, tablets, and other USB-powered devices.
- Cable Management: The 5-foot flexible cable length allows for convenient placement. Ensure cables are not tangled or obstructing drawers.
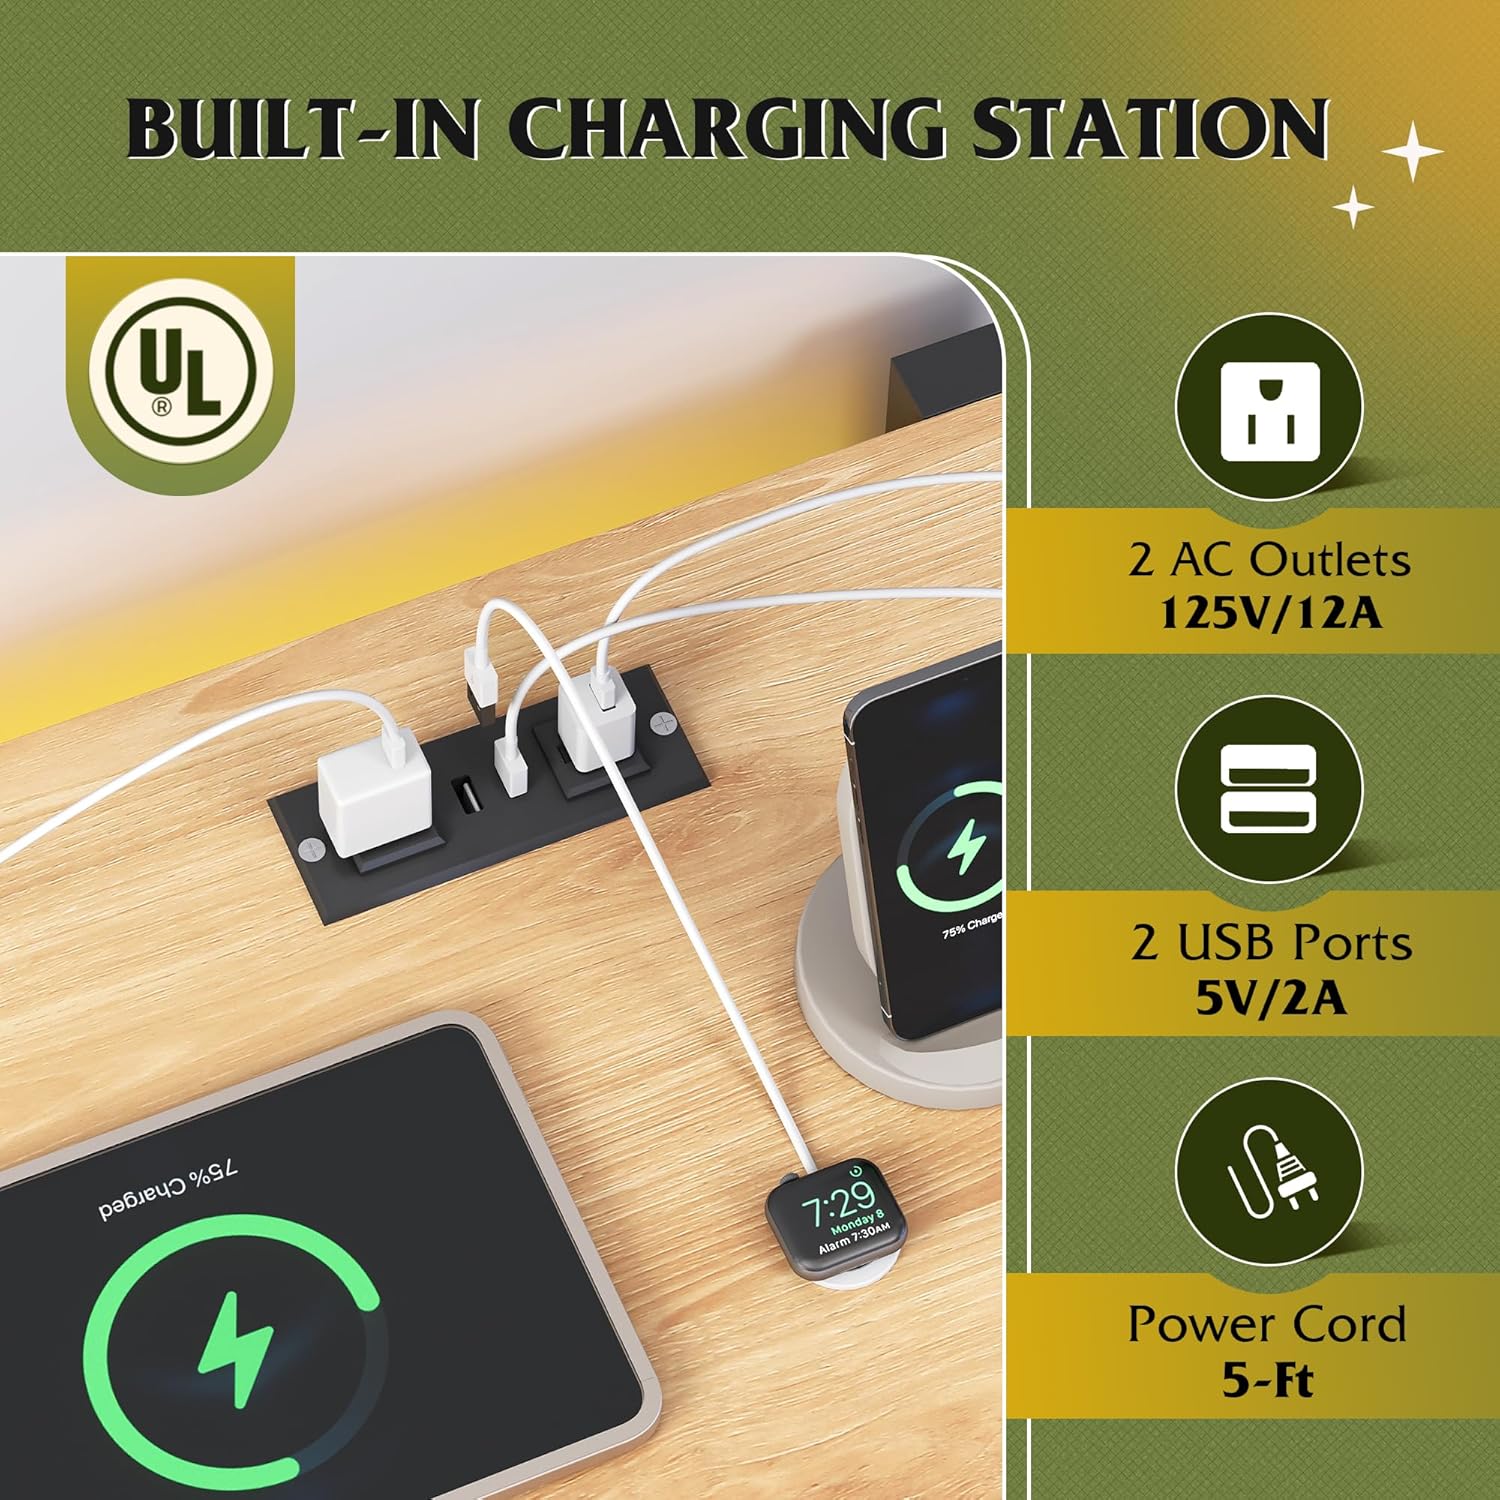
Image: A close-up view of the built-in charging station on the dresser's top surface, showing two AC outlets and two USB ports in use, charging a smartphone and other devices.
Maintenance
Proper care will extend the life of your dresser.
- Cleaning: Wipe surfaces with a soft, damp cloth. Avoid harsh chemicals or abrasive cleaners, which can damage the finish.
- Dusting: Regularly dust the dresser to prevent buildup.
- Drawer Maintenance: The drawers are equipped with smooth rails. If a drawer becomes stiff, ensure it is not overloaded and check the rails for any obstructions.
- Hardware: Periodically check all screws and fasteners to ensure they are tight. Retighten if necessary.

Image: A detailed view highlighting the dresser's premium features: elegant metal handles, metal roller glides for smooth drawer operation, sturdy wood pedestals for stability, and support plates for stronger load capacity within the drawers.
Troubleshooting
| Problem | Possible Cause | Solution |
|---|---|---|
| LED lights not working | Power connection loose; App/remote issue; LED strip damage. | Check power cable connection. Ensure app/remote is paired correctly. Contact customer support if LED strip is damaged. |
| Power outlets/USB ports not functioning | Power cord not plugged in; Overload; Internal wiring issue. | Ensure the main power cord is securely plugged into a wall outlet. Reduce the number of devices connected. Contact customer support if issue persists. |
| Drawers are stiff or not closing smoothly | Overloaded drawer; Misaligned slides; Obstruction in rail. | Remove some items from the drawer. Check if the drawer slides are properly aligned and secured. Inspect rails for any debris. |
| Dresser feels wobbly | Loose fasteners; Uneven floor; Anti-tip device not installed. | Tighten all assembly screws. Adjust floor levelers if present, or place shims under the base. Ensure the anti-tip device is correctly installed and secured to the wall. |
Specifications
- Brand: WLIVE
- Model Name: ASNG123 Wood dresser / QX
- Product Dimensions: 17.72"D x 50.79"W x 31.89"H
- Color: Light Oak
- Material: High quality artificial wood (EPA&SGS tested)
- Item Weight: 102.5 Pounds
- Assembly Required: Yes (Recommended 2 people, approx. 1.5 hours)
- Special Features: LED Light (6000+ colors, 12 modes, music sync), Built-in Charging Station (2 AC outlets 125V/12A, 2 USB ports 5V/2A, 5-ft cord), Anti-tip device, Scratch Resistant.
- Maximum Load Capacity: Up to 228 LBS (entire cabinet)
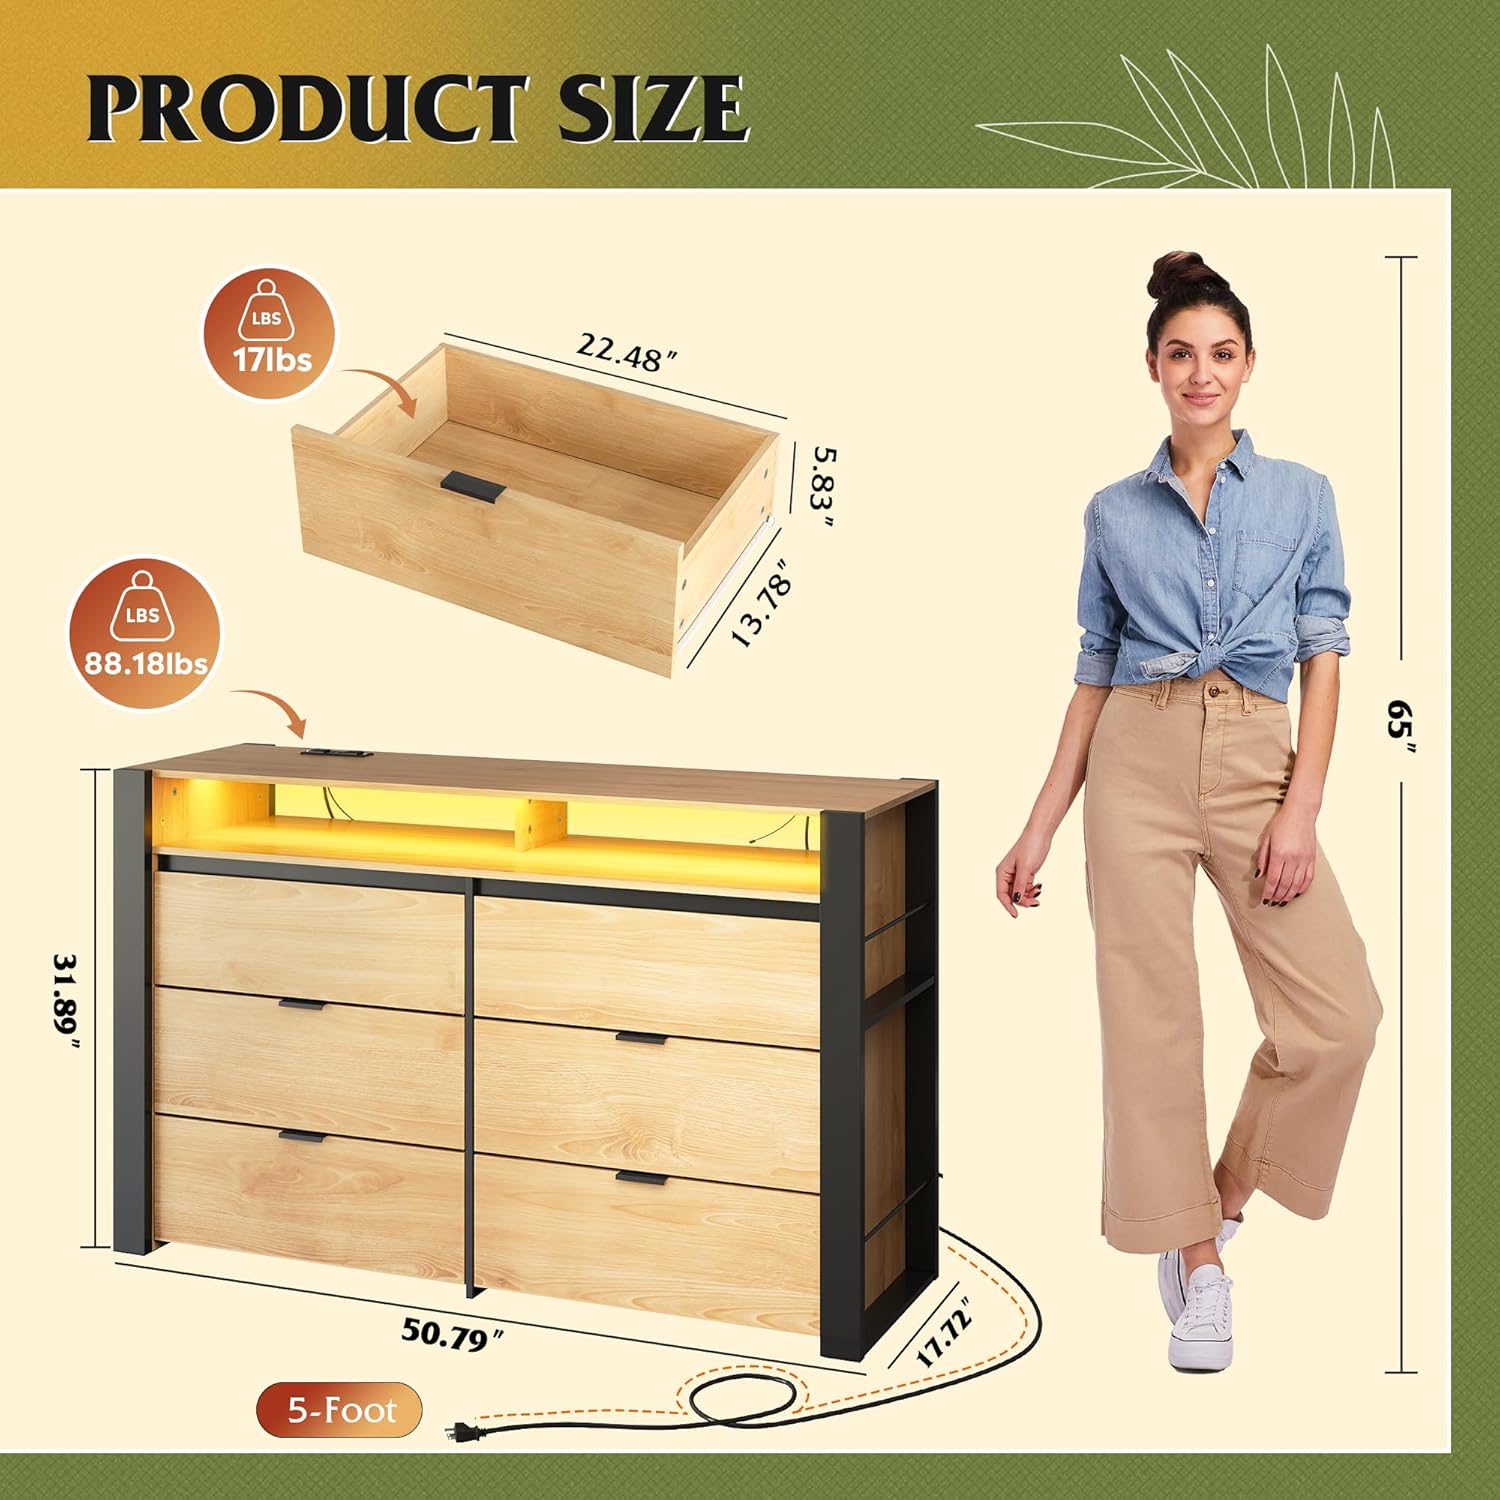
Image: A diagram illustrating the precise dimensions of the WLIVE 6-Drawer Dresser, including depth, width, and height, along with the weight capacity of individual drawers and the overall unit.
Warranty and Support
WLIVE products are designed for durability and customer satisfaction. For any questions, concerns, or to report missing/damaged parts, please contact WLIVE customer service. Keep your purchase receipt for warranty claims.
Contact information can typically be found on the WLIVE official website or through your purchase platform.