
1. Introduction
Thank you for choosing the DIYART White Large Shoe Cabinet. This manual provides essential information for the safe assembly, proper operation, and effective maintenance of your new shoe cabinet. Please read these instructions thoroughly before beginning assembly and retain them for future reference.
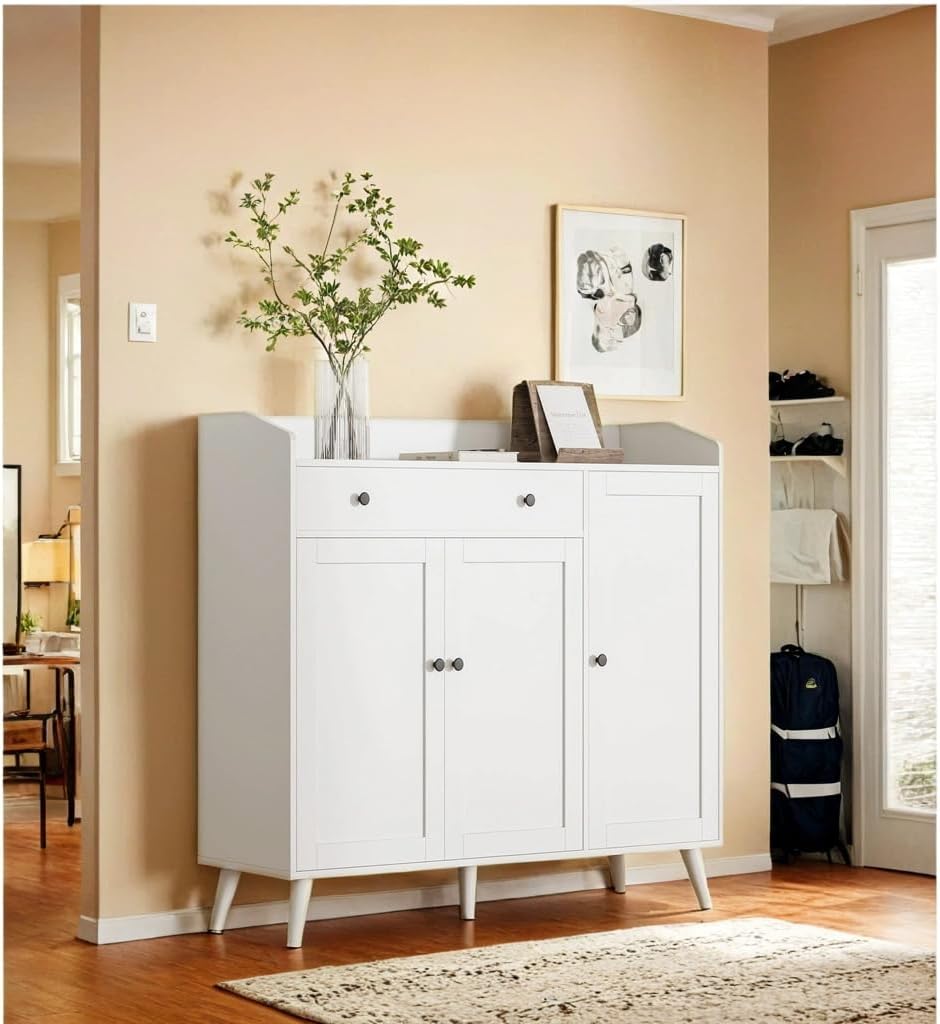
Image 1.1: The DIYART White Large Shoe Cabinet, featuring three doors and a top drawer, positioned in an entryway.
2. Safety Information
- Anti-Tip Kit: Always secure the cabinet to the wall using the included anti-tip kit to prevent tipping and potential injury. This is a critical safety measure, especially in households with children or pets.
- Weight Distribution: Distribute items evenly within the cabinet to maintain stability. Avoid placing excessively heavy objects on top or in a single section.
- Assembly: Assemble the unit on a soft, clean surface to prevent scratches. Ensure all fasteners are tightened securely before use.
- Cleaning: Use only a soft, damp cloth for cleaning. Avoid harsh chemicals or abrasive cleaners that may damage the finish.
3. Package Contents
Before assembly, verify that all components listed below are present and undamaged. If any parts are missing or damaged, please contact DIYART customer support.
- Cabinet Panels (various sizes for frame, doors, drawer)
- Hardware Pack (screws, cam locks, dowels, hinges, drawer slides, handles)
- Adjustable Shelves (3 included)
- Anti-Tip Kit (wall anchor, strap, screws)
- Assembly Instructions Manual
4. Setup and Assembly
Assembly of the DIYART Shoe Cabinet requires careful attention to detail. While instructions are included, having a second person may facilitate the process. A screwdriver is the primary tool required.
- Unpack and Identify: Carefully unpack all components and lay them out on a protected surface. Identify each part by comparing it to the parts list in the included assembly guide.
- Assemble Frame: Follow the step-by-step diagrams in the assembly guide to construct the main frame of the cabinet. Ensure all cam locks and screws are securely fastened.
- Install Drawer Slides: Attach the drawer slides to the cabinet frame and the drawer components as indicated. Ensure they are level and aligned for smooth operation.
- Assemble Drawer: Construct the drawer and install its base. Attach the drawer front and handle.
- Attach Doors: Install the hinges onto the doors and then attach the doors to the cabinet frame. Adjust hinges as necessary to ensure proper door alignment and closure.
- Insert Shelves: Place the adjustable shelves into the desired positions using the pre-drilled holes.
- Install Anti-Tip Kit: This is a crucial safety step. Secure the anti-tip strap to the back of the cabinet and then to a wall stud using the provided hardware. Refer to the anti-tip kit instructions for detailed guidance.

Image 4.1: Detailed dimensions of the shoe cabinet, showing height, width, and depth measurements.
5. Operating Instructions
The DIYART Shoe Cabinet is designed for efficient shoe storage and organization.
- Door Operation: Gently pull the handles to open the cabinet doors. Push firmly to close. The doors are equipped with soft-close hinges for quiet operation.
- Drawer Use: The top drawer provides convenient storage for smaller items such as keys, wallets, or shoe care accessories. Pull the handle to open and push to close.
- Adjustable Shelves: The cabinet features adjustable shelves that can be repositioned to accommodate various shoe heights, including boots and stilettos. The depth of 15.7 inches allows for shoes up to men's size 16. To adjust, remove the shelf, reposition the shelf pins to the desired height, and reinsert the shelf.

Image 5.1: Illustration of the adjustable shelves within the cabinet, demonstrating 2.5-inch adjustment increments for various shoe sizes.
6. Maintenance
Regular maintenance will help preserve the appearance and functionality of your shoe cabinet.
- Cleaning: Wipe surfaces with a soft, slightly damp cloth. Dry immediately with a clean, dry cloth. Avoid using abrasive cleaners, solvents, or polishes that may damage the finish.
- Shelf Protection: Consider using shelf liners to protect the white shelves from dirt and scuff marks from shoes.
- Hardware Check: Periodically check all screws and fasteners to ensure they remain tight. Retighten if necessary.
- Environmental Conditions: Avoid exposing the cabinet to extreme temperature changes or high humidity, which can affect the engineered wood material.
7. Troubleshooting
If you encounter any issues with your shoe cabinet, refer to the following common solutions:
- Doors Not Aligning: If doors appear misaligned or do not close properly, adjust the hinges. Most hinges have adjustment screws that allow for vertical, horizontal, and depth adjustments. Refer to the hinge manufacturer's instructions or a general guide on hinge adjustment.
- Drawer Catching/Sticking: Ensure the drawer slides are correctly installed and aligned. Check for any obstructions within the drawer tracks. If screws are protruding, they may need to be fully tightened or adjusted.
- Strong Odor: New furniture may emit a slight odor. To dissipate, ensure the room is well-ventilated by opening windows and doors. The odor should diminish over time.
- Stability Concerns: Double-check that the anti-tip kit is correctly installed and securely fastened to both the cabinet and a wall stud. Ensure the cabinet is on a level surface.
8. Specifications
| Feature | Specification |
|---|---|
| Brand | DIYART |
| Model Name | USA00700201 |
| Color | White |
| Product Dimensions (D x W x H) | 15.75"D x 42.52"W x 42.13"H |
| Item Weight | 83 Pounds |
| Material | Engineered Wood |
| Number of Doors | 3 |
| Number of Drawers | 1 |
| Number of Shelves | 3 (Adjustable) |
| Max Shoe Size Capacity | Up to Men's Size 16 |
| Mounting Type | Freestanding (with Wall Mount Anti-Tip Kit) |
| Assembly Required | Yes |
| UPC | 795276441977 |
9. Warranty and Support
For warranty information, please refer to the purchase documentation or contact your retailer. DIYART offers a 30-day easy return policy from the date of purchase. For any questions, missing parts, or technical assistance, please contact DIYART customer support directly. Contact details can typically be found on the DIYART official website or through your purchase platform.