COBIZI 10x30 Pop Up Canopy
COBIZI 10x30 Pop Up Canopy Instruction Manual
Model: 10x30 Pop Up Canopy | Brand: COBIZI
1. Introduction
This manual provides comprehensive instructions for the safe and efficient setup, operation, and maintenance of your COBIZI 10x30 Pop Up Canopy. Please read all instructions carefully before assembly and use to ensure proper functionality and longevity of the product.
2. Important Safety Information
WARNING:
- Always secure the canopy with the provided sandbags, ropes, and stakes to prevent it from tipping over in windy conditions.
- Do not use the canopy in heavy rain or strong winds.
- This pop-up canopy is not suitable as a permanent structure. Heavy rain and wind can accumulate on the roof, causing leaks or damage.
- Always follow the manufacturer's instructions for setup, use, and dismantling.
3. Packing List
Verify that all components are present before beginning assembly:
- 1 x Canopy Tent 10x30 Frame
- 1 x Party Tent Canopy Cover
- 3 x Pop Up Gazebo Sidewalls
- 4 x Sandbags
- 4 x Ropes
- 10 x Garage Tent Stakes
- 1 x Roller Bag

Figure 3.1: All components included in the COBIZI 10x30 Pop Up Canopy package.
4. Setup Instructions
Two people are recommended for efficient and safe assembly.
4.1. Unpacking and Initial Frame Expansion
- Remove the canopy frame from the roller bag. The roller bag features wheels for easy transport.
- Place the folded frame in the desired setup location. With a person at each end, gently pull the frame outwards to begin expanding it.
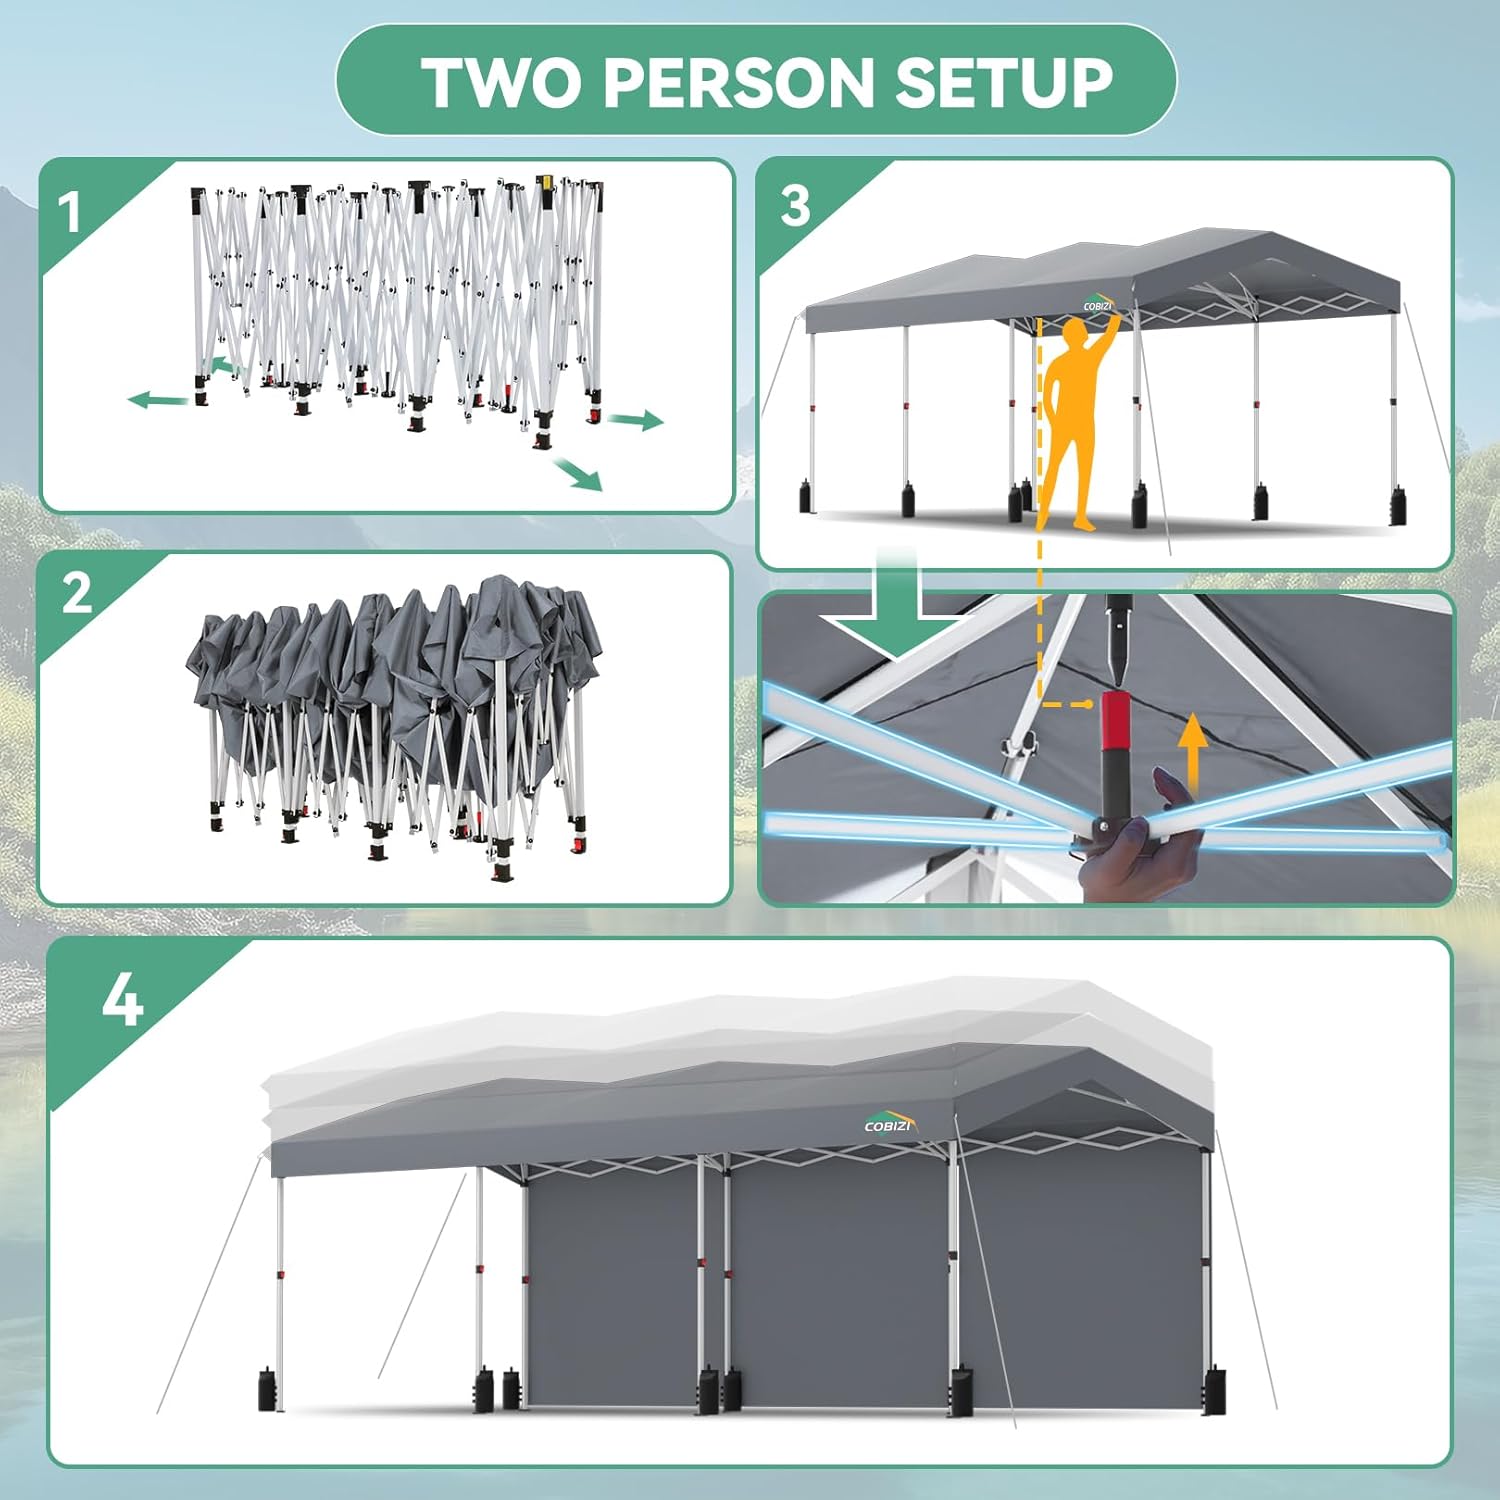
Figure 4.1: Initial expansion of the canopy frame, showing two people extending it.
4.2. Attaching the Canopy Top
- Drape the canopy cover over the partially expanded frame. Ensure the COBIZI logo is facing the desired front.
- Secure the canopy cover to the frame using the Velcro attachments located at the corners and along the sides.
4.3. Fully Expanding the Frame and Locking
- From underneath the canopy, push up on the central locking mechanism until it clicks securely into place. This is a one-button push center lock for ease of use.
- Extend each leg of the canopy by pressing the thumb latch button and pulling the leg downwards until it locks into the desired height setting. There are three adjustable height settings.
Video 4.1: Demonstration of the COBIZI 10x30 Pop Up Canopy setup, including frame expansion and center lock mechanism.
4.4. Attaching Sidewalls
- Attach the sidewalls to the canopy frame using the integrated Velcro straps. The sidewalls can be attached as needed for privacy or weather protection.
Video 4.2: Detailed view of canopy features, including sidewall attachment.
4.5. Securing the Canopy
- Fill the provided sandbags with sand and attach them to the canopy legs for added stability.
- Insert the tent stakes through the feet of the canopy legs and into the ground.
- Utilize the ropes to further secure the canopy by tying them to the top corners and staking them into the ground at an angle.

Figure 4.2: The COBIZI 10x30 Pop Up Canopy fully assembled with sidewalls, ready for use.
5. Operating Instructions
The COBIZI 10x30 Pop Up Canopy is designed for versatility and ease of use.
5.1. Height Adjustment
The canopy features three adjustable heights: 8.9ft, 8.5ft, and 8.2ft. Adjust the height by pressing the thumb latch on each leg and sliding the leg to the desired position until it clicks into place.

Figure 5.1: Product dimensions and illustration of adjustable height settings.
5.2. Usage Scenarios
This canopy provides 300 square feet of outdoor space, suitable for various applications:
- Parties and business events
- Beaches and weddings
- Parking small motorized carts, motorcycles, or bicycles
- Storing garden tools

Figure 5.2: The canopy in various settings, demonstrating its versatility for different seasons and events.
6. Maintenance
Proper maintenance will extend the life of your canopy.
- Cleaning: Clean the canopy fabric with mild soap and water. Do not use harsh chemicals or abrasive cleaners. Allow the fabric to dry completely before storage to prevent mildew.
- Storage: To prolong its lifespan, we recommend stowing away the canopy during instances of strong winds, heavy rain, or snowfall. Store the canopy in its roller bag in a dry, cool place when not in use.
- Frame Care: Inspect the alloy steel frame periodically for any signs of damage or corrosion. Clean any dirt or debris from the frame.
7. Troubleshooting
If you encounter any issues with your COBIZI 10x30 Pop Up Canopy, please refer to the following common problems:
- Canopy Instability: Ensure all legs are fully extended and locked, and that sandbags, stakes, and ropes are properly utilized to secure the canopy.
- Water Accumulation: The unique pointed top structure is designed to facilitate rain and snow runoff. However, in heavy precipitation, water may still accumulate. It is recommended to take down the canopy during severe weather conditions.
- Difficulty with Setup/Dismantling: Ensure the one-button push center lock mechanism is fully engaged or disengaged. If the frame is stiff, gently apply pressure evenly.
For any persistent issues or after-sales support, please contact COBIZI customer service.
8. Specifications
| Feature | Specification |
|---|---|
| Brand | COBIZI |
| Material | Fabric (420D Oxford fabric) |
| Color | Gray |
| Product Dimensions | 354"L x 118"W x 105"H (10x30 ft) |
| Ultraviolet Light Protection | UPF 50+ |
| Frame Material | Alloy Steel (0.6MM thickened) |
| Water Resistance Level | 2000mm Waterproof Rating |
| Floor Area | 300 Square Feet |
| Adjustable Heights | 8.9ft, 8.5ft, 8.2ft |
| Item Weight | 104 pounds |
| Item Model Number | Carport Canopy Tent |
9. Warranty and Support
For any questions, concerns, or assistance with your COBIZI 10x30 Pop Up Canopy, please refer to the contact information provided at the point of purchase or visit the official COBIZI website for customer support details. Specific warranty information may vary and is typically provided with your purchase documentation.
Ask a question about this manual
Ask about setup, troubleshooting, compatibility, parts, safety, or missing instructions. Manuals+ will review the question and use this page’s manual context to help answer it.