BLACK+DECKER EM044K6CE-SS
BLACK+DECKER EM044K6CE-SS 1.7 cu. ft. Over-the-Range Microwave Oven User Manual
1. Introduction
This manual provides essential information for the safe and efficient operation, installation, and maintenance of your BLACK+DECKER EM044K6CE-SS 1.7 cu. ft. Over-the-Range Microwave Oven. Please read these instructions thoroughly before using the appliance and retain them for future reference.
2. Important Safety Information
Always follow basic safety precautions when using electrical appliances to reduce the risk of burns, electric shock, fire, injury to persons, or exposure to excessive microwave energy.
- Do not attempt to operate this oven with the door open as this can result in harmful exposure to microwave energy.
- Do not place any object between the oven front face and the door or allow soil or cleaner residue to accumulate on sealing surfaces.
- Do not operate the oven if it is damaged. It is particularly important that the oven door closes properly and that there is no damage to the: (1) door (bent), (2) hinges and latches (broken or loosened), (3) door seals and sealing surfaces.
- The oven should not be adjusted or repaired by anyone except properly qualified service personnel.
- Ensure proper ventilation during use.
- Never heat sealed containers, as they may explode.
- Use only microwave-safe cookware.
3. Product Overview
The BLACK+DECKER EM044K6CE-SS is a 1.7 cubic feet over-the-range microwave oven designed for efficient cooking and ventilation.
3.1 Components
- Oven Cavity: The interior space where food is cooked.
- Glass Turntable: Rotates food for even heating.
- Control Panel: Digital display and touch buttons for operation.
- Vent Fan: Integrated fan to remove cooking odors and steam.
- Cooktop Light: Illuminates the cooking surface below the microwave.
3.2 Control Panel
The control panel features a digital display and various buttons for setting cooking times, power levels, and special functions.

Image: Front view of the BLACK+DECKER EM044K6CE-SS Over-the-Range Microwave Oven, showing the door, control panel, and interior with a cooked chicken.
4. Setup and Installation
This microwave oven is designed for over-the-range installation. Proper installation is crucial for safety and performance. It is recommended that installation be performed by qualified personnel.
4.1 Dimensions and Clearance
Ensure adequate space and proper clearance above your cooking range. The appliance dimensions are approximately 15.4 inches (D) x 29.9 inches (W) x 16.4 inches (H).

Image: Diagram illustrating the dimensions of the microwave oven (15.4"D x 29.9"W x 16.4"H) and recommended cabinet clearances for over-the-range installation.
4.2 Electrical Requirements
The microwave requires a dedicated 120V, 60Hz, 15-amp or 20-amp grounded outlet. Do not use an extension cord.
4.3 Mounting
Follow the detailed mounting instructions provided in the separate installation guide that accompanies your product. This typically involves securing a mounting plate to the wall and attaching the oven to the upper cabinet.
5. Operating Instructions
5.1 Basic Microwave Cooking
To cook with microwave power:
- Place food in a microwave-safe container on the turntable.
- Close the oven door.
- Press the 'Time Cook' button.
- Enter the desired cooking time using the number pads.
- Press the 'Power Level' button and select a power level from 1 to 10 (100% power is default).
- Press 'Start'.
5.2 10 Cooking Power Levels
The microwave offers 10 power levels, allowing precise control over cooking intensity for various food types.

Image: Visual representation of the 10 cooking power levels and their recommended uses, such as 10% for Keep Warm, 50% for Soften Butter, and 100% for Liquid.
5.3 One-Touch Speedy Cooking
For quick heating, use the Quick Start buttons:
- Press number 1 for 1 minute at 100% power.
- Press number 2 for 2 minutes at 100% power.
- Press number 3 for 3 minutes at 100% power.
- Press the +30 Sec button to add 30 seconds to the cooking time at 100% power.

Image: Close-up of the microwave control panel highlighting the '1', '2', and '3' buttons for Quick Start cooking.
5.4 Pre-set Auto Cooking Menus
The microwave includes convenient pre-set menus for common food items:
- Popcorn: For popping pre-packaged microwave popcorn.
- Potato: For baking potatoes.
- Beverage: For heating drinks.
- Melt/Soften: For melting butter or softening ice cream.
- Reheat: For warming up cooked food.
- Defrost: For thawing frozen items by weight or time.
5.5 Multi-stage Cooking
This feature allows you to program multiple cooking stages with different power levels and times. For example, you can defrost food and then cook it in a single sequence.

Image: Graphic illustrating a multi-stage cooking process, showing a power level of 90% for 10 minutes followed by 50% power for an additional 10 minutes, with a cooked meal inside the microwave.
5.6 Vent Fan Operation
The integrated 300 CFM vent fan helps remove smoke, steam, and cooking odors from your kitchen. It features a 2-speed setting.

Image: The microwave installed over a stove, with the 300 CFM vent fan and integrated light actively clearing steam from pots on the stovetop.
5.7 Cooktop Light
Press the 'Light' button on the control panel to turn the cooktop light on or off, providing illumination for your cooking surface.
5.8 Child Safety Lock
To prevent accidental operation, especially by children, activate the child safety lock. Refer to your control panel for specific instructions on how to engage and disengage this feature, typically by holding down a 'Stop' or 'Cancel' button for a few seconds.

Image: A hand interacting with the microwave control panel, with a shield icon overlay indicating the Child Safety Lock feature.
6. Maintenance and Cleaning
Regular cleaning and maintenance will ensure the longevity and optimal performance of your microwave oven.
6.1 Interior Cleaning
Clean the oven interior after each use with a mild detergent and a soft cloth. For stubborn food splatters, place a bowl of water with lemon slices inside and microwave for a few minutes to loosen residue before wiping.
6.2 Exterior Cleaning
Wipe the exterior surfaces, including the control panel, with a soft, damp cloth. Avoid abrasive cleaners or scouring pads that could scratch the finish.
6.3 Turntable Care
The glass turntable and turntable support can be removed for cleaning. Wash them in warm, soapy water or in the dishwasher. Ensure they are dry before placing them back in the oven.
6.4 Vent Filter Cleaning
The grease filters for the vent fan should be cleaned regularly. Refer to your installation guide for instructions on how to remove and clean these filters, typically by washing them in hot, soapy water.
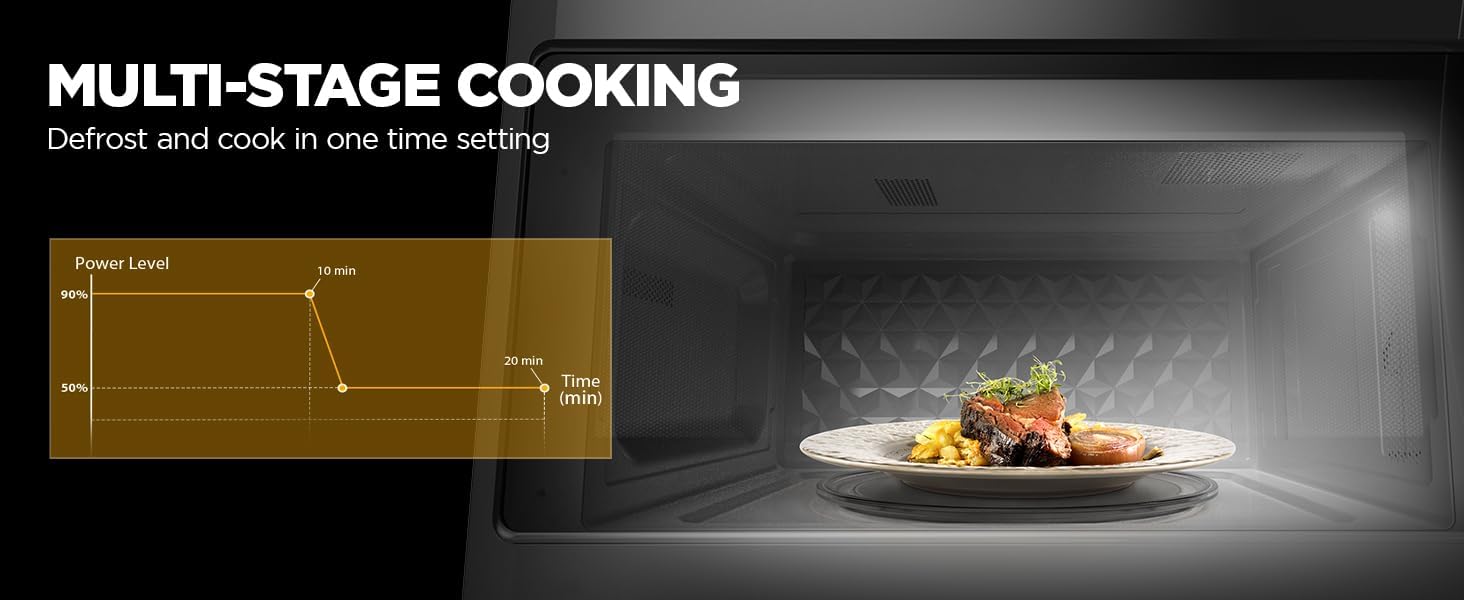
Image: A collage showing different aspects of cleaning the microwave, including wiping the interior, cleaning the turntable, and washing the vent filter.
7. Troubleshooting
If you experience issues with your microwave oven, consult the following common troubleshooting steps before contacting service.
- Oven does not start: Check if the power cord is securely plugged into the outlet. Ensure the door is completely closed. Check your household fuse or circuit breaker.
- Food not heating: Verify that the cooking time and power level are set correctly. Ensure the door is fully closed.
- Turntable not rotating: Check if the turntable is properly seated on its support. Ensure there is no obstruction beneath the turntable.
- Unusual noise during operation: This could be due to improper placement of the turntable or cookware. Ensure items are centered and not touching the oven walls.
- Oven light not working: The bulb may need replacement. Refer to the full product manual for instructions on replacing the oven light bulb.
8. Specifications
| Feature | Specification |
|---|---|
| Brand | BLACK+DECKER |
| Model Number | EM044K6CE-SS |
| Capacity | 1.7 Cubic Feet |
| Wattage | 1000 watts |
| Voltage | 120 Volts |
| Product Dimensions (D x W x H) | 15.4" x 29.9" x 16.4" |
| Item Weight | 55.9 pounds (25.4 Kilograms) |
| Color | Stainless Steel |
| Installation Type | Over-the-Range |
| Vent Fan CFM | 300 CFM (2-speed) |
| Controller Type | Touch |
| Special Feature | Auto Cook |
9. Warranty and Support
For warranty information and customer support, please refer to the warranty card included with your product or visit the official BLACK+DECKER website. Keep your proof of purchase for warranty claims.
If you require technical assistance or have questions not covered in this manual, please contact BLACK+DECKER customer service.