1. Introduction
This manual provides detailed instructions for the setup, operation, maintenance, and troubleshooting of your CWWK Micro Firewall Appliance. This compact Mini PC is designed for various applications, including use as a firewall, VPN gateway, NAS, or virtualization platform, leveraging its Intel Twin Lake N150/i3-N355 processor and multiple 2.5GbE network interfaces.
2. Package Contents
Please verify that all items are present in the package:
- CWWK Micro Firewall Appliance (CW-N155-4L)
- Power Supply
3. Product Overview
Familiarize yourself with the physical layout and ports of your CWWK Micro Firewall Appliance.
Front and side view of the CWWK Micro Firewall Appliance, showcasing its compact design and heat sink fins.
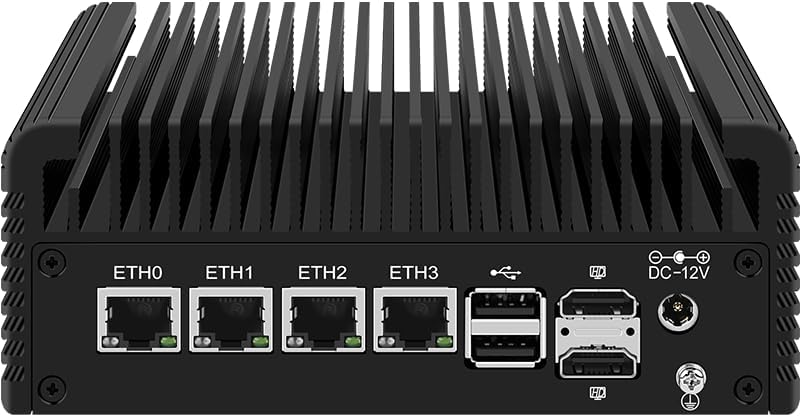
3.1 Rear Panel

Rear panel of the appliance, featuring four 2.5 Gigabit Ethernet ports (ETH0-ETH3), USB ports, HDMI and DisplayPort outputs, and the DC 12V power input.
- ETH0-ETH3 (4x 2.5GbE I226-V Network Ports): For high-speed wired network connections.
- USB Ports: For connecting peripherals such as keyboards, mice, or external storage.
- HDMI Port: For connecting to a display.
- DisplayPort (DP): For connecting to a second display, supporting dual 4K output.
- DC-12V: Power input connector.
3.2 Front Panel

Front panel of the appliance, including the power button, USB ports, HDMI output, TF card slot, and a Type-C port.
- Power Button: To turn the device on or off.
- USB Ports: Additional USB 3.0 and USB 2.0 ports for peripherals.
- TF Card Slot: For inserting a TransFlash (MicroSD) card.
- Type-C Port: A versatile USB-C port.
3.3 Port Diagram

Detailed diagram showing the layout and labels of all ports on both the front and rear panels of the CWWK Micro Firewall Appliance, including USB, HDMI, DP, Ethernet, and power.
4. Setup Instructions
Follow these steps to set up your CWWK Micro Firewall Appliance:
- Connect Display: Connect your monitor to the appliance using an HDMI or DisplayPort cable. For dual display setup, use both HDMI and DisplayPort.
- Connect Peripherals: Plug in your keyboard and mouse to the available USB ports.
- Connect Network: Connect Ethernet cables to the 2.5GbE network ports (ETH0-ETH3) as required for your network configuration (e.g., WAN, LAN, DMZ).
- Connect Power: Insert the power supply cable into the DC-12V port on the rear panel, then plug the power adapter into an electrical outlet.
- Power On: Press the power button on the front panel to turn on the device.
- Operating System Installation: The appliance supports various operating systems. You can install popular open-source software solutions like OPNsense, OpenWrt, Ubuntu, or Windows 10/11. Refer to the specific OS installation guide for detailed steps.
5. Operating Instructions
5.1 Basic Operation
- Power On/Off: Press the front power button to turn the device on. To turn off, perform a proper shutdown through the operating system, then press the power button if necessary.
- Restart: Use the operating system's restart function.
5.2 Network Configuration
The four 2.5GbE I226-V network ports allow for flexible network configurations. Depending on your chosen operating system (e.g., OPNsense, OpenWrt), you can configure these ports for various roles such as WAN (Internet connection), LAN (local network), or other specialized network segments. Consult your operating system's documentation for specific network setup procedures.
5.3 Display Setup
The appliance supports dual 4K display output via HDMI and DisplayPort. Configure display settings within your operating system to extend or duplicate your desktop across multiple monitors.
5.4 Wireless Connectivity
The device includes an M.2 KEY-E slot that supports Bluetooth/WiFi6 modules. If a compatible module is installed, configure wireless network settings through your operating system.
5.5 Usage Scenarios
This appliance is versatile and can be used for:
- Firewall Appliance: Deploy robust network security solutions.
- VPN Gateway: Securely connect remote networks or users.
- NAS (Network Attached Storage): Create a centralized storage solution.
- Virtualization Platform: Supports VT-X and VT-D for running virtual machines.
6. Maintenance and Upgrades
6.1 Storage and Memory Expansion
The appliance offers several expansion options:
- RAM: One SO-DIMM DDR5 slot, supporting up to 32GB at 4800MHz (compatible with 5200/5600MHz).
- M.2 NVMe: One M.2 NVMe x4 slot for high-speed storage. This slot can also support multiple M.2 or mSATA/SATA drives via an adapter board.
- SATA: Supports 2.5-inch SATA disks.

Internal view demonstrating the installation of a 2.5-inch SATA disk and the placement of an optional 8010 cooling fan for enhanced heat dissipation.

Illustration of various expansion board options, such as M.2 to SATA/mSATA adapter boards, showcasing the modularity for storage and connectivity upgrades.
6.2 Cooling Fan
The N355 version of this appliance includes a cooling fan. While generally quiet, ensure proper airflow around the device to maintain optimal operating temperatures. Regular cleaning of dust from the heat sink fins and fan (if present) is recommended to prevent overheating.
7. Troubleshooting
If you encounter issues with your CWWK Micro Firewall Appliance, consider the following basic troubleshooting steps:
- No Power: Ensure the power adapter is securely connected to both the device and a working electrical outlet. Test the outlet with another device.
- No Display: Verify that the HDMI or DisplayPort cable is correctly connected to both the appliance and the monitor. Check the monitor's input source setting.
- Network Connectivity Issues: Confirm Ethernet cables are properly seated. Check network settings within your operating system. Verify router/switch status.
- Operating System Not Booting: Ensure the bootable drive (SSD/NVMe/USB) is correctly installed and configured in the BIOS/UEFI settings.
For further assistance, please refer to the Warranty and Support section.
8. Specifications
| Feature | Specification |
|---|---|
| Processor | Intel Twin Lake N150/i3-N355 (3.6 GHz Intel Processor N100) |
| RAM | DDR5 (1x SO-DIMM slot, up to 32GB, 4800MHz/5200MHz/5600MHz compatible) |
| Hard Drive | 512 GB SSD (M.2 NVMe x4, supports multiple M.2 or mSATA/SATA via adapter) |
| Graphics Coprocessor | Integrated Graphics |
| Network Ports | 4 x 2.5GbE I226-V |
| Video Output | Dual HDMI + DisplayPort (4K support) |
| USB Ports | 2 x USB 3.0, 6 x USB 2.0 |
| Wireless | 1 x M.2 KEY-E (supports Bluetooth/WiFi6 module) |
| Operating System Support | Linux, Windows (OPNsense, OpenWrt, Ubuntu, Windows 10/11) |
| Dimensions (LxWxH) | 5.18 x 7 x 1.9 inches |
| Item Weight | 3.96 pounds |
| Certifications | FCC, CE, ROSH |
9. Warranty and Support
All CWWK Mini PCs are FCC, CE, and ROSH certified, ensuring compliance with relevant safety and environmental standards.
- Quality Assurance: The product comes with a 1-year quality assurance period.
- Technical Support: CWWK provides 24-hour technical support. If you have any product-related questions or require assistance, please contact CWWK customer service for prompt support.