1. Introduction
The Sainlogic SA9 WiFi Smart Weather Station provides comprehensive local weather data and forecasts. This system includes an outdoor multi-sensor unit and an indoor display console, offering real-time monitoring of various environmental parameters. With its 8.5-inch display and connectivity to the Weatherseed App, users can access detailed weather information, historical data, and receive instant alerts.

Image 1.1: Sainlogic SA9 Smart Weather Station components.
2. What's in the Box
Please check the package contents to ensure all items are present:
- Display Console
- Integrated Outdoor Transmitter (Multi-sensor unit)
- Manual
- Power Adapter
- Foot Mounting (with pole insert)
- Mounting Bracket Back Plate (pole mount)
- Mounting Pole
- 2 x Pole mounting nuts (M3) / bolts (Ø3)
- 4 x Pole mounting nuts (M5) / bolts (Ø5)
- 4 x Tapping screws

Image 2.1: Detailed view of package contents and dimensions.
3. Setup
3.1 Outdoor Sensor Installation
The outdoor multi-sensor unit measures temperature, humidity, rainfall, wind speed, wind direction, UV, and sunlight levels. Proper placement is crucial for accurate readings.
- Location: Mount the sensor in an open area, free from obstructions that could affect wind or rain measurements. Ensure it is at least 5 feet (1.5 meters) off the ground.
- Mounting: Use the provided adjustable bracket to mount the sensor on a pole, railing, or flat surface. Various mounting options are available (see Image 3.1).
- Orientation: Ensure the wind vane is pointing North for accurate wind direction readings. Use the integrated bubble level for horizontal alignment.
- Power: The outdoor sensor is solar-powered during the day and uses battery backup at night. Ensure the solar panel is exposed to direct sunlight. Batteries (3 AA, not included) are required for continuous operation.

Image 3.1: Outdoor sensor components and mounting considerations.

Image 3.2: Various installation methods for the outdoor sensor.

Image 3.3: Sensor details and mounting options.
3.2 Display Console Setup
The display console is designed for indoor use and provides a clear overview of all collected weather data.
- Power: Connect the display console to a power outlet using the provided power adapter. The console can also use 3 AA batteries (not included) for backup, but WiFi functionality requires AC power.
- Placement: Place the console in a central location where it is easily visible and can receive a stable signal from the outdoor sensor.
- Initial Sync: The display console and outdoor sensor should automatically sync upon power-up. Allow a few minutes for the data to appear on the screen.
3.3 Weatherseed App Connection (2.4G WiFi Only)
To unlock the full potential of your weather station, connect it to the Weatherseed App via WiFi. The station only supports 2.4G Wi-Fi networks.
- Download the Weatherseed App from your smartphone's app store.
- Open the app and create an account or log in.
- Tap "Add Device" and select model SA9.
- Press and hold the Max/Min button on the display console for 3 seconds to enter pairing mode and scan the QR code displayed on the console with your phone.
- Follow the in-app instructions to connect to your 2.4G WiFi network.

Image 3.4: Steps to connect to the Weatherseed App.
4. Operation
4.1 Display Console Overview
The 8.5-inch display console presents various weather parameters in an organized layout, ensuring clear readability from different angles.
- Key Data: Displays outdoor/indoor temperature and humidity, barometric pressure, rainfall, wind speed and direction, UV index, sunlight levels, moon phase, time, and date.
- Forecast Icons: Provides a visual weather forecast based on AI-driven predictions.
- Alerts: Customizable alerts for temperature, humidity, and barometric pressure can be set directly on the console.
4.2 Weatherseed App Features
The Weatherseed App extends the functionality of your weather station, offering advanced monitoring and data management.
- 24H/7Days AI Weather Forecast: Access accurate, AI-driven weather predictions for your location.
- Real-time Monitoring: View live data for temperature, humidity, pressure, wind, and rainfall.
- Instant Alerts: Receive notifications via the app or email for customizable thresholds (e.g., high/low temperature, humidity changes).
- 2-Year Data Storage & Export: The app stores up to 2 years of historical data, viewable through charts and graphs. Data can be easily exported in Excel format for detailed analysis.
- Weather Underground Support: Connect your station to Weather Underground to share and access a broader network of weather data.
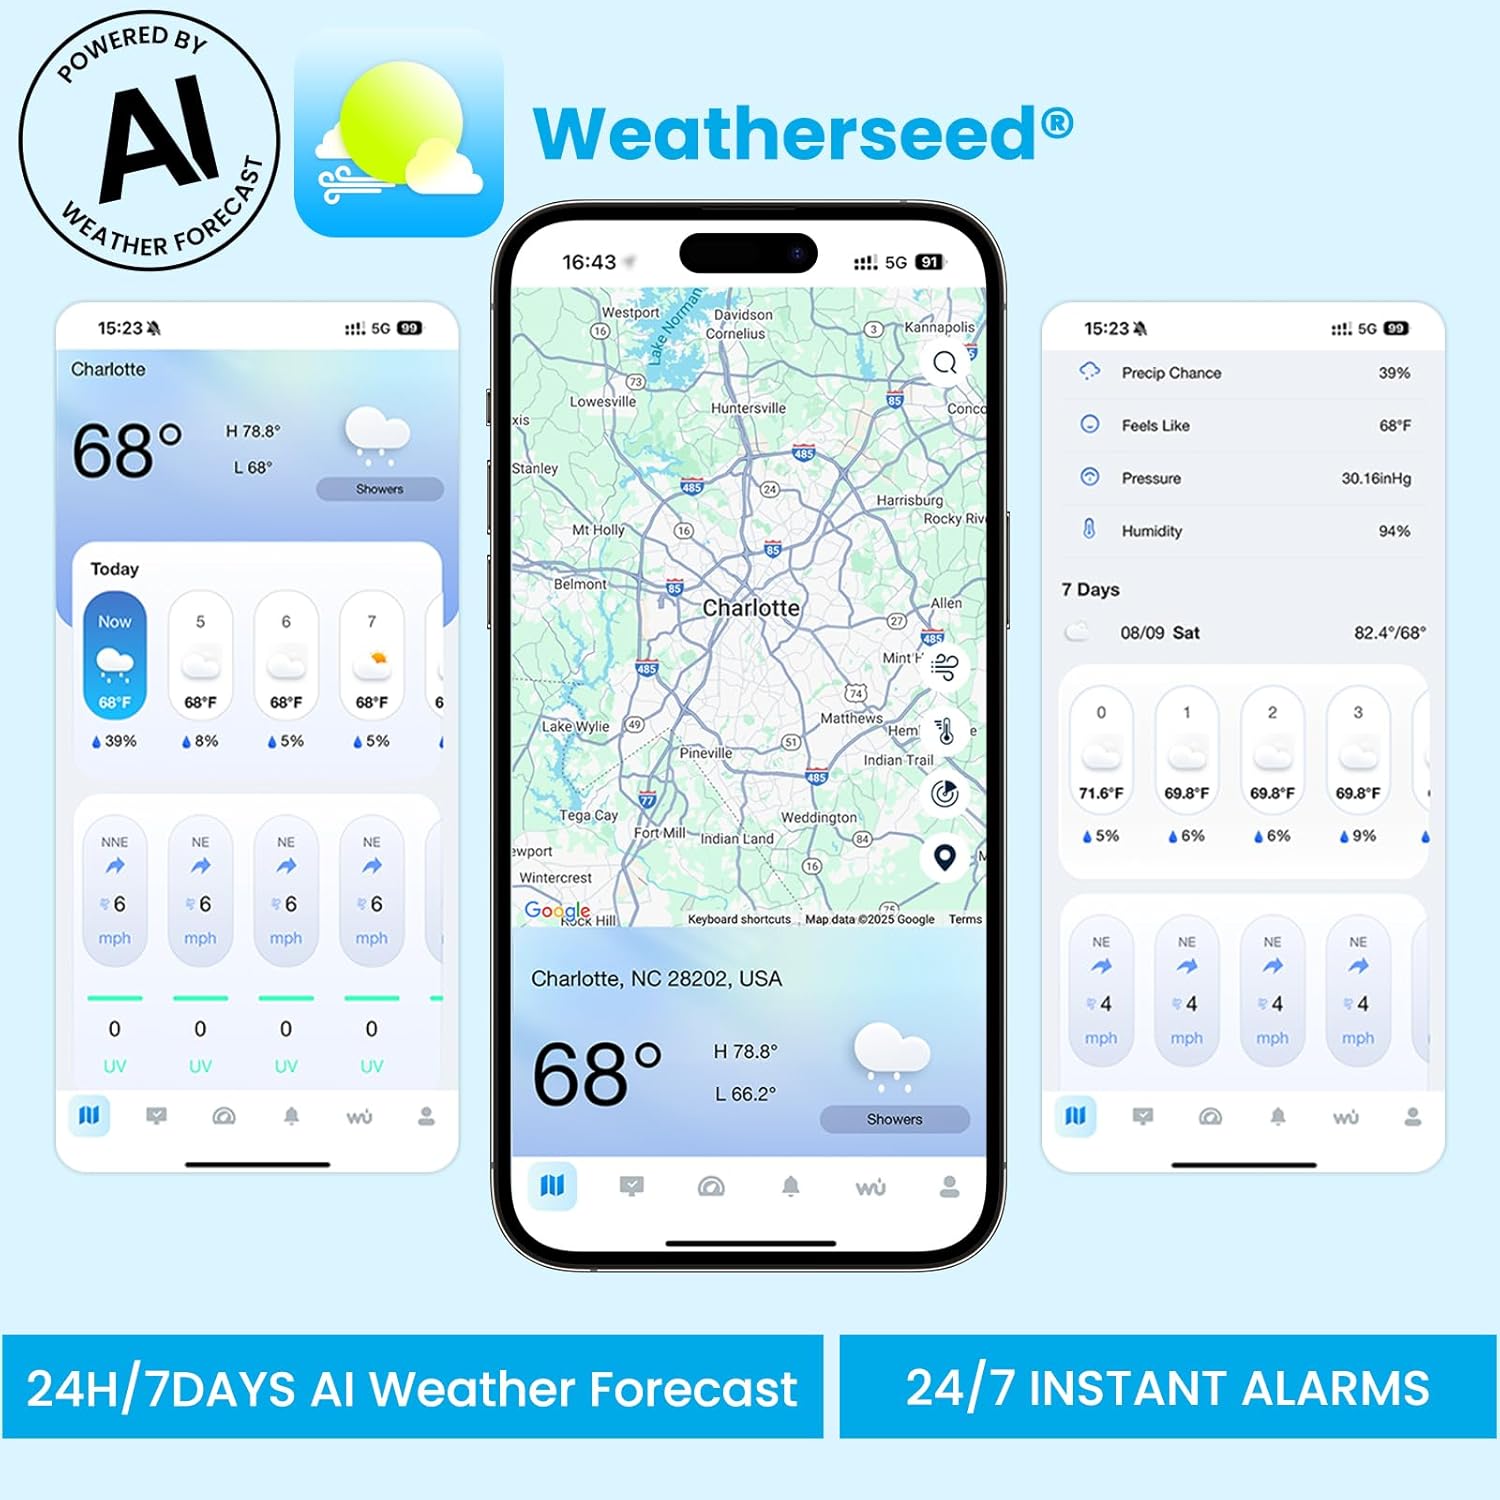
Image 4.1: Weatherseed App displaying 24H/7Days AI Weather Forecast.

Image 4.2: Weatherseed App displaying local detailed data and historical trends.

Image 4.3: Instant alert notifications via the Weatherseed App.

Image 4.4: 2-Year data storage and export functionality.
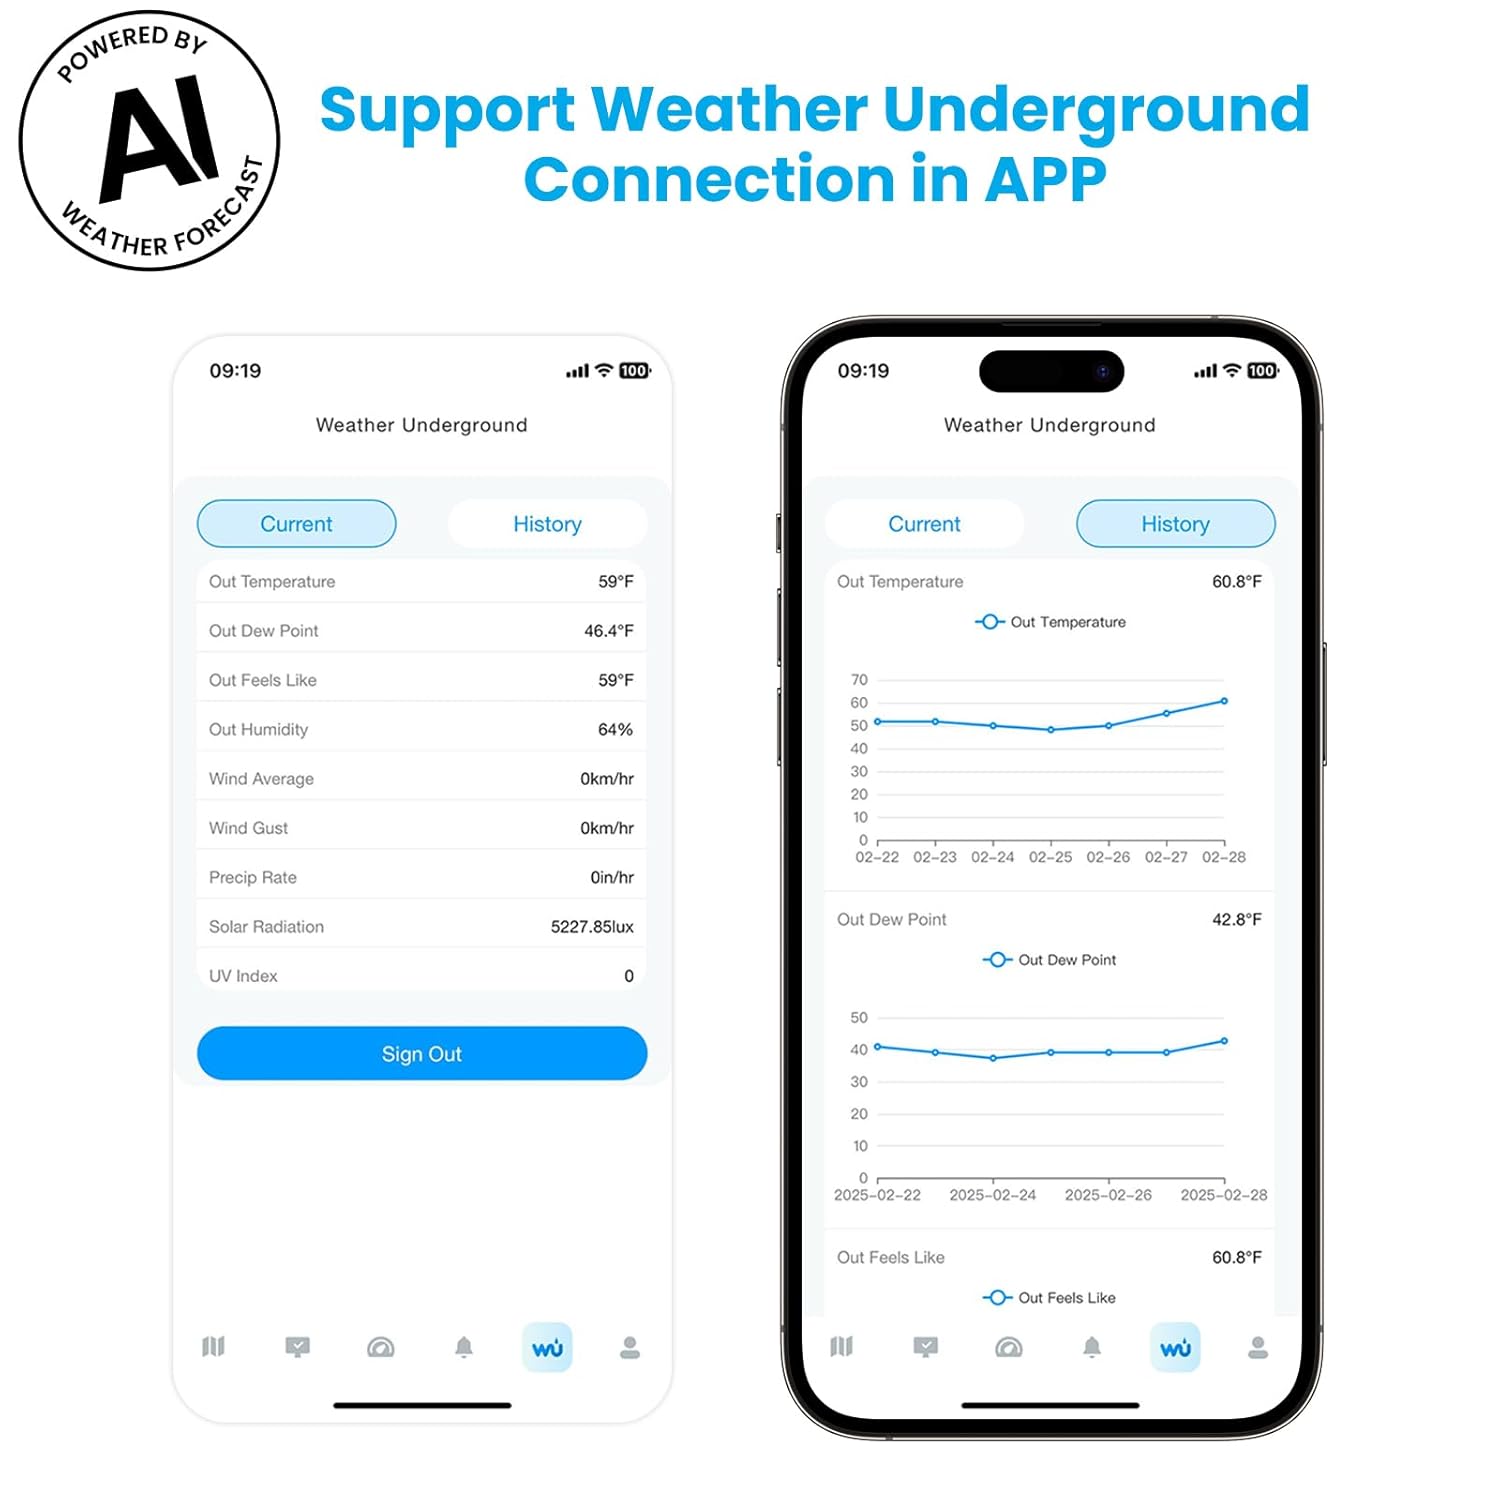
Image 4.5: Support for Weather Underground connection in the app.
5. Maintenance
- Cleaning: Periodically clean the outdoor sensor, especially the rain collector and solar panel, to ensure accurate readings. Use a soft, damp cloth. Avoid abrasive cleaners.
- Battery Replacement: Replace the AA batteries in the outdoor sensor and display console (if used for backup) as needed. Low battery indicators will appear on the display.
- Sensor Check: Regularly inspect the outdoor sensor for any debris, spiderwebs, or physical damage that might impede its function.
- Firmware Updates: Check the Weatherseed App periodically for any available firmware updates for your weather station to ensure optimal performance and new features.
6. Troubleshooting
- No Data on Display: Ensure both the outdoor sensor and display console have power. Check battery levels. Verify the outdoor sensor is within the 330 ft wireless range of the display console.
- WiFi Connection Issues: Confirm your router is broadcasting a 2.4G WiFi signal. Ensure the display console is plugged into AC power, as WiFi functionality is disabled when running on batteries. Restart your router, the display console, and try the app connection steps again.
- Inaccurate Readings: For wind and rain, ensure the outdoor sensor is mounted in an open area, away from obstructions. For temperature, ensure the sensor is not in direct sunlight (unless designed to measure sunlight) or near heat sources. Calibrate sensors if an option is available in the app or console settings.
- App Not Updating: Check your internet connection. Ensure the Weatherseed App is updated to the latest version. Restart the app.
- Display Freezes: Disconnect power from the display console, remove any backup batteries, wait 30 seconds, then reconnect power.
7. Specifications
| Feature | Detail |
|---|---|
| Model Number | SA9 |
| Product Dimensions | 8.5 x 6.2 x 1 inches (Display Console) |
| Weight | 5.95 Pounds |
| Batteries Required | 3 AA batteries (for outdoor sensor and display backup) |
| Wi-Fi Operation Frequency | 2.4 GHz (only) |
| RF Frequency | 433MHz |
| Main Material | Acrylonitrile Butadiene Styrene (ABS) |
| Power Input (Adapter) | 100-240V AC, 50/60Hz, 0.4A |
| Power Output (Adapter) | 5.0V DC, 1000 mA, 5W |
| Display Size | 8.5 inches |
| Connectivity Technology | Bluetooth, Wi-Fi |
| Special Features | 2-Year Data Storage & Export, Accurate 24-Hour & 7-Day AI Weather Forecast, Customizable Alerts |
8. Warranty and Support
Sainlogic products are designed for durability and performance. For specific warranty details, please refer to the documentation included with your purchase or visit the official Sainlogic website.
If you encounter any issues or require technical assistance, please contact Sainlogic customer support. Provide your model number (SA9) and a detailed description of the problem for efficient service.