
1. Important Safety Information
Please read all instructions carefully before assembly and use. Keep this manual for future reference.
- Weight Limits: Do not exceed the specified weight capacities for the tabletops and internal shelves. Overloading can cause structural damage and potential injury.
- Electrical Safety: The integrated charging station contains electrical components. Ensure the power cord is not pinched or damaged during assembly. Only plug the unit into a properly grounded electrical outlet. Do not expose the charging station to liquids. Disconnect from power before cleaning or if any electrical issue is suspected.
- Assembly: Assemble on a soft, clean surface to prevent scratches. Ensure all parts are securely fastened before use. Do not use power tools for assembly unless explicitly instructed, as overtightening can damage components.
- Stability: Place the tables on a flat, level surface. If the tables feel unstable, recheck all connections.
- Children and Pets: Keep small parts and packaging materials away from children and pets during assembly.
2. Package Contents
Your RWYHG Farmhouse End Table Set includes two tables: one 18-inch narrow side table and one 24-inch large sofa table. Each package contains all necessary parts, hardware, and tools for assembly. Please verify all components are present and undamaged before beginning assembly.
- Pre-drilled wood panels for two tables
- Glass barn doors (for both tables)
- Adjustable shelves
- Solid wood legs
- Charging station unit (pre-installed in one table, or to be installed)
- Assembly hardware (screws, cam locks, dowels, etc.)
- Assembly tools (e.g., Allen wrench)
- Instruction manual
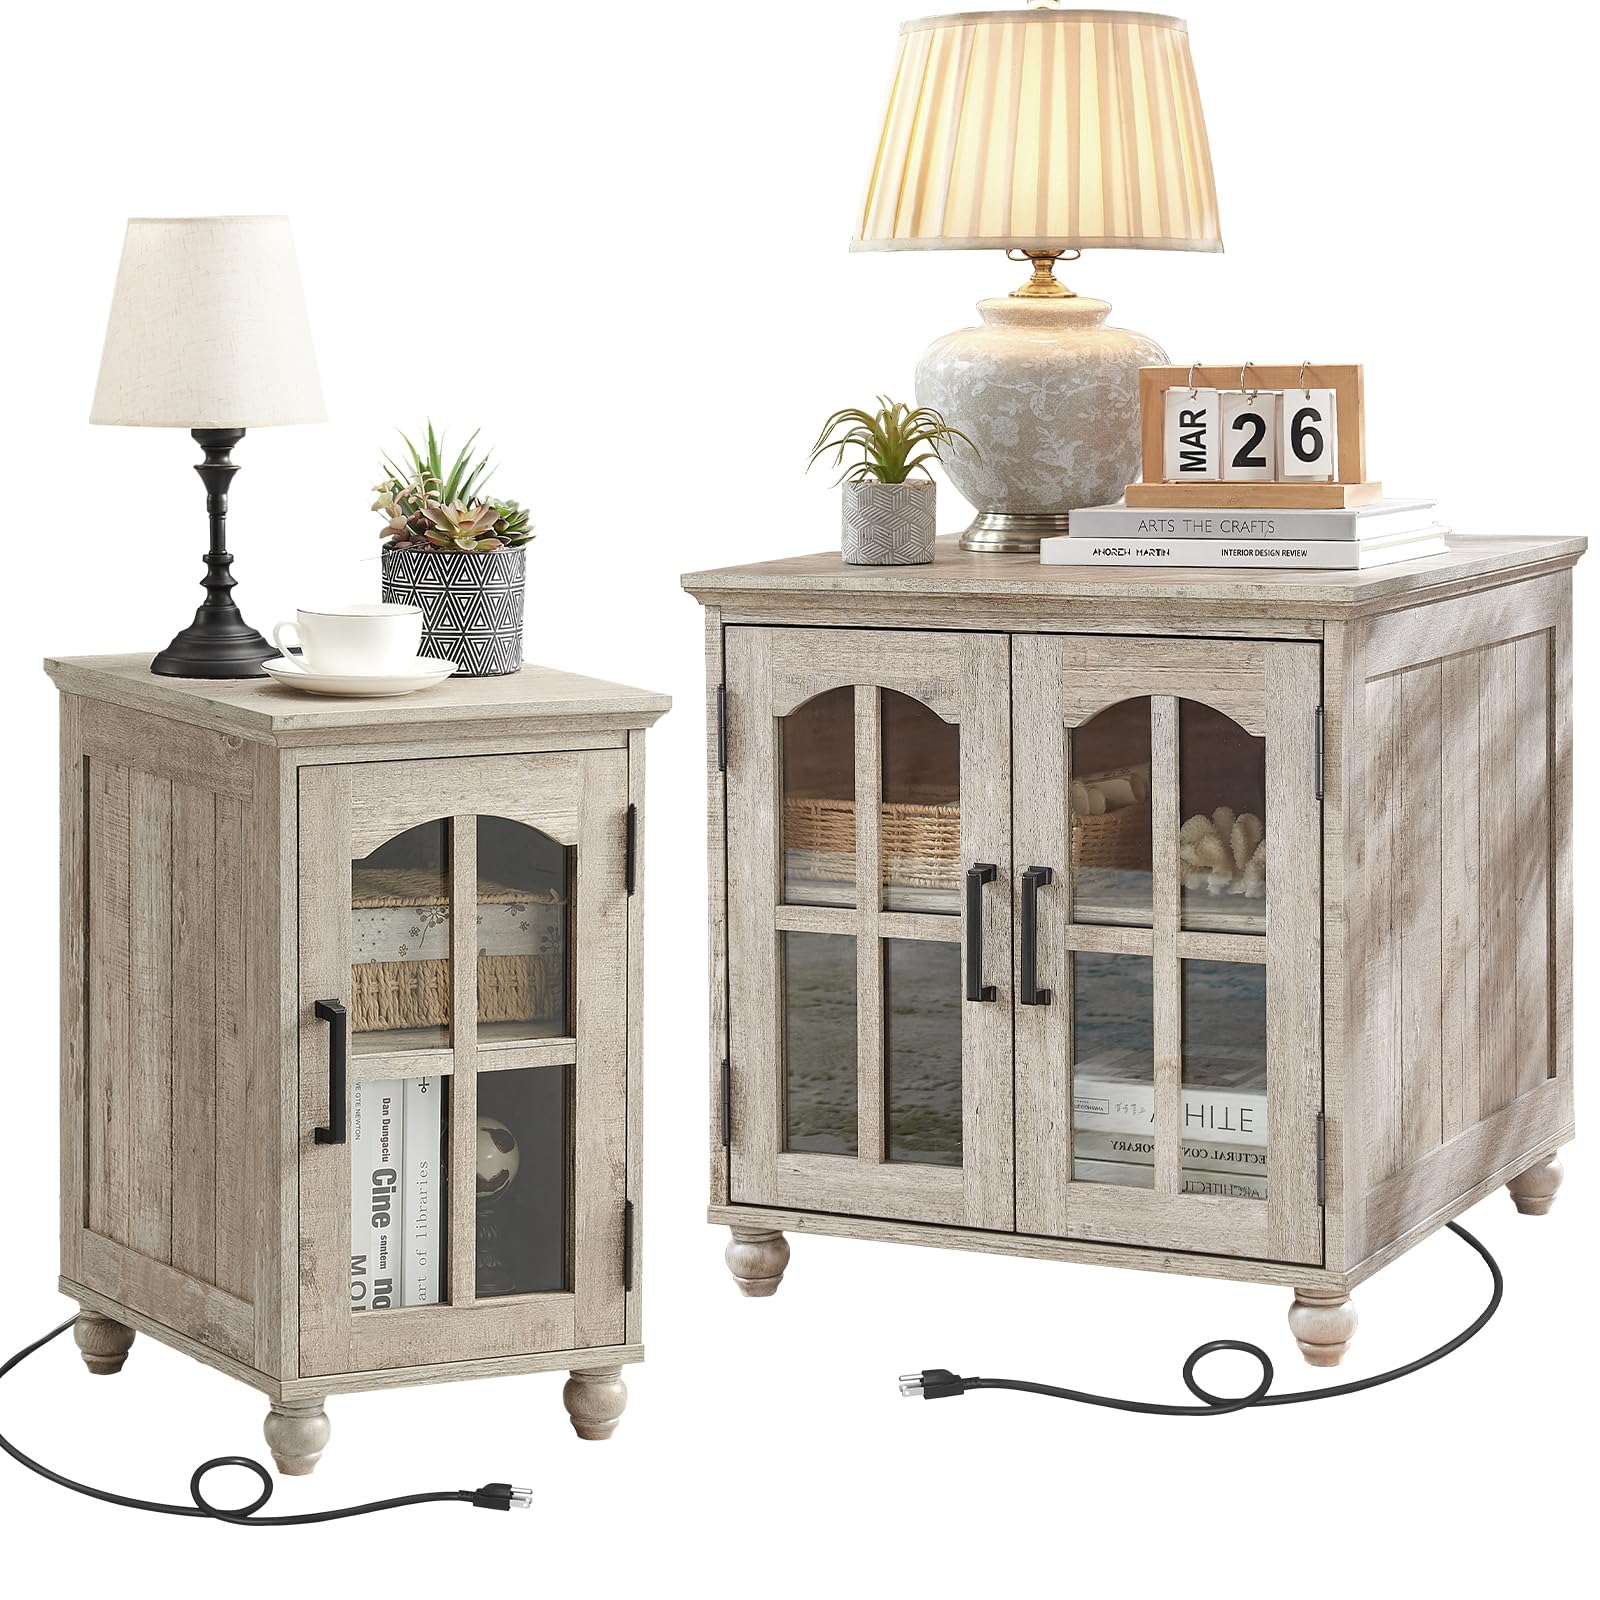
Image: The complete RWYHG Farmhouse End Table Set of 2 in Grey, showcasing both the narrow and large tables.
3. Assembly Instructions
The tables are designed for straightforward assembly. Each unit comes with clear, step-by-step instructions, labeled parts, and all necessary assembly tools. Follow the included detailed guide for your specific table set.
- Unpack and Identify: Carefully unpack all components and lay them out on a clean, soft surface. Identify each part using the labels and the parts list in your specific instruction booklet.
- Assemble Main Frame: Begin by connecting the side panels to the base and top panels using the provided hardware (e.g., cam locks and dowels). Ensure all connections are snug.
- Install Shelves: Insert the adjustable shelf supports into the desired holes on the inner side panels. Place the adjustable shelf onto these supports.
- Attach Doors: Secure the glass barn doors to the main frame using the hinges. Ensure the doors open and close smoothly. Attach the door handles.
- Install Legs: Screw the decorative solid wood legs into the pre-drilled holes on the bottom of the table.
- Charging Station (if not pre-installed): If your charging station is not pre-installed, follow the specific instructions to secure it into the designated cutout on the tabletop. Ensure the power cord is routed safely.
- Final Check: Once assembled, gently lift and move the table to its desired location. Verify all connections are tight and the table is stable.
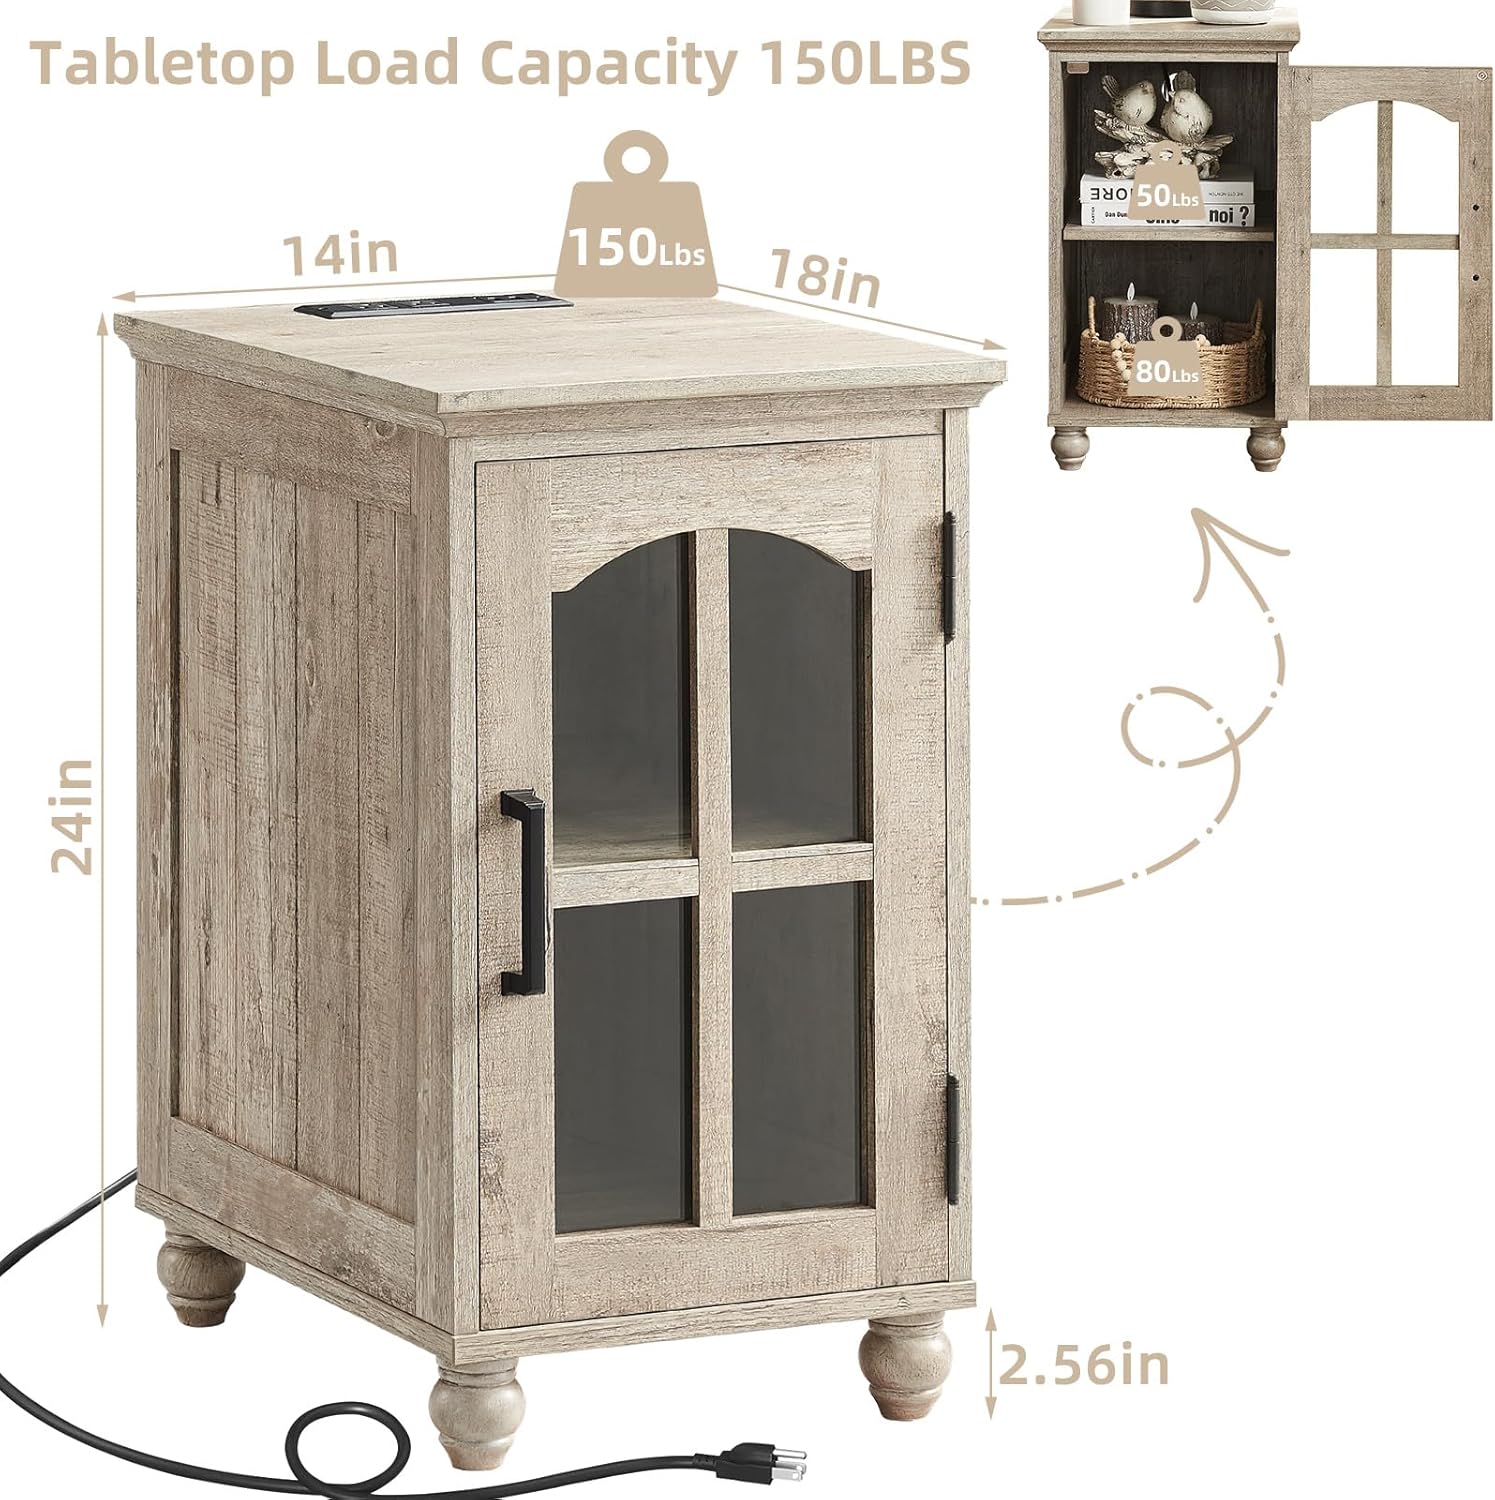
Image: A detailed view of the narrow end table, illustrating its dimensions (14in L x 18in W x 24in H) and load capacities (tabletop 150lbs, internal shelf 80lbs). The power cord for the charging station is visible.

Image: The large end table highlighting key features: a 1.1-inch thick desktop, magnetic door design for secure closure, an adjustable internal shelf, and unique solid wood legs.
4. Operating Instructions
4.1 Using the Charging Station
The integrated charging station provides convenient power access for your electronic devices.
- Power Connection: Plug the table's power cord into a standard 120V AC wall outlet.
- AC Outlets: Use the two 120V/12A AC outlets to power lamps, laptops, or other small appliances.
- USB Ports: Use the two 5V/2A USB ports to charge smartphones, tablets, and other USB-powered devices.
- Overload Protection: Avoid plugging in high-power appliances that exceed the station's capacity to prevent overload.

Image: A close-up of the charging station on the tabletop, showing a smartphone and tablet connected to the USB ports and a wall adapter in an AC outlet. Details of the 2 AC outlets, 2 USB ports, and 5-foot power cord are highlighted.
4.2 Utilizing Storage
Both tables feature internal storage with adjustable shelves and glass barn doors.
- Adjustable Shelves: The internal shelves can be repositioned to accommodate items of various heights. To adjust, remove the shelf, reposition the shelf supports to the desired height, and then place the shelf back on the supports.
- Glass Barn Doors: The doors provide easy access to stored items and feature a magnetic design to keep them securely closed.
5. Maintenance and Care
Proper care will ensure the longevity and appearance of your end tables.
- Cleaning: Wipe surfaces with a soft, damp cloth. Avoid harsh chemicals or abrasive cleaners that can damage the wood finish. For glass doors, use a standard glass cleaner.
- Spills: Immediately wipe up any spills to prevent staining or damage to the wood.
- Heat and Moisture: Avoid placing hot items directly on the tabletop. Use coasters for drinks to protect against moisture rings.
- Sunlight: Prolonged exposure to direct sunlight can cause fading or discoloration.
- Electrical Components: Ensure the charging station remains dry. Do not attempt to repair or modify the electrical components yourself.
- Regular Checks: Periodically check all screws and connections to ensure they remain tight. Retighten if necessary.
6. Troubleshooting
- Table is Unstable:
Solution: Ensure all assembly hardware is fully tightened. Check that the table is placed on a flat, even surface. - Charging Station Not Working:
Solution: Verify the table's power cord is securely plugged into a functional wall outlet. Check if the outlet itself is receiving power (e.g., by plugging in another device). Ensure devices are properly connected to the AC outlets or USB ports. Avoid overloading the charging station. - Doors Do Not Close Properly:
Solution: Check hinge alignment and ensure all hinge screws are tight. Verify that nothing is obstructing the door's path or the magnetic latch. - Scratches or Dents:
Solution: For minor blemishes, wood repair kits or markers can be used. Prevent future damage by using protective pads under items.
7. Specifications
| Feature | Description |
|---|---|
| Brand | RWYHG |
| Model | Farmhouse End Table Set with Charging Station (B0DXV748TJ) |
| Color | Grey |
| Material | Eco-friendly Wood Panels |
| Narrow Side Table Dimensions | 14" L x 18" W x 24" H |
| Large End Table Dimensions | 24" L x 24" W x 24.4" H |
| Item Weight (Set) | 65 Pounds |
| Tabletop Thickness | 1.1 inches |
| Tabletop Load Capacity | Up to 150 lbs (for narrow table, indicative) |
| Internal Shelf Load Capacity | Up to 80 lbs (for narrow table, indicative) |
| Charging Station | 2 AC Outlets (120V/12A), 2 USB Ports (5V/2A) |
| Power Cord Length | 5-foot |
| Assembly Required | Yes |
8. Warranty and Support
RWYHG products are manufactured with quality and customer satisfaction in mind. While specific warranty details are not provided in this manual, please retain your proof of purchase. For any questions regarding assembly, missing parts, or product defects, please contact RWYHG customer support through the retailer where the product was purchased. Refer to your purchase documentation for contact information.