1. Product Overview
The Tutoview QW7 is a 4K Dual-Lens Solar Security Camera designed for outdoor surveillance. It features both 5GHz and 2.4GHz Wi-Fi connectivity, a built-in battery powered by a solar panel for continuous operation, and a 360° PTZ (Pan-Tilt-Zoom) function. The dual-lens system provides comprehensive coverage with minimal blind spots, offering 4K (3840 x 2160) resolution and advanced night vision capabilities.

Image 1.1: The Tutoview QW7 camera system, showing the main unit, solar panel, and a simulated view from the companion application.
2. Package Contents
Please verify that all components are present in the package before proceeding with installation.
- Tutoview QW7 4K Dual-Lens Solar Security Camera
- Solar Panel
- Mounting Screws and Anchors
- Charging Cable
- Instruction Manual (this document)
3. Setup and Installation
3.1 Initial Charging
Before installation, fully charge the camera's built-in battery using the provided charging cable. Connect the cable to the camera's charging port and a standard USB power adapter (not included). The camera is equipped with a 9000mAh battery for extended operation.

Image 3.1: The camera system highlighting the integrated battery and solar panel for continuous power.
3.2 App Installation and Account Creation
- Download the "O-KAM Pro" application from your smartphone's app store (iOS App Store or Google Play Store).
- Open the app and follow the on-screen instructions to create a new user account or log in if you already have one.
3.3 Camera Pairing with Wi-Fi
- Ensure your smartphone is connected to a 2.4GHz or 5GHz Wi-Fi network. The camera supports both frequencies.
- In the O-KAM Pro app, tap the "+" icon to add a new device.
- Select your camera model or scan the QR code located on the camera unit (refer to Image 3.2 for location example).
- Follow the app's prompts to connect the camera to your Wi-Fi network. This typically involves entering your Wi-Fi password and presenting a QR code generated by the app to the camera's lens.
- Once connected, the camera will indicate successful pairing, and you will see it listed in your O-KAM Pro app.

Image 3.2: Rear view of the camera, showing the product label with identification details.
3.4 Mounting the Camera and Solar Panel
Choose a mounting location that provides optimal surveillance coverage and receives ample direct sunlight for the solar panel. The camera is IP66 waterproof rated for outdoor use.
- Use the provided mounting screws and anchors to securely attach the camera bracket to a wall or suitable surface.
- Attach the solar panel in a location that maximizes sun exposure throughout the day. Ensure the cable from the solar panel can reach the camera's charging port.
- Adjust the camera's angle to cover the desired monitoring area.
4. Operation
4.1 Live View and Dual-Lens Functionality
Access the O-KAM Pro app to view live footage from your camera. The dual-lens design allows for simultaneous monitoring of two different areas. One lens provides a fixed view, while the other offers 360° horizontal and 90° vertical PTZ rotation.

Image 4.1: Illustration of the dual-lens capability, allowing simultaneous viewing of two distinct areas.

Image 4.2: The camera's PTZ functionality, showing 355° horizontal and 90° vertical rotation for comprehensive coverage.
4.2 Motion Detection and Auto-Tracking
The camera features sensitive PIR motion sensors to detect human movement, reducing false alarms. When motion is detected, the camera can:
- Send real-time push notifications to your mobile phone.
- Automatically track the movement of detected subjects.
- Activate a sound alarm and spotlight to deter intruders.
- Record video footage to an installed SD card or cloud storage (subscription may apply).
Custom detection areas can be configured within the app to focus monitoring on specific zones.

Image 4.3: The camera's motion detection and auto-tracking features, including sound alarm and push notifications.
4.3 Night Vision Modes
The QW7 offers three night vision modes for clear visibility in low-light conditions:
- Color Night Vision: Utilizes built-in CMOS sensors and spotlights to provide full-color images even in darkness, up to 65 feet.
- Infrared (IR) Night Vision: Provides clear black-and-white images using infrared LEDs.
- Smart Night Vision: Automatically switches between IR and color night vision based on detected motion or ambient light.

Image 4.4: Visual comparison of color night vision and infrared night vision capabilities.
4.4 Two-Way Talk
The integrated microphone and speaker allow for real-time two-way communication through the O-KAM Pro app. This feature enables you to speak to visitors or deter unwanted individuals remotely.

Image 4.5: Demonstrating the two-way talk feature for remote communication.
4.5 Video Storage
The camera supports local storage via a microSD card (not included) and cloud storage options (subscription may be required). It is recommended to use a high-quality microSD card for reliable local recording.
4.6 Multi-User Sharing
You can share access to your camera's live feed and recordings with family members or trusted individuals through the O-KAM Pro app. Use the sharing QR code feature within the app to grant access.
5. Maintenance
- Cleaning: Periodically clean the camera lenses and solar panel with a soft, damp cloth to ensure optimal image quality and charging efficiency. Avoid abrasive cleaners.
- Solar Panel Placement: Ensure the solar panel remains free from obstructions (e.g., leaves, dirt, snow) that could reduce its ability to charge the camera's battery.
- Battery Health: While designed for continuous power, prolonged periods of low sunlight or extreme cold/heat may affect battery performance. Monitor battery levels via the app.
- Firmware Updates: Regularly check the O-KAM Pro app for available firmware updates to ensure your camera has the latest features and security enhancements.
6. Troubleshooting
6.1 Camera Not Connecting to Wi-Fi
- Ensure your Wi-Fi network is 2.4GHz or 5GHz.
- Verify the Wi-Fi password is entered correctly in the app.
- Place the camera closer to your Wi-Fi router during the initial setup process.
- Reset the camera (refer to the app or camera's physical reset button instructions) and attempt pairing again.
6.2 Poor Image Quality
- Clean the camera lenses to remove any dirt or smudges.
- Ensure your internet connection is stable and has sufficient bandwidth for 4K streaming.
- Check the camera's settings in the O-KAM Pro app to confirm it is set to 4K resolution.
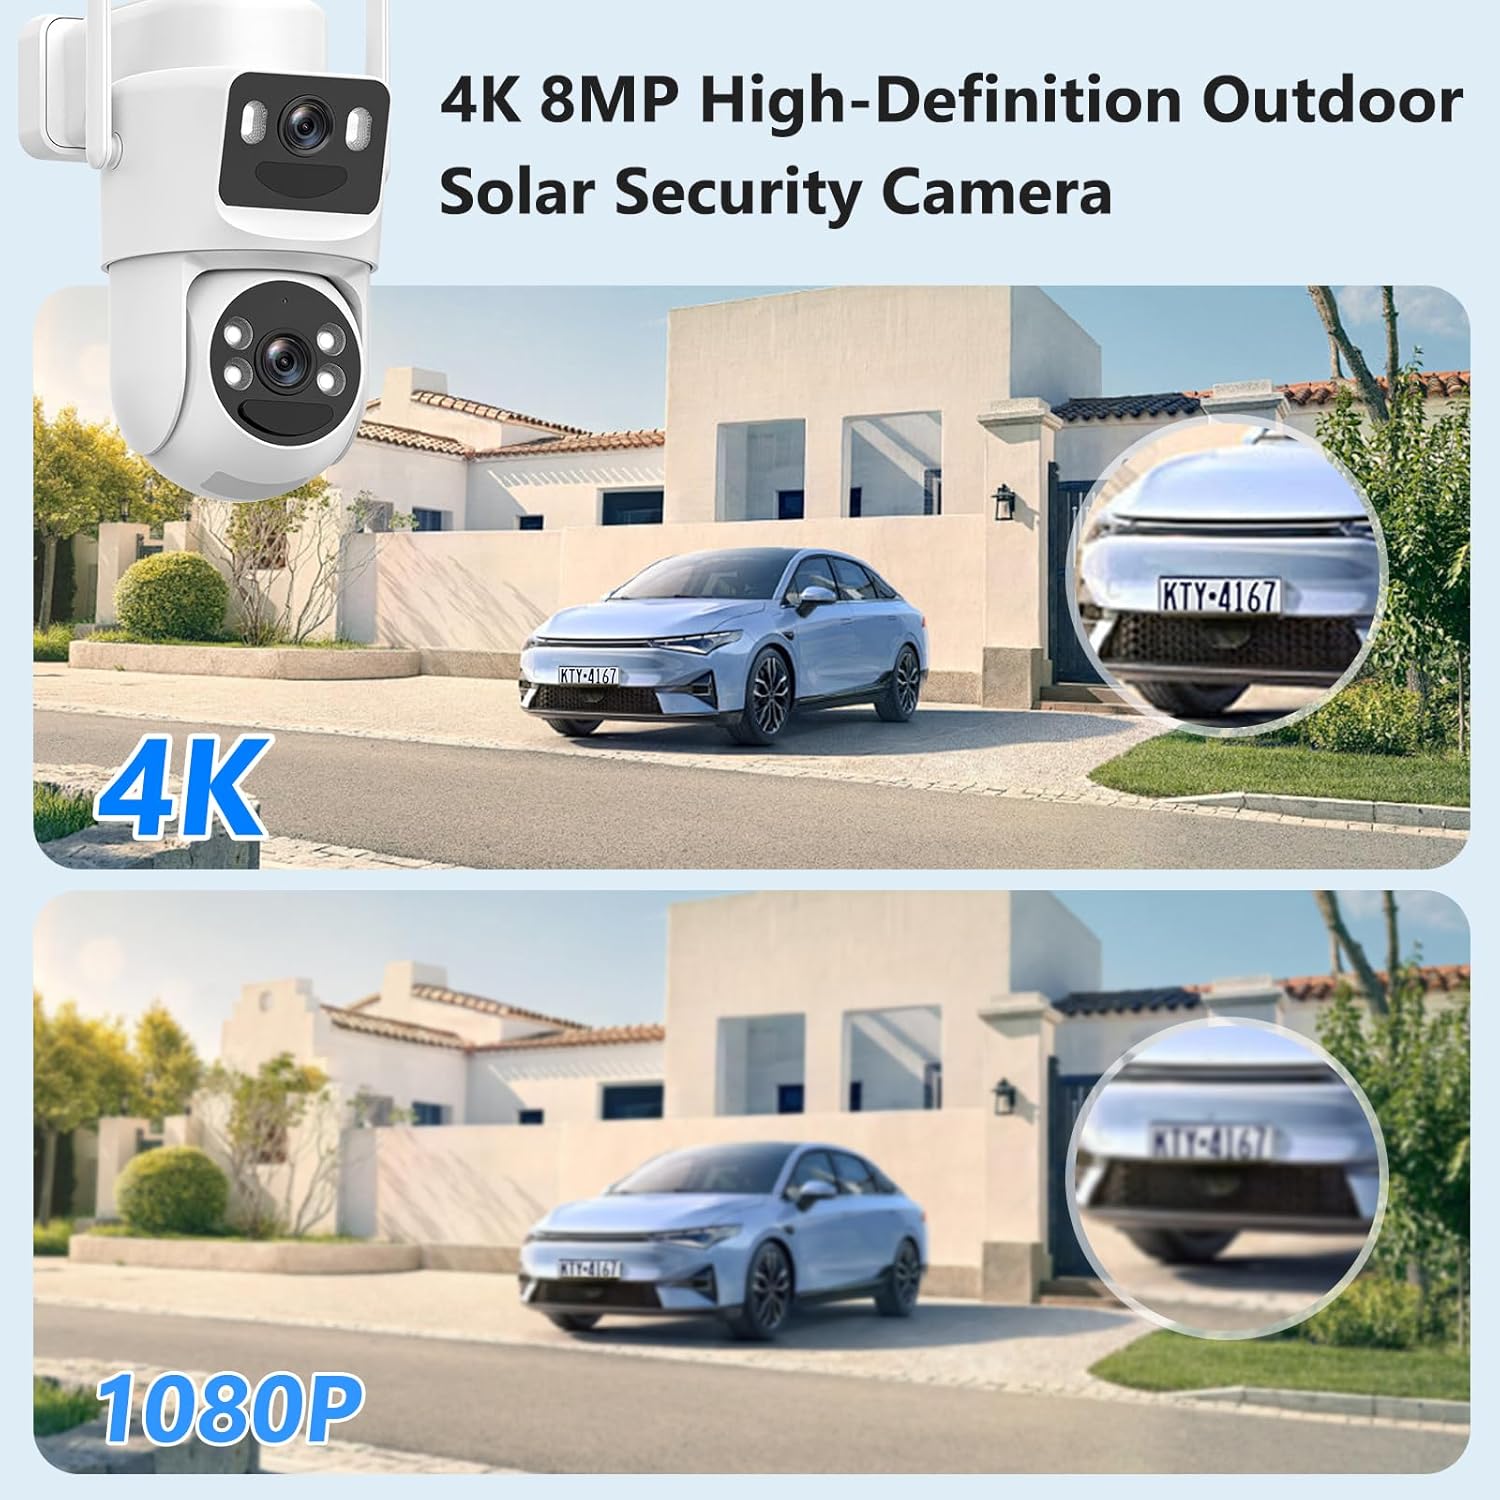
Image 6.1: Visual comparison demonstrating the clarity of 4K resolution versus 1080P.
6.3 Battery Not Charging / Low Battery
- Ensure the solar panel is receiving direct sunlight for several hours daily.
- Clean the solar panel surface to remove any dust or debris.
- Verify the solar panel cable is securely connected to the camera.
- In prolonged cloudy weather, consider temporarily charging the camera via the USB charging cable.
6.4 Motion Detection Issues
- Adjust the motion detection sensitivity settings in the O-KAM Pro app.
- Ensure there are no objects (e.g., tree branches, flags) constantly moving in the detection zone that could trigger false alarms.
- Verify that custom detection areas are configured correctly.
7. Specifications
| Model Name | QW7 |
| Video Capture Resolution | 4K (3840 x 2160) |
| Connectivity Technology | Wireless (Wi-Fi 5GHz & 2.4GHz) |
| Power Source | Battery Powered (with Solar Panel) |
| Battery Capacity | 9000mAh (approximate, based on feature bullets) |
| Solar Panel Power | 5W (approximate, based on feature bullets) |
| Indoor/Outdoor Usage | Outdoor |
| International Protection Rating | IP66 |
| PTZ Viewing Angle | 360° Horizontal, 90° Vertical |
| Night Vision Range | Up to 65 feet (Color Night Vision) |
| Storage Options | MicroSD Card (not included), Cloud Storage (subscription) |
| Operating Temperature | -4°F to 122°F (-20°C to 50°C) |
| Dimensions (L x W x H) | 12 x 10 x 4 inches (approximate) |
| Item Weight | 2.14 pounds (0.97 kg) |
8. Warranty and Support
For warranty information, technical support, or service inquiries, please refer to the contact details provided on the product packaging or the official Tutoview website. Keep your purchase receipt for warranty validation.
Manufacturer: Tutoview