
1. Introduction
Thank you for choosing the GHSOGEOM S1-D 2-Channel Triac DMX LED Dimmer. This device is designed to control dimmable LED lights and drivers using the DMX512 protocol. It features dual-channel output, a digital display for easy configuration, and operates within an AC100V-240V range, supporting a maximum load of 288W. This manual provides essential information for safe installation, operation, and maintenance of your dimmer.
2. Safety Information
Please read all safety instructions carefully before installation and operation. Failure to follow these instructions may result in electric shock, fire, or other hazards.
- Installation should only be performed by a qualified electrician.
- Ensure the power supply is disconnected before any wiring or maintenance.
- Do not exceed the maximum load capacity of 288W.
- This device is designed for indoor use only. Avoid exposure to moisture or extreme temperatures.
- Ensure proper grounding to prevent electric shock.
- Use appropriate wire gauges for connections to prevent overheating.
3. Product Overview
The S1-D is a compact and efficient DMX LED dimmer. It allows for precise control of two independent lighting channels. Its digital display and intuitive buttons facilitate DMX address setting and mode selection.
Key Features:
- Dual-channel AC Triac DMX dimmer.
- Input Voltage: AC100V-240V.
- Maximum Load Power: 288W (1.2A per channel, 2.4A total).
- Digital display for DMX address setting.
- Compatible with DMX512 protocol.
- Operating Temperature: -30°C to +55°C.
Component Identification:
The device features input/output terminals, DMX signal terminals, a digital display, and control buttons.

Figure 3.1: Front view of the GHSOGEOM S1-D dimmer, showing the digital display, control buttons, and terminal labels. This image illustrates the compact design and the various connection points for power, DMX, and output channels.
4. Setup and Installation
Before installation, ensure all power is disconnected. Follow the wiring diagrams carefully.
Wiring Connections:
- Power Input (AC100V-240V): Connect the AC power supply to the 'L' (Live) and 'N' (Neutral) terminals on the input side.
- DMX Signal Input: Connect your DMX Master controller to the DMX+, DMX-, and GND terminals. Ensure correct polarity.
- Output 1 (L1, N1): Connect the first dimmable LED light or LED driver to the 'L1' and 'N1' output terminals.
- Output 2 (L2, N2): Connect the second dimmable LED light or LED driver to the 'L2' and 'N2' output terminals.
- Wire Size: Use wires with a cross-section of 0.5-2.5mm² (AWG 20-14). Strip insulation 6-7mm.
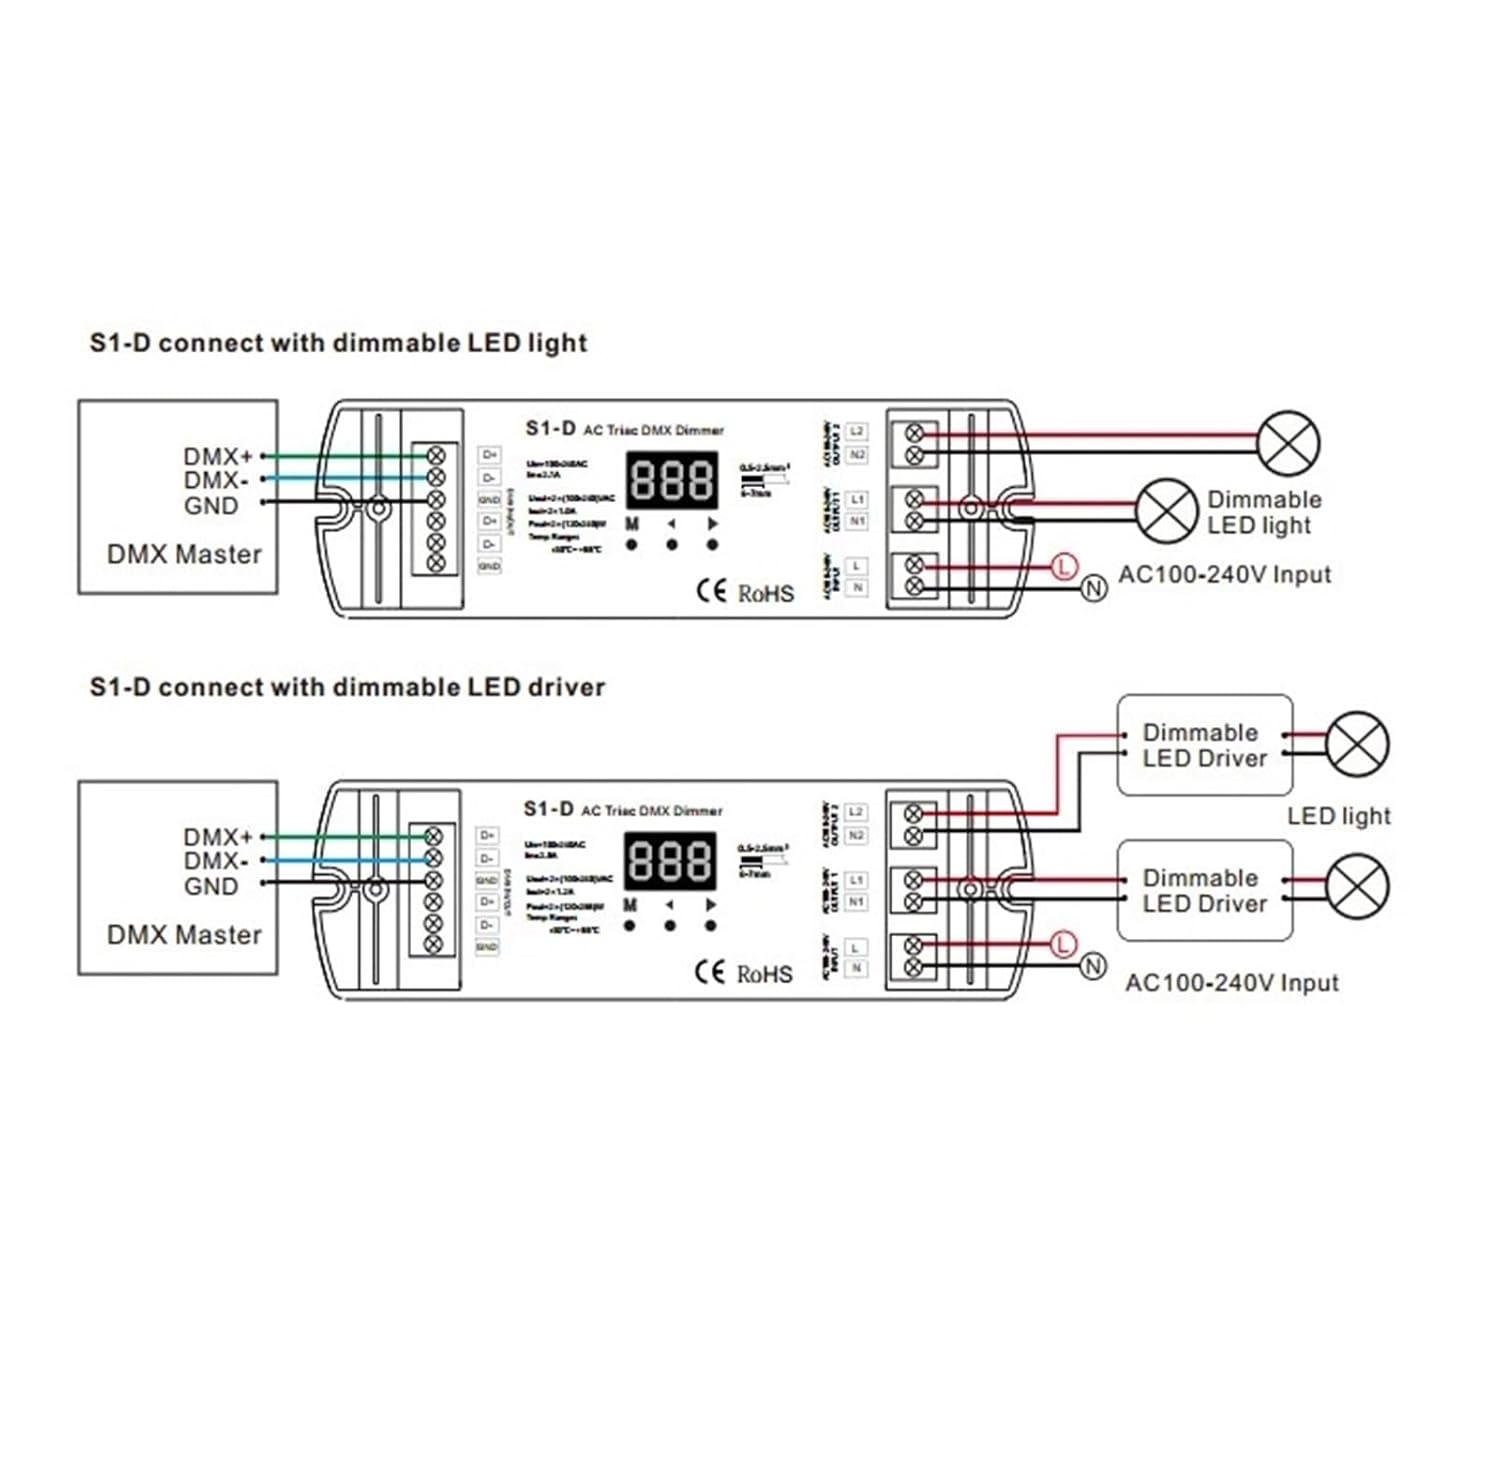
Figure 4.1: Wiring diagrams for the S1-D dimmer. The top diagram shows connection to dimmable LED lights directly, while the bottom diagram illustrates connection to dimmable LED drivers. Both diagrams detail the DMX input, AC power input, and dual-channel AC output connections.
After all connections are made, double-check for correct wiring before restoring power.
5. Operating Instructions
Setting DMX Address:
The S1-D dimmer uses a digital display and three buttons (M, <, >) for setting the DMX address.
- 'M' Button: Press 'M' to enter the DMX address setting mode. The display will flash.
- '<' and '>' Buttons: Use the '<' (decrease) and '>' (increase) buttons to adjust the DMX address value. The address ranges from 1 to 512.
- Confirm: After setting the desired address, press 'M' again to confirm and save the setting. The display will stop flashing.
Each channel of the S1-D dimmer will occupy consecutive DMX addresses starting from the set address. For example, if the DMX address is set to 100, Channel 1 will respond to DMX address 100, and Channel 2 will respond to DMX address 101.
DMX Control:
Once the DMX address is set, the dimmer will respond to DMX signals from your DMX master controller. Adjust the intensity of the connected lights by sending appropriate DMX values (0-255) to the assigned DMX addresses for each channel.
6. Maintenance
The GHSOGEOM S1-D dimmer requires minimal maintenance.
- Cleaning: Disconnect power before cleaning. Use a soft, dry cloth to wipe the surface. Do not use harsh chemicals or abrasive cleaners.
- Inspection: Periodically check wiring connections for tightness and signs of wear or damage.
- Environment: Ensure the operating environment remains within the specified temperature and humidity ranges.
7. Troubleshooting
| Problem | Possible Cause | Solution |
|---|---|---|
| No power to the dimmer. | Loose power connection, no AC input, faulty power supply. | Check AC input wiring (L, N). Ensure power supply is active. |
| Lights not dimming. | Incorrect DMX address, no DMX signal, non-dimmable lights/drivers, faulty output wiring. | Verify DMX address setting. Check DMX signal from master. Confirm lights/drivers are dimmable. Check output wiring (L1/N1, L2/N2). |
| Digital display not working. | No power to the unit, internal fault. | Check power input. If power is present and display is still off, contact support. |
| Overload protection triggered. | Connected load exceeds 288W total or 1.2A per channel. | Reduce the connected load. Ensure total wattage does not exceed 288W. |
8. Specifications
- Model: S1-D
- Input Voltage: AC100V-240V
- Output Channels: 2
- Max Load Current: 1.2A per channel, 2.4A total
- Max Load Power: 288W (AC240V)
- Control Protocol: DMX512
- Operating Temperature: -30°C to +55°C
- Wire Cross-section: 0.5-2.5mm²
- Certifications: CCC, CE, ROHS
- Dimensions: Approximately 1.18 x 0.79 x 0.39 inches (based on package dimensions, actual product size may vary slightly)
- Manufacturer: GHSOGEOM
9. Warranty and Support
GHSOGEOM products are manufactured to high-quality standards. For warranty information or technical support, please refer to the purchase documentation or contact your retailer. Please have your product model number (S1-D) and purchase date available when contacting support.