Introduction
This manual provides essential instructions for the installation, operation, and maintenance of the Generic Ignition Coil Module, designed for use with Craftsman 2500Watt 2500i Generators (Model CMXGIAC2500). Please read this manual thoroughly before installation to ensure proper function and safety.
Safety Information
Always disconnect the spark plug wire and battery before performing any maintenance or installation on the generator. Wear appropriate personal protective equipment (PPE) such as gloves and eye protection. Ensure the generator is cool before handling components. Refer to your Craftsman generator's main instruction manual for additional safety guidelines.
Package Contents
- 1 x Ignition Coil Module

Image: The ignition coil module is shown inside a white cardboard box, partially covered with bubble wrap, indicating secure packaging.
Setup and Installation
- Preparation: Ensure the generator is turned off, cooled down, and the spark plug wire is disconnected to prevent accidental starting.
- Locate Old Coil: Identify the existing ignition coil on your Craftsman 2500Watt 2500i Generator. It is typically located near the flywheel and connected to the spark plug.
- Disconnect Wiring: Carefully disconnect any electrical wires attached to the old ignition coil. Note their positions for reinstallation.
- Remove Old Coil: Unscrew and remove the bolts securing the old ignition coil to the engine block.
- Install New Coil: Position the new Generic Ignition Coil Module in the same location. Ensure the air gap between the coil and the flywheel magnet is correctly set according to your generator's service manual (typically 0.010-0.014 inches or 0.25-0.35 mm). Use a feeler gauge for accuracy.
- Secure Coil: Fasten the new coil with the original bolts, ensuring it is securely mounted.
- Connect Wiring: Reconnect the electrical wires to the new ignition coil, matching the connections noted during removal.
- Reconnect Spark Plug: Reattach the spark plug wire to the spark plug.
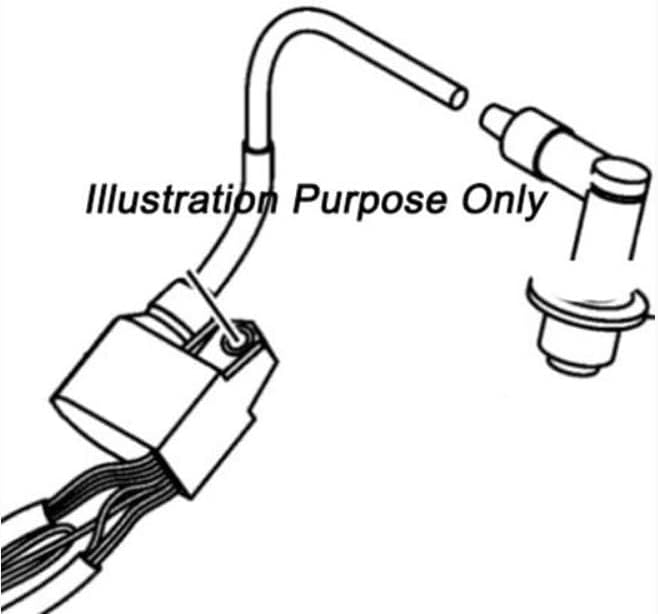
Image: An illustrative diagram showing the connection points of an ignition coil module, including the wiring harness and the spark plug boot connection. This visual aids in understanding the installation process.
Operating Instructions
Once the ignition coil module is correctly installed, the generator's operation will resume as per its original design. This module is a replacement part and does not alter the generator's operational procedures. Refer to your Craftsman 2500Watt 2500i Generator's main instruction manual for detailed operating instructions, including starting, stopping, and safety precautions during use.
A properly functioning ignition coil is crucial for generating the high voltage required to ignite the fuel-air mixture in the engine's cylinder, ensuring reliable starting and consistent power output from your generator.
Maintenance
The ignition coil module itself typically requires minimal maintenance. However, regular maintenance of your Craftsman 2500Watt 2500i Generator is essential for its longevity and performance. This includes:
- Spark Plug Inspection: Regularly check and replace the spark plug as recommended by the generator manufacturer. A worn or fouled spark plug can put undue stress on the ignition coil.
- Wiring Inspection: Periodically inspect all wiring connections to the ignition coil for signs of wear, corrosion, or looseness. Ensure all connections are secure.
- Cleanliness: Keep the area around the ignition coil and engine clean and free of debris, which can interfere with cooling and performance.
Always refer to your generator's specific maintenance schedule and guidelines.
Troubleshooting
If your generator experiences issues after installing the new ignition coil, consider the following troubleshooting steps:
- No Spark:
- Verify all electrical connections to the ignition coil are secure.
- Check the spark plug for proper gap and condition. Replace if necessary.
- Ensure the air gap between the coil and flywheel is correctly set.
- Inspect the kill switch or low oil sensor wiring for faults.
- Engine Cranks but Won't Start:
- Confirm there is fuel in the tank and the fuel valve is open.
- Check for proper fuel delivery to the carburetor.
- Ensure the choke is set correctly for starting.
- Verify the spark plug is firing by removing it, grounding it against the engine block, and pulling the starter cord (with safety precautions).
- Poor Performance/Misfires:
- Inspect the spark plug and spark plug wire for damage or wear.
- Ensure the air filter is clean.
- Check for proper carburetor adjustment.
If issues persist, consult a qualified service technician or refer to your generator's comprehensive service manual.
Specifications
| Feature | Detail |
|---|---|
| Product Type | Ignition Coil Module |
| Compatibility | Craftsman 2500Watt 2500i Generator (CMXGIAC2500) |
| Brand | Generic |
| Model Number | RIV-Sep33232 |
| Manufacturer | BMotorParts |
| ASIN | B0DXQ78X16 |
| Date First Available | July 7, 2022 |
Warranty Information
Specific warranty details for this Generic Ignition Coil Module are not provided in the product information. Please refer to the seller or manufacturer (BMotorParts) directly for any warranty-related inquiries.
Customer Support
For technical assistance or further questions regarding the installation or function of this ignition coil module, please contact the seller or the manufacturer, BMotorParts. When contacting support, please have your product model number (RIV-Sep33232) and purchase details readily available.
You may also refer to the official Craftsman 2500Watt 2500i Generator manual for comprehensive information about your generator's overall operation and maintenance.


