1. Introduction
Thank you for choosing the HONEYWHALE G2 PRO Electric Scooter. This manual provides essential information for the safe operation, assembly, maintenance, and troubleshooting of your scooter. Please read it thoroughly before your first ride and keep it for future reference. Ensure all users understand the instructions before operating the scooter.
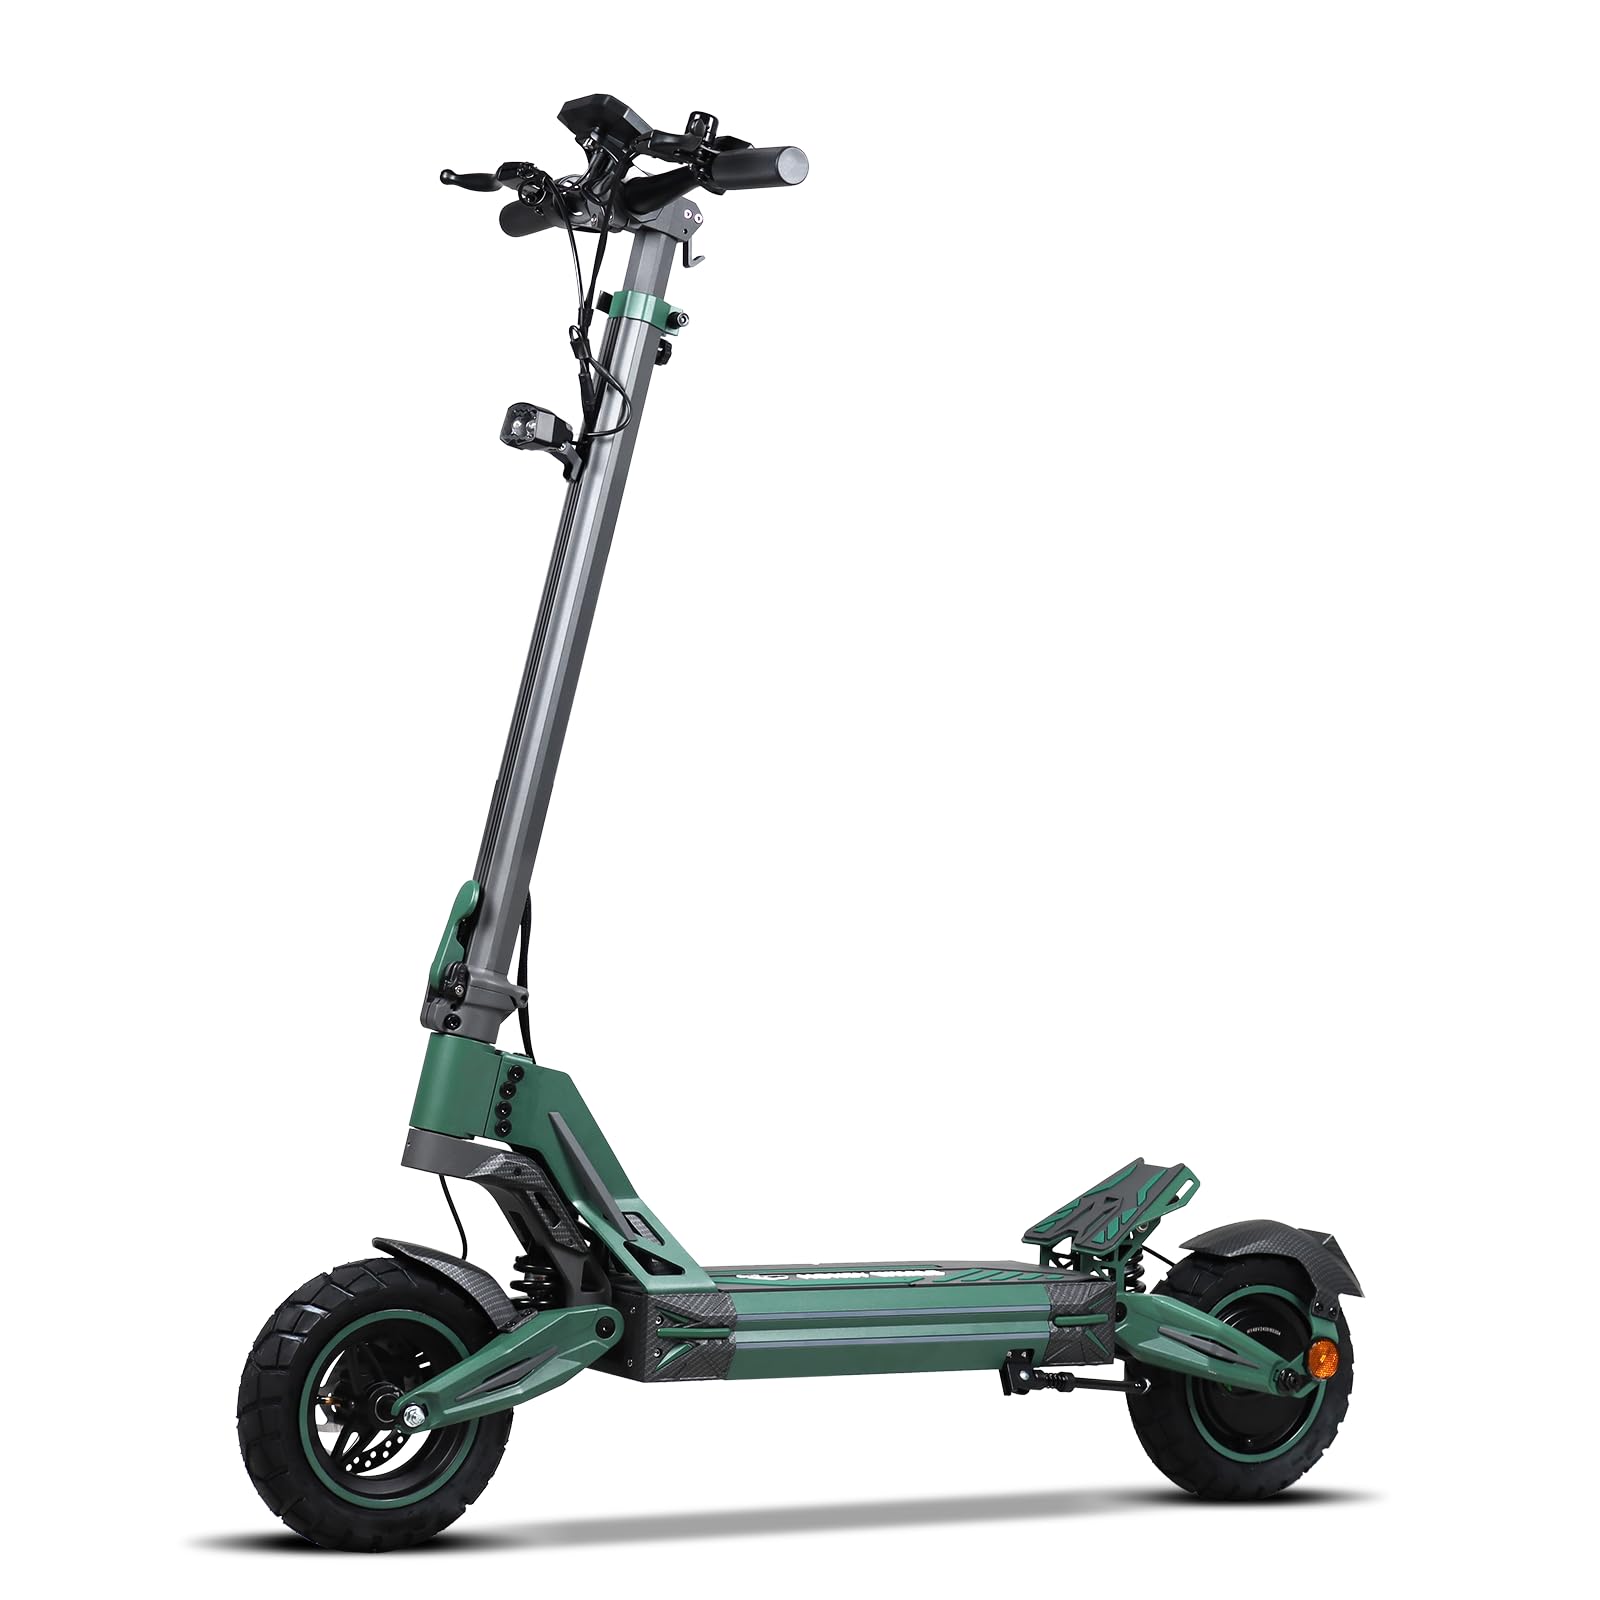
Image 1.1: The HONEYWHALE G2 PRO Electric Scooter. This image shows the scooter in an outdoor setting with a rider, highlighting its design and overall appearance.
2. Safety Information
Operating an electric scooter carries inherent risks. To ensure your safety and the safety of others, always adhere to the following guidelines:
- Always wear a helmet and appropriate protective gear (knee pads, elbow pads) when riding.
- Familiarize yourself with local laws and regulations regarding electric scooter usage.
- Do not ride in adverse weather conditions (heavy rain, snow, ice).
- Avoid riding on slippery surfaces, loose gravel, or uneven terrain.
- Maintain a safe distance from other vehicles, pedestrians, and obstacles.
- Do not perform stunts or dangerous maneuvers.
- Ensure the scooter is fully charged and all components are securely fastened before each ride.
- The maximum load capacity is 120 kg. Do not exceed this limit.
- This scooter is designed for adult use.
3. Package Contents
Upon opening the package, verify that all components are present and undamaged:
- 1 x HONEYWHALE G2 PRO Electric Scooter
- 1 x Charger
- 1 x Installation Tool Kit
- 1 x User Manual (this document)
4. Setup and Assembly
The HONEYWHALE G2 PRO Electric Scooter comes partially assembled. Follow these steps to prepare your scooter for its first use:
- Unfolding the Scooter:
Carefully remove the scooter from its packaging. Locate the folding mechanism near the base of the handlebar stem. Release the latch and lift the handlebar stem until it locks into the upright position. Ensure the locking mechanism is fully engaged and secure.

Image 4.1: Scooter dimensions and folding mechanism. This image illustrates the scooter in both its folded and unfolded states, along with its overall dimensions and adjustable height.
- Handlebar Installation:
If the handlebars are not pre-installed, attach them to the stem. Align the handlebars with the stem and secure them using the provided screws and installation tools. Ensure they are tightened firmly to prevent any movement during operation.
- Initial Charge:
Before your first ride, fully charge the scooter's battery. Connect the charger to the charging port on the scooter and then to a power outlet. The charging indicator on the charger will change (e.g., from red to green) when charging is complete. The charging time is approximately 6 hours.

Image 4.2: Battery compartment and charging details. This image shows the scooter's battery location and highlights its 48V 16AH capacity and charging time.
- Tire Pressure Check:
Verify that the 10-inch vacuum tires are inflated to the recommended pressure. Proper tire pressure ensures optimal performance, range, and safety.
5. Operating Instructions
Follow these steps to operate your HONEYWHALE G2 PRO Electric Scooter:
- Power On/Off:
Press and hold the power button on the smart LCD display to turn the scooter on or off. The display will illuminate, showing battery level, speed, gear, and mileage.

Image 5.1: Smart LCD display. This image displays the scooter's intelligent LCD screen, showing battery level, speed, lighting status, gear, and zero-start mode.
- NFC Unlock:
The scooter features NFC magnetic card unlocking. Tap your NFC card to the designated area on the display to unlock the scooter for use.
- Speed Modes:
The scooter offers three adjustable speed modes:
- Mode 1: 25 km/h
- Mode 2: 35 km/h
- Mode 3: 50 km/h (Maximum Speed)
Switch between modes using the control buttons on the handlebar to suit your riding environment and preference.
- Riding:
Place one foot on the deck and push off with the other foot to gain initial momentum. Once moving, gently press the accelerator lever to engage the motor. Maintain a balanced posture and keep both hands on the handlebars.
- Braking:
The G2 PRO is equipped with a dual braking system (front and rear hydraulic disc brakes). To slow down or stop, gently squeeze the brake levers on the handlebars. Apply both brakes simultaneously for effective and safe stopping. Avoid sudden braking, especially at high speeds.

Image 5.2: Front and rear dual disc brakes. This image highlights the scooter's front and rear disc brakes, emphasizing their role in providing faster and safer braking.
- Lighting System:
Activate the 360-degree lighting system, including dual headlights, dual side lights, brake lights, and rear turn signals, for enhanced visibility during night rides or in low-light conditions. Refer to the display for light controls.
6. Maintenance
Regular maintenance ensures the longevity and safe operation of your scooter:
- Cleaning: Clean the scooter regularly with a damp cloth. Do not use high-pressure water jets or immerse the scooter in water, as it has an IPx4 waterproof rating, meaning it is resistant to splashing water from any direction.
- Battery Care:
- Charge the battery fully after each use.
- Avoid completely draining the battery.
- If storing the scooter for an extended period, charge the battery to about 50-70% every 1-2 months.
- Store the scooter in a cool, dry place away from direct sunlight and extreme temperatures.
- Tires: Regularly check tire pressure and inspect for wear or damage. Replace worn tires promptly.
- Brakes: Inspect brake levers, cables, and pads for wear. Adjust or replace components as needed to ensure effective braking.
- Fasteners: Periodically check all screws and bolts for tightness. Tighten any loose fasteners to prevent accidents.
7. Troubleshooting
If you encounter issues with your scooter, refer to the following common troubleshooting steps:
- Scooter Not Turning On:
- Ensure the battery is charged.
- Check if the power button is pressed correctly.
- Reduced Range or Power:
- Verify tire pressure. Under-inflated tires can reduce efficiency.
- Ensure the battery is fully charged. Battery performance can degrade over time.
- Riding conditions (hills, heavy load, aggressive acceleration) affect range.
- Brakes Not Responsive:
- Inspect brake cables for looseness or damage.
- Check brake pads for wear. They may need adjustment or replacement.
- Unusual Noises:
- Check for loose components or debris caught in the wheels or motor.
- If the noise persists, discontinue use and contact customer support.
For issues not covered here, please contact HONEYWHALE customer support.
8. Specifications
Detailed technical specifications for the HONEYWHALE G2 PRO Electric Scooter:
| Feature | Specification |
|---|---|
| Model Name | G2 PRO |
| Brand | HONEYWHALE |
| Motor Power (Max) | 1200W |
| Rated Motor Power | 800W |
| Battery Voltage | 48V |
| Battery Capacity | 16AH |
| Charging Time | 6 hours |
| Max Speed | 50 km/h |
| Max Electric Range | 50 km |
| Max Load Capacity | 120 kg |
| Tire Size | 10 inches (Vacuum Tires) |
| Waterproof Rating | IPx4 |
| Body Material | Aluminum |
| Brake Type | Front and Rear Hydraulic Disc Brakes |
| Suspension | Dual Suspension |
| Product Dimensions (Unfolded) | 125 x 58 x 130 cm |
| Folded Dimensions | 125 x 58 x 56 cm |
| Adjustable Height | 130-145 cm |
| Net Product Weight | 24.5 kg |
| Special Features | Foldable, NFC Unlock, Smart LCD Display, 3 Speed Modes, All-Terrain Tires, LED Ambient Light |
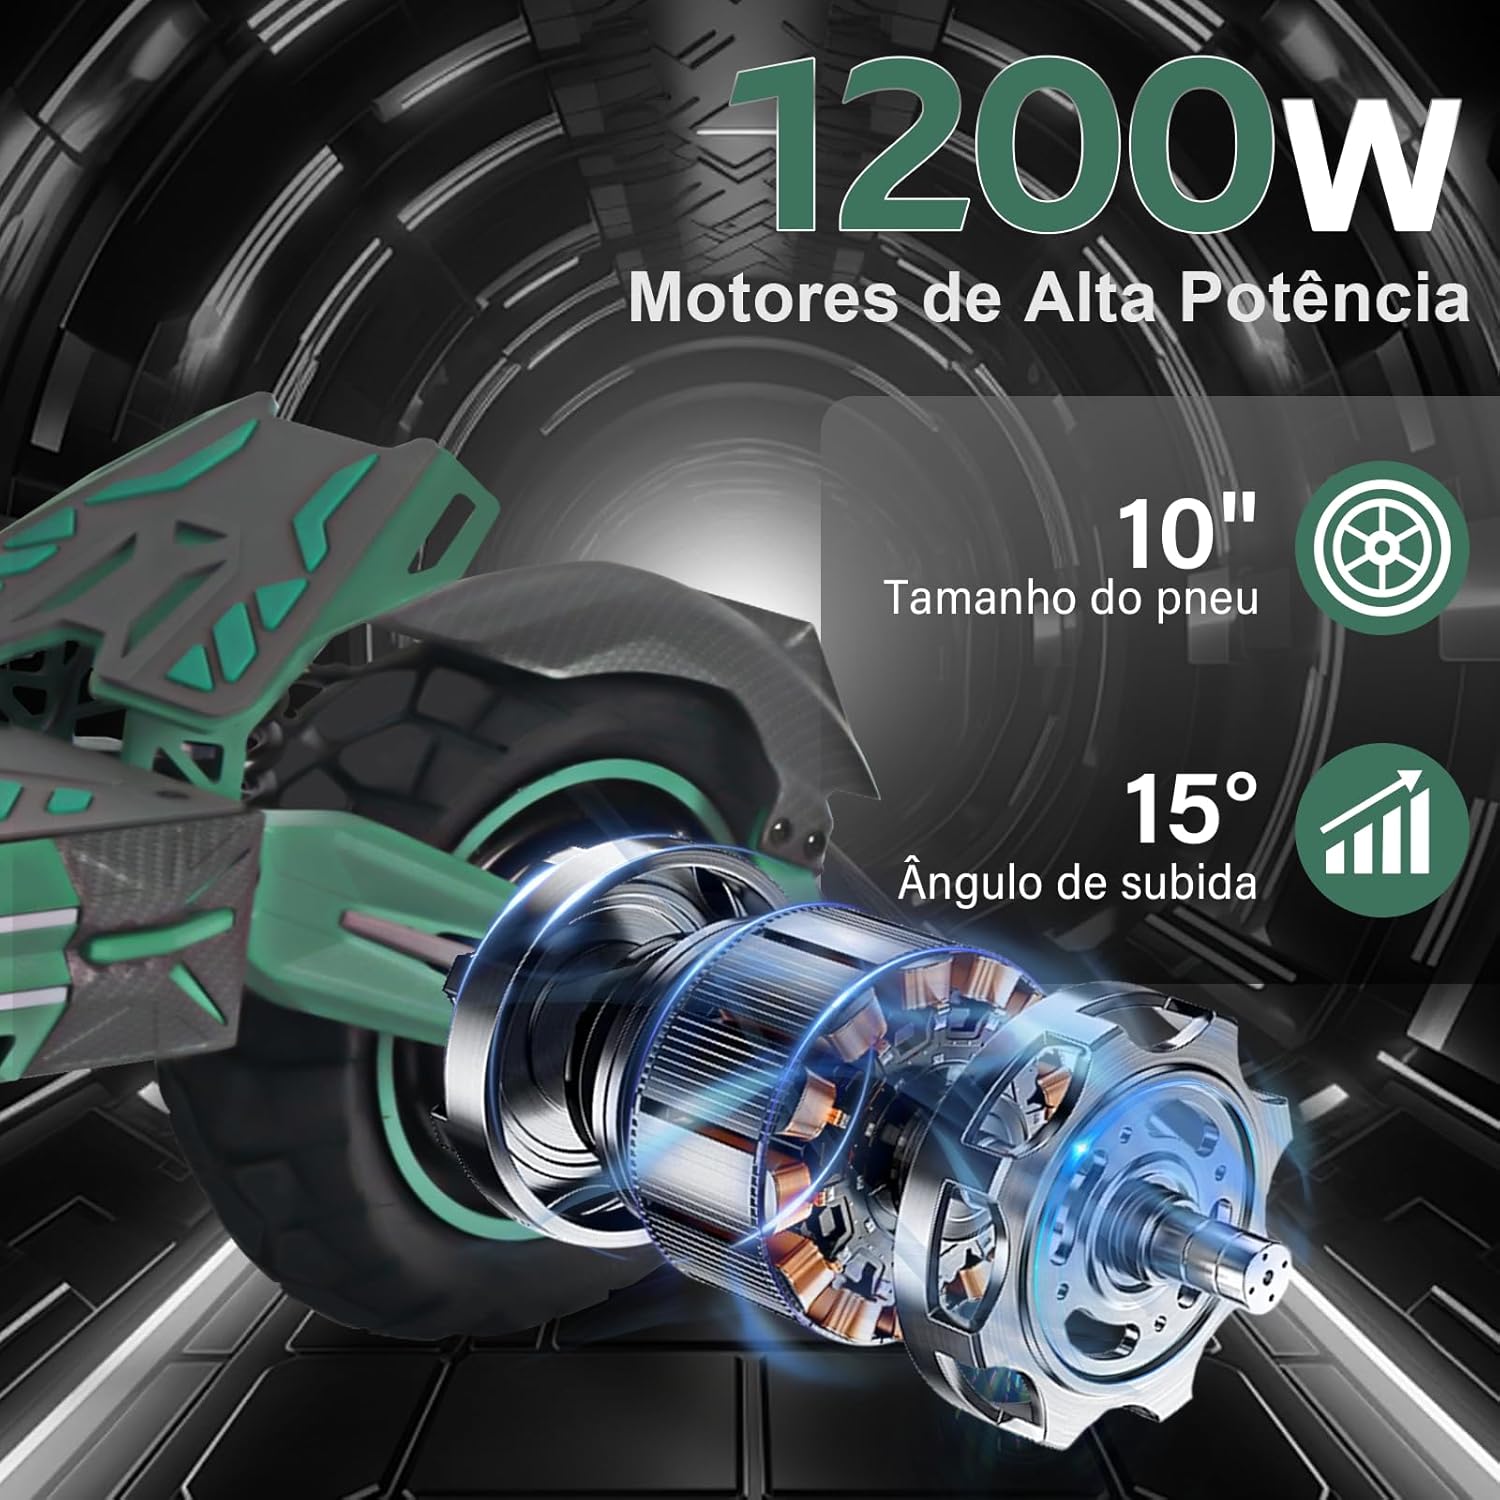
Image 8.1: High-power motor and tire detail. This image provides a close-up view of the scooter's 1200W motor and 10-inch tire, illustrating its climbing angle capability.
9. Warranty and Support
The HONEYWHALE G2 PRO Electric Scooter is manufactured by SHENZHEN MINZHUO TECHNOLOGY CO., LTD. For warranty information, technical support, or service inquiries, please refer to the warranty card included with your purchase or contact your retailer. Keep your proof of purchase for warranty claims.